There have been a lot of people asking how to post photos to their pages, so I'm posting some instructions to try to help.
Before you are able to post any photos, you need to upload them to a photo site like Photobucket or Flickr. These websites will provide you a place to store your photos online so you can provide a link to your photos to make them work on your page.
http://www.photobucket.com
http://www.flickr.com/
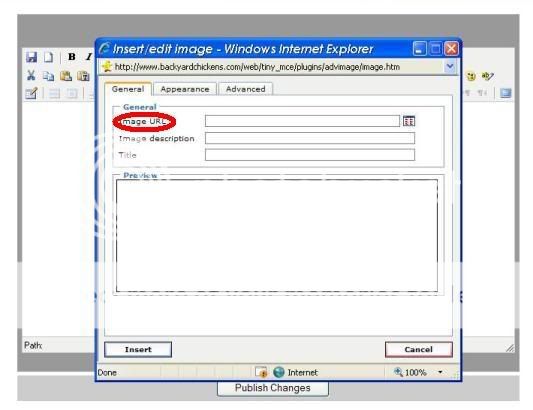
1. When you open the editor to your page, you will see that there is a toolbar at the top. Find the icon with the tree (circled in red). This is the "Insert/Add Image" button.

2. Once you click on this button, a box will pop up. The first blank is where you will put the URL, or link to your photo.
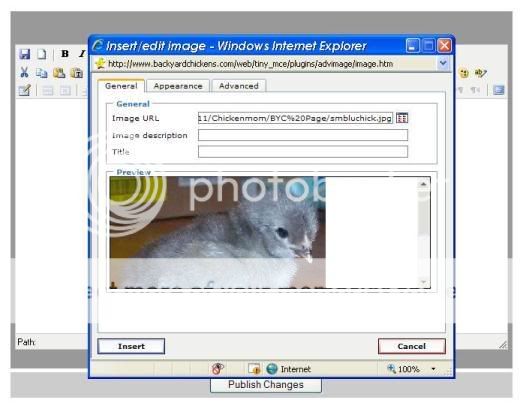
Insert the link in the box. You won't see the image at first, but if you click in the next blank down, it will make your photo appear in the box.
You can add an image description if you want the little yellow screen tags to pop up when someone puts the cursor over the photo. You may enter a description of your photo in the very last blank that says "Title", but you don't have to.
3. If you want to place your photo in a certain area of your page, you'll want to define the margin (left, center, or right). To do this, click the center tab labeled "Appearace" at the top of the box (circled in red). (This feature is usually used by those who have more advanced knowlege of building web pages, but I'll put it here anyway. If you think this will just confuse you, STOP HERE, and click "Insert" at the bottom left corner of the box.)
Notice the "Alignment" blank circled in blue. When you click the blue arrow in the blank, a list will drop down, giving you several choices. At this point, the only ones you should worry about are middle, left, and right. These will place your photo either in the center of the page, to the left margin, or to the right margin. The little box to the right with the tree in it will tell you where your photo is in relation to the text on the page.
The other blanks are for borders, spaces between photos, etc., for advanced users, so I'll stop here.
Once you have decided where you want your photo placed, then click "Insert" at the bottom left corner of the box.
If you want additional help, just let me know, and I'll try to post the answers here.
Before you are able to post any photos, you need to upload them to a photo site like Photobucket or Flickr. These websites will provide you a place to store your photos online so you can provide a link to your photos to make them work on your page.
http://www.photobucket.com
http://www.flickr.com/
1. When you open the editor to your page, you will see that there is a toolbar at the top. Find the icon with the tree (circled in red). This is the "Insert/Add Image" button.

2. Once you click on this button, a box will pop up. The first blank is where you will put the URL, or link to your photo.
Insert the link in the box. You won't see the image at first, but if you click in the next blank down, it will make your photo appear in the box.
You can add an image description if you want the little yellow screen tags to pop up when someone puts the cursor over the photo. You may enter a description of your photo in the very last blank that says "Title", but you don't have to.
3. If you want to place your photo in a certain area of your page, you'll want to define the margin (left, center, or right). To do this, click the center tab labeled "Appearace" at the top of the box (circled in red). (This feature is usually used by those who have more advanced knowlege of building web pages, but I'll put it here anyway. If you think this will just confuse you, STOP HERE, and click "Insert" at the bottom left corner of the box.)

Notice the "Alignment" blank circled in blue. When you click the blue arrow in the blank, a list will drop down, giving you several choices. At this point, the only ones you should worry about are middle, left, and right. These will place your photo either in the center of the page, to the left margin, or to the right margin. The little box to the right with the tree in it will tell you where your photo is in relation to the text on the page.
The other blanks are for borders, spaces between photos, etc., for advanced users, so I'll stop here.
Once you have decided where you want your photo placed, then click "Insert" at the bottom left corner of the box.
If you want additional help, just let me know, and I'll try to post the answers here.
Last edited:


