Running out of time and good weather ( a couple pics added)

21hens-incharge

Moderator
BYC Staff
Premium Feather Member
10 Years
Mar 9, 2014
32,816
132,217
1,782
Northern Colorado
I am building a new coop to replace the 5 smaller ones I have.

New coop size will be 8x14 with a salt box roof.
The base frame will be made out of 2x6 pressure treated lumber. I plan on using the concrete deck blocks to keep it off the dirt directly. I worry about moisture under the coop since the only place I can put it is on the downhill side of the yard.
What should I use under the coop to promote drainage and not cause sinking of the blocks?

Sand?
Pea gravel?
River rock?


I have the long walls built and primed and painted to make assembly faster. (need to take pics)

One thing I am wanting to discourage is the neighborhood cats trying to make a home under the coop so I will be skirting the coop itself with 1/4 inch hardware cloth. (Hoping it will help keep mice out from under too.)

The 8' wide side will be facing north and the run will be on the west to help cut down on wind blowing in the coop. The run will have a roof as well.

Huge project since I have to tear down all the existing coops and runs to get it done.
While I build the coop the chickens will have a temporary shelter in the existing run and be confined there. While I build the run they will be stuck in the new coop. (cannot let them run the yard due to hawks and foxes)

Thinking this is going to be a drag for them while it is going on. Fast assembly will be very important.

Will take some pics of the walls today.

Oh and it will house 20 hens and the run size will be 16 x 17.
 
Last edited:
You beat me to recommending Pat’s article, Judy.

From what you describe, I’d look at berms and/or swales on the uphill side to divert rainwater run-off around the coop and run. Slope your roof so the water runs off the downhill side. When I built my coop, I added a few inches of just plain clay dirt to the floor to raise it above the level of the surrounding ground to keep water out. I cut a swale above it too. The dirt got packed down under the bedding and won’t let water seep in. Sand is a good material too since it will let any water that gets in drain out, but keeping water out should be your first goal.

As long as it is contained, sand should work really well to keep the blocks from sinking. If sand is not contained, it will wash away. Dig out a shallow trench and put maybe a couple of inches of sand under the blocks. That should help you to level them too. Pea gravel will work too but sand should be less expensive and it will probably be easier to level the blocks with sand.
 
Cool so a french drain should do it. That will be easier for me to put in by myself anyway.

DH seems more frustrated at building another coop than interested in cutting down the difficulty of dealing with 5 small coops and all the frozen water in the winter.

Judy you always have good answers for folks. Thank you.

Babs
 
I used pea-gravel under the concrete blocks that support my 8X16' coop. I would think sand would much more easily be washed out. My coop is on a slight slope, and I did nothing to re-direct water flow around the coop. Rain/water runs under the coop with no problems. The coop has been sitting there almost 5yrs, and hasn't sunk into the ground, or fell off the blocks yet. I would think another thing to consider, would be the kind of soil you have. I have pretty solid ground with a clay base. Sandy soils could be more of a problem. Then I would just mix up a bit of concrete, dig some shallow holes, and put that under the blocks.
 
http://i1288.photobucket.com/albums/b491/BJ1108/DSCF1047_zps4188f771.jpg

The plan for the end wall that I will have to build in place since it would not fit into my workshop at that height.

I have 2 walls like this that put together give me the 14 foot length.

http://i1288.photobucket.com/albums/b491/BJ1108/DSCF1042_zpse6c1d42e.jpg

And 2 walls like this for the tall side. Sorry for the odd angle I had to flip it in my computer since it is sitting upside down right now.

http://i1288.photobucket.com/albums/b491/BJ1108/DSCF1044_zpsc1528095.jpg

I had been meaning to take some pics for a while now. ( I hope they are not super huge)
 
Our soil is mixed with/sitting on river rock, so sinking isn't much of an issue. I still dug about 3" deeper and filled with pea gravel under my cement blocks. Leveling with pea gravel is actually very easy and convenient. My coop when done is going to be 4' X 7.5'.
 
The structure will shift, more or less, without a foundation below the frost line, hence building code. Since we are talking about chicken coop, just remove any organic matter to minimize settlement. As things settle, shim to re-level structure. This works for my situation, but for a 8'x14' chicken "house", real foundation might be what the doctor orders.

I have a much smaller coop and elevated 1-1/2 feet with no skirting. It is too high and open for critters to find it inconspicuous to make homes out of it.
 
Thoughts on roost placement needed now.

I have been working hard to get it together and we are nearing completion on the coop. All the walls are up, 10 of the 11 windows are wired, door is on, even the chickens (at least most of them) are in.

I am wondering ..... What would you do?

Roosts along one long 14 foot wall?
Roosts along one 8 foot wall using 2 roosts?

It has a salt box roof line and 2 pop doors.

I had to shove the chickens in before it was done due to a hawk attack in the garden where I was keeping 13 of the ladies.
(It did not get the chicken but it was beyond close) The hawk was actually on one of the hens when I came running from the workshop. She is fine but one other hen shows signs that she was attacked too.

I am just very lucky that I took yesterday off work and was home at the time.

I will add pics when the sun comes up a bit more.
 
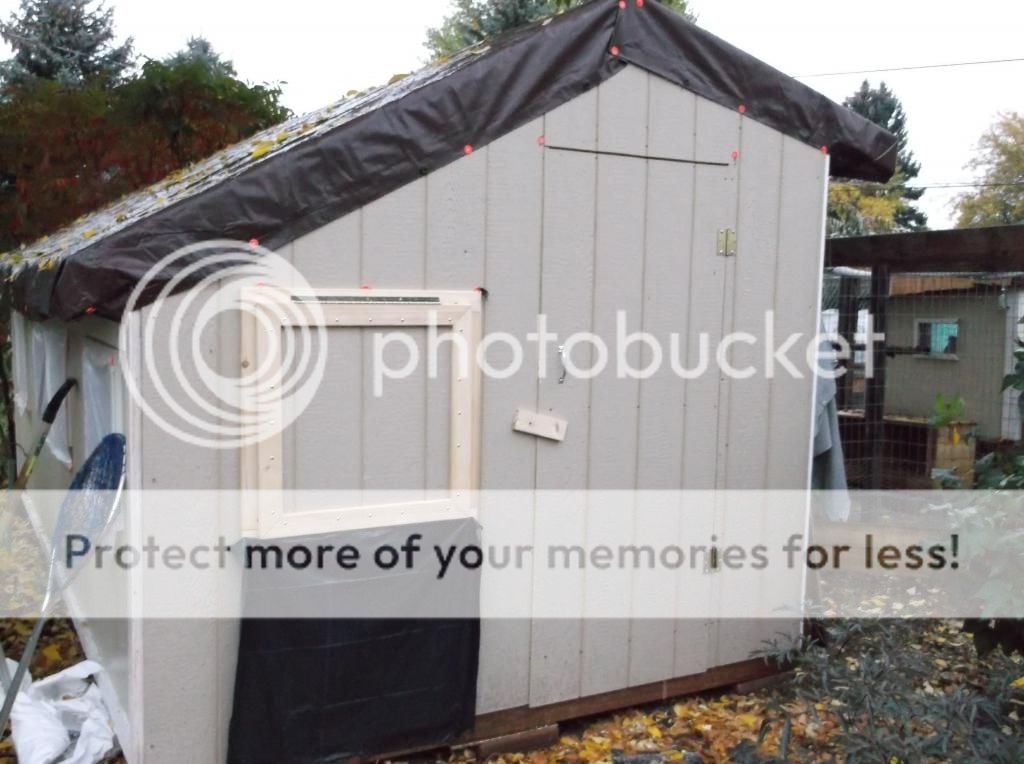
A few pics of the new coop.
DSCF1048_zps76fd916a.jpg

The front. There is a huge tarp on top since the metal roof cannot go on until Saturday.
The black bag and other bags on the windows are because of a huge rain storm. I am still working on more windows or as my DS calls them "hatches"
DSCF1056_zps50ac0b1e.jpg

a couple shots of the inside. Nope still not done. During the rain yesterday I did the painting inside and the hardware cloth on the windows. I ran out of the fender washers on the last 2 windows.

DSCF1057_zps21616d01.jpg


I may have to go ahead and split it down the middle since while I was taking pics my BO and Andalusian got in a huge fight.

The hen in the pics is Salt one of the CW hens. Yes she has been picked on hence the not willing to go out with the others.
They are back in what is left of the old run. Bummer that since it is even smaller during the construction.
 

New posts New threads Active threads

Back
Top Bottom