The Trap Nesting Thread

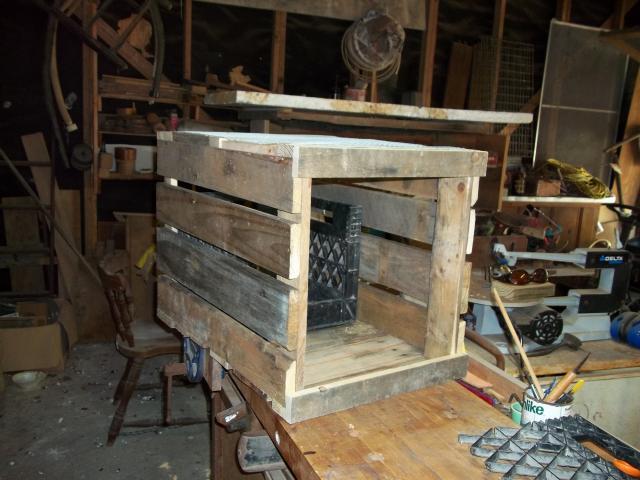
Trap nesting is foolproof and its more accurate than anything else that I have come across.The boxes themselves serve several uses for myself, one would be what they were designed for,two would be a nice sturdy chair esp when I wanna sit and take a break.Not to mention the recent Hurricane scare that almost came my way.I live 20-30 miles from the Gulf of Mexico.The Mrs. asked me what i was going to do if we had to evacuate?I had to boldly say I'm staying with my birds.Not knowing how I would get them moved out of harms way is what really sealed the deal for me.Now I dont have that worry anymore because these trap nests also doubles as evacuation boxes.I can put 2 birds in each box and I can fit all my boxes in a pick-up truck.I couldnt have come up with a better solution.These boxes serve several purposes outside of the normal use they were built for.

galanie-----the spacers you left in between your boards seem like a nice modification,I can see where you will benefit from that.Being able to easily peek in from time to time and identify your birds way before you let them out of the box.

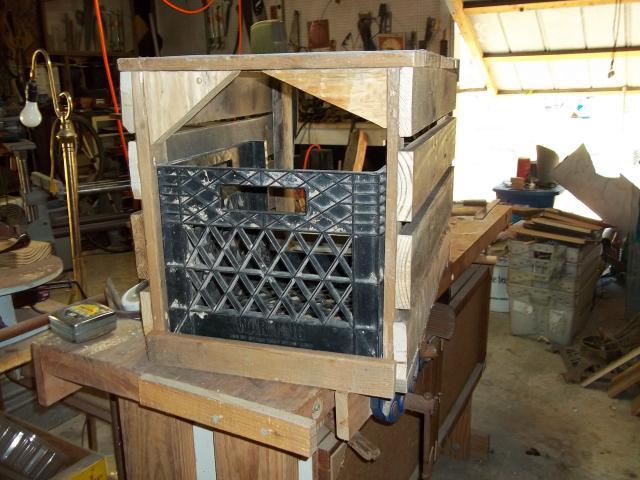
My tounge and groove boxes are a bit on the dark side,I have to let my birds out first and then identify them by their colored leg bands once they jump down.Tounge and groove boards is what I had on hand so I went with it.I didnt stain the inside of all the boxes because i wasnt sure if the girls would like the smell. My boards were recycled lumber and they were muddy and some rotten, I cleaned all the muck off them,some were painted too.Then I used my grinder with a rough grinding pad for wood sanding and took all the weathered outer layer off.OLd lumber is new lumber right underneath the top layer.My tractors need to be repainted after 1yr and i didnt want to have to keep painting these boxes so i went with the wood stain [thanx nonny] The wood soaks up the stain so i know it will last.Now I'm at the "TO varnish or Not To varnish" stage. lol
 
At this juncture I'd like to list the obvious,what has been easily discovered,seen,or understood. The ways to improve laying ability thus far has been narrowed to

#1 Have seperate pens for each bird
#2 Have different colored egg layers

I dont have #1 or #2, what i do have is

#3 trap nests

1,2, and 3 have the simplest ways to identify every bird.With that identification of bird and egg one can make positive progress beyond the breeding for show and size.Show and size seems to be what everyone breeds for.I dont want a pretty bird that performs poorly. That's just my opinion.Now a pretty bird that can perform,well that's another whole subject in itself.

This is a very small list thus far.Which makes me bold enough to say "If you are not using #1,#2 or #3 you cant possibly be boasting about your bird's egg laying abilities and be totally truthful at the same time." These are the no guesswork involved methods. It is what it is!
caf.gif
 
Manoz - Your boxes are more sturdy than mine are planned to be. I could reinforce them but I wanted to keep them from getting too heavy, while still of course having them solid enough to do the job and withstand moving, even using as a crate like you say for evacuation. I too live close enough to the Gulf of Mexico that this could be a concern. The spaces were planned for two reasons: Ventilation in the heat, and also because they are used to open nest boxes.

Right now they lay in the crate on the coop floor, under the poop board. The tops will be covered in chicken wire. After watching them gasp and pant in the nest boxes this summer during the horrific heat (that dead stuff in the pics used to be part of my lawn - what a drought!), even though open and with a fan going, I just can't see putting them in a solid enclosure. The doors will, however, be solid like yours are. And since they are going to be inside, I won't be putting a finish or stain on them.

After looking at this box, I think it's probably a bit too short. It appears I'll have to cut away part of the crate sides for door clearance.

My plan for training them is to put the crates they're laying in now right in these trap nests and leaving them there with the doors fixed open for about a week, then set the "trap" and watch. Guess it's a happy coincidence that they already lay in the right containers and conditions to make it easier to get them to use the traps.
 
Last edited:
galanie-----I do understand about the heat and I agree,makes me wish I would have done that. Yeah I think your box is a lil to short......but I wasnt gonna tell A LADY WITH POWER TOOLS such a thing. Dont feel bad my yard looks even worser.The milk crates did make the change over much easier.Imo.They'll recognize the crates.All you need is one to lay in it,they will come to see whats going on and take to the boxes themselves.Once I got one to lay in it,I had no futher issues. They will adapt quicker than you think.You'll see.
 
Ok, finished other than the door. I lied. It is indeed sturdy enough to sit on. And I just happened to have a piece of hardware cloth the right size so that went on top instead of chicken wire. I drove 1 & 9/16" brads in an X to fasten the boards and it worked great, btw (pachow! pachow!
tongue2.gif
). Found some scraps of wedge shaped 2x6 cutoffs and used those for the braces on the back top instead of the 1x2. All cuts done freehand on band saw. Just because I'm too lazy to set up the table saw. If a straight cut is important, I shoot it level with a jack plane. Or set up the table saw lol. But this time, band saw only.

Couple shots from the front:

65925_100_0374.jpg

65925_100_0378.jpg


From the back:

65925_100_0376.jpg
 
Last edited:
galanie------very nice! you got a band saw too now i'm really jealous.....lol.....that box look as solid as can be.It will last a long time.After I found the size that I was going with I kinda did the assembly line thing.One day I would just cut tounge and groove boards and clean them.One day I would sand them.One day hammering [oldskool]....lol...I see you've found a remedy for the crate.With a door narrow enough to pass in between the cutout on the crate.The door is the tricky part to the whole thing.I would advise you to make the door first before you put the facing on the front,but of course I know I didnt have to tell you that.You really are a SOUTHERN BELLE WITH POWER TOOLS.
big_smile.png
My hat goes off to you Maam!Glad to have you on the thread.


thumbsup.gif
thumbsup.gif


This is from my 20 inch long box 14 inches high and 14 inches wide.Its the box with the crate that I had to cut, showing my door measurements.This is the box that I patterned all the others after[door wise].

56493_trap_nest_research_019.jpg


56493_trap_nest_research_015.jpg


bottom door is 5 1/4 on this box

56493_trap_nest_research_126.jpg
 
Last edited:
This is how I went about putting my doors on

56493_trap_nest_research_133.jpg


With the door on I had a better idea of how wide to make the facing.
 
Last edited:
Quote:
lau.gif
lau.gif


lol think maybe you're confusing me and galanie? i'm the one said the power tools were mine not hubbies.
wink.png


but i wouldn't mind having a band saw... hubby was supposed to be trading for one with someone but i think it fell thru.
 

New posts New threads Active threads

Back
Top Bottom