Wine fridge incubator

Floof

Crowing
8 Years
Sep 28, 2015
751
1,025
281
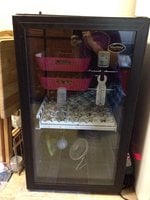
So I got a wine cooler/refrigerator for free off craigslist a couple weeks ago and I was super excited bringing it home. Got it home, dragged it inside, and then just sat there and stared at it. It's been a few weeks now and I finally decided last night to get started. I undid all the screws I could see and started removing wires. I got to the bulky stuff at the bottom and decided to send a text to my more mechanically inclined friend to ask "hey, what is this and can I just yank it out?" He immediately called to scold me. Apparently I was about the rip out the compressor. He cautioned me against exposing myself, my living room, and my family to the freon. So back those screws went! Today I bought two lamp kits for $6 each at Walmart and two small desk fans from the 99¢ Only store for $2 each. I was envisioning one light at the top and one slightly above the bottom with a fan pointed at each one to circulate the heat. I'm planning to use an inkbird plug and play thermostat that I already have from my last incubator project as well as a LG egg turner. I don't have the resources to have the freon professionally drained so I have to work around it. What would you do? Do those locations sound like a good idea? Any advice for how to drill holes without hitting tubes of freon?
 
Heres the fridge, doesn't it look spiffy?
700

700

Cat had to test it out. I think he approves.:p
700


and here it is folks, the thing I've been told can make me go blind if I touch it wrong!
700
 
Ultimately I decided not to mess with any of the coolant. After thinking about it for quite a while I realized the best way to avoid any tubing with freon was to make s small hole, poke around through it to make sure there was no piping in the area of the wall I wanted to put wire though, and then drill slowly through the plastic interior/insulation/metal exterior. I straightened and heated a wire hanger over the stove and poked it through my chosen areas through the plastic interior and once I was certain they were clear,I drilled my hole for my electrical and two holes for my fans.
700

700


700


I followed the directions included in the light kit but left out the rubber plug thing since I drilled the hole to the exact size of the metal "nipple"
700


I'm running it empty right now to see if I need to add another light but here it is so far :D
700
 
Last edited:
So it's been about a year and I've successfully incubated eggs in it about a dozen times, both chicken and quail eggs. I ended up putting automatic egg turners on the wire shelves and ran the cords out the same hole I made for the fans. When I put them on lock down, I remove the turners and put the eggs in plastic baskets lined with the skid resistant cupboard liner stuff that comes in a roll. I have had no problem with hot spots and getting the humidity up for lock down has been as simple as adding 2 damp sponges to the bottom area. I've incubated and sold a couple dozen chicken and quail and have turned a really good profit.
 
Pictures of my successful hatches with quail eggs.
 

Attachments

  • IMG_1326.JPG
    IMG_1326.JPG
    518.6 KB · Views: 26
  • IMG_1247.JPG
    IMG_1247.JPG
    417 KB · Views: 37
  • IMG_1189.JPG
    IMG_1189.JPG
    403.3 KB · Views: 36
  • 20170614_191300.jpg
    20170614_191300.jpg
    1.7 MB · Views: 36

New posts New threads Active threads

Back
Top Bottom