My DIY Coop - Novice to all of it

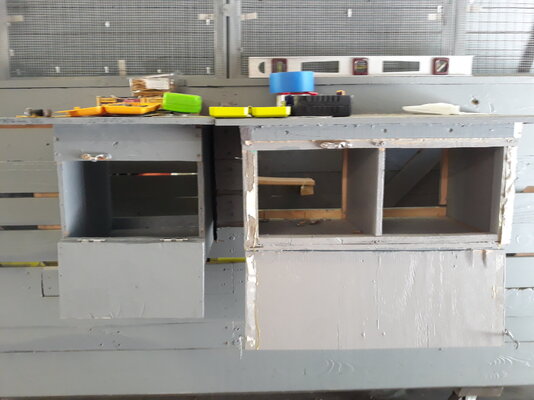
I'll check square footage. Sorry for confusion, I was asking regarding your advice to remove part of the siding on the coop walls. If you can look at the first pic in my post of the original crate and tell me please if this much ventilation is what you have in mind for my location? Less? More? Thanks!

The square footage of the coop tells you how many chickens you can put in it -- 4 square feet per chicken.

The number of chickens you can put in it tells you the minimum ventilation needed -- 1 square foot per chicken.

You need to measure the amount of floor space and the amount of wire.

But in Florida the more open wire the better -- some Florida coops only have one wall on the upwind side. :)
Thanks! I understand better now and thanks especially for your well written article on ventilation!
 
So double-checking on ventilation - the part under the roof on the side (in gray) is all hardware cloth. One window on the short end as well? If so that might be enough, but as it gets hotter you might want to get temperature readings in there to see how much heat is being retained.

I've pretty much already resigned to constructing an extension to the coop perpendicular to what I have coming off the wall beside the nest boxes. I can create quite a bit of extra room this way. Then I'll consider moving the roosting bars to the end of that extension and remove the current ones.

This would be very advisable - it's really the narrowness of the space that makes it difficult to figure out the layout (nevermind the overall lack of floor space) so if you could widen it, it'd give you more options.

If expansion is a plan for near-future-but-not-right-now, roosts will need to be width-wise so they have more length to land. Roughly 1' of roost per bird however Silkies are smaller and don't need as much space (if they choose to roost at all) so you may be able to get by with just roost space for the 3 layers. If the coop is 3' wide, for example, a single roost might be good enough until expansion.
 
So double-checking on ventilation - the part under the roof on the side (in gray) is all hardware cloth. One window on the short end as well? If so that might be enough, but as it gets hotter you might want to get temperature readings in there to see how much heat is being retained.


This would be very advisable - it's really the narrowness of the space that makes it difficult to figure out the layout (nevermind the overall lack of floor space) so if you could widen it, it'd give you more options.

If expansion is a plan for near-future-but-not-right-now, roosts will need to be width-wise so they have more length to land. Roughly 1' of roost per bird however Silkies are smaller and don't need as much space (if they choose to roost at all) so you may be able to get by with just roost space for the 3 layers. If the coop is 3' wide, for example, a single roost might be good enough until expansion.
Thanks Rosemarythyme! Yes, the grey scribbles on the front of coop above nest boxes is all ventilation covered with 1/4" hardware cloth. Also, the maintenance door on the one end is screened at top as well. Also, there's a small screened area on the other end. Finally, there's an electric ventilation fan at the peak of the roof over the end where chickens will come and go. What do you think?
On space: I'm going to extend the coop coming off wall beside nest boxes as soon as I set the coop up outside. I'll be waiting for chicks to be growing in feathers or incubating eggs. Either way should give me time to go ahead with extension. What do you think?
 
I'd try it as planned (with the existing ventilation and adding the extension) and then monitor the interior temperatures as the days get hotter. You're obviously handy (even if you say this is new to you!) so if the need arises things like the roosts can always be moved a bit, or more vents added.

In most climates (aka not hot & humid) this would be a lot of ventilation for a smaller coop.
I appreciate the advice! That's what I'll do.
 
Hi! I'm brand new to the whole deal! Thought I'd start with my DIY coop.
Objective: Start a coop as cheap as possible to hold 6 hens. (3 silkies and 3 pretty medium laying hens) Include all necessary elements.
Started With: An old wheeled crate with a lid. Originally built by restaurant owner to hold 3 large trash cans.
View attachment 3076300
As you can see it's rectangular and the hinged lid is hanging open on the right side looking down the end.
Repurpose: I decided to maximize my vertical space by using the lid as one side of the roof with steep slope.
View attachment 3076307
I'm a little constrained with depth and length but I'm only starting with 6 hens. I figure I can add an extension to create more floor space after I get coop set up outside. NOTE:: Coop dimensions are 8'6" L x 2'5" W x 5'3" H (at very peak)


Overall Re-Design: I took a photo of the crate with the lid (roof) in place. After some thought I scribbled all over the photo to get an idea of overall design.
View attachment 3076320
Additional Major Elements: 1.Shorter roof on other side with a lower slope (red). Cover roof with scavenged materials 2. Wire mesh vents for air and visual inspection (grey) allowed due to shorter lower sloped roof. 3. External nest boxes (yellow) maximising use of internal space. Plan for 2 small boxes for 3 silkies and 1 larger box for 3 hens. (I've read they will share?) 4. Maintenance door (blue) on nearest end. Provides access for raking out litter, accessing hens if necessary, etc.
Many Interim Elements: If there's interest I can fill in detail on additional steps including reinforcing floor, 3 roost bars, guillotine-style door for hens entry and exit to run, exhaust fan, internal coop walls covered with hardware cloth, etc.
Current Status: Photos of current build status. Where I am:
NOTE: Getting security error. Hopefully will finish soon. IF 1

Hi! I'm brand new to the whole deal! Thought I'd start with my DIY coop.
Objective: Start a coop as cheap as possible to hold 6 hens. (3 silkies and 3 pretty medium laying hens) Include all necessary elements.
Started With: An old wheeled crate with a lid. Originally built by restaurant owner to hold 3 large trash cans.
View attachment 3076300
As you can see it's rectangular and the hinged lid is hanging open on the right side looking down the end.
Repurpose: I decided to maximize my vertical space by using the lid as one side of the roof with steep slope.
View attachment 3076307
I'm a little constrained with depth and length but I'm only starting with 6 hens. I figure I can add an extension to create more floor space after I get coop set up outside. NOTE: Coop dimensions are 8'6"L x 2'5"W x
Hi! I'm brand new to the whole deal! Thought I'd start with my DIY coop.
Objective: Start a coop as cheap as possible to hold 6 hens. (3 silkies and 3 pretty medium laying hens) Include all necessary elements.
Started With: An old wheeled crate with a lid. Originally built by restaurant owner to hold 3 large trash cans.
View attachment 3076300
As you can see it's rectangular and the hinged lid is hanging open on the right side looking down the end.
Repurpose: I decided to maximize my vertical space by using the lid as one side of the roof with steep slope.
View attachment 3076307
I'm a little constrained with depth and length but I'm only starting with 6 hens. I figure I can add an extension to create more floor space after I get coop set up outside. NOTE: Coop dimensions are 8'6"L x 2'5"W x 5'3"H (at very peak). Ventilation is 100"x15" + 20"x25" actually less it is an odd shape + 19"×9"+ electric ventilation fan in peak.

Overall Re-Design: I took a photo of the crate with the lid (roof) in place. After some thought I scribbled all over the photo to get an idea of overall design.
View attachment 3076320
Additional Major Elements: 1.Shorter roof on other side with a lower slope (red). Cover roof with scavenged materials 2. Wire mesh vents for air and visual inspection (grey) allowed due to shorter lower sloped roof. 3. External nest boxes (yellow) maximising use of internal space. Plan for 2 small boxes for 3 silkies and 1 larger box for 3 hens. (I've read they will share?) 4. Maintenance door (blue) on nearest end. Provides access for raking out litter, accessing hens if necessary, etc.
Many Interim Elements: If there's interest I can fill in detail on additional steps including reinforcing floor, 3 roost bars, guillotine-style door for hens entry and exit to run, exhaust fan, internal coop walls covered with hardware cloth, etc.
Current Status: Photos of current build status. Where I am:
NOTE: Getting security error. Hopefully will finish soon. IF 1

Do you have measurements on this? Just curious as to how much space there actually is.

I would consider dropping nests to floor height, and then have roosts just above that in height. Not going to have a lot of landing space with limited floor space, so that'll make it more feasible for them to land off roosts. Very possible the Silkies don't roost at all.
3rd time trying to include measures:
8'6"L x 2'5"W x 5'
Do you have measurements on this? Just curious as to how much space there actually is.

I would consider dropping nests to floor height, and then have roosts just above that in height. Not going to have a lot of landing space with limited floor space, so that'll make it more feasible for them to land off roosts. Very possible the Silkies don't roost at all.
Finally! Dimensions are: 8'6"L x 2'5"W x 5'+H at very peak. The vent all the way across the top is 100"x15" + 20"x25" but less it's an irregular shape + 19"x9" on other end + electric vent fan over that at peak.
 
3rd time trying to include measures:
8'6"L x 2'5"W x 5'

Finally! Dimensions are: 8'6"L x 2'5"W x 5'+H at very peak. The vent all the way across the top is 100"x15" + 20"x25" but less it's an irregular shape + 19"x9" on other end + electric vent fan over that at peak.
Sorry to all I mangled my primary post trying to insert measures. I think I have a main post imbexded kn my post with measures in 3 places. God only knows how I did that. All I wanted to do was edit my initial post where I was describing everything! Oh well. When I get some memory on my phone I'll be able to add a few more pics.
 
Peek length ways showing lack of width. Additional space is a must when I set up coop. Roost bars will come down and go into additional space
 

Attachments

  • 20220427_105202.jpg
    20220427_105202.jpg
    370 KB · Views: 1
  • 20220427_105125.jpg
    20220427_105125.jpg
    339.2 KB · Views: 2
  • 20220427_110433.jpg
    20220427_110433.jpg
    294.9 KB · Views: 3

New posts New threads Active threads

Back
Top Bottom