While my better half--or really better 3/4ers-- will say this took way longer than it should have, I consider a labor of love and a love of labor to be one and the same and I enjoyed every step of creating this and continue to enjoy tinkering with it. This was my second coop build which interestingly made it more difficult as I'd consider this an accumulation of not only everything i learned in building the first one but also everything I've learned since in taking care of chickens in that first coop. The challenge became trying to account for every little "wish i had..." moment that filled my last coop experience. All that said, this is what I came up with and already look forward to the next opportunity. As a disclaimer: I'm not a contractor and I don't have any training/formal education in building or construction. I'm just a guy who loves tinkering and building, woodworking and chickens. While I'd love to believe I "know" what I'm talking about, I'm not a professional and none of my descriptions or thoughts are intended to be anything more than how I did it for my coop and to help add to the many examples on here from whom I myself learned.
Requirements:
- Curb appeal--space sits literally in front of our house, seen from the street
- Large enough run and coop to "comfortably" house up to 16-18 chickens while remaining secure
- Predator proof--given proximity to wood be local assassins (coyotes, raccoons, etc).
- Structurally sound--sits on a hillside, sloping in two directions
- Area within structure for quarantine, integration, separation, etc
- Sufficiently automated/self-sufficient to avoid daily chores (cleaning, de-pooping, re-filling water/feeders, "releasing" from coop, etc)
- Be in a separate area from our veggie boxes and garden--because chickens will be chickens and eat and tear up everything.
Dimensions:
- Total: 18' x 12' (~216sq ft)
- Height: Variable due to sloping of both hill and roof (at the tallest point ~9 feet off the ground, at the lowest ~5 feet off the ground)
- Coop: ~7 x ~6 feet (~40sq ft)
- Nest boxes: 4 (11"x14" each)
- Height: variable ~9' at tallest corner, ~5' at shortest corner
Design:
I spent a lot of time on this website, as well as youtube and various construction forums to learn how to build this structure. While my first coop turned out reasonably well it was 10x6 feet and on solid flat ground as opposed to this coop which was 18 x 12 feet and built on a hillside sloping in two directions. As a result of all the additional variables at play, I needed to feel confident in the decisions that I was making and that they were grounded in some rational construction principle or contractor wisdom. I therefore spent a lot of time reading and watching videos. Fortunately there is some really great content out there which was critical to answering each question about the building process from the cinder block placement to the roofing and everything in between.
In terms of the actual design, I again turned to SketchUp which I found very helpful with my first chicken coop. That said it took a tremendous amount of time to learn how to use it 7 years ago and unfortunately I basically had to re-learn it again here. As such, I used it to help give me a sense of the layout and then I quickly moved on to just pen and small notebook as it satisfied my need to calculate lengths and angles and actually remember the lengths when it came time to cutting.


The critical learning point for me here was, no matter how the sketchUp looks, the reality is, particularly on a hill, the geometry of the space and the slope will determine the dimensions. While these images gave me an idea of what to aim for, the ground and natural slopes of the hill gave me the answer and that really wasn't until I was out there digging the foundation that it became clear.
Foundation:
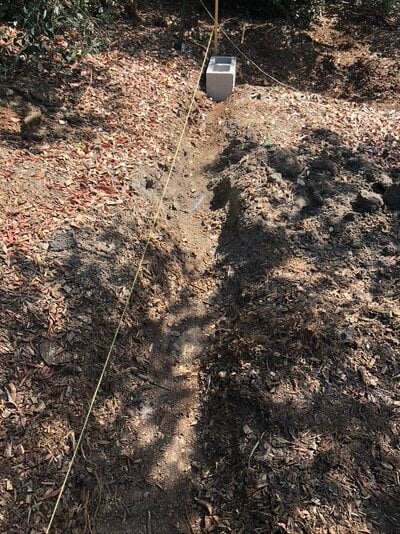
August 2022: Once I had the location set it and the plan set, I determined the location for my starting corner, set my lines at 90 degrees, started digging down and began the many journeys to the local Orange store get the foundation material transported home.
I chose a cinder block foundation because while it is truly a pain to set individually, I was familiar with it from my initial build, the blocks are straight-foward to work with, hold their place once level and generally, should i have to make changes to the plan for whatever reason (e.g., irrigation piping) I can rearrange without significant consequence other than time.
I found it helpful to roughly lay all the cinder blocks down to get a sense of the overall dimension and also understand the topography of the slope a little better. It helped me determine where I wanted the steps to be and how many overlapping blocks i would want/need for each step down. Particularly since each parallel side needed to be the same length, I had to ensure I kept track of the downsteps to keep it even. Once this was done, I confirmed my 90deg angles and proceeded with the long and difficult task of leveling each cinder block with a combination of sand and pea gravel. I would say loosely each one took about 20-30minutes of effort with a wide range from 10min to an hour with all sorts of yelling in between.
") I wish I had a tip for how to make it go faster. Ultimately with an infant at home and having only a couple hours each weekend day to work on this, this portion took probably 2 months to do.
I wish I had a tip for how to make it go faster. Ultimately with an infant at home and having only a couple hours each weekend day to work on this, this portion took probably 2 months to do.
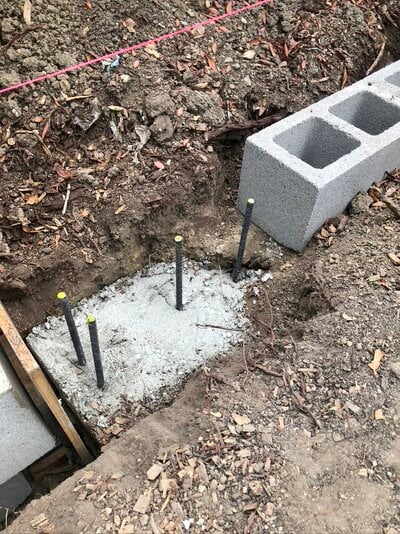
Once they were set I back filled with rocks. For overlapping areas at the steo downs I placed rebar and filled with cement to anchor them together. As well in some areas where it was particularly hard to level or I was concerned about the stability I dug down deep and laid a concrete pad with upright rebar to anchor the cinder blocks in once back-filled with cement.
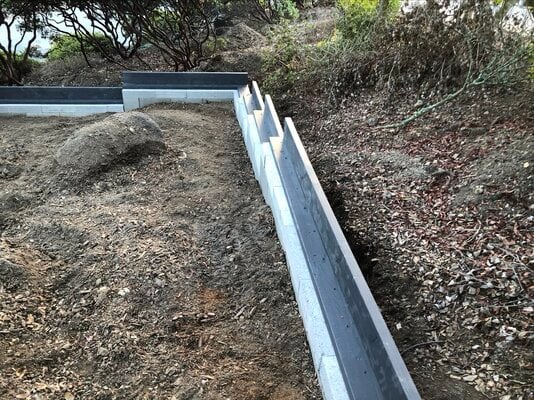
Once all the blocks were set and back filled, I placed cement caps on top completing the foundation. Date: November 12th
Framing:
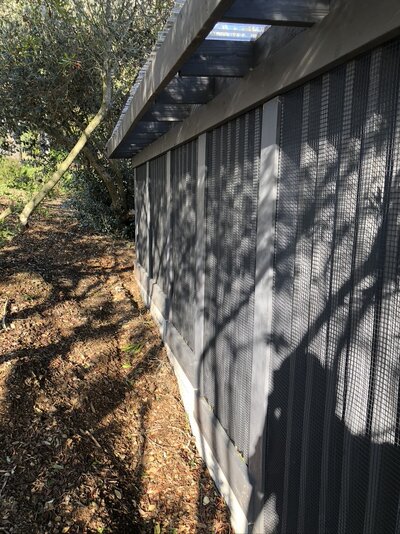
November 2022: As I was nearing completion of the foundation, at night with again pen and paper, I started drawing out the framing of the coop, with now exact knowledge of the dimensions and lengths. As a recommendation, regardless of the plans that you develop or use, always measure each length directly and precisely, particularly before cutting any wood. Once I had my drawings set, I calculated the amount of wood I would need of various widths and lengths. Given the size of the order and the particular lengths of wood needed (20' being the longest) I decided to do a bulk order from a local lumber yard. While I had debated at the time my options for picking up the wood myself over many trips, in hindsight this would have been a HORRIBLE decision. The wood arrived quickly, was well stacked, and save a few pieces that I would not have personally chosen, was good construction grade quality with couple bowed or splinted pieces. I'm posting the quote on the wood here mainly to give a sense of both the cost and also the overall amount of wood that I used. IN addition to the long pieces for rafters and roofing the order also included all of the plywood that I needed for the coop itself which was particularly nice to avoid having to breakdown plywood in the HD parking lot for transport. In addition to the delivery, I ended up probably purchasing ~20 additional 2x4x8's, mainly for various components for the coop itself. As well, wanted a semi-transparent, privacy screen on the street facing side of the coop for which we made a vertical slant wall with 2x4's. These weren't particularly load bearing but required a decent amount of wood.

There was something very gratifying about all of this wood being delivered. An endorphin kick of sorts which was quickly replaced with the stress of it now sitting in my drive way and really needing to kick this project into gear. Probably this day along with the day the chicks arrived were the moments in which I most felt pressed to hurry up!
That said, as I didn't want to use any pressure treated wood around my chickens and that the sills would be directly on cinder blocks, which is porous and can distribute moisture directly to the wood, I painted each piece of wood individually with two thick coats of exterior grade low VOC paint. Needless to say, this took a very very long time, occasionally applying the second coat when all were asleep or early in the morning prior to work. Fortunately, I did it somewhat piecemeal, focusing on the pieces I needed for that portion of the build with everything else left under a tarp lying in wait.
With wood painted and dry, I started the actual fun part: building. In an effort to save time which was at a premium with a toddler lurking, I purchased a battery powered framing nailgun. This was singly the best decision I made through the building process. For my first coop (which I had made a detailed video documenting the process) I used deck screws which was an extremely arduous and unnecessarily long process with pilot screws and counter-sinking as needed. At the time I thought in case I ever needed to take it down, I could literally unscrew the whole thing. In hindsight, that was never going to happen. and If it was required it would have been done with a chain saw and a team of hired folk. Recognizing that here, I quickly moved forward with nails and had no regrets. In terms of structural integrity, framing nails are the go-to in construction and after watching numerous construction and contracting videos on youtube, I probably placed even more nails than necessary...largely because..it was really really satisfying. Safety was critical and while I didn't have any accidents, I always wore eye protection knowing pieces can come splintering back at you.
The mudsill plate was made with untreated 2x6" framing wood and anchored about every 12" to the concrete caps with blue tapcon anchor screws.
I then proceeded with 2x6 header joists around the entire perimeter. Previously I had used 2x4" wood for this but felt the taller 2x6 edges woulde contain the dust/dirt/debris that the chicken can kick up with scratching. Also it gave my studs a little more purchase when anchoring those down to the sill and also the header joists.
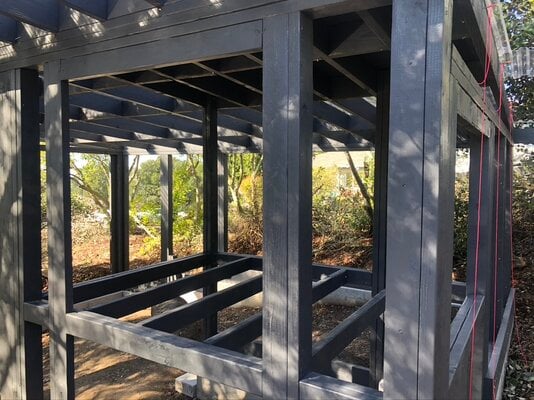
At each transition/step I placed an upright 2x4" at the bottom and top of the step, nailed to each other in multiple places, to the sills, and the headers. In most places I then reinforced this with an additional 2x4" on each side. A key point here was to make sure 1) everything was absolutely level and 2) everything was plumb. While errors here could be somewhat corrected once the top plates went across the top to square things up, I wasn't interested in questioning the structural integrity for the next 20 years. In terms of the height, with the goal of a slanted roof from front to back, with about a 12in drop over the 12 foot span (it does not snow and with a clear polycarbonate roof, the load is relatively minor), the measurements were fairly straightforward. I first used an 8' 2x4 in the bottom left corner (lowest point of the run) and then marched along the front side making sure the length at each "step up" was cut to be completely flush and level with the top of that first stud that I had placed. With the front side complete, I then cut a 2x4 to about 7'2" (10" shorter than the front corner stud) which I placed next to that initial corner stud which served as the height for that section of the wall and every other wall around the perimeter. Not sure how best to explain it but essentially, using the lowest point of the run (left front corner), the front wall was set to 8' and the side wall was set to 7'2". Accounting for the steps in the foundation, the entire front wall was set to maintain the height of that 8' 2x4. The other 3 walls of the run were all set to maintain the exact same height of that 7'2" 2x4 that had been placed which was started at the bottom of the left side wall of the coop (i.e., closest to the front wall). I don't have a great picture to explain this concept but the following pictures essentially detail it.
Other than the front wall, the remaining walls were all the same height which allowed for placement of a top plate that around the 3 sides that was the same height and level.
One component of the design worth mentioning here is that my goal was to have this feel as open yet secure as possible. As I placed the framing studs I was mindful to focus on spacing the studs such that it would allow for near full use of either 36" or 48" hardware cloth. So most spaces were either 30-32" for a 2-3in over lap on each side or 40-44" wide. It's worth calculating upfront how much HC you need so that you only have to purchase it once and avoid doubling the shipping costs. I purchased two 100' rolls (one 3ft and the other 4ft --black pvc coated from critterfence. I went with black because it looks much more see-through/invisible than the traditional galvanized option. I know there are a lot of options for HC. I initially bought a roll off amazon but it was fairly cheap and some of the wires were loose so I returned it and spent the extra-money for the higher quality product from critterfence. In hindsight, I should have gone with recommendations from people on BYC as opposed to trusting amazon reviews).
Roof:
Anywho, once the studs and walls were complete, I placed overlapping top plates. For the front wall I placed 3 top plates for added height to slightly increase the angle of the slanted roof to about ~11.5in rise over the 12 foot run of the structure. Again, with a relatively light roofing material (Suntuf--polycarbonate) and that I live in the bay area without snow, the load requirements for my roof were minimal and I was fine without a steep slope for the roof.
I'll pause here to say I spent a lot of time learning about roofs and rafters and pitch and how to make a birds beak notch in the rafters based upon the angle and how to use a speed square. There were a lot of videos online. In hindsight, probably note necessary. Particularly for my purposes with a low slope/pitch, the technique of just putting an uncut rafter up, and then marking the two lines at the points where it sits on top of the top plates with a line drawn parallel to the ground connecting the two points would have been adequate. My description doesn't probably make sense to most but if you're reading this to try and figure out how to cut rafters, my recommendation would be to check out youtube videos that start with something to the effect of "the easy way..." There are a lot of youtube videos on shed making that highlight the shortcut way to easy rafters versus the overly complicated way that's probably much more useful and needed for actual homes and buildings with heavy loads and absolute precision required.
Once the rafters were completed I chose to place integrated purlins to provide extra-support for the roof. This required cutting a series of 2x6's to fit between the rafters. An option would have been to simply place long 2x4's across the top of the rafters but that would have complicated not only the installation of the polycarbonate roof (Suntuf) but also the hardware cloth that I wanted to lay across the entire roof as extra protection. Possibly unnecessary but in 10-15 years I don't to find a flock of dead preyed upon chickens to be the initial indication that the roofing had become brittle under the beating sun. In terms of security from predators I'm a big fan of the belt and suspenders technique which certainly helps me sleep at night and go on vacation knowing the chickens are safe and sound.
Here's another picture of the roof from above after the purlin placement. I ran construction string across the length of the structure to help keep me honest and straight when nailing the purlins in. Of note, in the second pic you'll notice the rafters are closer together. I did this on the right side of the structure because it would support the 3/4" plywood over the coop. Probably would have been fine with the same spacing as the rest of the structure but I figured this couldn't hurt. I have no interest in this caving in on our little egg laying friends.
As mentioned, I placed hardware cloth over the entire roof. To install this was slightly complicated in that I needed to also place the suntuf panels as well which would be difficult if I effectively closed off direct access to the roof from the inside of the structure. As such, I completed this whole process piecemeal. After stapling down a strip of hardware cloth (I used a batter powered stapler--Makita--which makes this process very quick and efficient) over a span of two rafters, I would then immediately place the Suntuf panel and screw those in with the roofing screws (basically exterior grade screws that come with a neoprene washer to prevent leaking through the holes). I should mention, when designing the roof the distance between the rafters was based upon the width of the Suntuf panels which were 26" wide. The installation requires about 1-2 inches of overlap between panels. In order to effectively do this and allow for a row of screws into the rafters to anchor them down I set the rafters at about 22in apart. This became a little more complex over the coop portion where I had more tightly placed rafters. Ultimately it all worked out.
Regarding the suntuf panels they sell them in either 8' or 12' lengths. My rafter length was about 14' (including the 12in overhang on both sides to keep the structure dry). This meant I had to purchase the 8' lengths and cut them. Importantly I had to factor in the location of the purlins in order to make sure I could screw the panels down effectively. This was not a major problem but one of a 100 or so issues that had to be dealt with during the course of construction. In hindsight i probably could have designed the structure such that the rafter length was 12 feet. Going back to geometry however as the rafter is the hypotenuse of a triangle with the rise and run, the drawback to setting the entire rafter length to 12' would have meant the overall width of the structure would need to be slightly less than 10ft to account for the angle/pitch of the roof with a 12in overlap on both ends. My goal here was to make a chicken run as big as possible within the space limitations of my yard. The minor inconvenience of having to cut two 8' panels down to size was worth the extra ~36sq ft of run space for the chickens (18ft long x 2 additional feet wide).
With the roofing finally complete, the inside of the structure was now protected and dry from the rain and as such, I could proceed with the coop buildout.
At some point in here I also completed the stapling of the hardware cloth (HC) to the frame. It's helpful to have a second set of hands to really tug/pull on the HC to put tension on it while you're stapling so that it lays flat against the framing without bows or "pouches" in it. I'd recommend starting in your least visible area to get the hang of it prior to any front facing areas. With a staple gun you can't easily redo it as you would be able to with screws and washers. Once the HC was stapled in place I then put narrow panels of plywood over the HC and framing to add a nice finish covering the staples and also to re-enforce the staples to further prevent predators from accessing the corners and lifting the HC up. Here's a picture of what that looked like on the back end
The Coop Build:
January 2023: For the coop, my goals were relatively straight forward based upon a short list of needs and wants:
Needs:
- Predator proof to protect the hens particularly when most vulnerable at night.
- Adequate ventilation and air circulation
- Access to every part of the coop once complete from the outside
Wants:
- Easy to clean
- multiple access points
- slight slant of the floor for drainage and water runoff during deep clean
- non-stick surface
- Avoid cleaning (adequate height of perimeter walls to allow for deep-deep-clean-only-when-have-to-liter method)
- Automated run door
- Internal nest box (more aesthetically appealing)
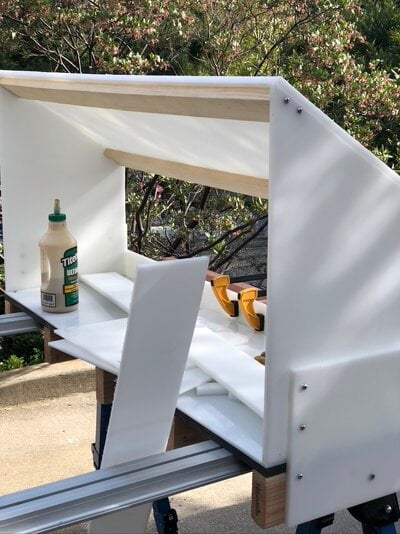
In designing the coop with these goals in mind I built upon many ideas from coops on backyard chickens and youtube. I previously used vinyl flooring which was nice because I could easily wash it down during deep cleans. However, eventually it became brittle and tore up. I decided to switch over to high density polyethylene (HDPE) for this flooring because it is food safe (used for cutting boards), very durable (used for cutting boards) and stuff doesn't easily stick to it (used for cutting boards). After calculating out the surface area needed to include the base of the coop and an 8-10in wall around the perimeter, I went to Tap plastics and had them rip down an 8'x4' panel of 1/4in HDPE to fit in my car. Of note, they had an off-cut 1/2in piece that I purchased at a discount to use for the nest box. In building the coop I used 3/4in plywood as a subflooring below the HDPE to provide some structural support. I used only stainless steal screws with the HDPE, including for the nestbox to prevent rust build up with future cleaning.
A jig saw came in handy for cutting out the various notches for the support columns. As mentioned above, the entire floor of the coop is sloped ~1in. You can't quite tell to the naked eye but the purpose was to help with water runoff to the front to avoid pooling whenever I get around to deep cleaning and spraying it all down.
Once flooring was complete I put the walls up accounting for locations of the doors, nestbox drop down openings and the door for the chickens into the run. Each of these openings was framed out prior to screwing the walls in. Importantly here, I chose to mainly use screws at this point so that I could take down and replace the coop in the future. Particularly with the amount of poop and moisture that can build up, along with sun-exposure, I wanted the coop components to all be replaceable if need be.
In terms of paint, for health reasons, though I can't really cite a source, I wanted to minimize the amount of paint the hens were exposed to so I only painted the outward facing side of the plywood, leaving the inner portions raw and unpainted to minimize off-gassing in the coop.
Now pushing into mid-February I'll say there was nothing more motivating than the day we brought our little 1 day old chicks home from Alchemist Farms in Sebastopol. It was as though the clock officially started in terms of needing to get things done.
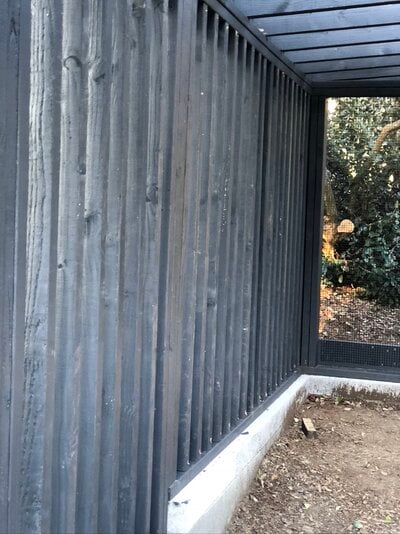
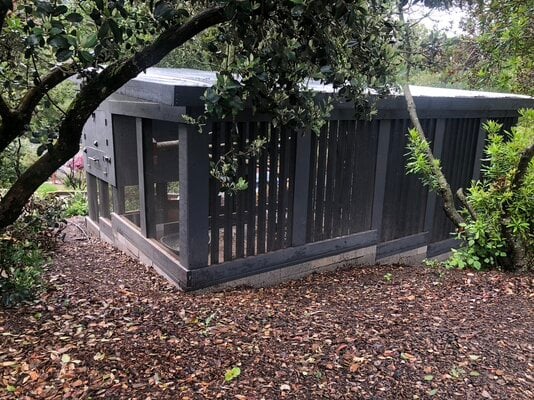
Around this time I also started adding in the vertical slats, made of 2x4 to the street facing side of the coop. The slats don't serve any real structural benefit to the structure. I got this idea from a coop design I had seen on line. For our purposes I felt it would help prevent headlights from shining directly into the coop and run and also the casual onlookers would really only be able to see the chickens when standing directly in front which I felt would minimize disturbances to the chickens, particularly from people walking their dogs and whatnot.
As you can see, I placed an 8in perimeter wall of HDPE all the way around the inside of the coop to allow for a deep liter method for managing the coop poop. I made a small ladder for the chickens which ultimately I don't think was particularly necessary--but like everything, save the foundation, I enjoyed making it.
Regarding the door/windo hardware, all of it was relatively straight-forward to install with hinges purchased from the orange store. I initially had hoped to make these hidden latches within the frame; however, it was going to take too much to get the router out and I just went with exposed which ultimately gives a reasonably nice contrast with the color of the coop. I did interestingly find somewhat unique magnetic latches on amazon that I hadn't seen before (Company called D&D technologies) which have a self-closing mechanism that I liked. Again with the goal of predator protection, i found two different locking mechanisms is the best way to avoid any high aptitude raccoons from causing a problem. So in addition to the magnetic lock I used a regular flip latch with a carabiner lock placed in it. Of note, I initially found these really nice flip latches on amazon that were quite heavy duty. Unfortunately the tolerances were so tight that being off by just a few millimeters between the two walls/doors was enough to prevent the latch from sliding in to place so they had to be returned. Learning point here, buy things as you need them so you can return them if necessary versus missing your 30 day return window.
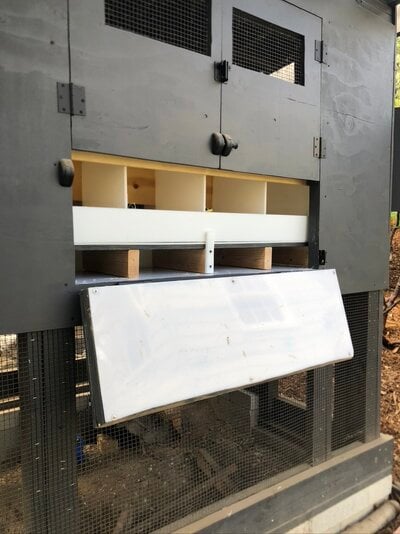
For the nest boxes while i don't plan on removing them with any regularity, I decided to make them completely removable. This allowed me to move the chicks from the garage brooder to the coop a little sooner than I otherwise would have been able to (around 7-8 weeks of age) because I hadn't finished the nest box. Particularly with keeping them in the cool for about a week to get used to the coop as home base before letting them out in the run, not having the nest boxes in there yet gave the a little extra room. Of note, I completed the nest boxes and put them in around week 13-14 with a plank over the entrance to prevent them from trying to roost in the boxes until week 16 when I removed it given them full access. As I mentioned earlier, I used HDPE for the nest boxes to allow for easy cleaning and wipe downs from time to time. I elevated the base on 2x4's to account for the deep litter method in the coop.
I chose to go with 4 nest boxes, knowing full well they will likely use just two, maybe three of them. While there will be screw holes, I can always modify this if necessary. You'll notice the fairly steep slope which was made to avoid chickens from roosting on top of this at night. As well, I placed a step bar in front for them to perch on prior to "jumping" into the nest box to avoid cracking eggs. Probably not necessary, but, I never turn down the opportunity to make something that seems like a good idea. On the outward facing portion of the nest box I placed a board to allow some ventilation above but also to limit the opening below to allow a hand to reach in for an egg but hopefully to avoid a chicken trying to occasionally jump out. On the inward facing side, at the time of installation I placed a board over the entrance to prevent the chickens from roosting inside which again I removed around week 16 in anticipation of eggs.
Chicken Move-in Day: April 10th
With the chicks (both pullets and cockerels (oh chicks were all unsexed) now in the coop the remaining to do's on the coop were finishing touches and hardware installation.
For the coop door I used the Ador1 automated door which opens and closes with daybreak and sunset. I had an extra 2x6 board of cedar laying after a deck furniture project that I used to make a landing right outside the coop door and then also as a ramp with 2x2 redwood steps screwed to it.
For the run door I chose to go with a dutch door so that I could open the top and throw treats into the run without having to completely open the door. For the hardware I again looked to amazon to help as there were few more styles than the big box stores. I went with a "self-closing" mechanism on the hinges to help with making sure when I carry things in and out the door closes. I ended up setting it to the lowest setting to prevent my daughter's little fingers from getting slammed or chickens for that matter should they try and make a run for it. Unfortunately I don't have a great picture of the door with all the hardware but for those following closely, to complete the security there's a flip-latch with carabiner on the upper portion of the door to the frame. The lower portion has a turnable handle that lives that lever up. At the time of this photo I hadn't installed the little latch/stopper that attaches to the frame holding that lever in place. It's a fairly straight-forward mechanism that I'm very happy with. With the upper piece held to the lower piece with those two lift locks the entire thing moves as one unit or independently when those two locks are raised. This set up all felt very secure to me and will require a very gifted racoon to overcome.
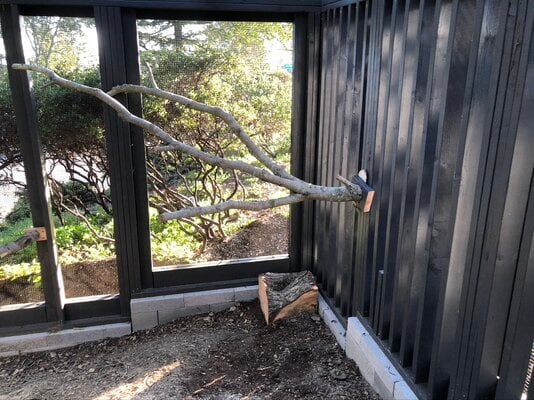
My final step prior to completing the run was installation of the feeders and a couple perches for the chicken's daytime entertainment. For the feeder and watering system I went with the CoopWorx units, mainly because of their high storage capacity (i believe 8gal of water and 80lbs of feed) and that they both have minimal losses, particularly of scattered feed which has always been a big challenge of mine. For the perches we had part of an oak tree fall down this winter which provided me with some nice branches to trim down. They were anchored at their bases to 2x4 and 2x6 boards which allowed me to drive a long 4in screw into them and then screw the block to the framing studs as you can make out in the photos. These worked fairly well. I imagine in a few years as the wood further dries out I'll likely be redoing/anchoring these. Time will tell.
Coop "Finished" April 15th, 2023
Took a little coaxing but eventually they all came out of the coop and into the run and the rest is as they say....
They even managed to steal a treat or two along the way...
At this point, save a few finishing details, including a 16-18in predator apron, the coop was done and ready for showtime. I put quotes around the "finished" because these are never really done. There's always a degree of upkeep, tinkering or modifying to be done. For example, shortly after i finished it, i added a couple swing doors under the coop to serve as a see-no-touch isolation area for integrating new chickens which I did twice this year due to the rooster odds not playing in our favor in our box of unsexed chicks. For the most part though and in particular, as far as my better 3/4ers is concerned, I'm done and as such, my turn to take care of the toddler.
If you made it this far, thanks for reading. As the coop evolves I'll provided updates where potentially helpful.