ChestnutRidge's
 Most Ingenious Chicken Design Contest
WEEK ONE CONTEST in conjunction with Mahonri's 3rd Annual Easter Hatch-A-Long
Vote here by 8pm EDT Tues. 3/27/12

WEEK ONE CONTEST in conjunction with Mahonri's 3rd Annual Easter Hatch-A-Long
Vote here by 8pm EDT Tues. 3/27/12
During week 1 of incubation (17 to 23 March), post a picture and brief explanation of your cool brooder / feeder / waterer / saddle / whatever that you created for your fowl on the hatch thread. Once the contest ends, the submissions will be put on a BYC poll for the kind folk of BYC to vote for a winner.
Prize: A copy of Gail Damerow's Chicken Health Handbook, which the winner will surely appreciate being such a witty chicken-fancier.
#1: Automatic Feeder by Wisher1000 (Post #2889; also here)


Made from all recycled materials (except for the pipe clamps, mine were too small). DH put ithe deer feeder on the scrap pile because the motor burned out, the pipe was laying around and the feeder and 's' hook were on a shelf in the feed room. It will hold up to 200 lbs of feed! I keep it under a shed were the tractor is parked so the rain will not wet the food.
#2: Fridge Incubator by Jessshan8 (Post #5616, also 5757)


[It] only cost me a little less than $35 to build. It maintains temp and my hatch rates have been 85% to 90%. I used the mini-fridge they are really insulated good and hold the temp really well. I knew someone who was going to throw it away. The heat source is from an old two bulb ceiling light wired through an electric thermostat. the water bottles at the bottom i use to hold heat and reduce cycling of the lights. The items I bought were from ebay and the cost is total cost including shipping.
2 blue lighted 100mm computer fans - $6
electric humidity sensor - $2 (battery powered)
electric thermostat/sensor - $21
I did buy a switch to turn off the fans before i open the door to eliminate blowing colder air suddenly across the eggs at home depot for just under $4. The box on top was an old cigar box that I cut holes in to mount the the thermostat and humidity sensor in.
#3: Plastic Needlepoint Canvas Pedigree Box by debs-flock (Post #5624)

Here's a picture of my pedigree box I made to go in the incubator. I made it out of plastic needlepoint canvas and zip ties. It took about 30 minutes to make and cost less than $1. I put a tie on the lid before placing it in the incubator, so the chicks couldn't climb out. All six eggs hatched. In this case I used it to identify four campines so I would know the breeding and I put in the two lightest marans eggs I was hatching. Those two chicks are now banded with a zip tie. If they turn out to be roos, they won't make it into the flock. If they are girls I can judge the color of the egg they produce. I had a second smaller box that held two marans eggs that were a specific pure line.
#4: "Chicken Getter" by Wisher 1000 (Post #5686)

First some background. I experienced a "guinea population explosion" summer-before-last. I built a 12 x 16 open air, covered run to house the guineas and whatever chickens wanted to stay there. The roof is over 12 feet high at the peak and the birds like to sleep in the rafters. All the birds. Even the old, fat, laying hens will make their way all the way to the highest rafters to roost. Within a week of finishing the coop, I needed a way to get then out of the rafters so I found a scrap of wood about 30 inches long and a smaller scrap to nail on top. I called it my "Chicken Gitter." I have used it nearly every day since and have several times intended to make a more presentable version, but this one is functional and always handy. I had a neighbor come over to care for my birds while we were away on vacation and I labled it for her. I wrote "Chicken Getter" on it so she could differentiate it from other scrap wood laying around and because I was afraid she would think I didn't know that "Chicken Gitter" was incorrect! I now have three old hens that will stay in the rafters until I help them down. They stand on the rafter until they see the "Chicken Gitter" in my hand, then they squat and I touch the back of their legs with it. They step back onto the cross piece and I lower them to the ground. Spoiled girls!
#5: Chicken Chores Table by Superchemicalgirl (Post #5723)


This is my "chicken chores" table. It is set up in the garage and I have everything I need right there.
#6: Grow Out Pen by Onawhimfarm (Post #6103)
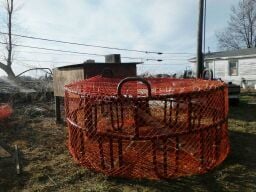
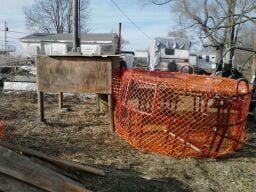
This is my grow out pen. My DH DC and myself built this out of material we found laying around the farm and an old hay ring that we haven't used in years. It is all recycled stuff!! The fencing is all the way around and top and bottom of the hay ring and is orange plastic safety fencing. The coop is 4ft x 4ft and the ring is about a 8 ft circle 4 ft tall.
#7: Lego Divider by Ambrosia (Post #6200)

Ok... this is my official post for entering the Week One contest for my "invention" that helps with my hatch. It is a Lego divider that I use when turning and hatching. Keeps my eggs separated, makes it easier to keep air cells in the big end of the egg, and helps me figure out who hatched from what by keeping the egg shell in the appropriate space ( I have a little diagram I make to match that goes along with at the start of the hatch).
#8: Run Roof Netting by Sueg4332 (Post #6211)


I made nets for the top of my chicken kennels out of bail twine. It takes a lot of twine and time. Was caring for elder mother and had time.. This one was 6 X 12 when finished. you just fold the twine in half , make a loop so you can attach it to your kennel or fence . On chain link you go thur each section. When you get the stings on the fence you just macrama them together. (tie knots) each sting make about 15 or 16 inches of length. just add another row of strings to make another section. I make them on a fence now and hang them over the pen when finished.
#9: Barbecue Brooder by Chick-among-us (Post #6217)


My entry is our brooder Deb rescued this from a local auction house it WAS an outdoor barbecue pit....crazy huh? used to cook em ....now is home for them... it looked nothing like this when we bought it for 20 bucks...it had a bottom brace ,which Deb made the bottom or floor of the brooder ....We decided on a baby nursery theme...and my son picked out the colors, deb designed,modified and closed it in and I decorated and painted it. So here it is our nearly seven foot long baby brooder in some of the pics you can see the GREEN house brooder where they go when they first hatch then at about a week or so they go into the big kid brooder....easy to clean you just scoop out shavings with a dust pan.The light can be lowered or raised for less or more heat and we even change out lights to lower wattage on bulbs for older babies...the little shelves make storing things easy and convenient.
#10: Candler by Debs_flock (Post #6241)

The candler I bought just wasn't bright enough for anything other than a white or light tinted egg. So I went to the store and bought the brightest LED light I could find, 144 lumens. It worked well but was flat so it was difficult to get a seal on the eggshell and not lose most of the light concentration. Also, the edge was quite hard with a sharp edge, so I had to be careful to not bump and crack my egg.
I needed to find a way to make a collar around the end of the light so the egg could fit into a recessed area. Then I thought of this!
#11: Reused Bottle Feeder by Emvickrey (Post #6257)

This starts out as a large empty bottle of bleach. And ends up as a chick feeder and quail feeder. There is little to no waste. I made many attempts to come up with something to stop the quail chicks and adults from wasting so much feed. Now I use it for all chicks and when they get older I don't put the top on. They waste some but not near as much as those jar feeders. No bleach jug goes to waste here. I make a feeder.
#12: Reused Bucket Feeder by Chick-among-us (Post #6321)

This is her less than beautiful but saves a RIDICULOUS amount of money in feed...
problem: head slinging hens while eating causing MUCH food waste ALL over and then they can't find it don't want it whatever....WE cut our feed cost IN HALF with this, if not more... I am not even exaggerating!
Solution: This little gadget! feeder....Easy to make...
1. cat litter bucket...we used this because we had them laying around but turned they have a handle and year later the handle hasnt busted off!,there is a locking lid...it holds ALOT of feed and there are 20 chickens in that pen
2 large tote with med sides....to low they still sling it over to deep its uncomfortable and they wont use it....make the pan only a couple of inches of extra room around the bucket once you set the bucket in the pan since if it is too big they get IN it and poop in the food.
3. drill 1 inch holes.very close to the bottom of the bucket, about 3 on each of the 4 sides of the bucket...
4 screw the bucket into the pan pick up the handle and it can be carried and moved easily!
see all that food in the pan part?? THAT is what they would hae wasted!! so now for chicks we do tha same thing!! no more wasted chick feed either! But for chicks it is scaled down...you take thier regular feeders and place them in a clean CAT PAN on a brick all the wasted food can be recycled back into the feeder and fresh added and you dont loose it anymore!! and your shavings last longer cause the yucky food isnt a factor....IF you still have problems with feed being slung out the side isnt tall enough or you have raised the feeder to high....take out the brick or get a pan with taller sides...chicks have to know where it is! so they know to hop in to eat! Thats it!!

#13: Rooster Dickie by Hillbilly Hen (Post #6653)

It is a "dickie" for a friend's rooster. The hens were always plucking out his neck feathers so my friend asked if I could create something to cover his neck area. This is what I came up with.
#14: Hanging Basket Nest by Karimw (PM)
Probably not unique, but my girls' favorite nest site is the hanging laundry baskets


#15: Pipe Insulation Egg Shipping Wraps by Debs_flock (Post #7262, also 7272 & 7296)

Once again, a piece of foam pipe insulation. It takes two snips of a pair of scissors (the length you want and to open the side), two pieces of papertowel to plug the ends, three pieces of tape and your eggs are ready to pack for shipment. The foam costs about $2 for a six foot length. All eggs can stand the correct orientation and side by side in the box. You can add a little filler between the cylinders if they don't fill the box.