It all started innocently enough. Build a large sturdy run and BUY a small coop to go inside. Simple, right?

So last year I set out to build the run. Our property, although not small at 1/4 acre, is definitely not HUGE. Space was going to be an issue.
The strip of land separating the main part of the back yard and the hillside had previously been a vegetable garden, for like 50years. I decided it was too much space to be all garden and I wanted chickens!
I measured the space, researched designs (mostly here and in books) and decided to build a 6foot square run. Something happened at the hardware store though. The person helping me chose lumber asked "why don't you do an 8foot square instead. That way you won't have to cut all the lumber, just get 8foot lengths". I'm not really sure what I was thinking, or if I was but it sounded like a good idea and off I went.
Got the lumber home and started framing up the run. Once I had it in place realized though I realized it gave me less than 6inches to get past it on 2 sides. No problem, I'll just have my DH move the retaining wall back 2feet. It needs to be replaced anyways!
Here's a VERY good friend digging the hole to bury the chicken wire under the run. Yes we dug an 8x8x1foot hole.
8X8X8 foot run structure with chicken wire floor to be buried. Barely fit in the space! Don't worry that retaining wall did get replaced and moved back!
Bracing installed, doors built and hardware wire ALL around. No varmints were gonna get my girls. Paint and corrugated roof installed. Bought a miniature coop for 3 bantams and put it inside the run. (BTW this little coop is now for sale).
Of course this year when we got 6 full size hens so we had to expand.
Foundation for the new coop started. Dimensions 6x10 feet. Pressure treated 2x4's on the ground with treated 4x4's posts at the corners. Hardware wire installed on the bottom, braced at the corners, then floor framed up with 2x6's at a height of 2 feet off the ground so there's run space underneath. Posts cut flush with the floor height and linoleum stapled down.
This is the only copy of any plans I still have. I was so happy to be done we probably threw them all out. I will post them if I find them.
I think I was working out the roof line angle here, I had to dig hard to remember that Pythagorean theorem from high school. In the end I just held the wood up and marked where to cut it.
Framed up the walls with 2x4's. We sloped the roof line from 5 1/2 feet to 5 feet (left to right). Here's a picture of my son impersonating a chicken. Notice the far right wall is much shorter. It was the first wall framed up by my (shorter) husband who thought 4 feet would be tall enough. Since I would be doing the coop cleaning, and I'm 6 feet tall, I changed the plan on him.
Instead of re-framing the first wall we decide to build up from it and make it a long high window for more ventilation. From here we must have lost the camera as we didn't take any more pics until it was done.
Here's the final coop from the garden side. Notice lots of ventilation on the left wall and above door and nesting boxes. All covered with hardware wire. DH put a little roof piece over the walkway for protection from the rain and sun into those big windows. When winter comes we will add window coverings to keep out the draft, but it really doesn't get too cold where we live.
Door big enough to get into the coop and nesting boxes with old cabinet doors easily accessible from outside.
View of inside with the door open and close up of the nesting boxes. The nesting boxes are roughly 15 inches square to accommodate the "big girls", hopefully it wont become a sleeping box for the bantams. Both sides of the nesting boxes have wood across them with a 2 inch gap at the bottom. Each one has a piece of wood that slides in and out to keep eggs in and allow for litter to be swept out for cleaning.
Nesting boxes from the inside with roosts in front of each one. I may have to build a ladder up to the top ones which are 3 feet off the ground. The lower box is 18inches off the ground so dirty litter is not kicked into them. Notice the hardware wire windows on the upper left. That's the short wall that ended up getting windows put over it. Light colored corrugated roofing for lots of light.
Roosts on the left. The bin under the roost is filled with Sweet PDZ now. This was an important element for me as I wanted to make clean up easier and keep the pine shavings on the coop floor as clean as possible. Door behind the plastic bin makes access from the outside easier. Opening into the chunnel on the right.
A major design dilemma was connecting the run I built last year to the new coop. Our solution was to build what we called the chunnel (chicken tunnel) between the structures. 4 feet high, 4 feet wide at the run side (so it matched up with a center post on the run) and eyeballed into the coop side so the poop door would open. Framed up with 2x4's and covered in hardware wire. We opted for sod under the coop and in the chunnel. The chickens will destroy it in time, but they really like it, it was relatively inexpensive, and it gives the area a nice feeling.
As a "side" project my DH built this walkway and stairs (photo from above on right) to make getting down to the coop easier.
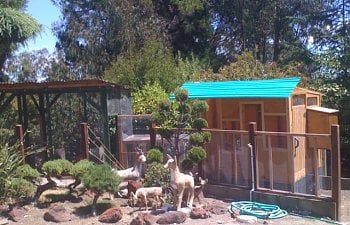
This picture gives a good perspective of the whole set-up. Notice how much space we got next to the run when we moved the retaining wall back. Think I'll hire my DH out as a general cooptractor.
I could post pictures of our set-up all day, but I think you get the idea. The deers are leftover from the previous owner of the property. My hubby wanted to get rid of them, but I think they fit in nicely with the current design. What do you think?
I also have to give a MAJOR shout out to the talent and perseverance of my wonderful husband who continued building through arguments, tearing the cartilage in his knee (hopping off the coop) and losing me as a contributing builder when I hurt my back at work. Neither I nor the chickens can believe its done!! They are rewarding us with lots of yummy eggs now that the noise and commotion is over.
Things I would change:
We are probably going to paint it before winter.
The original plan was to build storage under the nesting boxes for food etc. That may still happen (next summer).
The roofline of the coop and the walkway overhang need to match up (next summer).
We still need to find a plastic bin that more closely fits the area under the roosts. Giving that some thought before building the poop door might have been a good idea.
Things I would do differently "next" time:
Buy a kit and pay someone to build it for me