Another Wine Cellar Incubator
The vision:
To build an almost automatic incubator that was as easy to maintain as it is enjoyable for me & my 4 yo son to watch. I am lazy so I desire as much automation as possible. I could probably go out and buy exactly what I want (maybe even more cost effective to buy one) but building it myself is simply my style.
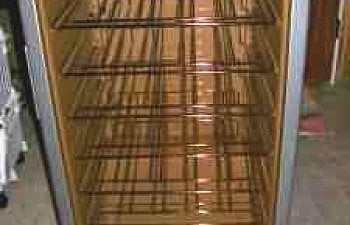
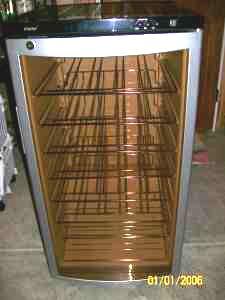
After weeks of searching on local craigslist, I found it... a large wine cooler with a glass door for 45.00. This was the start of the perfect (for us) homemade incubator. I was hoping to find a thermoelectric cooler so that I could modify and use the cooling system for my heating system but, it didn't work out that way. This model ran on freon and was equipped with a compressor just like a refrigerator. This is what it looked like before the conversion began.

Fortunately, the one I found had been damaged and didn't have any freon in it so I didn't have to deal with having the freon reclaimed. I started with removing and discarding the compressor, condenser, and all but one of the racks.
Now for the plan: nothing drawn, I like to 'wing it' as I go
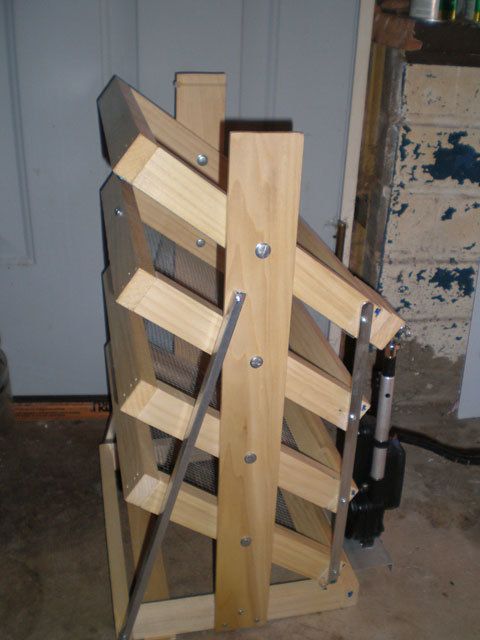
Egg rack - I have some incubator trays that hold 30 chicken eggs each and fit nicely into this cabinet. The plan is to build a rack system that will hold a total of 4 of these trays and pivot to a 45* +/- angle. The entire rack system will sit on one of the shelves about 10 inches off the bottom of the cabinet. I constructed each shelf frame out of poplar 1 x 2 material with a ¼” hardware cloth bottom to allow airflow through each shelf. The four shelves were then attached to a wood frame that allows each shelf to pivot. The frame was reinforced with a couple of aluminum angles and the shelves tied together (so they move together) with aluminum flat stock. A couple coats of clear shellac were applied to the shelves and frame to seal the wood. See picture of rack system below.
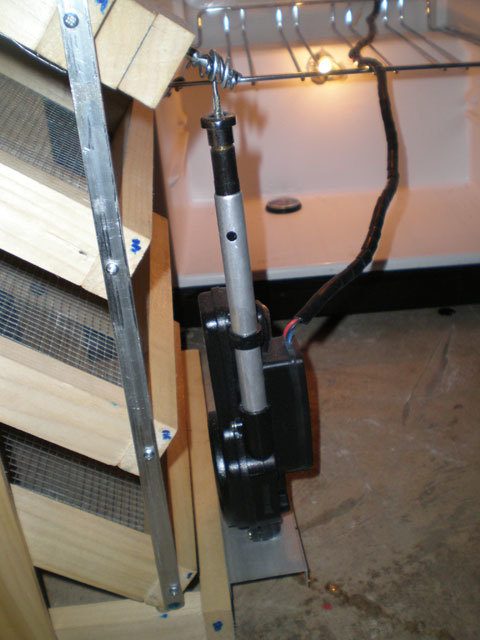
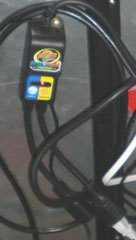
Auto Turner - I've never cared for the turners that are constantly turning. It seems I have better hatch rates with hand turning so I wanted to turn the eggs from one side to the other and let them rest each time. The plan is to use an automatic retracting car antenna to accomplish this. These antennas have a trigger wire that runs the antenna up when voltage is applied and down when voltage is cut to the trigger wire. The on / off cycles of the trigger wire will be controlled by a 12 volt digital clock timer. I purchased a new universal retracting auto antenna and modified it so that it only traveled 12 inches (instead of 40”). To modify the antenna I removed the top nut and found a washer that fit nicely inside. I then drilled the washer out so that only the two smallest sections of the antenna could fit through it. I then extended the antenna and crimped a stop onto the smallest section so that only 4 inches of it could retract. This left me with about 3.5 inches sticking out that I would make a loop out of to attach to the pivoting shelves. The antenna itself was mounted to the frame of the rack system. I decided that the antenna moved to quickly at 12 volts so I stepped the antenna voltage down to 9 volts, which works perfectly. I tucked the 12v transformer under the black plastic top of the cabinet as there was a couple inches to work with and keeps it out of the way. I mounted a couple extra switches in the top front of the cabinet so that I can move the racks to horizontal position and shut off all power to the antenna for easier loading and unloading of the trays. See pictures below.
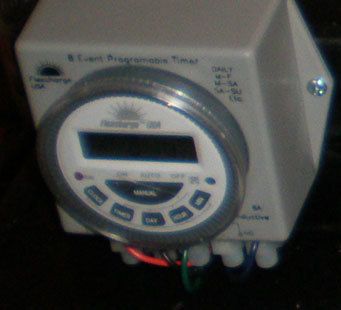
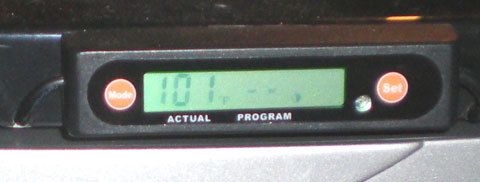
For the timer, I am using a 12v, 7 day, digital programmable timer that is designed for gate and solar applications. Here is a picture of the timer I am using.
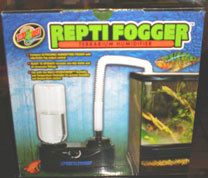
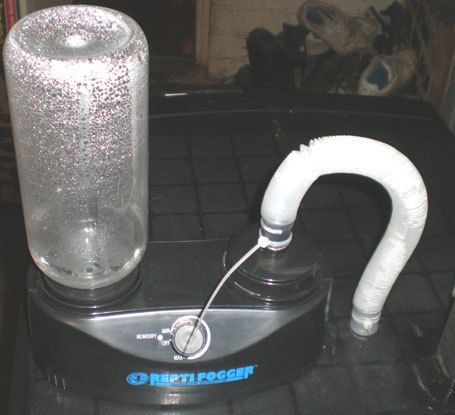
Humidity control - This is one that seems hard to maintain consistently. The plan is to use a reptile fogger machine to add humidity to the air. Best of all, this can be setup outside of the cabinet so I don't have to open it to add water and it doesn’t take up valuable incubator space. The fogger uses an ultrasonic transducer to turn the water into vapor. It also pushes room air into the cabinet with the vapor so there should be no shortage of oxygen. I cut a hole in the top and mounted a PVC fitting to the inside of cabinet and a nipple through the top. The fogger pumps the moist air in through this nipple and allows me to have the entire fogging setup on the outside of the cabinet. The fogger has a 1 liter bottle that I need to make sure I keep water in. Here is a picture of the fogger and where it goes into the cabinet.
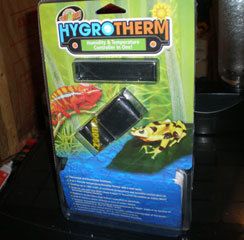
Temp / Humidity control - I found a sweet little device that is recently new to the market that controls both temp and humidity for reptile enclosures. Zoomed's HygroTherm controller will be my solution to controlling heat AND humidity. The only down side I have found to this controller is that it has a 2 degree Fahrenheit temp differential. This means that if you set it for 100 degrees it shuts the heat off at 100 and doesn’t kick back on until 98 degrees. I think it is more me than it being a real problem. The actual temp inside the cabinet is holding within ½ degree which is probably better than any other incubators I’ve had. Still, I would have been happier with a 1 degree differential but I’ll take the 2 with automatic humidity control. I mounted the control panel to the front of the cabinet and the outlets for the fogger and heater ran under the top and out the back of the cabinet. See pictures below.
Air circulation - This will be accomplished with PC fans run off 12 volts. I already have a 12v power source so these are easy. I am using dual CPU fans (30mm I think) for the heating element and another approximately 6 inch fan for circulation. I mounted the circulation fan in the center of the rear wall blowing at the back wall of the cabinet. This makes for a softer air circulation and reduces the chance of cool spots in the cabinet. The cabinet also has several holes (3 – ¾” diameter holes) that have/had wiring and refrigeration lines running through and out the back. These were left open and should allow for more than enough fresh air exchange. See pictures of fans below.

Heating - I found a small 120 volt space heater that had a dual element 500 watt ceramic heating grid... one of the elements runs at 250 watts which should be more than adequate to keep this cabinet at 99.5 degrees. The heating element was mounted just below a pair of CPU fans I had laying around. I had to do some makeshift changes to the mounting of the heater so it is not the prettiest right now. I will make a bracket and change this out sometime in the future. It is perfectly functional the way it is I just don’t like the looks of it being held together with mechanics wire.
Lighting - The wine cooler was equipped with a light but it was in the way of the racks so it was removed. I decided to use some low wattage (2 bulbs @ 6 watts each) 120 volt candelabra base bulbs. I mounted one in the top and rear of the cabinet and one in the bottom that will be just above the hatching tray. I decided to use the factory light switch and existing 120v wiring to hook the lights up. I covered the exposed electrical connections on the new light sockets with silicone to help prevent electrical shock. I also decided to use the factory thermal sensor and LED temp readout just because it was there. I mounted the temp sensor in the bottom so that I can see the temp near the hatching tray.
]Hatching tray - I am left with a bottom space in the incubator that is about 8 inches tall and runs about 2 degrees cooler than the upper portion. Exactly what I had hoped for and perfect for a hatching tray with an acrylic front so that we can see exactly what's happening. No pics of this yet as I haven’t taken the time to nail the tray together.
I now have the perfect lazy man’s incubator and the first batch of test eggs will be going in tomorrow. I have had the incubator running for over a week now and it seems to be holding perfect temp and humidity. I have to fill the 1 liter water bottle for the fogger every other day. The only time I will need to open the door and get in the incubator is to set eggs, candle eggs, or move eggs to the hatching tray. Here are the completed pictures of the front, back, and the control panel.
Total cost of this project, not including the wine cooler, was around $260.00 out of pocket (I had the lumber, hardware cloth, aluminum, PC fans, electrical wire, and 12 volt transformer already). If I had to go out and buy everything, it would be closer to $325.00… plus the cooler.
The vision:
To build an almost automatic incubator that was as easy to maintain as it is enjoyable for me & my 4 yo son to watch. I am lazy so I desire as much automation as possible. I could probably go out and buy exactly what I want (maybe even more cost effective to buy one) but building it myself is simply my style.
After weeks of searching on local craigslist, I found it... a large wine cooler with a glass door for 45.00. This was the start of the perfect (for us) homemade incubator. I was hoping to find a thermoelectric cooler so that I could modify and use the cooling system for my heating system but, it didn't work out that way. This model ran on freon and was equipped with a compressor just like a refrigerator. This is what it looked like before the conversion began.
Fortunately, the one I found had been damaged and didn't have any freon in it so I didn't have to deal with having the freon reclaimed. I started with removing and discarding the compressor, condenser, and all but one of the racks.
Now for the plan: nothing drawn, I like to 'wing it' as I go
Egg rack - I have some incubator trays that hold 30 chicken eggs each and fit nicely into this cabinet. The plan is to build a rack system that will hold a total of 4 of these trays and pivot to a 45* +/- angle. The entire rack system will sit on one of the shelves about 10 inches off the bottom of the cabinet. I constructed each shelf frame out of poplar 1 x 2 material with a ¼” hardware cloth bottom to allow airflow through each shelf. The four shelves were then attached to a wood frame that allows each shelf to pivot. The frame was reinforced with a couple of aluminum angles and the shelves tied together (so they move together) with aluminum flat stock. A couple coats of clear shellac were applied to the shelves and frame to seal the wood. See picture of rack system below.
Auto Turner - I've never cared for the turners that are constantly turning. It seems I have better hatch rates with hand turning so I wanted to turn the eggs from one side to the other and let them rest each time. The plan is to use an automatic retracting car antenna to accomplish this. These antennas have a trigger wire that runs the antenna up when voltage is applied and down when voltage is cut to the trigger wire. The on / off cycles of the trigger wire will be controlled by a 12 volt digital clock timer. I purchased a new universal retracting auto antenna and modified it so that it only traveled 12 inches (instead of 40”). To modify the antenna I removed the top nut and found a washer that fit nicely inside. I then drilled the washer out so that only the two smallest sections of the antenna could fit through it. I then extended the antenna and crimped a stop onto the smallest section so that only 4 inches of it could retract. This left me with about 3.5 inches sticking out that I would make a loop out of to attach to the pivoting shelves. The antenna itself was mounted to the frame of the rack system. I decided that the antenna moved to quickly at 12 volts so I stepped the antenna voltage down to 9 volts, which works perfectly. I tucked the 12v transformer under the black plastic top of the cabinet as there was a couple inches to work with and keeps it out of the way. I mounted a couple extra switches in the top front of the cabinet so that I can move the racks to horizontal position and shut off all power to the antenna for easier loading and unloading of the trays. See pictures below.
For the timer, I am using a 12v, 7 day, digital programmable timer that is designed for gate and solar applications. Here is a picture of the timer I am using.
Humidity control - This is one that seems hard to maintain consistently. The plan is to use a reptile fogger machine to add humidity to the air. Best of all, this can be setup outside of the cabinet so I don't have to open it to add water and it doesn’t take up valuable incubator space. The fogger uses an ultrasonic transducer to turn the water into vapor. It also pushes room air into the cabinet with the vapor so there should be no shortage of oxygen. I cut a hole in the top and mounted a PVC fitting to the inside of cabinet and a nipple through the top. The fogger pumps the moist air in through this nipple and allows me to have the entire fogging setup on the outside of the cabinet. The fogger has a 1 liter bottle that I need to make sure I keep water in. Here is a picture of the fogger and where it goes into the cabinet.
Temp / Humidity control - I found a sweet little device that is recently new to the market that controls both temp and humidity for reptile enclosures. Zoomed's HygroTherm controller will be my solution to controlling heat AND humidity. The only down side I have found to this controller is that it has a 2 degree Fahrenheit temp differential. This means that if you set it for 100 degrees it shuts the heat off at 100 and doesn’t kick back on until 98 degrees. I think it is more me than it being a real problem. The actual temp inside the cabinet is holding within ½ degree which is probably better than any other incubators I’ve had. Still, I would have been happier with a 1 degree differential but I’ll take the 2 with automatic humidity control. I mounted the control panel to the front of the cabinet and the outlets for the fogger and heater ran under the top and out the back of the cabinet. See pictures below.
Air circulation - This will be accomplished with PC fans run off 12 volts. I already have a 12v power source so these are easy. I am using dual CPU fans (30mm I think) for the heating element and another approximately 6 inch fan for circulation. I mounted the circulation fan in the center of the rear wall blowing at the back wall of the cabinet. This makes for a softer air circulation and reduces the chance of cool spots in the cabinet. The cabinet also has several holes (3 – ¾” diameter holes) that have/had wiring and refrigeration lines running through and out the back. These were left open and should allow for more than enough fresh air exchange. See pictures of fans below.

Heating - I found a small 120 volt space heater that had a dual element 500 watt ceramic heating grid... one of the elements runs at 250 watts which should be more than adequate to keep this cabinet at 99.5 degrees. The heating element was mounted just below a pair of CPU fans I had laying around. I had to do some makeshift changes to the mounting of the heater so it is not the prettiest right now. I will make a bracket and change this out sometime in the future. It is perfectly functional the way it is I just don’t like the looks of it being held together with mechanics wire.


Lighting - The wine cooler was equipped with a light but it was in the way of the racks so it was removed. I decided to use some low wattage (2 bulbs @ 6 watts each) 120 volt candelabra base bulbs. I mounted one in the top and rear of the cabinet and one in the bottom that will be just above the hatching tray. I decided to use the factory light switch and existing 120v wiring to hook the lights up. I covered the exposed electrical connections on the new light sockets with silicone to help prevent electrical shock. I also decided to use the factory thermal sensor and LED temp readout just because it was there. I mounted the temp sensor in the bottom so that I can see the temp near the hatching tray.
]Hatching tray - I am left with a bottom space in the incubator that is about 8 inches tall and runs about 2 degrees cooler than the upper portion. Exactly what I had hoped for and perfect for a hatching tray with an acrylic front so that we can see exactly what's happening. No pics of this yet as I haven’t taken the time to nail the tray together.

I now have the perfect lazy man’s incubator and the first batch of test eggs will be going in tomorrow. I have had the incubator running for over a week now and it seems to be holding perfect temp and humidity. I have to fill the 1 liter water bottle for the fogger every other day. The only time I will need to open the door and get in the incubator is to set eggs, candle eggs, or move eggs to the hatching tray. Here are the completed pictures of the front, back, and the control panel.


Total cost of this project, not including the wine cooler, was around $260.00 out of pocket (I had the lumber, hardware cloth, aluminum, PC fans, electrical wire, and 12 volt transformer already). If I had to go out and buy everything, it would be closer to $325.00… plus the cooler.