We purchased our three chicks before we thought too much about the coop and we thought we had plenty of time to build a small coop. They grew so darn fast that we started with a premade coop and then built the runs. We decided on "The Parlor Chicken Coop" from www.chickensaloon.com and ordered it online. It is made for about 4 hens, approximately 30 x 26 in dimensions not including the nesting box. It arrived fairly quickly and we set it up on our back porch. We have raccoons and hawks in our neighborhood, so thought we better re-enforce it somewhat and also used marine grade polyurethane on both the inside and outside for cleaning purposes. We put "L" brackets on all four corners and there were only two locks on the roof which lifted off and we felt the raccoon could easily lift up one side and slide in to eat the hens. The nesting box area and floor of the coop did not screw down either, so we took care of that. Our area for our hens was on a little bit of a slope so the coop we made level using mailbox post setters and then let the coop run be on a slant. Our one dachshund was very interested in the building process.
The 4x8 wide x4 high coop run has welded hardware mesh on sides and top. The bottom has a different welded fencing and extends about 10 inches beyond the bottom sides and runs underneath the coop. We felt the raccoons would have to work really hard to dig up under the 10 inches and then the fencing underneath would keep them from getting anywhere. We used this same fencing on the yard tractor run which you will see later. This way the chickens can scratch around a bit in the dirt. I used treated 2x4 and 2x2 with galvanized screws to construct this run and the yard run. Essentially a simple box structure.
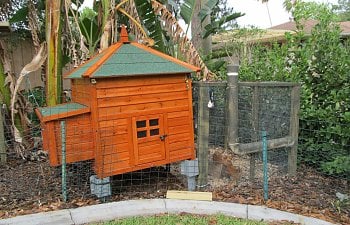
Then we attached the coop to the coop run
Because the coop was level and the run was on somewhat of an angle, we had to cut a 2x2 on an angle (like a door stop) and put fender washers through the coop to the inside of the run. We pounded a 2x2 into the ground to keep the door ramp up off the floor of the coop because we thought it would be better for the ramp not to be a conduit to all the bugs crawling around. We put a nice piece of split oak firewood for the hens to hop up on and onto the ramp to get in the coop. I also sprayed camouflage paint so that the run would blend into the viburnum hedge I had planted around my yard. The 4" PVC is attached to the coop run with cable ties and chicken nipple waterers fed through the wire wall into the inside of the coop run. Chicken nipple waters I purchased from Avian Aquamiser, they are really remarkable. Took the chickens about 1 hour to figure it out and NO messy water to deal with anymore! The PVC cap lifts off - we put 3 small stainless steel screws to keep the cap of the PVC up for ease of filling the water pipe. We put a small drill hole in the middle of the cap so that there is enough air to let the water go out the nipples. I can stand outside the run and fill the water pipe every morning. I fill it with ice so that the hens have cool water to drink during the day. I am thinking about putting some insulation around the water pipe to keep the water cooler. Here is a close up of the 2x2 angle where the coop meets the run and the door set-up:
We do not close this door/ramp at night, but did install a rope so that we could if we needed to later on.
Here are some of the locks that we have on our coop.
The above were the locks that came with the coop and really are very ingenious, but we could not find them anywhere so went with the standard locks that have the loop to put a keyed lock through. I put oil in all of keyed locks so they would not rust. I use a larger thumb combo lock on the main door of the run just because then I do not have to bother with the lock to feed the hens. I read all about raccoons getting into different kinds of carbiners, slide latches, etc. and wanted to be sure they could not open my doors. I already had a three foot fence separating my yard and back chain link fence behind the coop area, so we left that in case we wanted to confine the hens to the hedge area insead of roaming in the yard. That is the green fencing you see. Here is a picture of the opposite side of the coop run with the door opening and PVC feeders. We used 2" PVC for the feeders and did not glue all of them together so we could take them apart and wash them. The feeders are on the inside of the door so that they sit underneath the tarp that covers the top of the coop run keeping the food dry. We angled the cut out part of the feeder too so that splashing rain didn't make its way into the food. We use crumbles and it falls easily down the PVC pipes. It holds enough for about 2-3 days if they are not let out into the backyard to free range. The caps are also held up by stainless small screws so the cap does not fit on too tight to get it off to fill the tubes. I had to put a ribbon on the lock because if I went inside, the door would shut and I would be locked inside! We live in Florida and the summer is the rainy season. We had so much rain this summer that the hens were getting drenched every day. We decided to put the tarps on so that it kept them shady and also kept the rain off the coop run.
The viburnum hedge behind the run keeps the hens cool also. We put a fan underneath a garbage lid to blow extra air in the run for extra cooling. We use the deep litter method and the floor is two bags of large pine bark mulch (untreated), a bale of pine wood shavings, oak leaves, and two bags of top soil. They scratch around in that all day moving their droppings with the litter. Because of the tarps on top of the run this area does not get very wet and there is consistently NO smell with their run. No picking up droppings every day, etc. I plan on pulling it out with a garden rake twice a year to compost for my garden.
Here is a close-up of the nipple waterers. We used clear nylon tubing and small hose clamps to attach the nipples to the tubing. They come through the hardware mesh about 4 inches and the hens drink from here. They are drinking about a half gallon of water or so a day from here. I go in the run occasionally to make sure they are all working properly. Since I use ice to fill the 4" PVC drinking tube, it is filtered through my refrigerator so does not get any mineral buildup that some people have problems with at all. Don't have to worry about freezing either here in central Florida!
Here is the other side of the coop. My husband recycled a computer fan and installed it in the window of the coop to keep it cooler. The window has a door for the winter colder weather and it came with hardware mesh already for the warmer weather. The roof of the coop comes off so you can wash and get into the coop. We put electric in the ceiling of the roof, that is why you see the cord going up to the roof vent at the top of the cuppola. That runs both the fan, nightlight and baby monitor. The banana trees also keep the run cool.
There was not hardware mesh at the roof vent openings, so we added some just to be on the safe side from the raccoons. Because it is so hot here in the summer, we added the baby monitor which monitors the temperature and the noise activity of the coop. We wanted an LED nightlight which came on automatically with night and day and we finally found one that had the right amount of light. Too much and they were awake all night, too little and they would not move if threatened.
This coop came with two nesting boxes which you access from the outside with the great lock, easy to open and use. There were two roosts both on the bottom of the coop, we raised one up higher. Also, we started having mosquitos in the coop and so cable tied some fiberglass screening to the window and made some coverings for the doors which you will see next. I use hay for the nesting boxes and newspaper covered with pine shavings for the floor. I access this through the side door and change this out as needed about once a week. Since the hens have decided to sleep in the nesting boxes, I have ordered a bakery display plastic tray 9" x 26" to slide it under the roost and nesting box area because this seems to be the area for most droppings to accumulate.
The side door opens into our backyard. I made a little ladder for the girls to get in and out of the coop. They put themselves to bed at night after free ranging for a couple of hours every evening. You can see the mosquito screen I put in their doorways. There are two layers of fiberglass pliable mesh window screening that I overlapped and cut in two inch sections. I cable tied a stainless steel washer to the bottom for weight so that they would fall back in place after hens went through the door. It took quite a few grapes, but the hens figured it out and now go out and in without any fear. I have not found ANY mosquitos in their coop at all since I installed the screening. This door is closed after they go in for the night.
Now onto the yard run........Because of the hawks, I made a tractor run that would fit with the coop, have its own ladder integrated into the coop, feed and water accessed from both inside and outside the run in case they were free ranging and wanted food and water, and protection from the hawks. We built the canvas part from plasticized canvas drop cloth and 1" PVC which we bent and put in 45 degree angle PVC which we screwed on the side of the 2x2's to create the rain and shade roof. It also protects the feed from getting wet from rain. It does not have a floor because they do not stay in this at night. The original wheels were too small and we had to go to bigger wheels 9" because it was too hard to pull through the grass. It is 4x7 and 2 feet high.
Here is a close up of the ramp and how it works with the coop. I open the side door of the coop and fold that door back. Like a drawbridge, the yard run has its own ladder ramp that is hinged. They walk down the ladder, I pull up on a rope and close it up and push the yard run to where I want them to be for the afternoon.
Here is one of the hens drinking from the yard run nipple waterer.
Originally, we had velcroed the plastic canvas dropcloth to the PVC and it pulled off. I used cable ties to keep it to the PVC. Probably needs to have a pocket sewn and then slide the PVC through like a curtain to be perfect. The green aviation cloth on the top added little weight to the yard run but enough to keep out the hawks. I had to redo the hinges on the gate/ladder ramp because it was down on the grass and I pulled on the run and bent the hinges. So, I decided to keep it up off the grass by shortening the rope and the hens hop up and down and if I move it, there is no tension on the hinges.
And finally,
the end result, gold plated eggs!

Several things I would do differently if I had to do over again:
1. I would make the coop run tall enough for me to stand in.
2. Bought a coop that had a pull out dropping tray.
3. Built a fan into the run area, project for next summer!
4. Bought chicks a long time ago if I knew it was going to be this easy to have my own eggs.
Happy Chickens!