I decided this year to get chickens since our county finally changed the code last year to allow them in non-agricultural zones areas. From reading all the helpful information on Backyardchickens.com and other resources, I decided to build this spring and summer with the chicks coming in August. Since it took me a little bit to talk my DH into this and I would need his help, I wanted to make sure we would have plenty of time to build. I'm basing our coop on the Wichita Cabin Coop but will be enlarged to 6x12 for 6 chicks.
The first hurdle was picking a spot. Our back yard is large and fenced but there is not a level spot on it! I decided to build the foundation out of concrete blocks and pavers. Digging in the red clay in Georgia was the hardest part. Instead of using mortar, I used Gorilla glue on the blocks. Found a You Tube video about it.

I also made a PVC drainage system in case of heavy rains blowing in the coop. Under the PVC, I lined with hardware cloth before adding a pickup truck load of gravel.
This is when my DH got involved. He build the base after I pre-painted every board. The painting is going to consume most of my time as I decided to match our house and separate garage. I have to prime everything first then paint. Very boring work but I don't want to have to do it again for a long time.
After painting the concrete block, I put landscape fabric and pine straw down around the perimeter to keep red mud from splashing up on it when it rains. Later, I'll be adding river rock around the perimeter when finished.
The framing went pretty fast after that.
We started installing the OSB sheathing on the roof on 6/7.
Spent most of the day priming the ship lap board we bought from Lowe's for the coop siding.
We used 1/2 inch roof sheathing 4x8 sheets and 30lb felt paper.
Our funny dogs are out there with us every time.
Decide on river sand for the base and since the sides of the coop aren't up yet, took advantage of my dump cart to haul it in.
My DH has taken vacation for aweek so we can work on the coop. As of 6/16/2014, we completed the framing, installed the metal roofing and started on the hardware cloth.
On 6/17/2014, we made a lot of profess: two siding walls, the coop floor and vinyl for the floor. I realized after we finished for the day, we forgot about the window on one of the siding walls. Will correct that tomorrow.
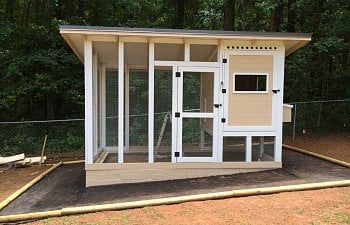
On 6/29/2014, we finished all the big stuff. Since it is summer, we'll make the glass windows in the next few months. We won't need them for a while. Next to do is make the ramp, hang feeders and eventually add wiring.
Added some decorative touches with the first chickens
Completed a brooder too with scraps from the coop. Chicks will arrive the week of July 21st! Can't wait.
UPDATE 08/02/2014: Chicks are here and growing fast! We decided to go ahead with wiring the coop since it will be a lot easier and cleaner before we move the chicks to the coop.
We have a garage that is only 30 feet from the edge of the coop so we installed a 20 amp exterior GFCI outlet to it. Built a 60 ft extension cord out of 12/3 cording with 20 amp plugs. Our ground is so hard so this is why we didn't just bury a line and I wasn't having my yard torn up!
On the outside of the coop, we installed an exterior male 20 amp outlet where the extension cord plugs in. It is Marine grade so it weatherproof.
For the wiring, we used 12/2 aluminum clad wire. We installed one 20 amp outlet box and a pull chain light fixture on the inside of the coop and in the run.
We also finally came up with how we wanted to install the poop board and two perches. I love how it turned out. The remove very easily. You can also see the board we built to retain the sand we are going to put in the bottom of the coop.