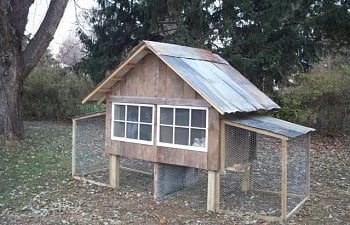
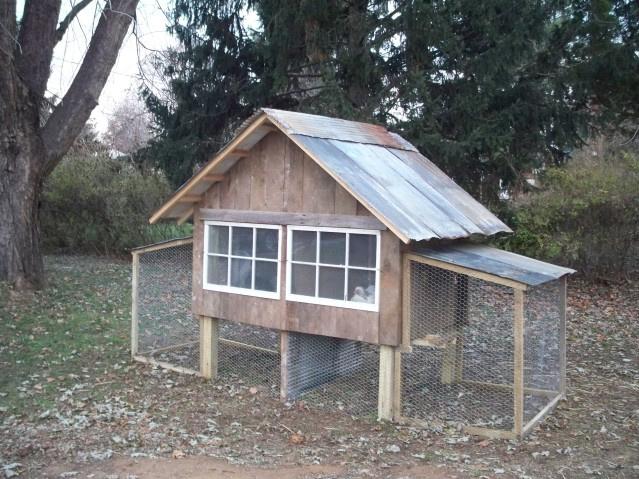
[FONT=georgia,palatino]Our Cochin Duplex consists of two 3x5 ft. coops with 5x6 ft. runs attached to the side. It is elevated to allow more scratching room underneath. It is a good size for breeding pairs or trios. Small doors in the runs allow for alternating free ranging. Each side has an auto feeder and two bantam-sized nesting boxes. Barn style doors in the back give easy access for egg collecting, feeding, and cleaning.

I love it when Rusty makes my drawings come to life. If you are in the market for a coop in the MD VA WV PA area, please check out our site, http://designercoops.blogspot.com/ which has all of our models, prices, available upgrades and delivery options.
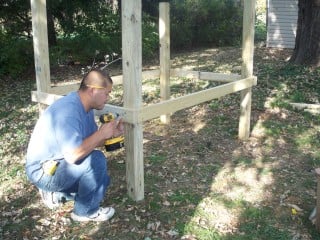
We used 4x4 pressure-treated posts to support the structure. We cut two 2x4's 6ft. long and screwed them to the face of the 4x4's 2ft. from the bottom. This gives us our length and height.
We then cut two more 2x4's 5 ft. long to give us the width of the coop. Now our structure is already solid.
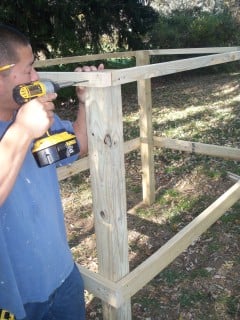
Next, we braced the top with 2x2's (2x4 ripped in half on table saw)
We added floor joists in between the 2x4 base which started to look a lot like a bed frame. We took into account the thickness of our flooring material, 1/2" plywood, so we screwed in the joists 1/2" from the top. This is because we wanted to be able to sweep out debris easily with a broom.
Here is a view of the under side of the floor.
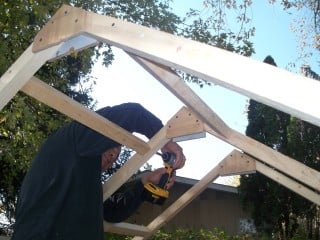
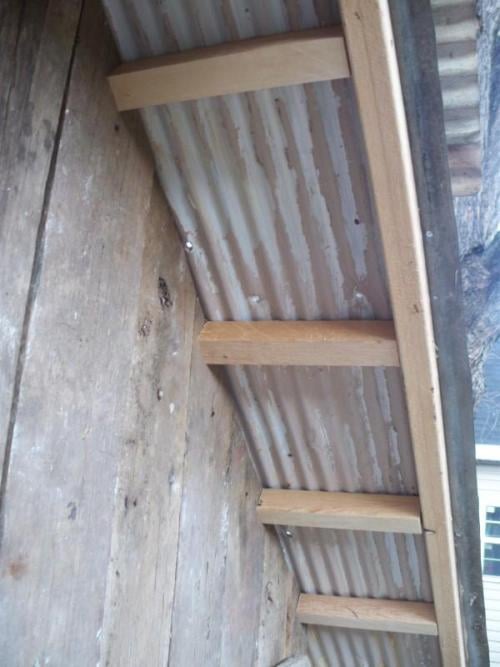
We learned from looking at the trusses inside our shed how to make a super sturdy roof. Just miter your ends to your desired angle. We like a 35 degree so we cut out 4 pairs of 2x2 boards with plenty of overhang. (The more overhang, the better. I think it gives the old-fashioned look) Then we cut out scraps of the plywood to the shape of the angle, then screwed in four screws. We did this on each side and they were strong enough to support Rusty climbing all over the roof .
He added 2x2's bracing supports to the bottom of the trusses as well. We screwed these boards to the truss then down onto the frame for stability. Make sure these boards are cut flush with the building as to not inhibit the roofing material when you get there. We also blocked in between the trusses on the bottom to eliminate any open space once the roof is added.
Rus blocked inbetween the trusses for added support with 2x2's. We stagger the blocking material to allow for screws to be drilled in from the sides.
We screwed a 2x4 in the center and framed out the rough opening for windows wth 2x2. We used whatever scrap material to separate the living quarters. Rusty then stapled on the hardward cloth.
Now for the siding! We nailed on a 2x2 guide to assure the boards would all be even around the window opening. Then we screwed in our relcaimed barnwood siding") LUV IT!! Using the same angle as the trusses, we mitered the boards to follow our roof line.
LUV IT!! Using the same angle as the trusses, we mitered the boards to follow our roof line.
We screwed 2x2's that were 10 inches long to the face and rear of our building. We used two 3 inch screws in each one for strength. We added one more truss to the front and back and screwed those into the 10 inch boards. This will give an attractive overhang.
We scored some reclaimed corrugated roofing as well. I hate cutting metal so we cut just what we had to. We cut the length to fit then just overlapped it evenly. I like the length to be at least an inch past the wooden truss to prevent water from dripping on any exposed wood. We then screwed down one long sheet on the very top and folded it over both sides. Lasty, we go over the metal with silicone to seal any holes.
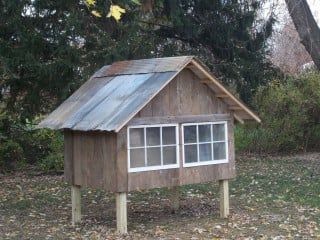
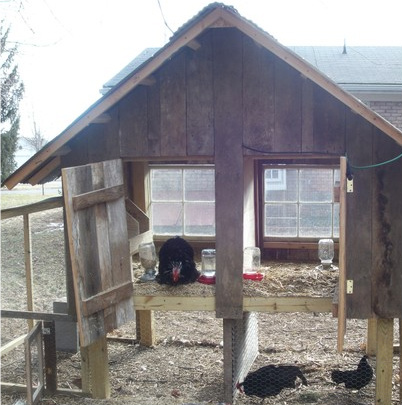
Here's a pic of the finished coop without the runs attached.
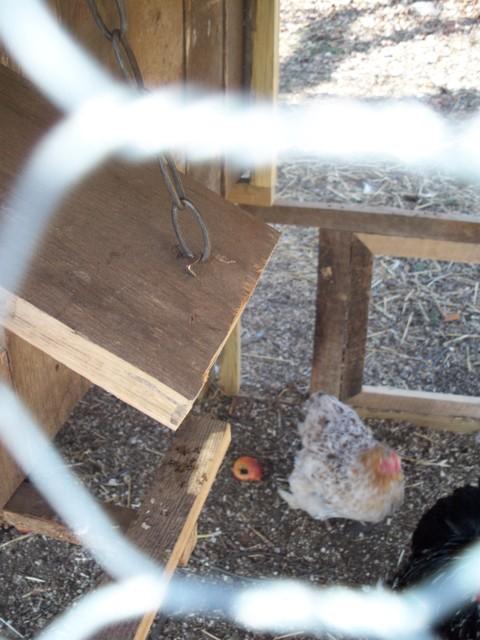
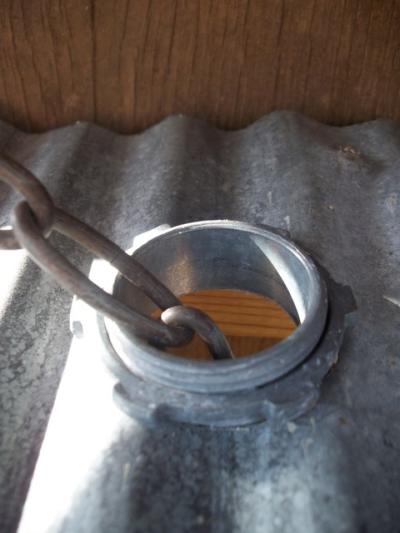
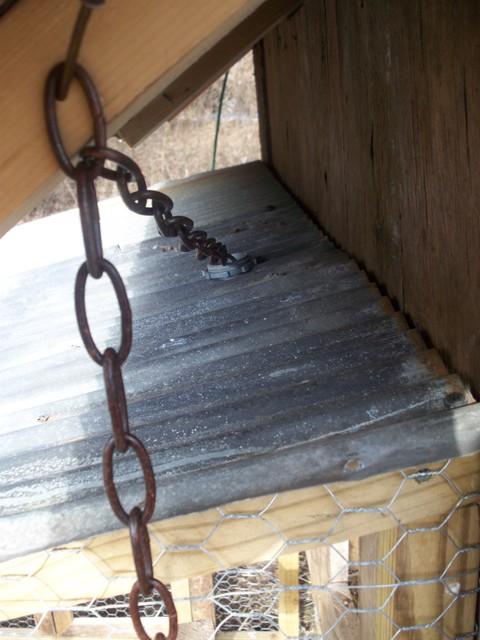
Chicken doors were added on the sides. Opening and closing the traps from the outside took a bit of creative thinking. Hubby came up with this idea which is idea which turned out to work great. We cut out a peice of barnwood that would allow the chickens to fit through comfortably (about 12" high by 7" wide) we attached the top back on with a hinge and attached an eye hook so that it could be pulled up and dropped back down. We attached some chain to the hook and cut a hole in the galvanized roof and installed a galvanized "romex connector" (electrical supply) so that the chain could be pulled through easily. We then just bent a nail on the wooden frame of the coop to hold the trap door open. We added a little landing underneath so the birdies could jump and down.
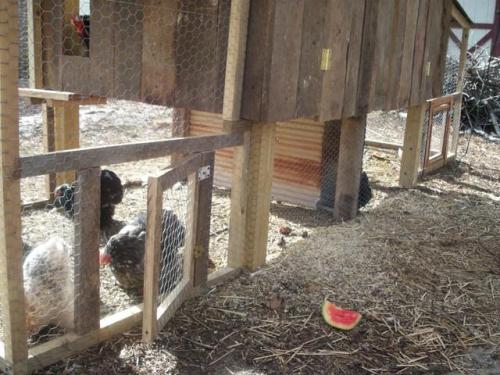
We put in little doors on the runs so the trios could have separate free-ranging time.
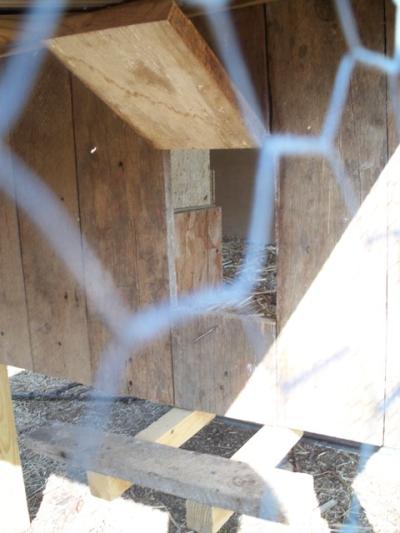
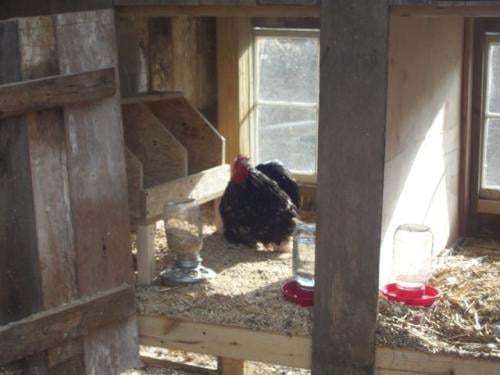
Here's a pic of the back of the coop and of the nesting boxes.
We assembled the barn doors and just affixed them with these horizontal boards and screwed them in. We attached them to the frame with hinges. The green cord coming from the coop is only temporary... it's hooked up to two heat lights for a little heat during these cold months.[/FONT]
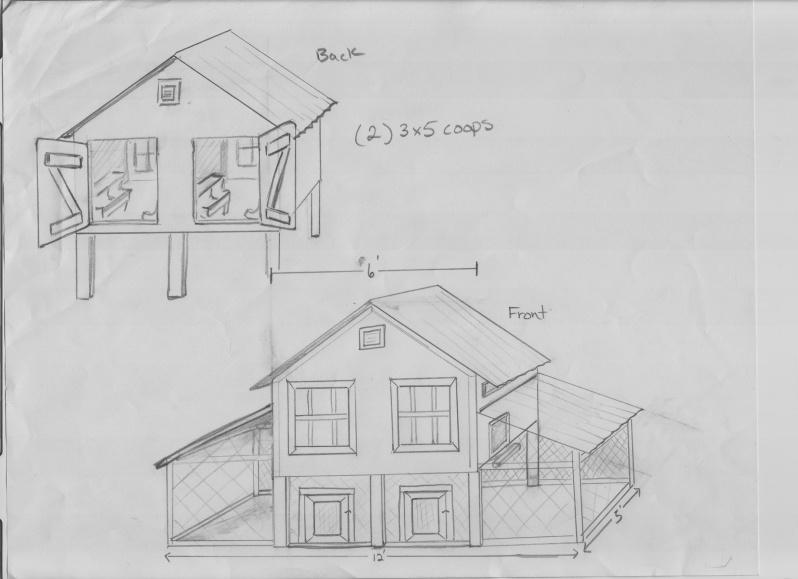
I love it when Rusty makes my drawings come to life. If you are in the market for a coop in the MD VA WV PA area, please check out our site, http://designercoops.blogspot.com/ which has all of our models, prices, available upgrades and delivery options.
We used 4x4 pressure-treated posts to support the structure. We cut two 2x4's 6ft. long and screwed them to the face of the 4x4's 2ft. from the bottom. This gives us our length and height.
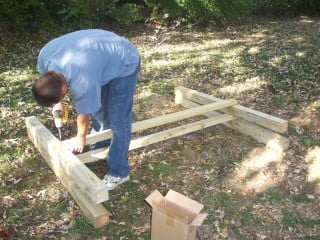
We then cut two more 2x4's 5 ft. long to give us the width of the coop. Now our structure is already solid.
Next, we braced the top with 2x2's (2x4 ripped in half on table saw)

We added floor joists in between the 2x4 base which started to look a lot like a bed frame. We took into account the thickness of our flooring material, 1/2" plywood, so we screwed in the joists 1/2" from the top. This is because we wanted to be able to sweep out debris easily with a broom.

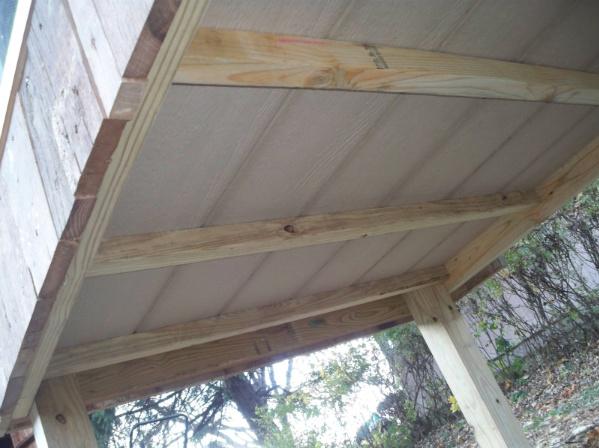
Here is a view of the under side of the floor.
We learned from looking at the trusses inside our shed how to make a super sturdy roof. Just miter your ends to your desired angle. We like a 35 degree so we cut out 4 pairs of 2x2 boards with plenty of overhang. (The more overhang, the better. I think it gives the old-fashioned look) Then we cut out scraps of the plywood to the shape of the angle, then screwed in four screws. We did this on each side and they were strong enough to support Rusty climbing all over the roof .
He added 2x2's bracing supports to the bottom of the trusses as well. We screwed these boards to the truss then down onto the frame for stability. Make sure these boards are cut flush with the building as to not inhibit the roofing material when you get there. We also blocked in between the trusses on the bottom to eliminate any open space once the roof is added.
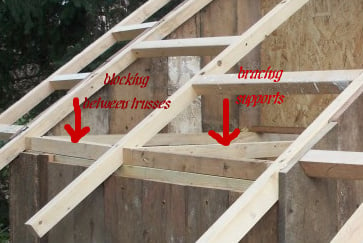
Rus blocked inbetween the trusses for added support with 2x2's. We stagger the blocking material to allow for screws to be drilled in from the sides.
We screwed a 2x4 in the center and framed out the rough opening for windows wth 2x2. We used whatever scrap material to separate the living quarters. Rusty then stapled on the hardward cloth.
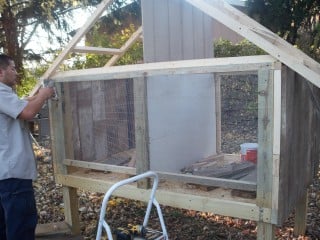
Now for the siding! We nailed on a 2x2 guide to assure the boards would all be even around the window opening. Then we screwed in our relcaimed barnwood siding
LUV IT!! Using the same angle as the trusses, we mitered the boards to follow our roof line.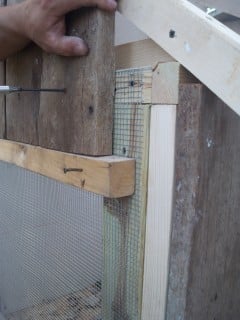
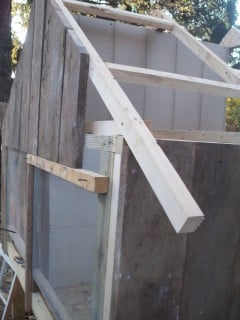
We screwed 2x2's that were 10 inches long to the face and rear of our building. We used two 3 inch screws in each one for strength. We added one more truss to the front and back and screwed those into the 10 inch boards. This will give an attractive overhang.

We scored some reclaimed corrugated roofing as well. I hate cutting metal so we cut just what we had to. We cut the length to fit then just overlapped it evenly. I like the length to be at least an inch past the wooden truss to prevent water from dripping on any exposed wood. We then screwed down one long sheet on the very top and folded it over both sides. Lasty, we go over the metal with silicone to seal any holes.
Here's a pic of the finished coop without the runs attached.

Chicken doors were added on the sides. Opening and closing the traps from the outside took a bit of creative thinking. Hubby came up with this idea which is idea which turned out to work great. We cut out a peice of barnwood that would allow the chickens to fit through comfortably (about 12" high by 7" wide) we attached the top back on with a hinge and attached an eye hook so that it could be pulled up and dropped back down. We attached some chain to the hook and cut a hole in the galvanized roof and installed a galvanized "romex connector" (electrical supply) so that the chain could be pulled through easily. We then just bent a nail on the wooden frame of the coop to hold the trap door open. We added a little landing underneath so the birdies could jump and down.
We put in little doors on the runs so the trios could have separate free-ranging time.
Here's a pic of the back of the coop and of the nesting boxes.
We assembled the barn doors and just affixed them with these horizontal boards and screwed them in. We attached them to the frame with hinges. The green cord coming from the coop is only temporary... it's hooked up to two heat lights for a little heat during these cold months.[/FONT]