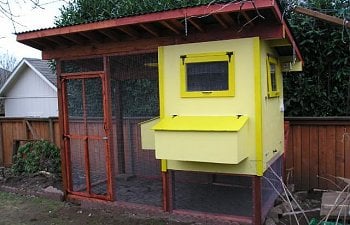
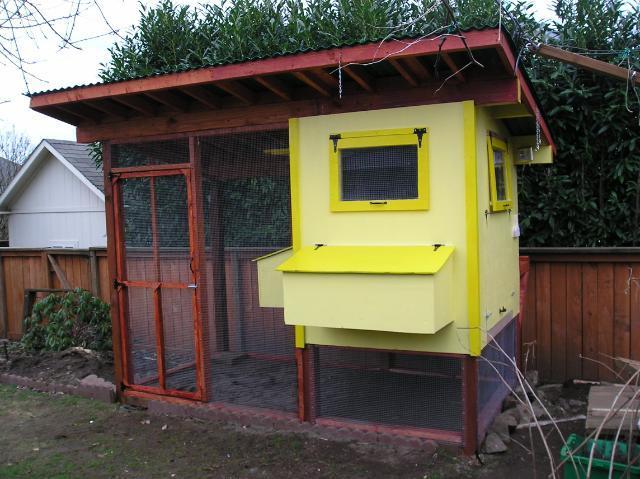
The Chicken McMansion
My wife and I have talked for years about raising chickens but never really thought about it seriously until late last year. I did some research online and arrived at BYC pretty quickly and found the single best informational resource I have ever used on the internet. I lurked for quite a while here and the reading I did convinced me that we could in fact raise chickens successfully in our backyard.
We live in the Pacific Northwest in Southwest Washington, on the edge of the Columbia River Gorge. It is beautiful out here but we do get some very brisk winds year round out of the Gorge. My first coop design criteria was to be able to withstand those high winds.
We live in town but have plenty of wildlife around, from bald eagles, hawks, owls and other raptors; to 'possoms and even urbanized (not domesticated...) coyotes as well as a whole herd of neighborhood cats that all think they really own the place (No, you can NOT haz cheekan...!!).
I did my homework and checked with the City to see what the regulations concerning chickens was, and luckily there has been a chicken ordinance in effect here for several years. We are permitted to have up to five laying hens with no roosters allowed. The City does not charge anything for this, unlike some other towns over in Oregon who have enacted an annual "Chicken license".
I started by getting a large pad of graph paper that is lined off in 1" squares, and sublined in 1/4" squares. It is very handy stuff for drawing and designing projects like this one and the lines are an enormous help with keeping things square and understandable.
I have put up several threads here at BYC that detail the construction of this project. I have dozens of construction fotos and commentary at these threads:
Building a Foundation for the Chicken McMansion (Part 1)
A wind-tested roof for the Chicken McMansion (Part 2)
Building the Chicken Mcmansion (Part 3)
Nesting Boxes for the Chicken McMansion (Part 4)
Windows for the Chicken McMansion (Part 5)
Roosts for the Chicken McMansion (Part 6)
Rainwater Collection System for the Chicken McMansion (Part 7)
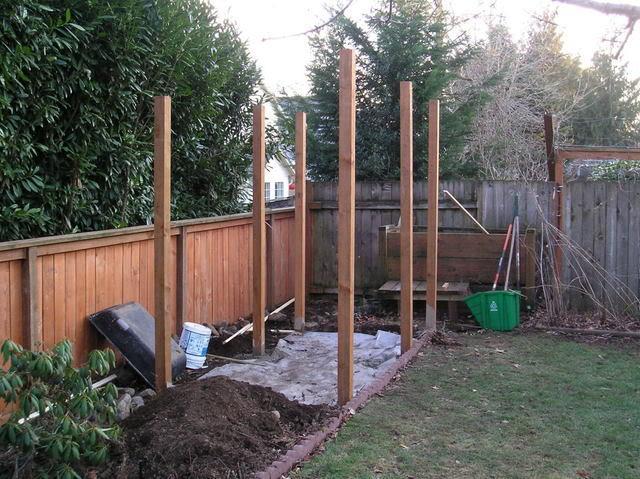
The site is located four feet from the front of my compost bin and the back is three feet off of the centerline of the back fence. I laid out the locations of the posts holes and dug holes about 2 feed deep into undisturbed soil. I took 10' treated posts, studded the bottom sides with a few galvanized nails for the concrete to grab, then fixed them in place with sackcrete. I covered the middle of the excavation with ground cover cloth to prevent weeds from infiltrating and to allow water to flow freely.

I began the run base by leveling and installing pressure treated 4x4 lumber along the front edge of the run. I leveled everything from that, and built a solid frame around the perimeter of the foundation. The back is 2 4x4s high, and to get the same level I had to add gravel and tamp down the area below where the timbers would go. Once I had a level, I mounted the timbers to the upright posts with 3" construction screws and made sure they were filled underneath. I added a hardware cloth apron around the perimeter, secured it to the lower timber and then drove landscape spikes through holes in the timber, through the hardware cloth and into the ground.
I then filled the bottom of the pan with about 28 cubic feet of red volcanic rock, which is readily available out here. It is light in weight and will provide excellent support for a sand bed, and will drain very well.
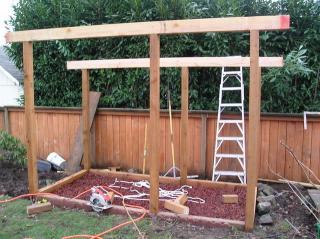
I pre-drilled and countersunk three holes in a pair of 12' long green Douglas Fir timbers, mounted them atop the posts, then drove 8" long x 3/8" diameter lag screws down into the top of the posts with my air impact gun. It was impressive how rigid the entire assembly became as those bolts tightened up. This is an extremely strong construction and since none of the roof wood is in contact with the ground, treated lumber is not required, although final sealing of the wood will be.
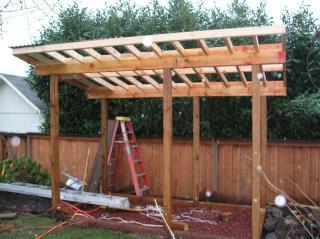
The roof framing itseslf was fairly simple to install. I cut "birdsmouths" on all of the 2x4 joists, pinned them to the beams with 2" galvanized wire nails on 12" centers and spaced them with cut 2x4 spacers. I then anchored everything to the main beams with construction screws. I then capped the front and back with 12' 2x4 lumber, and proceeded with roofing. I chose a dark green foamed polycarbonate roofing because I believe it will be quieter in the rain than metal roofing would be. The panels are attached with special support brackets underneath and screwed down with shouldered, gasketed 2" galvanized screws. The inherent safety of this roof is that in any wind strong enough to do damage, the polycarbonate roofing would fail long before the roof structure would.