How To Build A
4 x 4 x 8 Brood Pen

4 x 4 x 8 Brood Pen
Recently I needed a new brood pen for some of my American Game Bantams & thought I would share how I build it. The requirenment is that it has to house a trio of chickens & provide a safe place for them to produce fertile eggs for my Dickey incubator. It must also provide protection from bad weather and must be easy to build using standard hand tools and be cost effective. To build this pen the way I did, using all new material purchased at Lowes, you'll spend about $75 (give or take) but while explaining how I built mine I'll point out ways that you can save money and not spend so much.
For materials you'll need 3 2x4x8's that are treated, 10 regular 2x4x8 studs, 2 sheets of 3/8 inch plywood, 3 six foot long sheets of barn tin for the roof, a roll of 48 inch wide chicken wire, 1 box of 2.5 inch decking screws, 1 box of 1.5 inch decking screws, 1 box of poultry wire staples, 2 three inch hinges, and a spring loaded door latch. Now if you want to save some money you can use nails rather than decking screws, I'd rather use screws myself. For tools you'll need a drill with a small drill bit and cross tip screw bit (unless you use nails, then you won't need the screw bit), a skill saw, a hammer, a speed square, and a pencil. So, let's get started.
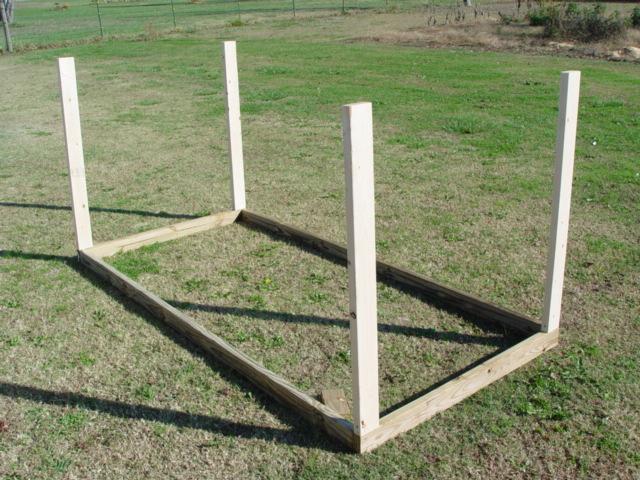
Start by cutting one of your treated 2 x 4's in half, on both ends of both boards use the drill and drill bit to drill pilot holes for the screws that you will use to build the rectangle as shown in the photo on the left above. The long boards are your other two treated 2 x 4 x 8's. Once you have this rectangle laid out and screwed together use your square to check all the inside corners & shift the boards to make the rectangle square.
Remember that any time you're going to put a nail or a screw into the end of a 2 x 4 it is always best to drill a pilot hole first in order to not split the wood. Many of the attachment points require that the screws/nails be toenailed in, with the pilot hole the ends of the boards will split for sure! Use 2 of your 2 x 4 studs & cut 4 lengths that are 44 1/2 inches long. Attach these studs to the base as shown in the photo on the right above.
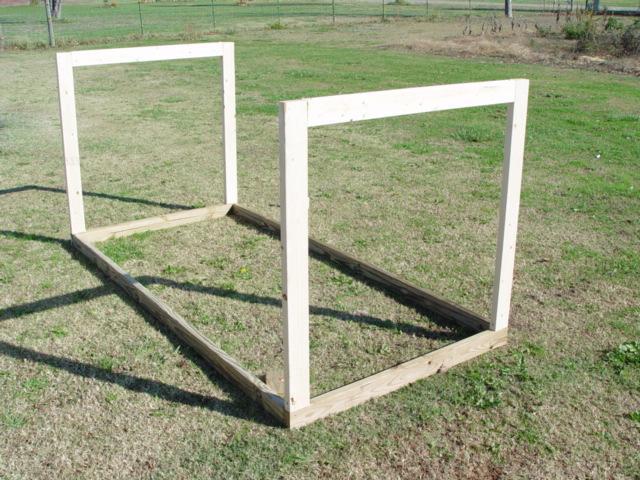
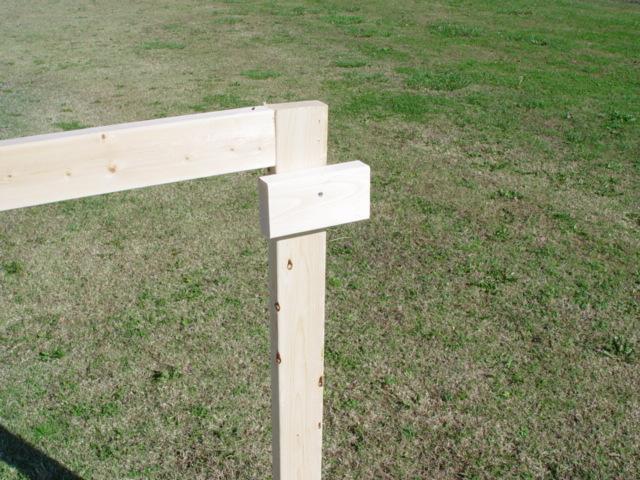
From another stud cut two pieces that are 41 inches long, drill the pilot holes in the ends, then install them as shown in the photo on the left above. If you're working by yourself you may find it helpful to use a cheater block as shown in the photo on the right, this block holds one end of the stud while you attach the other end to the structure. It'll come in very handy in the next step.
Now using two 2 x 4 x 8 studs attached the top runners as shown in the photo on the left above. Then measure 48 inches from the rear of the structure and mark this location on both the top and bottom runners on both sides. The marks will be used in the next step. What you have now is a 4 x 4 x 8 framework, give or take a little….
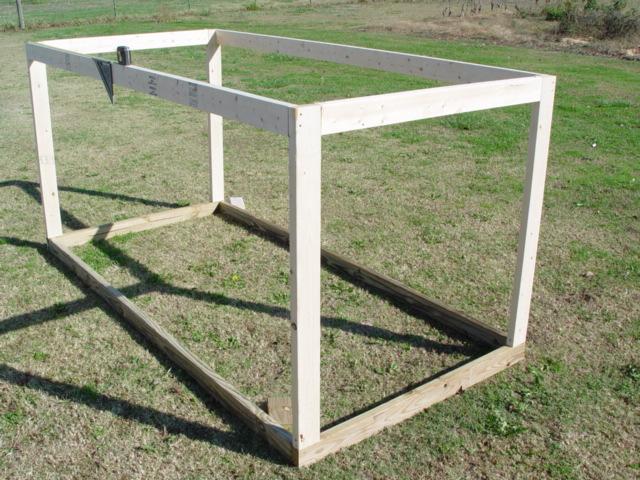
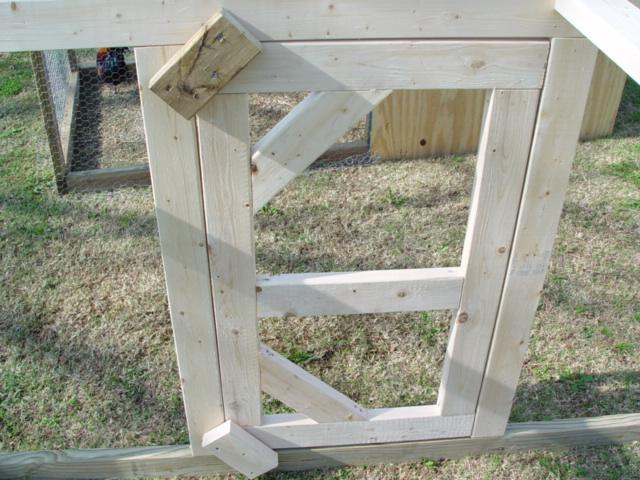
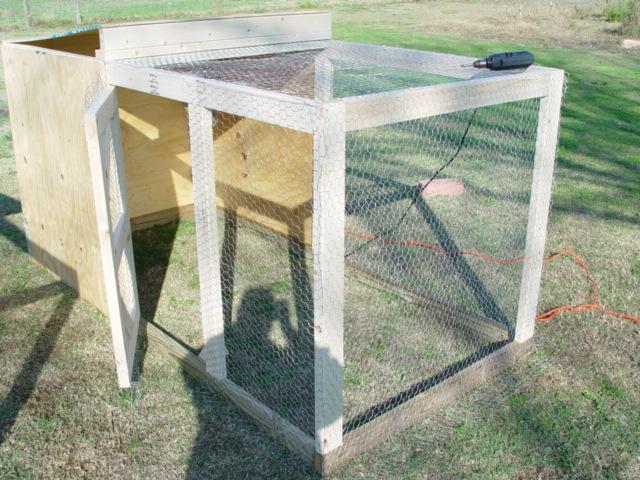
From your stud boards cut two lengths that are 41 inches long and one that is 45 inches long.The 41's are for the sides, the 45 is for the top. The front edge of all three boards should line up with the lines you made on the runners at 48 inches. This is important because your plywood sheets are 48 inches square if you had them cut in half at Lowes or the lumber yard where you bought them, if not you'll have to cut them in half yourself. Now you're ready to work on the door. From the studs cut two 24 inch boards and two 33.5 inch boards. The center brace board will need to be about 17 inches and you can use scrap from your cuts to make the corner braces, the slanted edge of your speed square is 45 degrees, use it to draw your lines and make your cuts on the lines. This will make a very sturdy door for the pen that will be warp resistant. Remember to drill pilot holes for all screws or nails. If you intend to make your pen a tractor type that you can move around I suggest these same type corner braces for the pen's frame. Installing them on the front end of the structure will stiffen that end up, corner braces should not be needed on the back end as the plywood will stiffen that end just fine.
Next use your hinges and the 1.5 inch decking screws to hang your door as shown on the left above. You'll need to block up the bottom of the door about 1/4 inch before attaching the hinges to the frame. Now cut another board that is 41 inches long and install it on the framework on the non-hinged side of the door, spaced about 3/16ths of an inch (eyeball it, you'll do fine). Next, on the inside of the frame work attach two blocks, one at the top corner of the door and one at the bottom as shown. These are screwed to the framework, then use a third screw through the block and into the door to help hold it in place for the next step.
Now you're ready to hang your chicken wire. The wire is only needed on the front half of the structure, from the center bracing forward. On the door side I just cover from the rear of the door to the front of the structure then cut the door free when I'm done. This is the part of construction that I don't like to do, it takes me forever it seems. I need a staple gun for my compressor but regular poultry staples are cheap so I use them. 1 x 2 welded wire would work well for this pen if you're so inclined, I use chicken wire because I have a bunch of it left over from other projects, it's cheap, and predators have not been a problem for me.
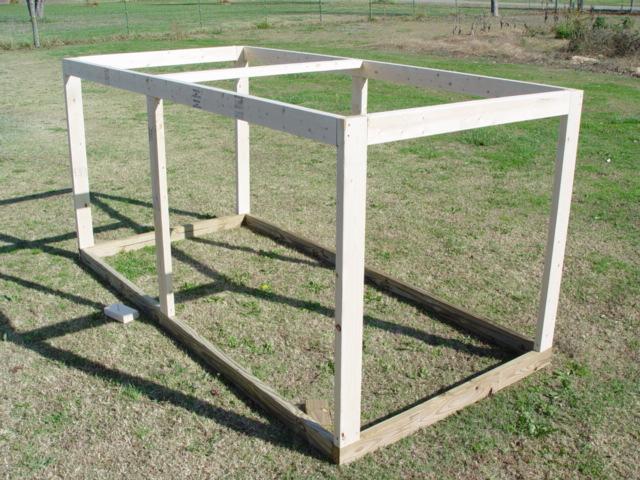
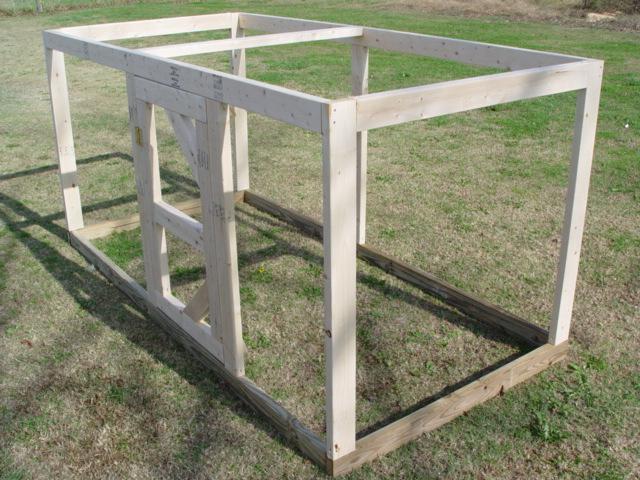
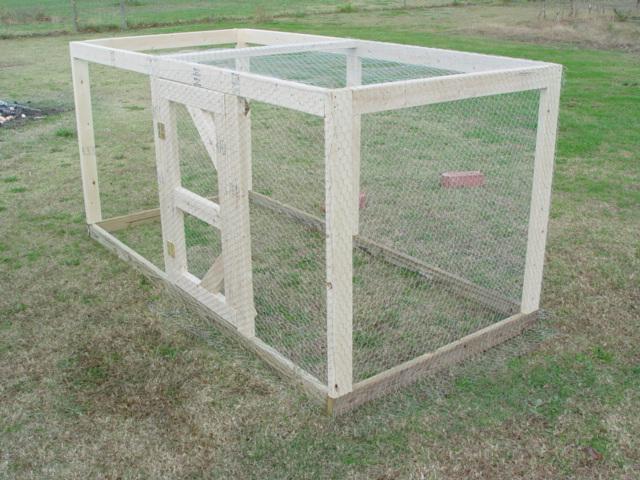
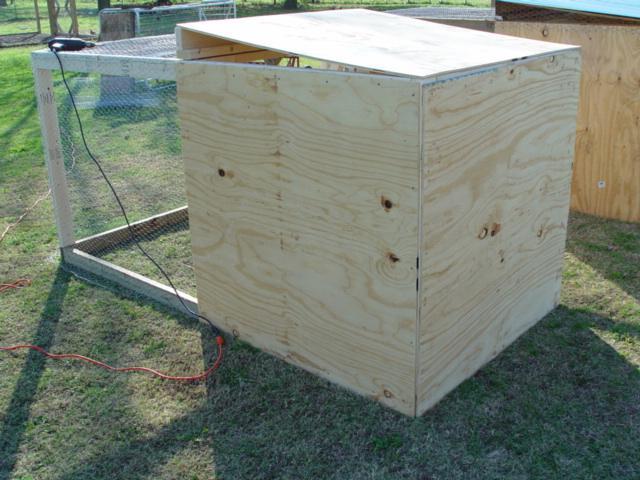
Now cut two 48 inch boards, one stud cut in half does it. Then install them on top of the top center brace as shown, this will give elevation to the front of the roof. Once that's in place there is one VERY important thing you MUST do before installing the plywood walls & roof, can you guess what it is?? O' Okay I'll tell ya, you must go inside the structure and remove the two screws from the blocks that are holding the door secure. If you don't do it now you won't be able to open the door after the plywood is on. You'll have to remove a plywood side & you'll cuss & feel pretty silly for making such a mistake.... never mind how I know all this, just take my word for it <Big Grin> . Leave the blocks in place, these will act as door stops and prevent the door from being pushed into the pen & possibly ripping out the door's hinges. Now, use the four 3/8 x 4 x 4 sheets of plywood to box in the back half of the structure, when you're done it should look like the photo on the right above.
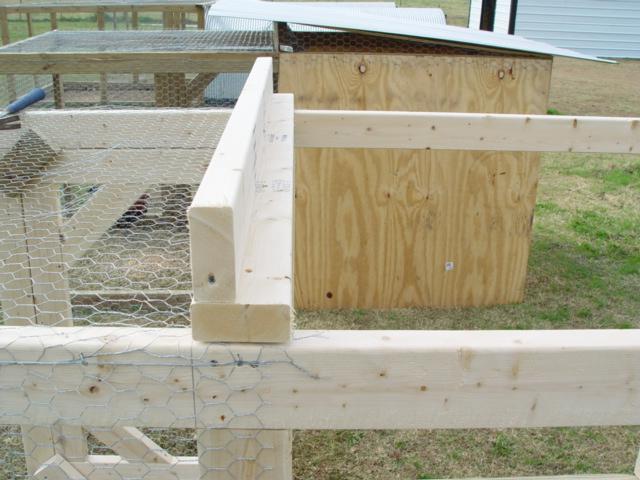
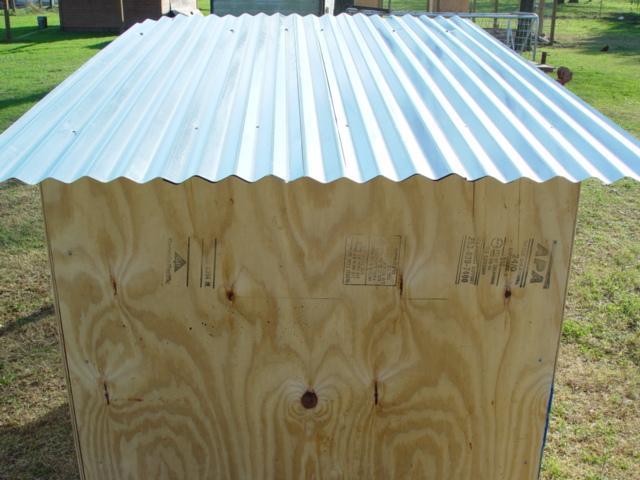
When you're ready to put the metal on the roof cut two strips of chicken wire that are wide enough to lay under the metal and then be stapled to the top of the plywood sides. I leave these open like this to provide good upward ventilation which helps to dry the pen out after a good rain storm and so forth. I suppose for winter use these gaps could be covered with temporary plywood then removed in the spring.
It takes 3 sheets of 6 foot long metal to cover the roof. I just use the 1.5 inch screws at the front & rear to attach it to the 2 x 4's. Next install a roost, nest box, door latch, chickens, salt & pepper to taste, and you're all done! You can leave it like this or paint the plywood if you're so inclind. You could also make it into a tractor with the addition of two wheels and a set of handles. My 1.5 acre chicken yard is fully fenced with field wire and 3 stands of electric, the only predators that I've ever had to deal with are hawks during the day and a big 'ol owl at night. If you're in an area where predators are a real problem you may want to make a modification to better predator proof the brood pen from a digging predator.
To reduce the total cost of this pen you could use nails rather than decking screws. Reuse materials that you already have like boards & plywood. Some money could be saved by using an alternate material for the roof, have you priced barn tin lately!! Wow!! To winterize the coop area I have two ideas, the first is to add another piece of plywood on the inside of the pen to box in the coop area, the plywood would need a door cut into it for the chickens and you would probably want a second door on the back of the coop for your own access to this area. The second idea, and the one that I will probably use, is to take 2 bales of straw into the pen and stand them up under the center brace. This will provide a wind block and there will be a gap between them giving the chickens access to the coop.
I hope you've enjoyed this little tutorial on how I build my brood pens. If you have any questions or commets please feel free to PM or eMail me via BYC.
Best Regards,
Matt.
Claremore, Oklahoma
For materials you'll need 3 2x4x8's that are treated, 10 regular 2x4x8 studs, 2 sheets of 3/8 inch plywood, 3 six foot long sheets of barn tin for the roof, a roll of 48 inch wide chicken wire, 1 box of 2.5 inch decking screws, 1 box of 1.5 inch decking screws, 1 box of poultry wire staples, 2 three inch hinges, and a spring loaded door latch. Now if you want to save some money you can use nails rather than decking screws, I'd rather use screws myself. For tools you'll need a drill with a small drill bit and cross tip screw bit (unless you use nails, then you won't need the screw bit), a skill saw, a hammer, a speed square, and a pencil. So, let's get started.

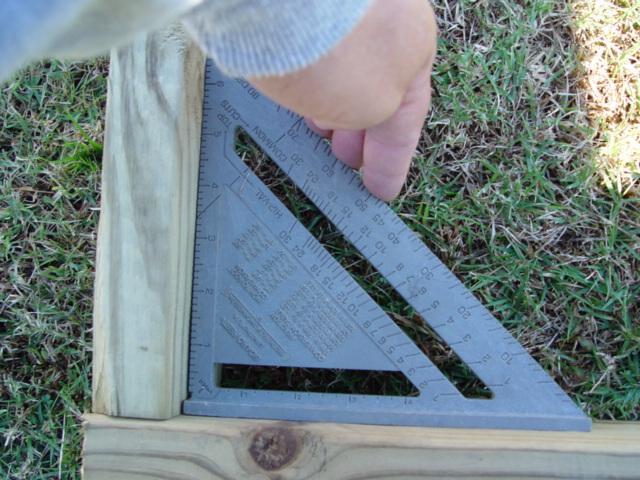
Start by cutting one of your treated 2 x 4's in half, on both ends of both boards use the drill and drill bit to drill pilot holes for the screws that you will use to build the rectangle as shown in the photo on the left above. The long boards are your other two treated 2 x 4 x 8's. Once you have this rectangle laid out and screwed together use your square to check all the inside corners & shift the boards to make the rectangle square.
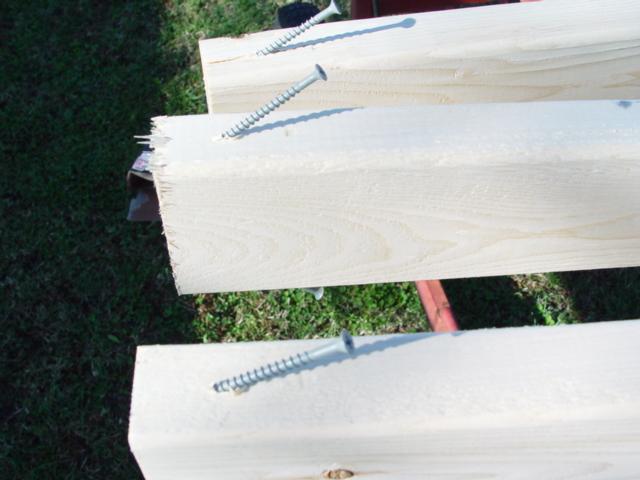
Remember that any time you're going to put a nail or a screw into the end of a 2 x 4 it is always best to drill a pilot hole first in order to not split the wood. Many of the attachment points require that the screws/nails be toenailed in, with the pilot hole the ends of the boards will split for sure! Use 2 of your 2 x 4 studs & cut 4 lengths that are 44 1/2 inches long. Attach these studs to the base as shown in the photo on the right above.
From another stud cut two pieces that are 41 inches long, drill the pilot holes in the ends, then install them as shown in the photo on the left above. If you're working by yourself you may find it helpful to use a cheater block as shown in the photo on the right, this block holds one end of the stud while you attach the other end to the structure. It'll come in very handy in the next step.
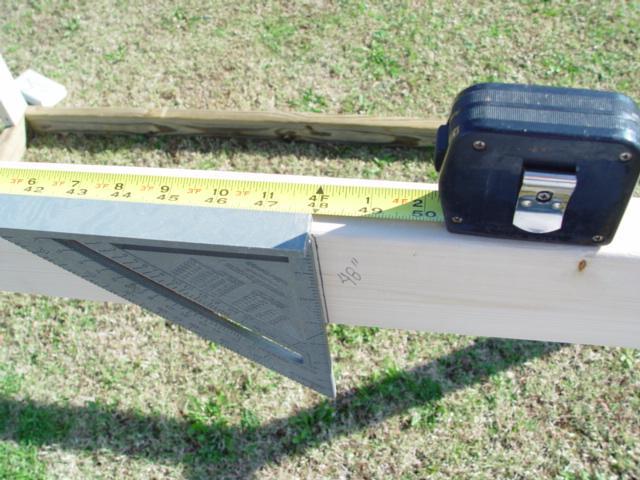
Now using two 2 x 4 x 8 studs attached the top runners as shown in the photo on the left above. Then measure 48 inches from the rear of the structure and mark this location on both the top and bottom runners on both sides. The marks will be used in the next step. What you have now is a 4 x 4 x 8 framework, give or take a little….
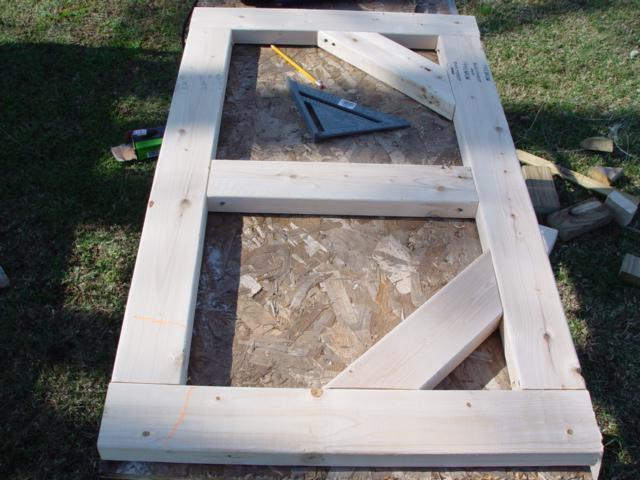
From your stud boards cut two lengths that are 41 inches long and one that is 45 inches long.The 41's are for the sides, the 45 is for the top. The front edge of all three boards should line up with the lines you made on the runners at 48 inches. This is important because your plywood sheets are 48 inches square if you had them cut in half at Lowes or the lumber yard where you bought them, if not you'll have to cut them in half yourself. Now you're ready to work on the door. From the studs cut two 24 inch boards and two 33.5 inch boards. The center brace board will need to be about 17 inches and you can use scrap from your cuts to make the corner braces, the slanted edge of your speed square is 45 degrees, use it to draw your lines and make your cuts on the lines. This will make a very sturdy door for the pen that will be warp resistant. Remember to drill pilot holes for all screws or nails. If you intend to make your pen a tractor type that you can move around I suggest these same type corner braces for the pen's frame. Installing them on the front end of the structure will stiffen that end up, corner braces should not be needed on the back end as the plywood will stiffen that end just fine.
Next use your hinges and the 1.5 inch decking screws to hang your door as shown on the left above. You'll need to block up the bottom of the door about 1/4 inch before attaching the hinges to the frame. Now cut another board that is 41 inches long and install it on the framework on the non-hinged side of the door, spaced about 3/16ths of an inch (eyeball it, you'll do fine). Next, on the inside of the frame work attach two blocks, one at the top corner of the door and one at the bottom as shown. These are screwed to the framework, then use a third screw through the block and into the door to help hold it in place for the next step.
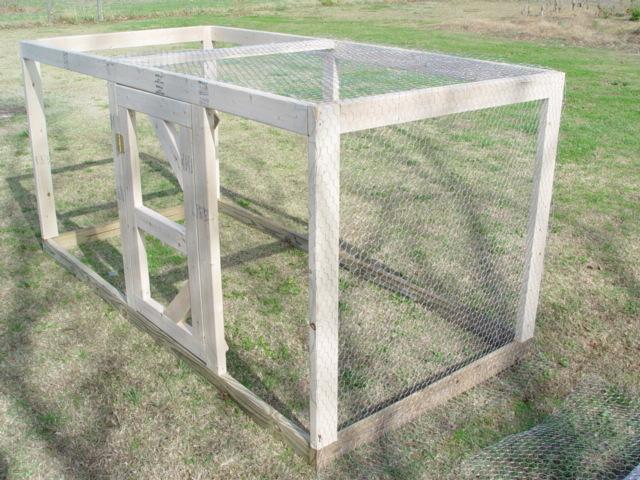
Now you're ready to hang your chicken wire. The wire is only needed on the front half of the structure, from the center bracing forward. On the door side I just cover from the rear of the door to the front of the structure then cut the door free when I'm done. This is the part of construction that I don't like to do, it takes me forever it seems. I need a staple gun for my compressor but regular poultry staples are cheap so I use them. 1 x 2 welded wire would work well for this pen if you're so inclined, I use chicken wire because I have a bunch of it left over from other projects, it's cheap, and predators have not been a problem for me.
Now cut two 48 inch boards, one stud cut in half does it. Then install them on top of the top center brace as shown, this will give elevation to the front of the roof. Once that's in place there is one VERY important thing you MUST do before installing the plywood walls & roof, can you guess what it is?? O' Okay I'll tell ya, you must go inside the structure and remove the two screws from the blocks that are holding the door secure. If you don't do it now you won't be able to open the door after the plywood is on. You'll have to remove a plywood side & you'll cuss & feel pretty silly for making such a mistake.... never mind how I know all this, just take my word for it <Big Grin> . Leave the blocks in place, these will act as door stops and prevent the door from being pushed into the pen & possibly ripping out the door's hinges. Now, use the four 3/8 x 4 x 4 sheets of plywood to box in the back half of the structure, when you're done it should look like the photo on the right above.

When you're ready to put the metal on the roof cut two strips of chicken wire that are wide enough to lay under the metal and then be stapled to the top of the plywood sides. I leave these open like this to provide good upward ventilation which helps to dry the pen out after a good rain storm and so forth. I suppose for winter use these gaps could be covered with temporary plywood then removed in the spring.
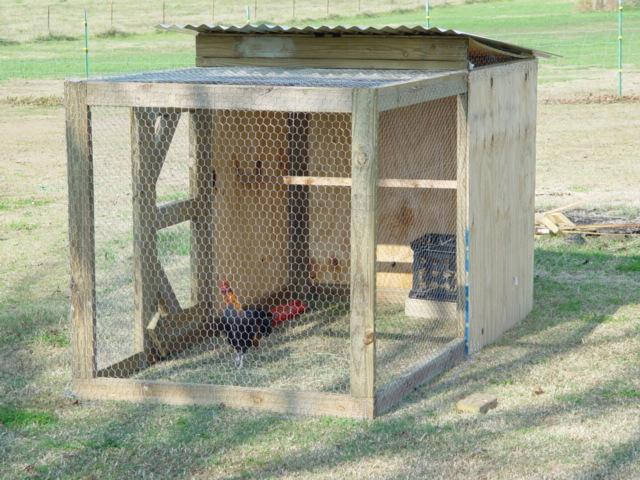
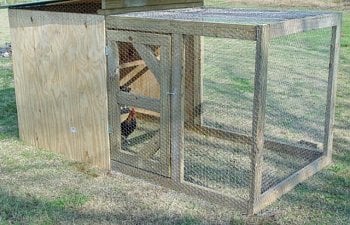
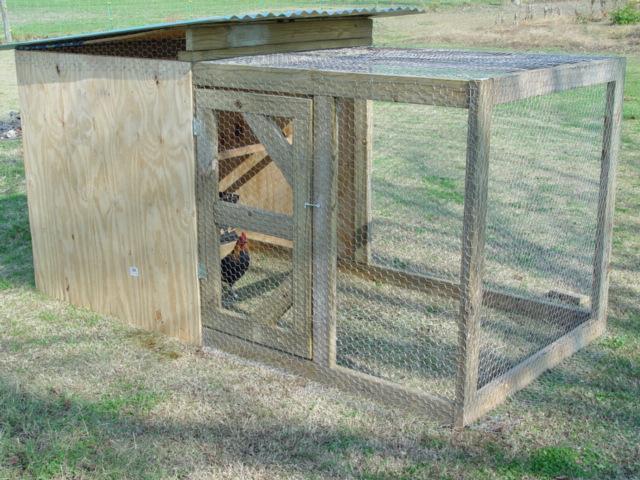
It takes 3 sheets of 6 foot long metal to cover the roof. I just use the 1.5 inch screws at the front & rear to attach it to the 2 x 4's. Next install a roost, nest box, door latch, chickens, salt & pepper to taste, and you're all done! You can leave it like this or paint the plywood if you're so inclind. You could also make it into a tractor with the addition of two wheels and a set of handles. My 1.5 acre chicken yard is fully fenced with field wire and 3 stands of electric, the only predators that I've ever had to deal with are hawks during the day and a big 'ol owl at night. If you're in an area where predators are a real problem you may want to make a modification to better predator proof the brood pen from a digging predator.
To reduce the total cost of this pen you could use nails rather than decking screws. Reuse materials that you already have like boards & plywood. Some money could be saved by using an alternate material for the roof, have you priced barn tin lately!! Wow!! To winterize the coop area I have two ideas, the first is to add another piece of plywood on the inside of the pen to box in the coop area, the plywood would need a door cut into it for the chickens and you would probably want a second door on the back of the coop for your own access to this area. The second idea, and the one that I will probably use, is to take 2 bales of straw into the pen and stand them up under the center brace. This will provide a wind block and there will be a gap between them giving the chickens access to the coop.
I hope you've enjoyed this little tutorial on how I build my brood pens. If you have any questions or commets please feel free to PM or eMail me via BYC.
Best Regards,
Matt.
Claremore, Oklahoma