I've talked about this before on other threads. I'd like to say it was my own brilliant idea, but actually I saw a video made by a woman who broods her chicks outdoors using a heating pad "cave" and straw. The idea intrigued me, and I so wish I could give proper credit. Alas, I can't find the video now so I hope that if you know who it was, you will jump in here and let us know. My dear friend Beekissed was also a huge inspiration with the heating pad project. That woman is a font of good information and I'm lucky she's one of my best teachers.
I used this heating pad method when we had a tiny chick who got frostbitten feet. (You can click on the link in my signature to read Scout's adventure.) I used it for the short time he was inside the house, then moved it outside to the coop. It worked so well that I am now using it for our latest batch of chicks. They were supposed to start out in the coop from the getgo. However, our long, several week long stretch of balmy weather ended the day I got the babies, so they are in the house until we get back above zero. One chick with frostbitten feet was enough. Then too, my sweet husband is in the hospital, and since he's my brooder builder we are a little behind on getting the outside coop brooder built.
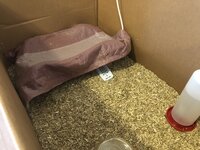
Now, on the to the "hows". I'm using a wire dog crate with hardware cloth running a bit up the sides to prevent escapees. This particular crate has a front door and a side door - mighty doggone handy! I used some good old Press 'n Seal and ran it around the crate. Believe it or not, it actually sticks to the hardware cloth very well. Then I tucked the excess under the crate. This has done a wonderful job of keeping the shavings inside the crate and not all over my living room floor! It's a little more crowded in there than I like, but in a few days they'll be going out to the big brooder.

I got a scrap of wire fencing and bent it into a hoop. Then I stood it up with the open side down. You can see where I've used electrical tape to cover any little points left from cutting the wire. There was a hole in the top that I didn't like, so there's a bit of hardware cloth covering it.
I'm using a Sunbeam heating pad. You can see on the control that I can opt to use the "Auto Off" feature so the pad stays on all of the time. As the chicks grow and as their need for a lot of heat changes, I can use a bigger bit of fence, make the hoop taller, and turn down the temp on the heating pad. This heating pad is the smaller model - there is also an extra large one and that's the one we'll be using when the chicks go outside, hopefully at the end of this week.
The heating pad is draped over the wire frame. I didn't like the way the hardware cloth kept the heating pad from making full contact with the frame all the way down, so I replaced it with a smaller piece just larger than the hole. That is working better than what you see in this picture. Of course, if your scrap of fencing has no hole, you get to skip this fitting.
Again using my good old Press 'n Seal, I covered a folded towel with it. Yes, it will stick, and stick very firmly. I tore the sheets longer than I needed and folded the excess under, pressing it there as well. This keeps the edges of the folded towel together, keeps the towel clean, and covers all of those frayed little fringes that are on the towel so the chicks don't try to eat them.
The towel assembly goes over the heating pad, with a little awning to keep out light and give them a sense of being able to hide. The towel is tucked under the bottom edges of the frame, and at the back of the frame it goes all the way down to the floor of the brooder, holding in heat and closing off the back.
You can see how dark and cozy it is under there. On the right side you can see where the towel is not pulled all the way down - I was trying to get a little more light in there for the photo. Um, didn't work!
The little ones absolutely love this. They like to sit on top (hence the Press 'n Seal covering) and they go in and out at will for a quick warm-up, just like they would under a broody. They spend most of their time out of the "cave" exploring, eating and drinking and THEY control their own comfort. When the lights go out in the house, all of them have gone under for the night. In the first 24 hours they'd been here they'd already learned that night time is time for sleeping. They don't have a harsh light on all night. They are quiet all night long - no cheeping or fussing at all. Just blessed quiet! Personally I think that the natural day/night cycle and a full night of sleeping can reduce stress in the chicks but I have no study to back up this claim other than common sense. Fire danger is also reduced. I don't like heat lamps, does it show?
I also start them out with vertical nipple waterers. I know that this one is too large for this size brooder, but again it's just for a few days. Out in the coop I use the horizontal nipples for the big girls but I think that at first it takes less effort for them to get enough water from the vertical ones. I also have a smaller waterer with just two horizontal nipples that I'll use when I move them outside. I learned this while taking care of Scout. He couldn't stand on his feet - he stood on his hocks - and he couldn't balance and press the horizontal nipple adequately, so we were clicking it for him when he went for water. I put this one in there for him for a short time, then went back to the horizontal when he got stronger. This worked so well that I now have 2 chick waterers - my beginner system and the intermediate one. When these little babies go out to the coop they will be quite familiar with how it works. Oh, and it took less than half a minute to train these day old chicks to use it. One went over and clicked on the shiny metal thing. Water came out! She drank her fill, the others saw her do it, and I never had to do a thing. I don't have to worry about a dirty waterer, soaked bedding, and drowning chicks. The vertical waterers do leak a little more than the horizontal ones, but it's far easier to use a spatula and scoop up the bits of damp litter directly under the nipples than it is to have an entire brooder full of dumped, poopy water.
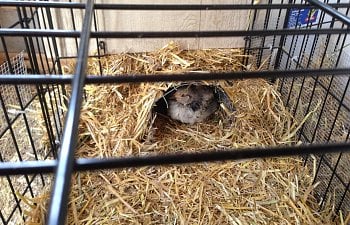
I want to leave you with two more pictures - this is Scout's domain after he recovered from his frostbite enough to go back outside with the big girls. They could see him, he could see them, but they were separate. He could get back into his "man cave" but the big girls couldn't follow him because the door was wired in such a way that only he could fit through. Mama Heating Pad kept him warm even with temps below freezing. We tucked the wire frame into a bed of straw that was dug out to be lower in the back than in the front rather than using a towel out there to hold the heat.
He looks pretty cozy in there, doesn't he? The day I took this picture it was 4 degrees below zero.
I hope this information has been helpful. I don't claim that this is the best way to raise chicks, but it's the best way for me to raise them. This forum is all about sharing, and I wanted to share what I've learned right here from BYC and how I modified it to fit our situation. It's as natural as I can get without a broody, and the chicks are well prepared when the day comes for them to move out to the coop. No adjustment to darkness, no adjustment to a different waterer, and they and the girls can get acquainted with the safety of bars between them. We'll be setting up the bigger brooder out there built under the poop board as soon as my dear spouse is released from the hospital, and we'll use the same setup as we used for Scout, just larger to accommodate more chicks than just one. I'll do the work, he'll do the instructing and supervising. If you have any questions I'd be happy to answer them if I can.
My friend Perchie Girl mentioned that the wire frame should be higher in the front than in the back. I did that, I just forgot to point it out when I was giving the description. I think, though, that you can see the taper in the photos. The smaller, chillier chicks can use the back and the larger chicks stay more toward the front. Thanks, Deb, for pointing out that omission so I could correct it!
This video says it all. The chicks sleep all night long, and are doing very well.
When Ken was released from the hospital, we put set up the outdoor brooder as we had planned. The chicks moved out there and despite one night with temps in the teens, and most other nights in the 20s, they thrived. We added four more chicks for total of 15 in the brooder. Those 4 additional chicks went into the outside brooder the day we brought them home. The brooder is an old x-pen from my dog showing days, and the box which stands at the end of it was our old brooder from last year. We had re-purposed it and were keeping the metal can of chicken food in it, but it liked being a brooder so we gave it another chance. It's doing much better this time!
Using the same process as we used in the dog crate in the house, with the addition of straw on the inside of the cave, then more tucked in behind it, around it, and on top of it.
The Cave. We didn't plan on using a towel again, but found that the Rubbermaid shelf liner that I covered with Press'n'Seal slid around too much and didn't drape very well to provide that awning at the front. So back to the towel.
The Littles adapted to being outdoors immediately.
And this little girl was hogging up all that warmth for herself! In this shot you can see how low the pad is in the back, and why using a wire frame with a good amount of open space between the bars is so beneficial.
Integration and learning to go outside with the Bigs went beautifully, Since the "Littles" and "Bigs" were always within sight and sound of each other out in the run, they were very accustomed to each other.
I am now raising batch number three in the run, under the Mama Heating Pad Cave. "The Tinys" are 4 weeks old and doing every bit as well as Scout and the LIttles did. I am sold on this more natural system for raising chicks.
I used this heating pad method when we had a tiny chick who got frostbitten feet. (You can click on the link in my signature to read Scout's adventure.) I used it for the short time he was inside the house, then moved it outside to the coop. It worked so well that I am now using it for our latest batch of chicks. They were supposed to start out in the coop from the getgo. However, our long, several week long stretch of balmy weather ended the day I got the babies, so they are in the house until we get back above zero. One chick with frostbitten feet was enough. Then too, my sweet husband is in the hospital, and since he's my brooder builder we are a little behind on getting the outside coop brooder built.
Now, on the to the "hows". I'm using a wire dog crate with hardware cloth running a bit up the sides to prevent escapees. This particular crate has a front door and a side door - mighty doggone handy! I used some good old Press 'n Seal and ran it around the crate. Believe it or not, it actually sticks to the hardware cloth very well. Then I tucked the excess under the crate. This has done a wonderful job of keeping the shavings inside the crate and not all over my living room floor! It's a little more crowded in there than I like, but in a few days they'll be going out to the big brooder.
I got a scrap of wire fencing and bent it into a hoop. Then I stood it up with the open side down. You can see where I've used electrical tape to cover any little points left from cutting the wire. There was a hole in the top that I didn't like, so there's a bit of hardware cloth covering it.
I'm using a Sunbeam heating pad. You can see on the control that I can opt to use the "Auto Off" feature so the pad stays on all of the time. As the chicks grow and as their need for a lot of heat changes, I can use a bigger bit of fence, make the hoop taller, and turn down the temp on the heating pad. This heating pad is the smaller model - there is also an extra large one and that's the one we'll be using when the chicks go outside, hopefully at the end of this week.
The heating pad is draped over the wire frame. I didn't like the way the hardware cloth kept the heating pad from making full contact with the frame all the way down, so I replaced it with a smaller piece just larger than the hole. That is working better than what you see in this picture. Of course, if your scrap of fencing has no hole, you get to skip this fitting.
Again using my good old Press 'n Seal, I covered a folded towel with it. Yes, it will stick, and stick very firmly. I tore the sheets longer than I needed and folded the excess under, pressing it there as well. This keeps the edges of the folded towel together, keeps the towel clean, and covers all of those frayed little fringes that are on the towel so the chicks don't try to eat them.
The towel assembly goes over the heating pad, with a little awning to keep out light and give them a sense of being able to hide. The towel is tucked under the bottom edges of the frame, and at the back of the frame it goes all the way down to the floor of the brooder, holding in heat and closing off the back.
You can see how dark and cozy it is under there. On the right side you can see where the towel is not pulled all the way down - I was trying to get a little more light in there for the photo. Um, didn't work!
The little ones absolutely love this. They like to sit on top (hence the Press 'n Seal covering) and they go in and out at will for a quick warm-up, just like they would under a broody. They spend most of their time out of the "cave" exploring, eating and drinking and THEY control their own comfort. When the lights go out in the house, all of them have gone under for the night. In the first 24 hours they'd been here they'd already learned that night time is time for sleeping. They don't have a harsh light on all night. They are quiet all night long - no cheeping or fussing at all. Just blessed quiet! Personally I think that the natural day/night cycle and a full night of sleeping can reduce stress in the chicks but I have no study to back up this claim other than common sense. Fire danger is also reduced. I don't like heat lamps, does it show?
I also start them out with vertical nipple waterers. I know that this one is too large for this size brooder, but again it's just for a few days. Out in the coop I use the horizontal nipples for the big girls but I think that at first it takes less effort for them to get enough water from the vertical ones. I also have a smaller waterer with just two horizontal nipples that I'll use when I move them outside. I learned this while taking care of Scout. He couldn't stand on his feet - he stood on his hocks - and he couldn't balance and press the horizontal nipple adequately, so we were clicking it for him when he went for water. I put this one in there for him for a short time, then went back to the horizontal when he got stronger. This worked so well that I now have 2 chick waterers - my beginner system and the intermediate one. When these little babies go out to the coop they will be quite familiar with how it works. Oh, and it took less than half a minute to train these day old chicks to use it. One went over and clicked on the shiny metal thing. Water came out! She drank her fill, the others saw her do it, and I never had to do a thing. I don't have to worry about a dirty waterer, soaked bedding, and drowning chicks. The vertical waterers do leak a little more than the horizontal ones, but it's far easier to use a spatula and scoop up the bits of damp litter directly under the nipples than it is to have an entire brooder full of dumped, poopy water.
I want to leave you with two more pictures - this is Scout's domain after he recovered from his frostbite enough to go back outside with the big girls. They could see him, he could see them, but they were separate. He could get back into his "man cave" but the big girls couldn't follow him because the door was wired in such a way that only he could fit through. Mama Heating Pad kept him warm even with temps below freezing. We tucked the wire frame into a bed of straw that was dug out to be lower in the back than in the front rather than using a towel out there to hold the heat.
He looks pretty cozy in there, doesn't he? The day I took this picture it was 4 degrees below zero.
I hope this information has been helpful. I don't claim that this is the best way to raise chicks, but it's the best way for me to raise them. This forum is all about sharing, and I wanted to share what I've learned right here from BYC and how I modified it to fit our situation. It's as natural as I can get without a broody, and the chicks are well prepared when the day comes for them to move out to the coop. No adjustment to darkness, no adjustment to a different waterer, and they and the girls can get acquainted with the safety of bars between them. We'll be setting up the bigger brooder out there built under the poop board as soon as my dear spouse is released from the hospital, and we'll use the same setup as we used for Scout, just larger to accommodate more chicks than just one. I'll do the work, he'll do the instructing and supervising. If you have any questions I'd be happy to answer them if I can.
My friend Perchie Girl mentioned that the wire frame should be higher in the front than in the back. I did that, I just forgot to point it out when I was giving the description. I think, though, that you can see the taper in the photos. The smaller, chillier chicks can use the back and the larger chicks stay more toward the front. Thanks, Deb, for pointing out that omission so I could correct it!
This video says it all. The chicks sleep all night long, and are doing very well.
When Ken was released from the hospital, we put set up the outdoor brooder as we had planned. The chicks moved out there and despite one night with temps in the teens, and most other nights in the 20s, they thrived. We added four more chicks for total of 15 in the brooder. Those 4 additional chicks went into the outside brooder the day we brought them home. The brooder is an old x-pen from my dog showing days, and the box which stands at the end of it was our old brooder from last year. We had re-purposed it and were keeping the metal can of chicken food in it, but it liked being a brooder so we gave it another chance. It's doing much better this time!
Using the same process as we used in the dog crate in the house, with the addition of straw on the inside of the cave, then more tucked in behind it, around it, and on top of it.
The Cave. We didn't plan on using a towel again, but found that the Rubbermaid shelf liner that I covered with Press'n'Seal slid around too much and didn't drape very well to provide that awning at the front. So back to the towel.
The Littles adapted to being outdoors immediately.
And this little girl was hogging up all that warmth for herself! In this shot you can see how low the pad is in the back, and why using a wire frame with a good amount of open space between the bars is so beneficial.
Integration and learning to go outside with the Bigs went beautifully, Since the "Littles" and "Bigs" were always within sight and sound of each other out in the run, they were very accustomed to each other.
I am now raising batch number three in the run, under the Mama Heating Pad Cave. "The Tinys" are 4 weeks old and doing every bit as well as Scout and the LIttles did. I am sold on this more natural system for raising chicks.

 Ive followed BYC for years! Very informative, Awesome ideas, current issues effecting our poultry and feathered friends is a God send!


 It was so horrible!