As you can see from the video series on my member page we live on an old farm in Kentucky. An old coop was present when we bought the place. We raised a few chickens years ago when the kids were young, but now they are grown and moved away. We discovered BackYardChickens.com and fell in love with all of the designs and ideas.
After much searching, study and planning (see the videos here: https://www.backyardchickens.com/a/planning-and-building-our-coop) we finally decided on a design which was based upon the old coop, but modernized.
We salvaged some of the siding from the old coop and used it inside the new one. We salvaged the rocks around the old coop and reused them. But I'm happiest about the old nesting boxes which we salvaged. We scrubbed it good, sanitized it with Clorox and re-hung the boxes with an opening in the wall behind them so we could collect the eggs without going into the chicken area.
We built the coop on the same site as the old one and since it was a little hillside, we used the area below the new coop to screen off an outside run. I built a door for the back of the run where we can get together with our flock and feed them treats.
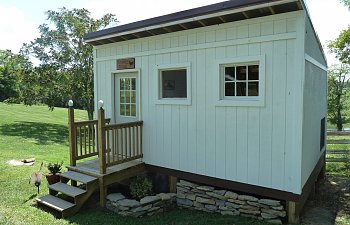
The coop is 12' x 16 feet and the front room is 6' x 10'. The chickens in the coop area have the rest to themselves. The roosts are 2 x 4's laid broad side up and measure 6 feet long.
I have installed 6 windows (barn sash) and built screens out of hardware cloth to fit in the openings. I built the screen frames out of cedar.
The building is on 6x6 posts set in concrete, 2x10 beams and 2x8 floor joists 16" on center. The outside is sided with a heavy paneling and the trim is all cedar. We left all of the eaves under the roof overhang open and screened them with hardware cloth for added ventilation. We also installed a large ventilation window, screened, down near the floor in the back corner which will remain open all year long. This idea came from the Woods " fresh air poultry house" design.
I installed electricity for a light in both rooms operated by switches inside the front door which has a window in it, and for outlets around the coop. I had to build a small porch to get up to the door and found some finials at Boston Turning Works which resembled eggs to top the posts on the porch.
We screened off the underneath area by burying the cloth 6 inches below the soil and bending another 4 inches of the cloth outward to discourage predators from digging under. We also installed an automatic chicken door and built a walkway from the door down to the run underneath. I discarded the cheap timer that came with the door and for $16 got a very nice digital timer to run the door. It has a battery backup so the timer will not reset if we get a power outage.
I also installed a small LED light which comes on at night to give the inside of the coop a little light, and installed a 4' shop light with daylight color bullbs running on a timer to give the hens 16 hours of daylight year round.
We built egg collection doors inside the front room on the wall where the nesting boxes hang so we can collect eggs from the front room. I installed a small base cabinet and two wire shelves in the front room for storing feed and tools as well as other work I expect to have with cleaning and working up eggs.
The roof is metal over 2x6 rafters 16" on center. We used a Valspar paint with primer already in it for the siding and the trim.
The rocks we salvaged were used to do a wall around the front and a small bed for a bush.
The other landscaping is "hens and chickens" transported from my wife's grandmothers garden.
We had several old chicken decorations around and reused them as well as purchasing a new item or two to decorate. I'm sure we will find more.
I hope you like this plan and this coop. This website was a great help.

(PS: We named it Cripple Coop because our farm has an old house we use for our hunting club to gather and we named the clubhouse "Cripple Creek". Cripple Coop sits right next to it.)
After much searching, study and planning (see the videos here: https://www.backyardchickens.com/a/planning-and-building-our-coop) we finally decided on a design which was based upon the old coop, but modernized.
We salvaged some of the siding from the old coop and used it inside the new one. We salvaged the rocks around the old coop and reused them. But I'm happiest about the old nesting boxes which we salvaged. We scrubbed it good, sanitized it with Clorox and re-hung the boxes with an opening in the wall behind them so we could collect the eggs without going into the chicken area.
We built the coop on the same site as the old one and since it was a little hillside, we used the area below the new coop to screen off an outside run. I built a door for the back of the run where we can get together with our flock and feed them treats.
The coop is 12' x 16 feet and the front room is 6' x 10'. The chickens in the coop area have the rest to themselves. The roosts are 2 x 4's laid broad side up and measure 6 feet long.
I have installed 6 windows (barn sash) and built screens out of hardware cloth to fit in the openings. I built the screen frames out of cedar.
The building is on 6x6 posts set in concrete, 2x10 beams and 2x8 floor joists 16" on center. The outside is sided with a heavy paneling and the trim is all cedar. We left all of the eaves under the roof overhang open and screened them with hardware cloth for added ventilation. We also installed a large ventilation window, screened, down near the floor in the back corner which will remain open all year long. This idea came from the Woods " fresh air poultry house" design.
I installed electricity for a light in both rooms operated by switches inside the front door which has a window in it, and for outlets around the coop. I had to build a small porch to get up to the door and found some finials at Boston Turning Works which resembled eggs to top the posts on the porch.
We screened off the underneath area by burying the cloth 6 inches below the soil and bending another 4 inches of the cloth outward to discourage predators from digging under. We also installed an automatic chicken door and built a walkway from the door down to the run underneath. I discarded the cheap timer that came with the door and for $16 got a very nice digital timer to run the door. It has a battery backup so the timer will not reset if we get a power outage.
I also installed a small LED light which comes on at night to give the inside of the coop a little light, and installed a 4' shop light with daylight color bullbs running on a timer to give the hens 16 hours of daylight year round.
We built egg collection doors inside the front room on the wall where the nesting boxes hang so we can collect eggs from the front room. I installed a small base cabinet and two wire shelves in the front room for storing feed and tools as well as other work I expect to have with cleaning and working up eggs.
The roof is metal over 2x6 rafters 16" on center. We used a Valspar paint with primer already in it for the siding and the trim.
The rocks we salvaged were used to do a wall around the front and a small bed for a bush.
The other landscaping is "hens and chickens" transported from my wife's grandmothers garden.
We had several old chicken decorations around and reused them as well as purchasing a new item or two to decorate. I'm sure we will find more.
I hope you like this plan and this coop. This website was a great help.
(PS: We named it Cripple Coop because our farm has an old house we use for our hunting club to gather and we named the clubhouse "Cripple Creek". Cripple Coop sits right next to it.)