My home made double stacked Brooder:
materials used
1: 2 sheets osb 4'x8'x7/16"
2: 4- 2"x2"x8'
3: 4- 2"x4"x8'
4: 2- porcelain light fixtures ( already had)
5: 2 metal electric boxes (already had)
6: 1 nail on outlet box
7: 2 wafer thermostat and switch assemblies
8: 2 sheets 1" blue board insulation
9: 2 tubes insulation adhesive ( must be the right kind or it will eat the insulation)
10: misc. wire and screws which I always have on hand
11: 4 hinges for doors
12: plexiglass for see through doors.
These are the basics and probably forgot something ( such as the ceramic heat emitters or heat lamps).
OK so here's what I did!!
First thing I did was get all my osb cut to the desired lengths and widths.
I cut one sheet in half makind 2 pieces 4'x4', and cut the remaining sheet into 2'x4' sheets.
Second thing to get done was cutting the 2"x2"s to the proper lengths which can vary depending on where you start. I framed the three pieces that would create the top , middle , and bottom of the brooder with the 2"x2"s and used screws to attach everything together.
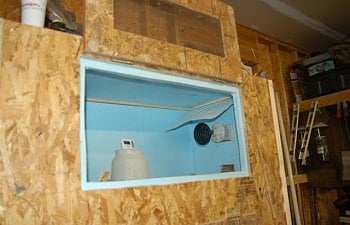
I started with one of the 4'x4' pieces and attached the top , middle, and bottom to one sheet first centering the middle sheet. I then laid out my openings for the doors on the remaining 4'x4' piece leaving room on both sides and about 4" up from the bottoms which would be the floors of the brooder. I cut the openings and the openings for the plexiglass and then attached to the existing framework. With this done I now attached the sides in the same fashion.
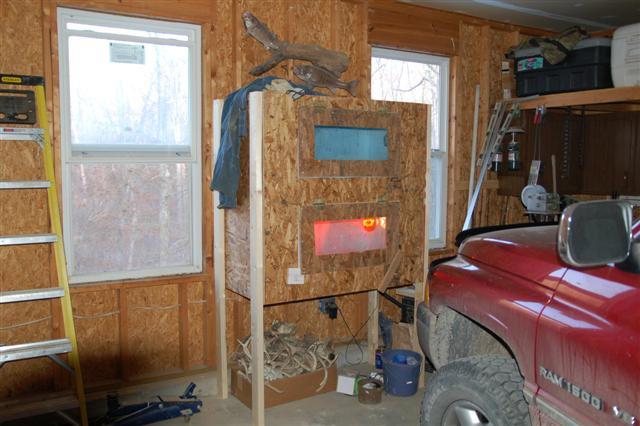
I cut my four 2'x4's down to I think 6'6" to use for the legs and just screwed them to the brooder sides flush with the top.
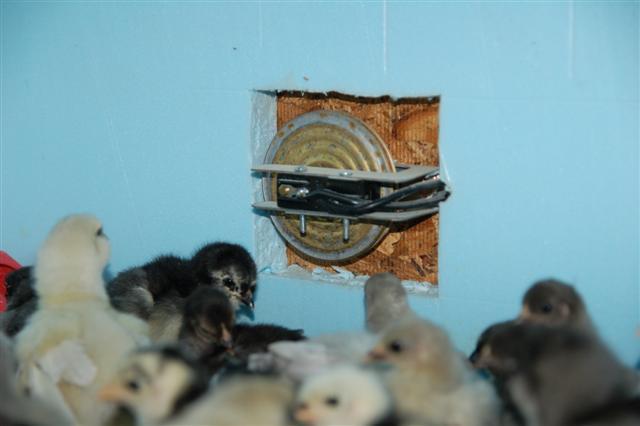
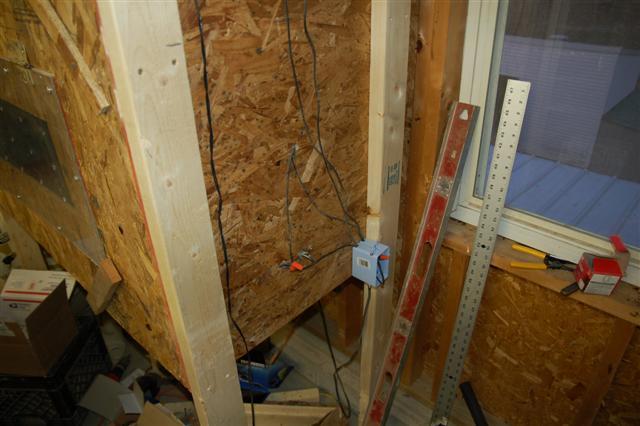
Inside the brooder I cut 2 blocks 4"x4" out of the 2x4 scraps to attach the electric boxes to. I held them up 12" off the floor and centered on the sides and attached with screws and then screwed the electric boxes to these and drilled two holes through to the outside which allowed wiring up of the thermostats.
With this all done it was time for the thermostats which are your run of the mill wafers like in a cabinet incubator which I had already. I'm sure there are other ways of regulating the temp but these are just easy to work. I drilled three holes out the sides allowing the wafer to sit off the floor 4" and allow the adjustment rod to stick out the side.
OK getting close. I actually wired it up like this and left it overnight to see how the temps held since it was gonna be really cold and it didn't keep heated well enough to suit me being outside like it is so I decided to add the insulation the next day. I went to Lowes and purchased 2 sheets of 1" insulation and adhesive and just cut to fit in between the 2x2 framing on the entire brooder. I have mine framed up with the 2x2s so that there is a piece of insulation under the brooder bottom, one on the bottom of the middle floor , and one on the underside of the top. I did leave the insulation overhang an inch around the door openings acting as a door stop.
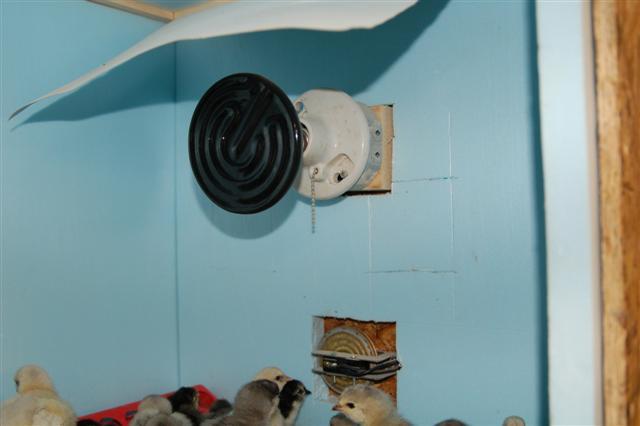
Wiring of the thermostat to the porcelain lamp base is simple, Run 1 wire from power to each base and connect, run wire from each thermostat switch to its own lamp and then the other wire from the thermostat switch to the opposite power wire.
This is the finished Result

Wafer thermostat shown from inside with insulation cut around.
Porcelain lamp and ceramic heat emitter shown and had to add a heat deflector to keep from melting the insulation, it is just a piece of metal flashing I had laying around.
Just a shot with the door open showing the insulation hanging over creating the door stop and insulation on the roof of the brooder. The plexiglass was attached with screws and I drilled 3/8"holes in it every 6" or so to allow for ventilation.
This a pic of the side wher I wired everything up. Its not pretty but works. Hard to see in the pic but the thermostat adjustment rods stick out and allow me to adjust the temps.
It could probably use some paint but it works so I'm not touching it .
If I had to do it all over ,and I still may, I'd do a couple things just a little different. First it would have to be a little bigger maybe 3'Wx8'L and double stacked. I know I'd make it so that I'd have droppings pans and a hardware cloth floor to make cleaning easier. Its not hard to clean now but my last one I had pans built for and it worked great. Other than that it really does a good job and has quite a few happy residents!!!
materials used
1: 2 sheets osb 4'x8'x7/16"
2: 4- 2"x2"x8'
3: 4- 2"x4"x8'
4: 2- porcelain light fixtures ( already had)
5: 2 metal electric boxes (already had)
6: 1 nail on outlet box
7: 2 wafer thermostat and switch assemblies
8: 2 sheets 1" blue board insulation
9: 2 tubes insulation adhesive ( must be the right kind or it will eat the insulation)
10: misc. wire and screws which I always have on hand
11: 4 hinges for doors
12: plexiglass for see through doors.
These are the basics and probably forgot something ( such as the ceramic heat emitters or heat lamps).
OK so here's what I did!!
First thing I did was get all my osb cut to the desired lengths and widths.
I cut one sheet in half makind 2 pieces 4'x4', and cut the remaining sheet into 2'x4' sheets.
Second thing to get done was cutting the 2"x2"s to the proper lengths which can vary depending on where you start. I framed the three pieces that would create the top , middle , and bottom of the brooder with the 2"x2"s and used screws to attach everything together.
I started with one of the 4'x4' pieces and attached the top , middle, and bottom to one sheet first centering the middle sheet. I then laid out my openings for the doors on the remaining 4'x4' piece leaving room on both sides and about 4" up from the bottoms which would be the floors of the brooder. I cut the openings and the openings for the plexiglass and then attached to the existing framework. With this done I now attached the sides in the same fashion.
I cut my four 2'x4's down to I think 6'6" to use for the legs and just screwed them to the brooder sides flush with the top.
Inside the brooder I cut 2 blocks 4"x4" out of the 2x4 scraps to attach the electric boxes to. I held them up 12" off the floor and centered on the sides and attached with screws and then screwed the electric boxes to these and drilled two holes through to the outside which allowed wiring up of the thermostats.
With this all done it was time for the thermostats which are your run of the mill wafers like in a cabinet incubator which I had already. I'm sure there are other ways of regulating the temp but these are just easy to work. I drilled three holes out the sides allowing the wafer to sit off the floor 4" and allow the adjustment rod to stick out the side.
OK getting close. I actually wired it up like this and left it overnight to see how the temps held since it was gonna be really cold and it didn't keep heated well enough to suit me being outside like it is so I decided to add the insulation the next day. I went to Lowes and purchased 2 sheets of 1" insulation and adhesive and just cut to fit in between the 2x2 framing on the entire brooder. I have mine framed up with the 2x2s so that there is a piece of insulation under the brooder bottom, one on the bottom of the middle floor , and one on the underside of the top. I did leave the insulation overhang an inch around the door openings acting as a door stop.
Wiring of the thermostat to the porcelain lamp base is simple, Run 1 wire from power to each base and connect, run wire from each thermostat switch to its own lamp and then the other wire from the thermostat switch to the opposite power wire.
This is the finished Result
Wafer thermostat shown from inside with insulation cut around.
Porcelain lamp and ceramic heat emitter shown and had to add a heat deflector to keep from melting the insulation, it is just a piece of metal flashing I had laying around.
Just a shot with the door open showing the insulation hanging over creating the door stop and insulation on the roof of the brooder. The plexiglass was attached with screws and I drilled 3/8"holes in it every 6" or so to allow for ventilation.

This a pic of the side wher I wired everything up. Its not pretty but works. Hard to see in the pic but the thermostat adjustment rods stick out and allow me to adjust the temps.
It could probably use some paint but it works so I'm not touching it .
If I had to do it all over ,and I still may, I'd do a couple things just a little different. First it would have to be a little bigger maybe 3'Wx8'L and double stacked. I know I'd make it so that I'd have droppings pans and a hardware cloth floor to make cleaning easier. Its not hard to clean now but my last one I had pans built for and it worked great. Other than that it really does a good job and has quite a few happy residents!!!