I have a broody who has added about 4 eggs to her clutch over the last couple weeks, and she started hatching the eggs I gave her yesterday. My incubator (china-bator) has been doing great, but it's full! So I decided to make my own lock down incubator! My plan is to keep my china-bator with the egg turner going and move my clutch that is currently in it to the one I made in a couple of days when it's time for lock down! It took some tweeking but, so far it is holding temp and humidity. Now to add some eggs!
I have poured over this site and others for ideas, and this is what I came up with!
Side note: I am "crafty" not "handy", and I'm not comfortable with wiring things so I wanted to make sure everything I used was already "put together"!!! Also, ignore the temps on all but the 1st pic! All the other pics are after it was opened for photographing!


SUPPLIES:
-Styrofoam cooler with tight fitting lid
*$5/grocery store
-5.5" clamp light with hood (Looks like a mini version of a brooder lamp)
*$10/Lowes
-15w light bulb (not LED)
*$3 for 2/Dollar General
-XL coffee mug (make sure it's heavy, and wide enough to clamp your light on it, but not so tall that your lamp hits the lid of the cooler)
*Free/my cupboard
-electrical tape
*$1.25 for a pack of 2/Dollar Tree
-USB mini fan
*less than $5/Shein (I bought it a while ago and don't remember exactly but I wouldn't have paid more than a few dollars for it from Shein)
-AccuRite Thermometer/Hygrometer
*$10/Walmart
-5×7 picture frame (for the glass)
*$1.25/ Dollar Tree
-Tin Foil
*Free/my pantry (chicken math )
)
Instructions:
Choose the location of your window. It can go in the lid if your cooler allows for it (mine was vaulted so wouldn't work), or on the side like mine. Trace around the glass that came from the picture frame. Cut out the styrofoam about 1/4 inch INSIDE the line you drew. Keep the leftover styrofoam.
Now, line the bottom and part way up the sides of your cooler with foil (shiny side up), and fasten with electrical tape. Some people glue theirs down, but I wanted to be able to change it with every hatch for easy clean up. I also lined the top of my lid with foil to help maintain the temp.
It's time to attach your window with electrical tape. You can also tape the leftover styrofoam piece in front of the glass if you are losing heat but don't want to cover your vent holes.
Speaking of vent holes! Use a pencil to poke about 4 holes into the cooler. I put 2 in the lid, and 2 on the sides. I positioned 1 of the holes in the lid to act as a peephole so that I can see the water level in the mug. The holes can be covered with a little electrical tape if you can't keep temp or humidity up.
Once all of that is done, clamp your lamp to your XL coffee mug, and sit it down in your cooler where you want it. Cut a small notch in the top edge of the cooler, and in the little lip of the lid where the cord comes out. This spot will also offer ventilation.
At this point, fill your cup with water. I add green food coloring to mine so I can see the water level easier. You can also position your fan, and run the cord out the same spot as your light cord. I propped mine up on the handle of the mug. Make sure none of your cords are touching your lamp.
It's finally time to plug her in and see what happens!
If you struggle with maintaining heat, you can try the things listed above and/or you can add more foil to the walls, put a towel on top of the lid, and/or cover the whole thing with a blanket or towel. You can also change the wattage of your bulb but in my trials this had the opposite effect for me and my temps were way too high.
If your struggle is humidity, you can add a sponge and/or paper towel to your mug. You can also add another container to increase the surface area of your water. You can put tape over some of your ventilation holes, but make sure you don't cover all of them! Those babies need to breathe!
Hope this helps someone!
I will update progress once I get some eggs in there!
This shows the window covered.
This shows how the lamp is clamped to the mug.
With lid
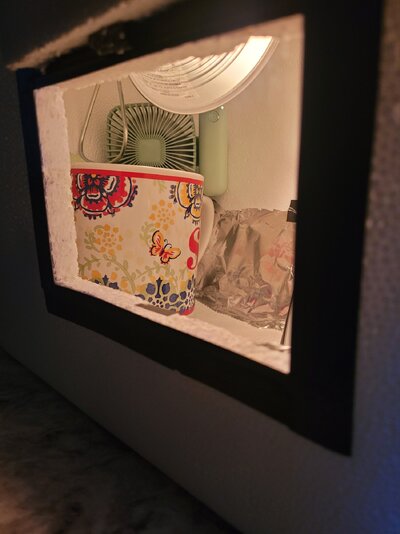
Window view
Vent holes- 1 is covered. The other is my peep hole.
Close up of the peep hole! You can see my green water!
Close up of the notch for the cords.
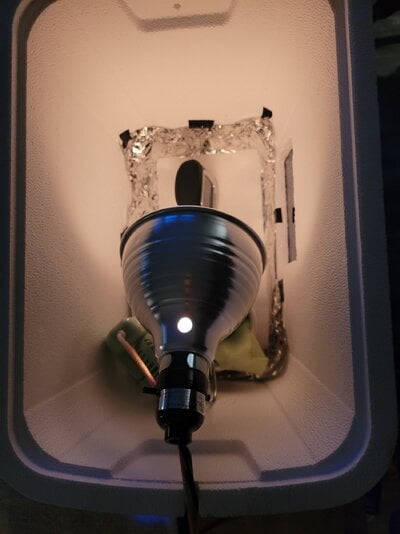
Close up of lamp hood and bulb
Close up of lamp set up
View from above
UPDATE:
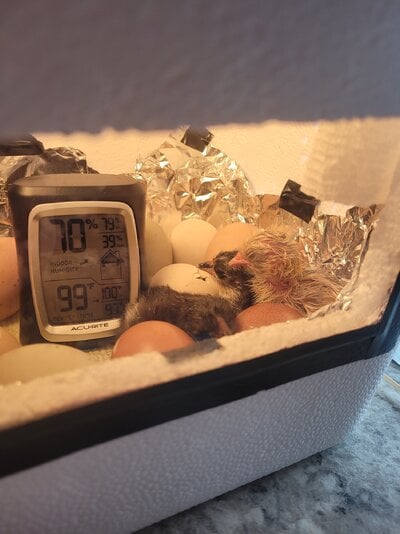
I completed that first hatch, and I'm on to the 2nd! Of the 17 eggs that went into lockdown in this incubator, 16 hatched! The only egg that didn't hatch was a dark egg that I never could see through when candeling so I put it in as a just in case.
Clean up was easy. I just pulled out the cup, light and fan, removed and replaced the foil from the bottom, and wiped down the window. Over all I am very happy with this incubator and will be using it with each hatch as a lockdown incubator.
For this 2nd hatch, I made a couple of changes. The first time around I struggled with keeping the temperature consistent. We (Oklahoma) had a very warm days and very cold nights, and the temperature in my house flip flopped a lot. It really effected the temperature of the incubator and I found myself constantly having to add a towel here, or remove some tape there. In one of the reviews to this article, someone suggested a reptile thermostat. I went and bought one yesterday, and it has already made a huge difference in maintaining a constant temperature in there!
*ZooMed Reptitemp Digital Thermostat-$35 at Petsmart (pic below)
I also added a new fan because the old one was very noisy.
*Amazon Fan- $13 https://www.amazon.com/dp/B0BV7DW9CS?ref_=cm_sw_r_apan_dp_9H59D6TD9JFTKAVP9JD6&language=en-US
(pic below)
These 2 items increased the overall cost of this incubator by quite a bit, but in my opinion it is totally worth it for my purposes!
I can't resist sharing a few hatch pics! I will include pics from the viewing window and from one of the vent holes at the top!


I have poured over this site and others for ideas, and this is what I came up with!
Side note: I am "crafty" not "handy", and I'm not comfortable with wiring things so I wanted to make sure everything I used was already "put together"!!! Also, ignore the temps on all but the 1st pic! All the other pics are after it was opened for photographing!
SUPPLIES:
-Styrofoam cooler with tight fitting lid
*$5/grocery store
-5.5" clamp light with hood (Looks like a mini version of a brooder lamp)
*$10/Lowes
-15w light bulb (not LED)
*$3 for 2/Dollar General
-XL coffee mug (make sure it's heavy, and wide enough to clamp your light on it, but not so tall that your lamp hits the lid of the cooler)
*Free/my cupboard
-electrical tape
*$1.25 for a pack of 2/Dollar Tree
-USB mini fan
*less than $5/Shein (I bought it a while ago and don't remember exactly but I wouldn't have paid more than a few dollars for it from Shein)
-AccuRite Thermometer/Hygrometer
*$10/Walmart
-5×7 picture frame (for the glass)
*$1.25/ Dollar Tree
-Tin Foil
*Free/my pantry (chicken math
)Instructions:
Choose the location of your window. It can go in the lid if your cooler allows for it (mine was vaulted so wouldn't work), or on the side like mine. Trace around the glass that came from the picture frame. Cut out the styrofoam about 1/4 inch INSIDE the line you drew. Keep the leftover styrofoam.
Now, line the bottom and part way up the sides of your cooler with foil (shiny side up), and fasten with electrical tape. Some people glue theirs down, but I wanted to be able to change it with every hatch for easy clean up. I also lined the top of my lid with foil to help maintain the temp.
It's time to attach your window with electrical tape. You can also tape the leftover styrofoam piece in front of the glass if you are losing heat but don't want to cover your vent holes.
Speaking of vent holes! Use a pencil to poke about 4 holes into the cooler. I put 2 in the lid, and 2 on the sides. I positioned 1 of the holes in the lid to act as a peephole so that I can see the water level in the mug. The holes can be covered with a little electrical tape if you can't keep temp or humidity up.
Once all of that is done, clamp your lamp to your XL coffee mug, and sit it down in your cooler where you want it. Cut a small notch in the top edge of the cooler, and in the little lip of the lid where the cord comes out. This spot will also offer ventilation.
At this point, fill your cup with water. I add green food coloring to mine so I can see the water level easier. You can also position your fan, and run the cord out the same spot as your light cord. I propped mine up on the handle of the mug. Make sure none of your cords are touching your lamp.
It's finally time to plug her in and see what happens!
If you struggle with maintaining heat, you can try the things listed above and/or you can add more foil to the walls, put a towel on top of the lid, and/or cover the whole thing with a blanket or towel. You can also change the wattage of your bulb but in my trials this had the opposite effect for me and my temps were way too high.
If your struggle is humidity, you can add a sponge and/or paper towel to your mug. You can also add another container to increase the surface area of your water. You can put tape over some of your ventilation holes, but make sure you don't cover all of them! Those babies need to breathe!
Hope this helps someone!
I will update progress once I get some eggs in there!
This shows the window covered.
This shows how the lamp is clamped to the mug.
With lid
Window view
Vent holes- 1 is covered. The other is my peep hole.
Close up of the peep hole! You can see my green water!
Close up of the notch for the cords.
Close up of lamp hood and bulb
Close up of lamp set up
View from above
UPDATE:
I completed that first hatch, and I'm on to the 2nd! Of the 17 eggs that went into lockdown in this incubator, 16 hatched! The only egg that didn't hatch was a dark egg that I never could see through when candeling so I put it in as a just in case.
Clean up was easy. I just pulled out the cup, light and fan, removed and replaced the foil from the bottom, and wiped down the window. Over all I am very happy with this incubator and will be using it with each hatch as a lockdown incubator.
For this 2nd hatch, I made a couple of changes. The first time around I struggled with keeping the temperature consistent. We (Oklahoma) had a very warm days and very cold nights, and the temperature in my house flip flopped a lot. It really effected the temperature of the incubator and I found myself constantly having to add a towel here, or remove some tape there. In one of the reviews to this article, someone suggested a reptile thermostat. I went and bought one yesterday, and it has already made a huge difference in maintaining a constant temperature in there!
*ZooMed Reptitemp Digital Thermostat-$35 at Petsmart (pic below)
I also added a new fan because the old one was very noisy.
*Amazon Fan- $13 https://www.amazon.com/dp/B0BV7DW9CS?ref_=cm_sw_r_apan_dp_9H59D6TD9JFTKAVP9JD6&language=en-US
(pic below)
These 2 items increased the overall cost of this incubator by quite a bit, but in my opinion it is totally worth it for my purposes!
I can't resist sharing a few hatch pics!
I will include pics from the viewing window and from one of the vent holes at the top!