Fort Thomas

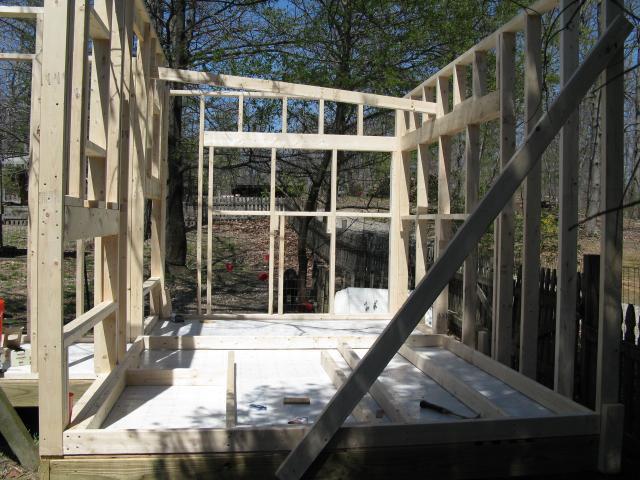
The Foundation:
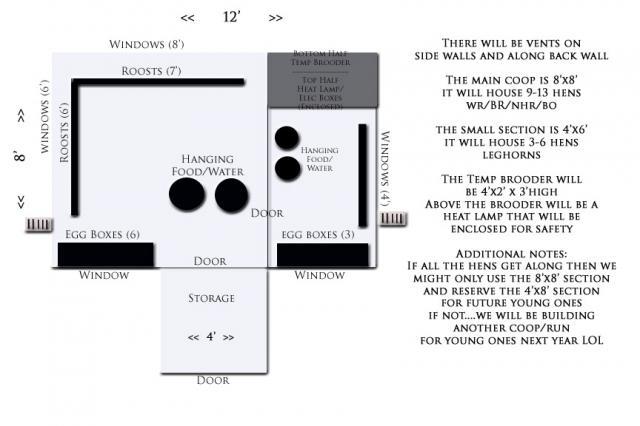
The coop will be 12' x 8' with a 4' storage room/entrance room.
There will be two doors so I can close the main door before opening the inside door to the coop. Don't want the girls to run out into the yard since the dogs will probably be close by.
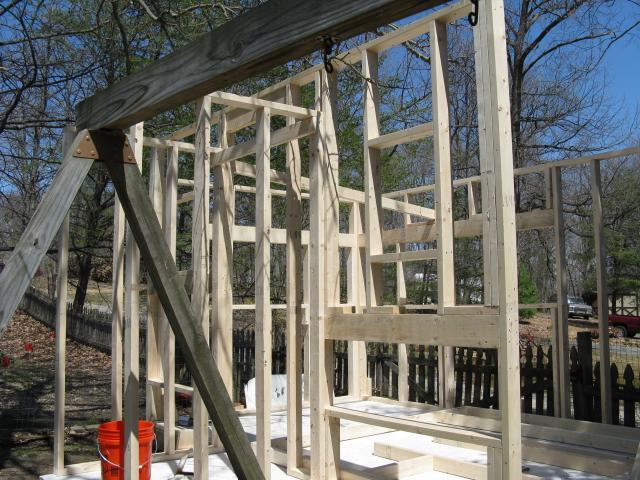
We built the foundation in 3 parts. 4x8' , 4x12' and 4x8'.
Flipped each part over and put boards on bottom to hold insulation and keep out predators.
Then we secured them together.
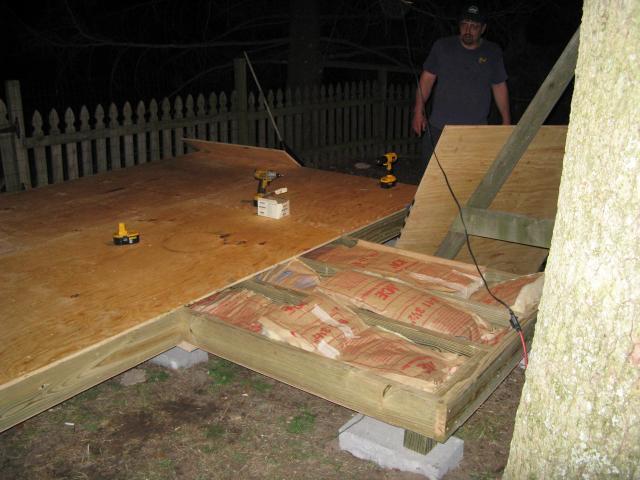
Insulation in and laying plywood on top. Had to bring out a light since we needed to get it done and covered before the rain started in the morning.
After laying the plywood we rolled out vinyl flooring to protect the plywood and for future easy cleaning. (Sorry didn't get pics since it was so late)
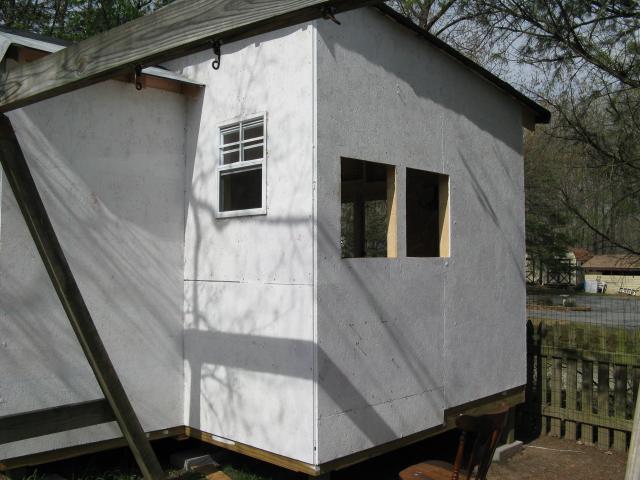
The outside walls:
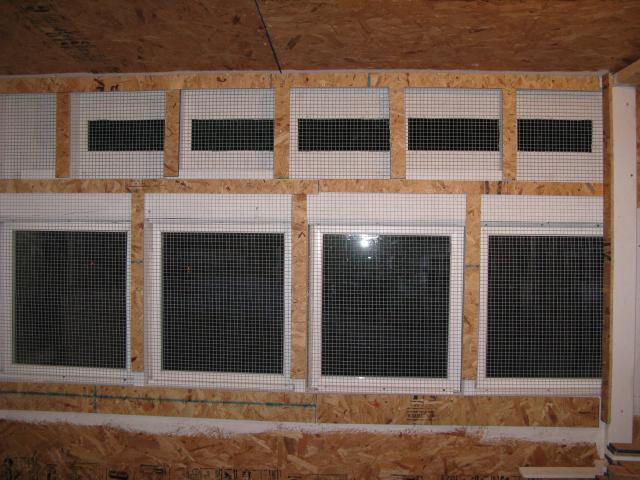
We purchased 10 double paned windows (just the window panes) for $5.00 each. The roosts will be under the windows so there'll be no fighting for a window seat.
We also purchased 2 windows for the front which can be opened. The egg boxes are under those windows on either side of the entrance room. (Pardon the swing set in the way of pic....it'll be moved soon but for now we are working around it)
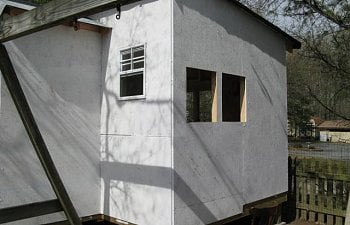
The siding (Chipboard...$5.83 each at Home Depot) is on and a coat of Kilz to prime and cover the blue lines. Red paint will follow with white trim (if the rain ever stops)
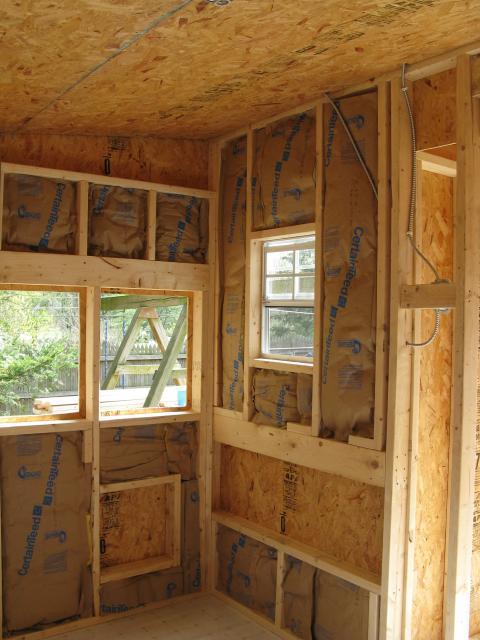
The Inside:
All the walls and ceiling are insulated and covered with chipboard. Windows are cut out. Egg boxes and pop door openings are framed and ready to build when we get that far.
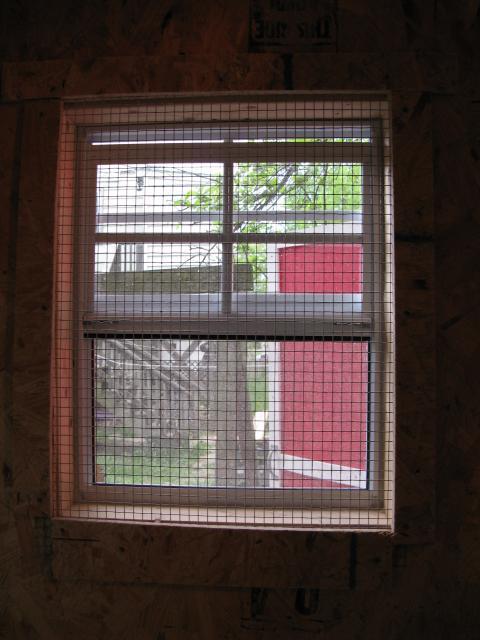
Windows are put in with lots of sillicone to stop drafts and covered with hardare cloth. We used strips of chip board to screw the hardcloth to wall and also to protect the girls from any rough edges.
This is a pic of one of the front windows which open. DH wants to make a "door" with the hardware cloth so that I can open and close the windows easier. For now the hardware cloth is screwed on for security. Won't be closing the window until fall or winter anyway.
I will be painting all the walls white since it is brighter and I hope that will promote more egg laying and happier hens.
Of course pictures will be hung and carpet laid out.....just joking.
Lighting and Electricity:
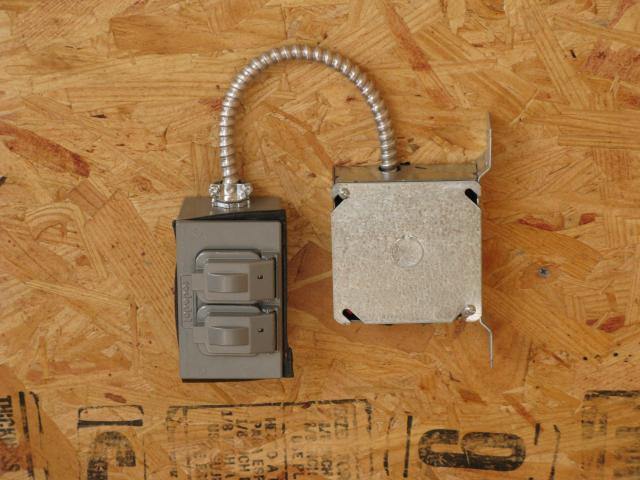
Currently we have a male hook-up on the outside of coop to plug in a heavy duty electrical cord. We will be upgrading to electric wire inside of conduit after all the other work (expense LOL) is done. On the inside we used BX cable installed behind boards. There is one light on the ceiling and an weather proof outlet to plug in brooder light. We also installed a junction box for possible future needs. It will be enclosed behind hardware cloth to keep the brats out.
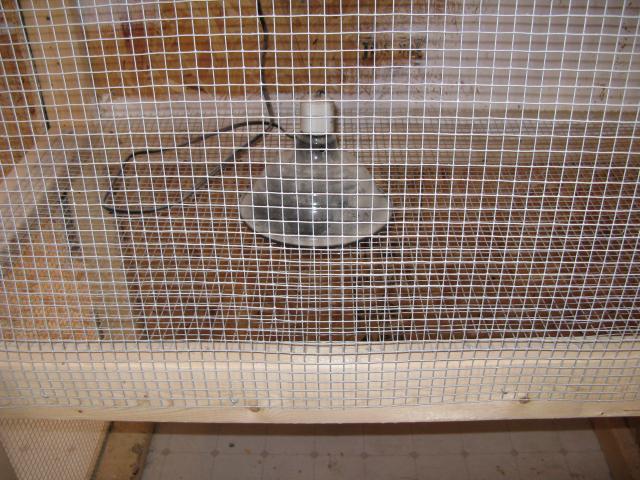
Heat Lamp (not needed so much now)
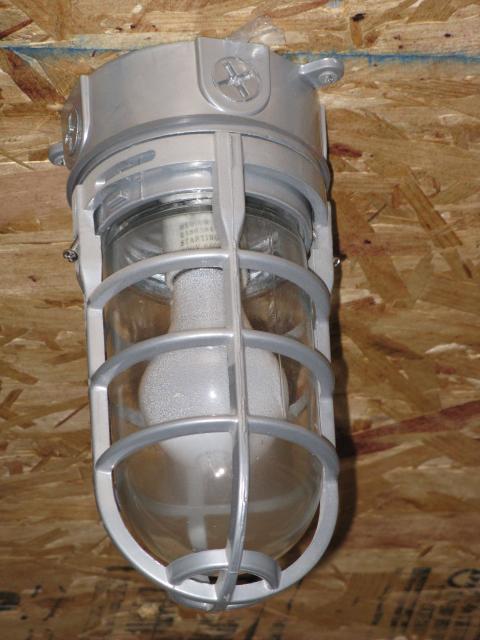
We found this covered light fixture for the ceiling at Home Depot:
I have also decided to add a light fixture to put a low watt red light in as a night light for the girls. Will add pic after install.
Ventilation:
The double paned windows above the perches do not open and are well sealed to prevent drafts. The floor, roof and most of the walls are insulated due to cold winters. But we needed ventilation and a method to cool the coop in the hot summer months. So.......
Ventilation holes were cut near the roof along the back wall and on the side walls. They are covered on both sides with hardware cloth and the back ventilation holes will have a door/flap that can be closed on very cold days.
And for those hot summer nights.......
A "wind turbine" was installed in the roof. From what I understand, the hot air rises which causes the turbine to spin. The spinning causes an upflow of air moving. Since the pop doors will remain open the flow will go from floor to ceiling. In the winter we can cover the ceiling opening to prevent heat loss.
Inside Doors:
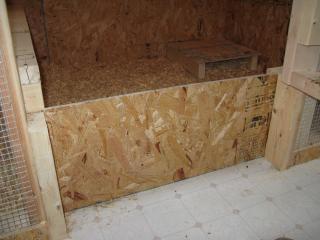
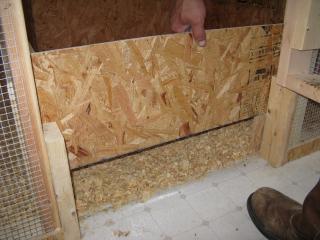
Since we will be using the deep litter method and have two inside doors, DH built the doors about 8 inches off the floor and made a removable partition to fill in the opening.
Pop Doors:
Because we work varied hours, the pop doors will remain open except when needed to close the girls in due to extreme cold, snow or hurricanes. (We get it all here in Maryland). The runs will be as predator proof as we can get them to allow for the open doors. (Pics to be added soon).
Egg Boxes:
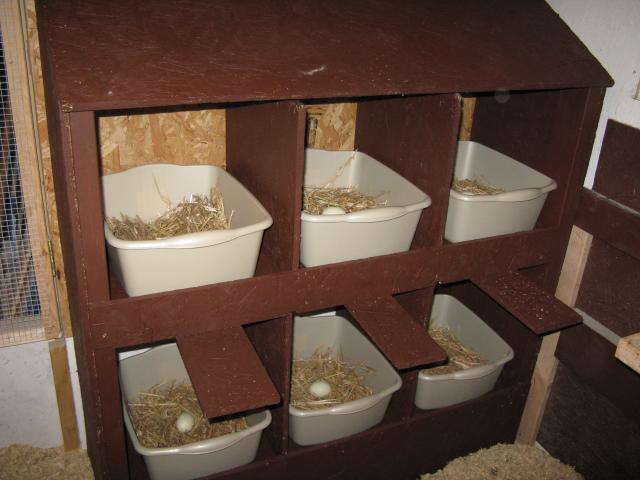
There are 6 egg boxes in the large pen and we plan on 3 egg boxes in the small pen. The egg boxes are 13 x 16 x 16. I put dish pans in the boxes for easy clean up. The boxes are installed inside the coop (for warmth in winter). We decided against having an outside egg door because we wanted to reduce any "weak links" (from predators) and we don't mind going inside the coop to collect eggs. (gives me a chance to check things out).
Things I've learned while building "The Coop":
1. Band Aids, Band Aids, Band Aids.
2. Red paint WILL NOT cover the blue lines on chipboard.
3. Rain is not my friend when trying to get this done (but very much needed).
4. Just buy the large tub of screws to start with.
5. It has cost way more than what our original budget was.
6. The girls are worth it.
The Foundation:
The coop will be 12' x 8' with a 4' storage room/entrance room.
There will be two doors so I can close the main door before opening the inside door to the coop. Don't want the girls to run out into the yard since the dogs will probably be close by.
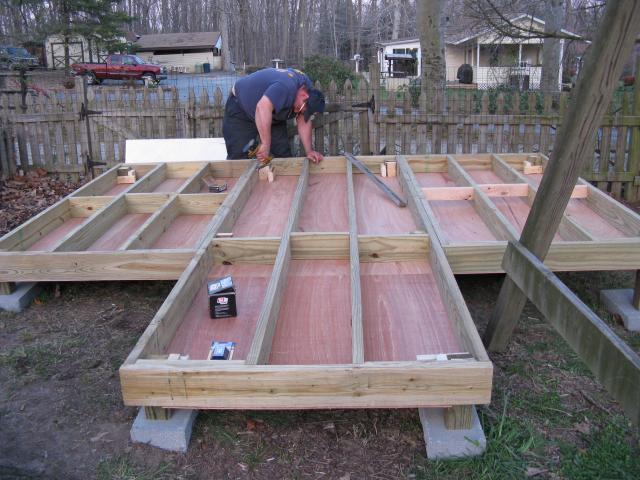
We built the foundation in 3 parts. 4x8' , 4x12' and 4x8'.
Flipped each part over and put boards on bottom to hold insulation and keep out predators.
Then we secured them together.

Insulation in and laying plywood on top. Had to bring out a light since we needed to get it done and covered before the rain started in the morning.
After laying the plywood we rolled out vinyl flooring to protect the plywood and for future easy cleaning. (Sorry didn't get pics since it was so late)
The outside walls:
We purchased 10 double paned windows (just the window panes) for $5.00 each. The roosts will be under the windows so there'll be no fighting for a window seat.
We also purchased 2 windows for the front which can be opened. The egg boxes are under those windows on either side of the entrance room. (Pardon the swing set in the way of pic....it'll be moved soon but for now we are working around it)
The siding (Chipboard...$5.83 each at Home Depot) is on and a coat of Kilz to prime and cover the blue lines. Red paint will follow with white trim (if the rain ever stops)
The Inside:
All the walls and ceiling are insulated and covered with chipboard. Windows are cut out. Egg boxes and pop door openings are framed and ready to build when we get that far.
Windows are put in with lots of sillicone to stop drafts and covered with hardare cloth. We used strips of chip board to screw the hardcloth to wall and also to protect the girls from any rough edges.

This is a pic of one of the front windows which open. DH wants to make a "door" with the hardware cloth so that I can open and close the windows easier. For now the hardware cloth is screwed on for security. Won't be closing the window until fall or winter anyway.
I will be painting all the walls white since it is brighter and I hope that will promote more egg laying and happier hens.
Of course pictures will be hung and carpet laid out.....just joking.
Lighting and Electricity:
Currently we have a male hook-up on the outside of coop to plug in a heavy duty electrical cord. We will be upgrading to electric wire inside of conduit after all the other work (expense LOL) is done. On the inside we used BX cable installed behind boards. There is one light on the ceiling and an weather proof outlet to plug in brooder light. We also installed a junction box for possible future needs. It will be enclosed behind hardware cloth to keep the brats out.
Heat Lamp (not needed so much now)
We found this covered light fixture for the ceiling at Home Depot:
I have also decided to add a light fixture to put a low watt red light in as a night light for the girls. Will add pic after install.
Ventilation:
The double paned windows above the perches do not open and are well sealed to prevent drafts. The floor, roof and most of the walls are insulated due to cold winters. But we needed ventilation and a method to cool the coop in the hot summer months. So.......
Ventilation holes were cut near the roof along the back wall and on the side walls. They are covered on both sides with hardware cloth and the back ventilation holes will have a door/flap that can be closed on very cold days.
And for those hot summer nights.......
A "wind turbine" was installed in the roof. From what I understand, the hot air rises which causes the turbine to spin. The spinning causes an upflow of air moving. Since the pop doors will remain open the flow will go from floor to ceiling. In the winter we can cover the ceiling opening to prevent heat loss.

Inside Doors:
Since we will be using the deep litter method and have two inside doors, DH built the doors about 8 inches off the floor and made a removable partition to fill in the opening.
Pop Doors:
Because we work varied hours, the pop doors will remain open except when needed to close the girls in due to extreme cold, snow or hurricanes. (We get it all here in Maryland). The runs will be as predator proof as we can get them to allow for the open doors. (Pics to be added soon).
Egg Boxes:
There are 6 egg boxes in the large pen and we plan on 3 egg boxes in the small pen. The egg boxes are 13 x 16 x 16. I put dish pans in the boxes for easy clean up. The boxes are installed inside the coop (for warmth in winter). We decided against having an outside egg door because we wanted to reduce any "weak links" (from predators) and we don't mind going inside the coop to collect eggs. (gives me a chance to check things out).
Things I've learned while building "The Coop":
1. Band Aids, Band Aids, Band Aids.
2. Red paint WILL NOT cover the blue lines on chipboard.
3. Rain is not my friend when trying to get this done (but very much needed).
4. Just buy the large tub of screws to start with.
5. It has cost way more than what our original budget was.
6. The girls are worth it.