Geo's Hatch Box
(Click on thumbnails to enlarge photos.)
My main goal was to build an economical incubator that was sturdier than regular foam cooler-type incubators. I figured I could scrounge up enough materials around the house (which seems to be in a constant state of remolding) to construct it. I've perused the forums and asked plenty of questions on BYC to get some ideas on style, shape and inner workings of fellow members' creations.
Plans
I drew multiple sketches to get an idea how I wanted my incubator to look.
My main interest were the following:
• Size and dimension
• Location of various elements (bulbs, thermostat, window, etc.)
The BeginningMy main interest were the following:
• Size and dimension
• Location of various elements (bulbs, thermostat, window, etc.)
Early on in my design I liked the idea of having a separate heat chamber. This would allow me to accomplish a couple of things.
One — I wouldn't have to worry about chicks getting tangled in wires
Two — Eggs and chicks would not be in close proximity to the bulbs.
Three — There would be plenty of room for chicks to hatch and roam around to dry off.
In order to do this, I had to figure out how to get the heat and air to circulate and function correctly.
Construction
I found a couple of 1 x 12 x 8 boards laying around to use for the sides. Some scrape 1 x 4 pieces and a sheet of half-inch exterior wafer board used for roofing. I had some odd 3/4-inch plywood pieces, plus a couple of scrape plywood cabinet doors with hinges still attached that would be repurposed.
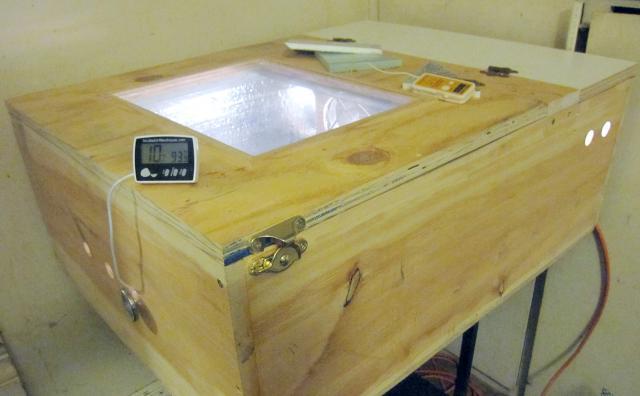
The exterior dimensions are 24 inches wide by 32 inches deep.
Using 1 1/2-inch screws and a spot of glue, I constructed the sides first. Then attached the wafer board to the bottom. I used my belt sander to flush the joints smooth.
To create the heat chamber I measure 7 inches from one end and attached a T-shaped piece with 6-inch by 8-inch sections cut out at each end. This would become the vents for air to circulate through the incubator.

I then installed a 1 x 4 cross brace in front of the T-shape divider and flushed it with the top boards for added support to connect the lid doors later on. NOTE: Make sure you have a stubby screwdriver handy to use. The space doesn't allow for a screw gun to drive in screws.
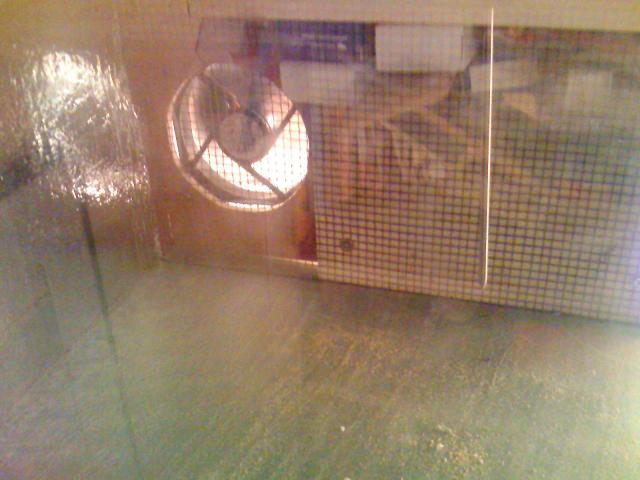
Next, I cut a piece of mesh wire to fit in front of the T-shape divider. This will keep the chicks from entering in the danger zone. I secured it with small screws fitted with washers. I put a few in the T-shaped divider and a few in the bent mesh wire that meets the floor.

For bulb placement, I had a round junction box I positioned in the center of the back board. I used a pencil and marked around the box and used a jigsaw to cut out the hole. Since there wasn't a means to attach the junction box securely, I drilled two holes in the plastic to secure it to the wood.

Vent holes
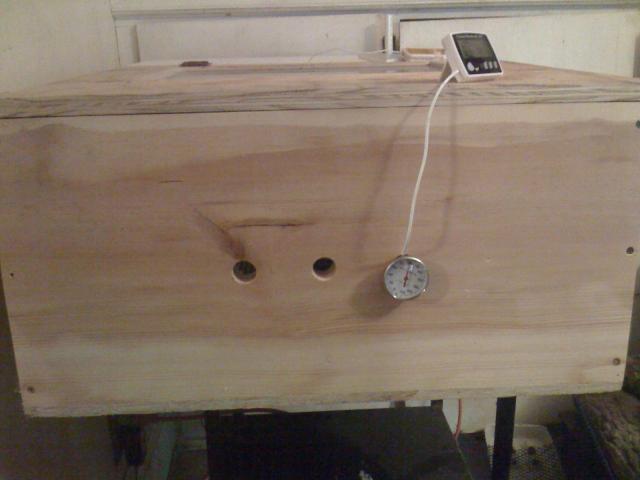
I really didn't know where to put these, but I figured I needed at least three in the heat chamber. One in the back to allow my water tube and a couple on the side to allow fresh, outside air in. I drilled these toward the top of the incubator. In hindsight. perhaps I should of made these lower. In the front, I made three vent holes about 3-inches apart in the middle of the board. I think I should of placed these higher. I made the vent holes before I installed the insulation.
Insulation
Below are two samples of insulation I used. I placed the 3/8-inch foil foam on the sides. I'm not sure what this type of insulation is used for, but it was cheap and I am installing it as a vapor barrier in my bathroom. The other is a thicker and harder insulation board that is used to line the inside of metal buildings. I used this to line the floor and inside top of my incubator.

I measured and cut the longer side walls first for the foil insulation. Making them as snug a fit as I could. Next I cut the thicker insulation board to fit in the floor. This enable the floor piece to keep the sides tightly in place. There were a few areas where I used small screws with washers to tighten up gaps in the loose insulation toward the top of the incubator.
Here's a couple of photos showing the heat chamber and insulation during an early stage of construction. Note the incorrect placement of my thermostat.

Making the doors (lids)
The first thing I had to do was to attach another 1 x 4 to the top of the existing 1 x 4 to secure my hinges onto. I glued and placed a couple of screws to secure the wood. I removed the hinges off the old plywood cabinet doors, then measured and cut the heat chamber lid. I had to find another piece of 3/4-inche plywood for the egg chamber lid because my opening was a tad to large to reuse the other plywood cabinet door. Lucky for me my brother had a scape piece. I measured and cut to fit. I attached the hinges and used my belt sander to flush up the sides.
I attached the harder insulation board to the top by using plastic washers and screws. I measured and test fitted the insulation board before I attached it and marked it on the lid. I had to do some trimming with the matt knife to make a snug fit.
For the window, I used a piece of 1/4-inch plexiglas I happen to have tucked away in a junk pile. I routed a 1/8-inch bevel to make a lip to seat the glass into. I then place a bead of silicon caulk around the edge and dropped in the plexiglass. I mitered some trim to overlap the plexiglass and wood and used small finishing nails to seat the window.

Wiring
This was relatively east for me, but can be confusing. The thing you want to remember is that the thermostat has to break the circuitry. As you can see by the photo below, the black wires are connected to the bulb fixture only. (It would also work correctly if you only hooked up the white wires to the bulb fixture.) The bottom wires go to the thermostat and the top wires go to the plug. The ground wire shows the bare copper wire.

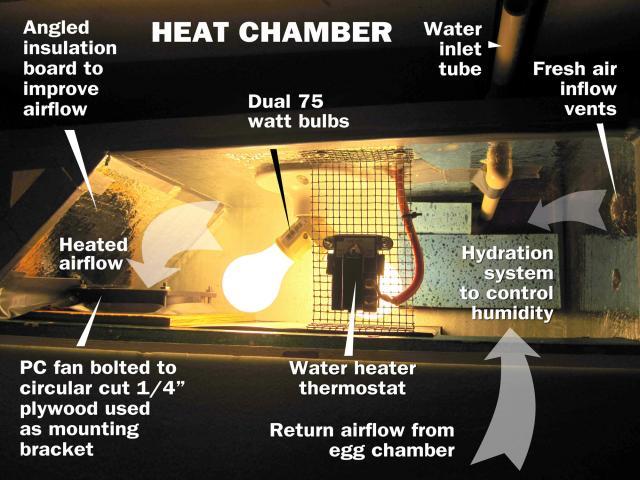
The heat chamber
Thermostat — The most difficult thing for me to get right. I moved this thing FOUR times before settling on a permanent place for it. I decided to use the common water heater thermostat many Do-It-Yourselfers are installing in their homemade incubators here on BYC.
After much consternation — I finally stumbled upon the secret. Place the metal side 1 to 1.5 inches directly in front of the bulb. As you may have noticed in a photo early on in my construction process, I place the thermostat in the egg chamber. DOH! The temperature swings were huge. What was I thinking? Another secret — wire mesh can be used in everything.
I also drilled a couple of 1/8-inch holes in the side of the thermostat. Here's a link by a BYC member on how to do that. I think this may have helped open up the thermostat, but it isn't near as important as the proper placement of the device. Scroll to the bottom third of the page to see how jus1jack did this modification.

Bulbs — Make them hot, hot, hot. I began with 15-watt bulbs, then I tried 60-watt. I finally decided on TWO 75-watt bulbs. Keep in mind that my incubator is a mid-size box made of wood. I have sufficient amount of space to heat — and heat fast. I discovered that the radiant heat from the bulb is what interacts with the little wafer inside the thermostat. The cooling and heating is what triggers the speed of the wafer to go off and on. If you notice in the picture below, I placed a piece of 6-inch galvanized metal flashing to the T-shape divider. This will help heat reflect off the flashing instead of being absorbed by the painted plywood.

Airflow — This one I had down pat or I was lucky. The key is to seal off areas around the 12-volt PC fan. This forces the fan to draw heated air from the bulbs and push it into the egg chamber. It then swirls around and exits the opposite vent to be reheated. I first had to figure out which direction air was blowing from the fan. I discovered, with my PC fan, the manufacture's label placement is the direction the air will blow.
I constructed a bracket made out of 1/4-inch plywood and cut a circular hole to match the size of the blades in the middle to secure my PC fan onto. I then attached it to my T-shape divider with a couple of small screws. I figured if it ever stopped working, I could just unscrew it from the incubator, slide it out and replace with another without taking too much stuff apart.

To increase airflow efficiency, I cut an angled piece of foil foam insulation and place it in the corner at a 45-degree angle. I wanted to grab as much hot air as I could. This seems to work really well. I slapped on some duct tape to keep it in place.

Hydration — To supply humidity to my hatch box I devised a method where I could add water through an exterior 1/2-inch PVC pipe. I used two 90-degree elbows and cut a piece of pipe that barely touches the bottom of the water container inside the box. I cut another piece of pipe to set a small funnel on the tube outside the incubator.

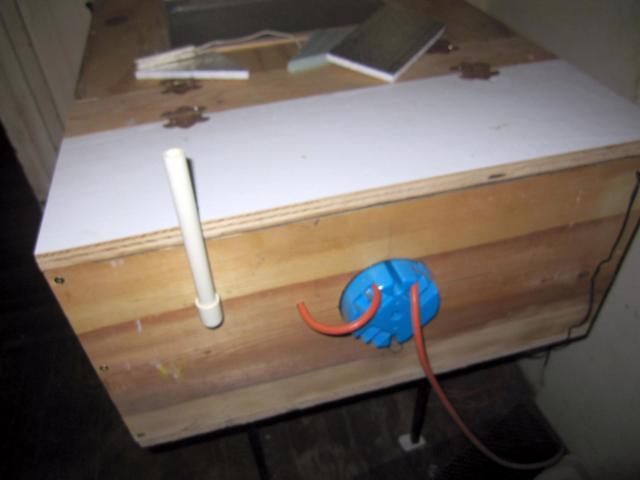
I originally wanted the water to set in front of the fan so it would be heated, but since space was tight, I was content with it being in front of the return air flow from the egg chamber and the intake vents on the side walls in the heat chamber. I used a mop sponge to soak up water to increase the surface area. I carefully pealed it off a replacement mop head I had laying around. The mop it belonged to has long disappeared. I cut the mop sponge to fit inside the plastic container and tucked the excess in beside it. The plastic container was originally a display box with a plastic lid. I'm not sure what it was used for, but it was the perfect size for my needs.
Humidity — Argg! Here's another tough obstacle I had to figure out. I have three hygrometers in this thing and they all read differently. With the help of many forum posts on this subject, I found a nice article on how to calibrate your digital or analog hygrometer. I found my large analog hygrometer to be the most accurate.

The dual hygrometer/thermometer I bought through Egg Warehouse reads 30 percent to low. There isn't a function to reset it, so I have to mentally take note to add to the reading. I've since bought another digital hygrometer that has a calibration function. I'm still waiting on it to arrive in the mail. At this time, my incubator is running with no water and reads about 37 percent humidity. I would prefer it to be a little lower, 30 percent would be ideal, but this is sufficient for now.
In regards to humidity — I've decided that I'm going to use the dry incubation method on my eggs. You may also want to consider trying this. Here's a great article Bill Worrell wrote on how low humidity levels can greatly increase hatch rates. He concluded that large amounts of humidity during the first 18 days of incubation slows the absorption rate of the embryo. By the time the eggs are ready to hatch, the chicks basically drown from undeveloped air sacks and excessive fluids.
Here's a detailed photo of my competed heat chamber labeling all the essential devices working in concert to create an ideal environment for hatching fertile chicken eggs.
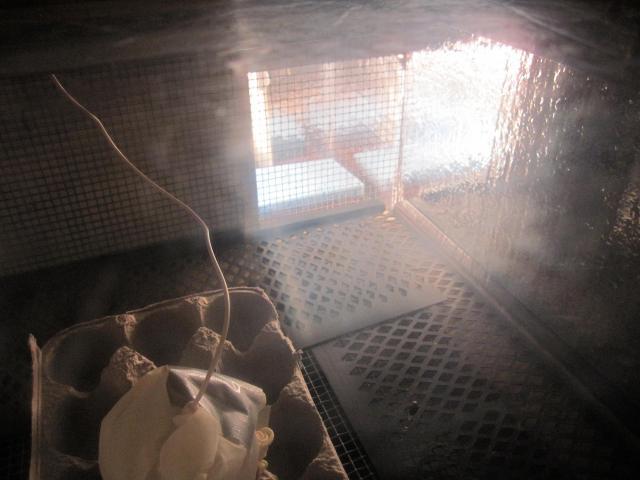
Flooring
The purpose of constructing a floor is to raise the eggs to an optimal heated level of circulating air. I made this out of plastic gutter grates, plastic zip ties and more wire mesh. I laid this on top of scrap pieces of 1 x 2 boards fitted around the sides of the egg chamber. I wanted the floor removable so I could scrub off chick goo after hatching. (I hear they make a real mess.) You can see in the photos below that the floor lies just below the fan. Note: I used a bunch of zip ties. Each tie makes the flooring stronger.

Thermometers
How many are too many? Egads. I have five in there. Three analog and two digital and a third one on its way. I have been relying on my digital thermometers to zone in my thermostat. I am comparing the Spot Check thermometer with the Egg Warehouse thermometer. I discovered that the Spot Check thermometer is useless when dangled in the circulated air. It will always read hotter. To use this accurately, it needs to be place in a "water wiggler."
If you're new to BYC you may be asking yourself, "what the heck is that?" I did the google to find out. It's a toy tube filled with a water-like substance that squirms through your hands as you squeeze it. It also happens to be the perfect item to stick your Spot Check probe into.


I've yet to find one at my local Wally World. So, I fabricated my own using duct tape and a surgical glove partially filled with water. UPDATE: You can find them in the party section of Wally-World. Just look for the bags of party favors. They are a buck a piece.
Using these two thermometers, I compared the Spot Check thermometer (SPT) against the Egg Warehouse thermometer (EWT). The SPT became very stable inside my homemade wiggler while the SPT moved up and down about 1 degree. I adjusted the range of the EWT where SPT would fall directly in the middle of the temperature reading. Example: If my EWT range was 99.0 to 100.0 — my SPT would read a perfect 99.5 degrees.
You may also have to take in consideration the temperature outside your incubator. I found that my reading fell a couple of tenths in the morning and pick back up in the afternoon. Taping vent holes also affects temperature. If you find your reading lacking, try plugging up one vent hole to raise the heat slightly.
Test run
I can't stress enough how important it is to test your incubator before placing in fertile eggs. I still have mine running and it's been a good 2 weeks since I finished it. I've been monitoring and tweaking it ever since.
Thermal mass — I also discovered that if you put in a few jars of water inside your incubator it will help stabilize the temperature by way of thermal mass. The jars of water heat up when the bulbs are on and emit heat when they are off. Here's a photo of the thermal jars I have located in my homemade incubator. I strategically placed them where I thought the temperature might be cooler inside the incubator.

Conclusion
I really enjoyed constructing my homemade incubator. With lots of valuable information from BYC and its members, I had plenty of help answering a plethora of questions. I have been able to stabilized the temperature in the incubator and the water heater thermostat is working perfectly. It cycles on and off about every 2 to 3 minutes.
I think I'm ready to begin the hatching process — as soon as my egg turner arrives. eBay sellers can sometimes take forever to ship goods. My daughters keep asking me when will we get the eggs. Hopefully soon!
This is my first time building an incubator as well as trying to hatch eggs. I have a local source for Black Copper Marans eggs that will become my chicken of choice. And, I won't have to worry about shipped eggs. That's a big relief.
If you have comments or questions, please feel free to PM me. I will do my best and try to answer them.
Thanks for stopping by!