Hatching Quail Eggs

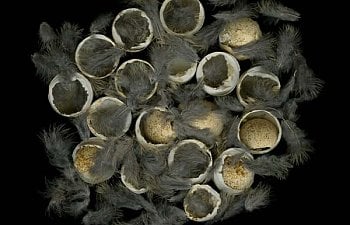
(California Quail eggs after a hatch)
Hatching Quail can be a fun and educational experience for the entire family. Since Quail are not as available as many of the other species of poultry, often this is the only way to increase the size your Quail flock. It is rare for Quail to go broody in captivity so an incubator will be needed. There is nothing more heartwarming than watching a tiny egg turn into a small baby Quail. Some say that watching Quail hatch is like watching corn pop because of the quickness of their zipping out of the egg. Once they get started in zipping, there is no stopping them! They are fast and just like to pop right out of their shells!
Getting Started
First thing, you will need to purchase an incubator or build one yourself. I have never tried to build my own, but there is a section in our learning center on homemade incubators you might get some ideas from. There are lots of good brands of incubators out there on the market that are affordable. For the sake of this article, I am not going to go into all the different brands of incubators and how they operate as that is an entire other article all together! However I do suggest you do your research into the different makes and models and pick the right one for you. There are a few threads here on BYC as well on the best incubators. I will tell you, there are certain things to look for to make your incubating experience easier on you. Try to stay clear of "still-air" incubators. These are machines that do not use fans to move air. Still-air can cause hot spots all throughout the incubator and can cause developmental issues to the embyos. So I will recommend "forced-air", incubators with fans. This will distribute the air evenly all throughout the machine and draw in more oxygen as well. Also, pick a machine that has egg turners in it. Some makes and models sell the turners on the side, so I do recommend you get the turner as well. You can turn your eggs by hand, but it is a lot easier on you and healthier for the growing embryos if they are turned more regularly. Get a machine that is easy to add water. Some incubators make it hard to add water and you will need to do this all throughout your cycle. And lastly, if you can find one with vents you can open and close this is a wonderful feature to have. In certain situations you may need to close your vents partially to control humidity or heat levels. I have used incubators with non adjustable vents that stay open all throughout the cycle and have had nothing but success. But sometimes the situation can arise that you want to close some of the vents down.
Purchasing and Storing Your Eggs
If you are going to purchase eggs to hatch, please order from a reliable breeder. This is imperative! I do not recommend any old breeder off E-bay or Craigslist. Do your homework and find a reliable breeder so you are getting quality stock. A good hatch and healthy birds starts with good genetics. Genetics are everything. You don't want to go through the disappointment of a poor hatch or sickly birds. So get good stock! Order more eggs than you want to hatch as some might get broken during shipment or you may not like every egg that was sent to you for some reason. When they arrive, you will want to carefully open the packaging and inspect each and every egg for cracks or other imperfections. You are only going to set the largest and cleanest looking eggs. Don't set any with cracks, funky shaped or really small eggs. The best ones only. You are going to let these eggs rest on your kitchen counter in egg cartons with the large end up. You want these eggs to come to room temperature, let all the air bubbles settle from shipping and the air cell to re-settle in the large end of the egg. Never set eggs you just received and allow them to rest for 12 to 24 hours before setting.
If you are collecting your eggs from your stock, you will want to start collecting a few days before setting. Don't set freshly laid eggs. I like to collect them and with a pencil, date each egg I collect. As I am collecting them, rest the eggs large end up in egg cartons in a cool place in the house. You don't want to refrigerate them nor do you want them resting in a really warm area either as they will start to develop. Try to find a place in the house that is 50 to 60 degrees. Let them rest for 5 days or so. Each day give them a twist several times a day to keep the yolk from sticking to the inside of the egg. Fertility can start to decline after 10 days, so try to set them before this. As stated above, you will want to set only your best and largest eggs. You can mark them from who they came from as well if you want to keep track of genetics.
Setting Your Eggs
Make sure to start with a clean incubator. If you have used it before, blow it out with an air compressor and fumigate it. If it is dirty, you will only be incubating all kinds of bacteria and disease in all that warm moist air and these things can and do kill hatchlings. Get your incubator up and running 24 hours before you are going to set your eggs. You do not want to set eggs in a cold incubator. AND you do not want to be fumbling with getting your machine working! Nothing worse than setting your eggs and then having all kinds of trouble. You can potentially destroy the entire hatch! So get the machine up and running 24 hours in advance so when you set your eggs your temp and humidity is all up to the recommended levels.
The proper temp for hatching Quail eggs for forced air incubators is 99.5 to 99.8 degrees Fahrenheit. Still air is a l00 to 101 degrees Fahrenheit. Humidity levels can vary as per the different species. I have found the larger breeds need a bit more humidity during the incubation cycle than the smaller breeds, but this just might be my climate. You will want to keep your humidity hovering around 50%. If you are hatching Bobwhites or some of the Jumbo breeds of Quail, they seem to grow better with a humidity somewhere between 55% and 60%.
Set your eggs in your machine so that the large end is tilted up a bit. You want to keep the air cell up in the large end of the egg and this also gives the growing embryo a sense of up and down so he will hatch from the large end of the egg. When you first load your incubator, your temp will no doubt drop and your humidity go hay-wire. This is normal. Just as you put warm food in your refrigerator and it takes awhile to warm up all that food, so will be for your eggs. They will take time to come up to temperature and the temp inside the incubator can drop. So give everything time to stabilize. Depending on how many eggs you set, this could take many hours.
Hatching times:
Coturnix Quail: 16-18 days
Button Quail: 16 days
Bobwhite Quail: 22-23 days
Gambel's Quail: 22 days
Mountain Quail: 24-25 days
California Quail: 22-23 days
Blue Scale Quail: 23 days
Montezuma Quail: 24-25 days
The moment you set your eggs, you are working on day 1. So if you set your eggs at noon on Monday, Tuesday at 11:59 am is the end of day 1, noon starts day 2. Then on Wednesday at noon is the beginning of day 3 and so on. Try to set you eggs so that you are going to be home on the estimated time of hatch, say on the weekend. These hatch times are only approximate and not set in stone. So if day 23 comes and goes and your Bobwhites have not hatched, do not panic. There are a few factors that can cause a late hatch, especially if your temperature during incubation was a bit low. A slightly low temp will only delay the hatch and generally won't cause too much problem as long as it was not too awfully low. If you have a power outage any time during the incubation process, don't panic and go moving the incubator or anything. You can risk dropping the machine or making matters worse. Just cover the incubator with a thick blanket and wait until the power comes on. Eggs have enough mass that they do not cool down all that fast. So just because your incubator is stone cold after an hour of a power outage, does not mean your eggs are that cold. They retain heat. In the wild, it is very common for the hen to get off her eggs should a predator be lurking or she needs to eat, drink or bathe. This chill down period will only delay your hatch a few hours to a day, and as long as the power comes back in a few hours should do very little damage if any to the embryos. I have even heard of a fairly decent hatch after a 24 hour power outage.
You can start to candle your eggs around day 8 for most of these species although you don't have to. You should start to see veins appearing around this time. Just be careful you don't drop the eggs. If you do crack one, I have had good luck with a tiny piece of scotch tape over the crack. If you don't cover the crack with something, the embryo will dry up and die. Heavily spotted eggs can be difficult to candle. The lighter colored eggs are easy to candle with a very bright flashlight in a dark room. By lock down, you should see only a very dark mass beneath the air cell.
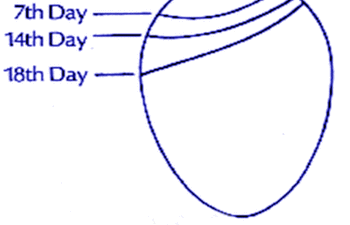
Humidity is important to monitor during the incubation process. Too dry and the egg looses too much weight. Too wet and the egg doesn't lose enough. The yolk is what the embryo is going to feed on all during the cycle. You don't want it drying up too fast and the embryo itself dehydrating if your humidity is too low. However you don't want the air cell to not grow large enough. You want that air cell to be just large enough so that at hatch time, the chick can internally pip into this air cell and breath oxygen. Here is a diagram of the desired size of the air cell at certain stages...(this is a chicken egg however this works the same for all poultry)

Keep your eggs turning. If you don't have a turner, turn them at LEAST 3 times a day if not more. In these professional hatcheries, eggs are turned once an hour. The reason for the turning of the egg is that they embyo is laying in a certain area and is feeding off of what is available in that area. Once the food is gone, the nutrients need to be replenished. The lack of turning eggs enough can lead to deformities in the chicks or even death of the embryo. Turning your eggs is easy to do. You can put an X on one side of the egg. Imagine the rocking back and forth of a ship, back and forth, back and forth. That is how you are going to turn your eggs. The X will get turned to the other side, 180 degrees each time you turn your eggs. Each hour, turn to one side, the next hour turn to the other side. Never turn your eggs 360 degrees around.
Lock Down
Lock down is the day you will want to stop turning your eggs. 3 days before the estimated hatch date. This gives the chicks time to get into position to hatch. You can either let them hatch in your incubator or move them to a hatcher at this point. Some people like to candle at this point to remove any eggs that are not viable. No matter where you hatch them, lay down some non stick material either in your incubator or hatcher. This will give the chicks firm footing to prevent spraddle legs on a slick surface. I like to use that rubber shelf liner with the tiny holes in it. In your incubator, remove the turners if they come out. If not, cover them with this material. Some hatchers have 1/4 inch hardware cloth in them and this is fine as is. You will also want to up your humidity by 15% above your incubation humidity level or somewhere around 65% to 70%. This does a couple things. One, it softens the egg shells a bit so they can zip out easier. Second, when the chicks are ready to begin the process of hatching, they will pip (poke a tiny hole through the shell to breathe). During this time they can dry out, sticking to the shells and die if they dry out. Keep your humidity up! You do NOT want to ever open the incubator when there is pipping going on. If there is no pipping, you can open the lid if you must, but never when there is pipping. Do not panic when they pip and sit there for 24+ hours like this all pipped. They are busy absorbing the last of the yolk and detaching themselves from the inside of the egg. They do not need busting out, so let them do their thing. They will hatch when they are ready. Unlike chicken chicks that can go 3 days on their absorbed yolk sac, Quail cannot go that long. 36 hours maximum. I like to get them out by 24 hours if I can. Let them fully dry before removing them from the incubator or hatcher.
Brooding Quail Chicks
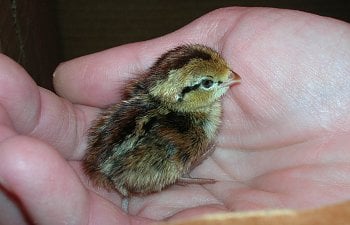
Have your brooder ready so when the chicks hatch, you can transfer them quickly into a warm area. Be very careful when removing chicks from the incubator so you don't drop them. A brooder can be anything from a cardboard box, a plastic tote or even one of those round livestock watering troughs. Use only brooders that have a solid floor and 4 solid walls. No open brooding areas for Quail. Quail chicks are very susceptable to drafts and dying in the brooder so pay attention to detail when setting up their area. Never cram chicks in. It only leads to over heating, aggression, trampling, starving and or dying of thirst due to too much competition. So start with giving them about 1/2 square foot per chick in the brooder. As they grow, depending on the breed and their size, you may need to increase this size to 1 square foot at 3 weeks of age. (You will need to follow this space requirement for all chicks in the New World Quail grouping.)
For bedding, you can use pine shavings, (never use cedar shavings...toxic on the lungs) grass hay or even raise them on wire. I raise all my chicks on wire...1/4 inch to start and then 1/2 inch by 2 or 3 weeks of age. Wire is very sanitary for the chicks. Babies are pooping machines and the poop also carries Coccidiosis which Quail chicks are very susceptable too. Cocci kills. You can lose entire batches of Quail due to cocci. If you do not use wire, keep your brooder EXTREMELY clean! If you are finding soiled feed and water, keep water and feed elevated after they are large enough to reach, keep it clean and remove all wet bedding daily.
Baby Quail are extremely tiny at hatch, ranging from as small as a button and on up to the size of a bumble bee and can drown very easily in their water. So you will want to use either a chick waterer with tiny stones or use a regular water font with tiny stones or marbles in the base. And this is especially important if you are hatching Button Quail. If you only have a couple chicks, the lid of a jelly jar with tiny stones in it works well too. Just something to keep them from falling in as they can and do. When transferring your chicks to the brooder, individually dip each beak in the water. Quail need to drink immediately after hatch. Set them down right in front of the water so they will keep drinking. This also helps to prevent pasty butt. Eating before drinking after hatch leads to pasty butt through dehydration. So make SURE they all get a good drink of water before eating. If you have to, dip the beaks again later that day to make sure they all know where the water is.
You will want to lay paper towels down over your bedding for the first week and sprinkle CRUSHED gamebird chick starter all around the feeder area on these towels so they can find the feed. Do not be tempted to use chicken chick starter as it does not have enough protein for growing Quail babies and can cause all kinds if growth and health issues. Once you know they all know where the feed is stored, you can removed the towels, usually after 3 days or so. You can stop crushing the feed after 1 to 2 weeks depending on which breed and size you are raising. Quail chicks are too tiny to eat the crumbles right out of the bag. It doesn't have to be powder, but make sure it is small enough for them to eat or they will starve to death. You will need to tap with your fingers at the food throughout that first day to help them find the food. Quail are just not that smart at hatch.
As for heat and lighting...I recommend using an Infra-red bulb (not to be confused with the standard red bulb). Infra-red will allow for a normal sleeping pattern at night and keeps Quail mentally chilled. It is also a very penetrable light warming them internally. Bobwhites are notorious for killing each other in the brooder so never use a white light on Bobs. White lighting is too excitable and if they are not sleeping, you will have little killing monsters on your hands. White lighting can burn the surface but leave the internal tissue cold. So infra-red only. Red bulb if you can't find infra-red. Lay a good thermometer on the floor directly beneath the heat source. Heat on one side of the brooder, food and water on the other. This will allow for cool spots in the brooder. Chicks can't yet regulate their internal temps and can over heat or chill very easily. So give them places to cool off. Start the heat off at 95 to 97 degrees Fahrenheit. (The New World birds like it a bit higher than 95.) Make SURE your thermometer is reading correctly as even a few degrees off in either direction and you can kill your chicks. You are going to lower the temp by 5 degrees each week until they are fully feathered or 5 to 6 weeks. If at any time you start to see aggression in the brooder, you either have them crammed in and or it is way too warm for them. Give them more space if they need it and lower the temp by 3 or 4 degrees. Then you will work your heat down from there each week. Heat/light is left on 24/7 until they are ready to head outside to their new living quarters.
You can also give them things to do in the brooder too. It can get mighty boring in there at times. After a few days or so I like to put some cut branches from outside to give them places to climb on, and a low box with some sand, alfalfa leaves and chick starter in it gives them a place to scratch around in. They also might appreciate some small mirrors or parrot toys. Just make sure there is nothing that they can swallow on these toys.
Change the water daily and keep the feeder topped off and clean. Keep the brooder as clean as possible at all times.
Lastly, do NOT cover your brooder with anything but a screen or wire. You want good heat and oxygen exchange out the top of the brooder. A screen also helps protect them should the light fall into the brooder.
At 5 to 6 weeks, they are now ready to head outside to their living area.
Hatching Quail is an experience you will never forget! With each hatch, you will learn and improve on techniques and hatching skills. Don't worry, these tiny adorable chicks will have you trained up in no time!
For more information on keeping quail see these articles:
https://www.backyardchickens.com/a/getting-started-in-raising-and-keeping-quail
https://www.backyardchickens.com/a/quail-breeds-and-how-to-pick-the-right-bird-for-you
Link to our learning center on homemade brooders:
https://www.backyardchickens.com/a/homemade-chicken-egg-incubator-designs-pictures
And you will also want to stop by our quail section here on BYC for help, sharing pics or stories about your quail:
https://www.backyardchickens.com/f/48/quail
(California Quail eggs after a hatch)
Hatching Quail can be a fun and educational experience for the entire family. Since Quail are not as available as many of the other species of poultry, often this is the only way to increase the size your Quail flock. It is rare for Quail to go broody in captivity so an incubator will be needed. There is nothing more heartwarming than watching a tiny egg turn into a small baby Quail. Some say that watching Quail hatch is like watching corn pop because of the quickness of their zipping out of the egg. Once they get started in zipping, there is no stopping them! They are fast and just like to pop right out of their shells!
Getting Started
First thing, you will need to purchase an incubator or build one yourself. I have never tried to build my own, but there is a section in our learning center on homemade incubators you might get some ideas from. There are lots of good brands of incubators out there on the market that are affordable. For the sake of this article, I am not going to go into all the different brands of incubators and how they operate as that is an entire other article all together! However I do suggest you do your research into the different makes and models and pick the right one for you. There are a few threads here on BYC as well on the best incubators. I will tell you, there are certain things to look for to make your incubating experience easier on you. Try to stay clear of "still-air" incubators. These are machines that do not use fans to move air. Still-air can cause hot spots all throughout the incubator and can cause developmental issues to the embyos. So I will recommend "forced-air", incubators with fans. This will distribute the air evenly all throughout the machine and draw in more oxygen as well. Also, pick a machine that has egg turners in it. Some makes and models sell the turners on the side, so I do recommend you get the turner as well. You can turn your eggs by hand, but it is a lot easier on you and healthier for the growing embryos if they are turned more regularly. Get a machine that is easy to add water. Some incubators make it hard to add water and you will need to do this all throughout your cycle. And lastly, if you can find one with vents you can open and close this is a wonderful feature to have. In certain situations you may need to close your vents partially to control humidity or heat levels. I have used incubators with non adjustable vents that stay open all throughout the cycle and have had nothing but success. But sometimes the situation can arise that you want to close some of the vents down.
Purchasing and Storing Your Eggs
If you are going to purchase eggs to hatch, please order from a reliable breeder. This is imperative! I do not recommend any old breeder off E-bay or Craigslist. Do your homework and find a reliable breeder so you are getting quality stock. A good hatch and healthy birds starts with good genetics. Genetics are everything. You don't want to go through the disappointment of a poor hatch or sickly birds. So get good stock! Order more eggs than you want to hatch as some might get broken during shipment or you may not like every egg that was sent to you for some reason. When they arrive, you will want to carefully open the packaging and inspect each and every egg for cracks or other imperfections. You are only going to set the largest and cleanest looking eggs. Don't set any with cracks, funky shaped or really small eggs. The best ones only. You are going to let these eggs rest on your kitchen counter in egg cartons with the large end up. You want these eggs to come to room temperature, let all the air bubbles settle from shipping and the air cell to re-settle in the large end of the egg. Never set eggs you just received and allow them to rest for 12 to 24 hours before setting.
If you are collecting your eggs from your stock, you will want to start collecting a few days before setting. Don't set freshly laid eggs. I like to collect them and with a pencil, date each egg I collect. As I am collecting them, rest the eggs large end up in egg cartons in a cool place in the house. You don't want to refrigerate them nor do you want them resting in a really warm area either as they will start to develop. Try to find a place in the house that is 50 to 60 degrees. Let them rest for 5 days or so. Each day give them a twist several times a day to keep the yolk from sticking to the inside of the egg. Fertility can start to decline after 10 days, so try to set them before this. As stated above, you will want to set only your best and largest eggs. You can mark them from who they came from as well if you want to keep track of genetics.
Setting Your Eggs
Make sure to start with a clean incubator. If you have used it before, blow it out with an air compressor and fumigate it. If it is dirty, you will only be incubating all kinds of bacteria and disease in all that warm moist air and these things can and do kill hatchlings. Get your incubator up and running 24 hours before you are going to set your eggs. You do not want to set eggs in a cold incubator. AND you do not want to be fumbling with getting your machine working! Nothing worse than setting your eggs and then having all kinds of trouble. You can potentially destroy the entire hatch! So get the machine up and running 24 hours in advance so when you set your eggs your temp and humidity is all up to the recommended levels.
The proper temp for hatching Quail eggs for forced air incubators is 99.5 to 99.8 degrees Fahrenheit. Still air is a l00 to 101 degrees Fahrenheit. Humidity levels can vary as per the different species. I have found the larger breeds need a bit more humidity during the incubation cycle than the smaller breeds, but this just might be my climate. You will want to keep your humidity hovering around 50%. If you are hatching Bobwhites or some of the Jumbo breeds of Quail, they seem to grow better with a humidity somewhere between 55% and 60%.
Set your eggs in your machine so that the large end is tilted up a bit. You want to keep the air cell up in the large end of the egg and this also gives the growing embryo a sense of up and down so he will hatch from the large end of the egg. When you first load your incubator, your temp will no doubt drop and your humidity go hay-wire. This is normal. Just as you put warm food in your refrigerator and it takes awhile to warm up all that food, so will be for your eggs. They will take time to come up to temperature and the temp inside the incubator can drop. So give everything time to stabilize. Depending on how many eggs you set, this could take many hours.
Hatching times:
Coturnix Quail: 16-18 days
Button Quail: 16 days
Bobwhite Quail: 22-23 days
Gambel's Quail: 22 days
Mountain Quail: 24-25 days
California Quail: 22-23 days
Blue Scale Quail: 23 days
Montezuma Quail: 24-25 days
The moment you set your eggs, you are working on day 1. So if you set your eggs at noon on Monday, Tuesday at 11:59 am is the end of day 1, noon starts day 2. Then on Wednesday at noon is the beginning of day 3 and so on. Try to set you eggs so that you are going to be home on the estimated time of hatch, say on the weekend. These hatch times are only approximate and not set in stone. So if day 23 comes and goes and your Bobwhites have not hatched, do not panic. There are a few factors that can cause a late hatch, especially if your temperature during incubation was a bit low. A slightly low temp will only delay the hatch and generally won't cause too much problem as long as it was not too awfully low. If you have a power outage any time during the incubation process, don't panic and go moving the incubator or anything. You can risk dropping the machine or making matters worse. Just cover the incubator with a thick blanket and wait until the power comes on. Eggs have enough mass that they do not cool down all that fast. So just because your incubator is stone cold after an hour of a power outage, does not mean your eggs are that cold. They retain heat. In the wild, it is very common for the hen to get off her eggs should a predator be lurking or she needs to eat, drink or bathe. This chill down period will only delay your hatch a few hours to a day, and as long as the power comes back in a few hours should do very little damage if any to the embryos. I have even heard of a fairly decent hatch after a 24 hour power outage.
You can start to candle your eggs around day 8 for most of these species although you don't have to. You should start to see veins appearing around this time. Just be careful you don't drop the eggs. If you do crack one, I have had good luck with a tiny piece of scotch tape over the crack. If you don't cover the crack with something, the embryo will dry up and die. Heavily spotted eggs can be difficult to candle. The lighter colored eggs are easy to candle with a very bright flashlight in a dark room. By lock down, you should see only a very dark mass beneath the air cell.
Humidity is important to monitor during the incubation process. Too dry and the egg looses too much weight. Too wet and the egg doesn't lose enough. The yolk is what the embryo is going to feed on all during the cycle. You don't want it drying up too fast and the embryo itself dehydrating if your humidity is too low. However you don't want the air cell to not grow large enough. You want that air cell to be just large enough so that at hatch time, the chick can internally pip into this air cell and breath oxygen. Here is a diagram of the desired size of the air cell at certain stages...(this is a chicken egg however this works the same for all poultry)
Keep your eggs turning. If you don't have a turner, turn them at LEAST 3 times a day if not more. In these professional hatcheries, eggs are turned once an hour. The reason for the turning of the egg is that they embyo is laying in a certain area and is feeding off of what is available in that area. Once the food is gone, the nutrients need to be replenished. The lack of turning eggs enough can lead to deformities in the chicks or even death of the embryo. Turning your eggs is easy to do. You can put an X on one side of the egg. Imagine the rocking back and forth of a ship, back and forth, back and forth. That is how you are going to turn your eggs. The X will get turned to the other side, 180 degrees each time you turn your eggs. Each hour, turn to one side, the next hour turn to the other side. Never turn your eggs 360 degrees around.
Lock Down
Lock down is the day you will want to stop turning your eggs. 3 days before the estimated hatch date. This gives the chicks time to get into position to hatch. You can either let them hatch in your incubator or move them to a hatcher at this point. Some people like to candle at this point to remove any eggs that are not viable. No matter where you hatch them, lay down some non stick material either in your incubator or hatcher. This will give the chicks firm footing to prevent spraddle legs on a slick surface. I like to use that rubber shelf liner with the tiny holes in it. In your incubator, remove the turners if they come out. If not, cover them with this material. Some hatchers have 1/4 inch hardware cloth in them and this is fine as is. You will also want to up your humidity by 15% above your incubation humidity level or somewhere around 65% to 70%. This does a couple things. One, it softens the egg shells a bit so they can zip out easier. Second, when the chicks are ready to begin the process of hatching, they will pip (poke a tiny hole through the shell to breathe). During this time they can dry out, sticking to the shells and die if they dry out. Keep your humidity up! You do NOT want to ever open the incubator when there is pipping going on. If there is no pipping, you can open the lid if you must, but never when there is pipping. Do not panic when they pip and sit there for 24+ hours like this all pipped. They are busy absorbing the last of the yolk and detaching themselves from the inside of the egg. They do not need busting out, so let them do their thing. They will hatch when they are ready. Unlike chicken chicks that can go 3 days on their absorbed yolk sac, Quail cannot go that long. 36 hours maximum. I like to get them out by 24 hours if I can. Let them fully dry before removing them from the incubator or hatcher.
Brooding Quail Chicks
Have your brooder ready so when the chicks hatch, you can transfer them quickly into a warm area. Be very careful when removing chicks from the incubator so you don't drop them. A brooder can be anything from a cardboard box, a plastic tote or even one of those round livestock watering troughs. Use only brooders that have a solid floor and 4 solid walls. No open brooding areas for Quail. Quail chicks are very susceptable to drafts and dying in the brooder so pay attention to detail when setting up their area. Never cram chicks in. It only leads to over heating, aggression, trampling, starving and or dying of thirst due to too much competition. So start with giving them about 1/2 square foot per chick in the brooder. As they grow, depending on the breed and their size, you may need to increase this size to 1 square foot at 3 weeks of age. (You will need to follow this space requirement for all chicks in the New World Quail grouping.)
For bedding, you can use pine shavings, (never use cedar shavings...toxic on the lungs) grass hay or even raise them on wire. I raise all my chicks on wire...1/4 inch to start and then 1/2 inch by 2 or 3 weeks of age. Wire is very sanitary for the chicks. Babies are pooping machines and the poop also carries Coccidiosis which Quail chicks are very susceptable too. Cocci kills. You can lose entire batches of Quail due to cocci. If you do not use wire, keep your brooder EXTREMELY clean! If you are finding soiled feed and water, keep water and feed elevated after they are large enough to reach, keep it clean and remove all wet bedding daily.
Baby Quail are extremely tiny at hatch, ranging from as small as a button and on up to the size of a bumble bee and can drown very easily in their water. So you will want to use either a chick waterer with tiny stones or use a regular water font with tiny stones or marbles in the base. And this is especially important if you are hatching Button Quail. If you only have a couple chicks, the lid of a jelly jar with tiny stones in it works well too. Just something to keep them from falling in as they can and do. When transferring your chicks to the brooder, individually dip each beak in the water. Quail need to drink immediately after hatch. Set them down right in front of the water so they will keep drinking. This also helps to prevent pasty butt. Eating before drinking after hatch leads to pasty butt through dehydration. So make SURE they all get a good drink of water before eating. If you have to, dip the beaks again later that day to make sure they all know where the water is.
You will want to lay paper towels down over your bedding for the first week and sprinkle CRUSHED gamebird chick starter all around the feeder area on these towels so they can find the feed. Do not be tempted to use chicken chick starter as it does not have enough protein for growing Quail babies and can cause all kinds if growth and health issues. Once you know they all know where the feed is stored, you can removed the towels, usually after 3 days or so. You can stop crushing the feed after 1 to 2 weeks depending on which breed and size you are raising. Quail chicks are too tiny to eat the crumbles right out of the bag. It doesn't have to be powder, but make sure it is small enough for them to eat or they will starve to death. You will need to tap with your fingers at the food throughout that first day to help them find the food. Quail are just not that smart at hatch.
As for heat and lighting...I recommend using an Infra-red bulb (not to be confused with the standard red bulb). Infra-red will allow for a normal sleeping pattern at night and keeps Quail mentally chilled. It is also a very penetrable light warming them internally. Bobwhites are notorious for killing each other in the brooder so never use a white light on Bobs. White lighting is too excitable and if they are not sleeping, you will have little killing monsters on your hands. White lighting can burn the surface but leave the internal tissue cold. So infra-red only. Red bulb if you can't find infra-red. Lay a good thermometer on the floor directly beneath the heat source. Heat on one side of the brooder, food and water on the other. This will allow for cool spots in the brooder. Chicks can't yet regulate their internal temps and can over heat or chill very easily. So give them places to cool off. Start the heat off at 95 to 97 degrees Fahrenheit. (The New World birds like it a bit higher than 95.) Make SURE your thermometer is reading correctly as even a few degrees off in either direction and you can kill your chicks. You are going to lower the temp by 5 degrees each week until they are fully feathered or 5 to 6 weeks. If at any time you start to see aggression in the brooder, you either have them crammed in and or it is way too warm for them. Give them more space if they need it and lower the temp by 3 or 4 degrees. Then you will work your heat down from there each week. Heat/light is left on 24/7 until they are ready to head outside to their new living quarters.
You can also give them things to do in the brooder too. It can get mighty boring in there at times. After a few days or so I like to put some cut branches from outside to give them places to climb on, and a low box with some sand, alfalfa leaves and chick starter in it gives them a place to scratch around in. They also might appreciate some small mirrors or parrot toys. Just make sure there is nothing that they can swallow on these toys.
Change the water daily and keep the feeder topped off and clean. Keep the brooder as clean as possible at all times.
Lastly, do NOT cover your brooder with anything but a screen or wire. You want good heat and oxygen exchange out the top of the brooder. A screen also helps protect them should the light fall into the brooder.
At 5 to 6 weeks, they are now ready to head outside to their living area.
Hatching Quail is an experience you will never forget! With each hatch, you will learn and improve on techniques and hatching skills. Don't worry, these tiny adorable chicks will have you trained up in no time!

For more information on keeping quail see these articles:
https://www.backyardchickens.com/a/getting-started-in-raising-and-keeping-quail
https://www.backyardchickens.com/a/quail-breeds-and-how-to-pick-the-right-bird-for-you
Link to our learning center on homemade brooders:
https://www.backyardchickens.com/a/homemade-chicken-egg-incubator-designs-pictures
And you will also want to stop by our quail section here on BYC for help, sharing pics or stories about your quail:
https://www.backyardchickens.com/f/48/quail