At the beginning of this Fall, I had a problem. Chicken math had set in, and I had gone from my beginning flock of birds that fit snugly in an 8x4 coop to a flock that numbered near thirty (not to mention the ducks, goose, and guineas!). Obviously, I needed a bigger coop.
Let me begin by saying I hated my old coop. It was two level, both levels 8' x 4', and the chickens had nesting boxes off the 8' x 4' structure. There was a chicken door and a cleaning door, and I still had an awful time cleaning it because the chicken floor level was 4 feet off the ground. Also, the doors to everything, the duck house, the chicken house, the nesting boxes, took to freezing shut in the winter. There were days the birds were frozen shut inside the coop. There were days I couldn't collect eggs. And the eggs tended to freeze solid, which was just great. And to top it all off, it had a ventilation issue. My poor roosters lost all the points on their combs and got frostbite no matter how often I cleaned it out or how dry I tried to keep it. In short, I loathed my current coop.
So I came up with a list of things I wanted in my new coop, in order of importance:
- Ventilation - never again will my birds have frostbite
- Inside, easy to access nesting boxes.
- Room for the birds to move around a little and stay in on rainy/snowy days
- Walk in - I wanted to be able to stand up in this one
After I made my list, I did some research, and I came up with a hoop coop. They're easy to build, easy to make big, you can walk in and stand up, they offer plenty of ventilation, and, for their size, they tend to be less expensive than all-wood coops. So it was settled, and I got to work.
There were no real drawn out plans for a hoop coop out there, but I knew what I wanted and the construction would be fairly easy so I dove right in without making any solid plans, planning to just make it up as I went.
These are the supplies I started with:
I had a bunch of cattle panels, and some would become the run. Three were for the actual coop structure. I decided to make it 8' by 12', so 96 square feet in all. This was roughly 3 square feet per bird, and since a good chunk of my flock is bantams and the flock will also have a nice big covered run and free ranges when I'm home, this seemed ideal. Plus, with the smaller space, they would be able to heat it up more effectively on chilly winter nights.
For the base, I had two pressure treated 8' 2x4's and two pressure treated 12' 2x4's. These are the only pressure treated boards in the whole coop, since I don't like pressure treated wood around my birds. I only went with it because I wasn't painting and non pressure treated wood touching the ground would eventually rot out. I wanted to avoid that.
I began by building the base, and here it is all completed and square:
It was nice and sturdy, and I had no doubt it would be able to take the pressure of holding the panels in an arc. After the base was done, the next step was to connect the cattle panels together. I decided to use nice, thick, strong zip ties as they were easy to use and pretty inexpensive. I joined them together by using zip ties both vertically and horizontally to keep the panels from shifting either way.
After all was said and done, I had a nice stretch of joined panels. The panels are four feet wide by sixteen feet long, so they covered a good chunk of ground. I suggest you find a nice roomy area to do this part if you make yourself one.
After zip tying them all together, I also ran two 12' 2x4's down the panels and attached them with fence staples to give the structure some additional support and give me something to attach the door frame and back supports to. In the end, I was very glad I did this.
Next was getting the panels on the base. This was a two-person job, and the only part of the build that I had help with. Those cattle panels that are so easy to bend over on their own suddenly get demonic and resist all attempts at bending when they are joined, I found out. Still, I had a friend that was willing to help me wrestle it into place and we got it up. We used fence staples every four inches to make sure that the panels would not be putting enough pressure on individual staples to pop loose. It worked beautifully. Here's the frame all set up and attached to the base.
You can see my old coop in the background here. Way too small for all my birds. I never even finished painting it.
After the hoops were up, I went ahead and put in the back supports. These are just 8' 2x4's cut to fit. I ran them from the base to the support beams I put in at the top of the panels. Then I braced them with some cut 2x4's so the structure could not rock from side to side. You can also see the beginnings of my nesting box racks here.
I set about putting up the nesting box shelves. I wanted something inexpensive and easy to clean. Plus, being able to pick the whole box up and move it was something I really wanted. This way I could easily separate broodies without having to remove them from their nests and risk breaking them. And I raise brahmas, silkies, and orpingtons, so boy do I have broodies. I settled on using five gallon buckets, and made the frame so that they were held snug with pieces of wood, but could be easily lifted up and out. Now I can remove a broody's bucket and replace it with another bucket so everyone could still have use of the favorite nest box.
Before the nest boxes were done, I framed up the door and the poultry door. The door I made three feet wide, so I can fit in cages and things if it's necessary to separate a bird due to injury or to keep a broody and her chicks in their own area until the chicks are bigger. The poultry door had to be large enough to accomodate small geese.
As you can see, one side attached perfectly to the top beam. The other was a little off, so I just ran the frame longer and used a fence staple to attach it to the panels at the top.
Next was wiring the coop and the front and back. The coop I just slung welded wire over, with chicken wire on the bottom two feet to prevent any freak accidents, like a chick getting trapped between the panels and the tarp or something. For the front and back, the bottom two feet is hardware cloth for predator prevention, and the top is welded wire to give it strength. I used pieces of wire and fence staples to attach the welded wire, and pieces of wire and a staple gun to attach the hardware cloth. I also went ahead and made the door and poultry door and put them up. The door is, again, just 2x4's cut to size and was really simple, just a rectangle with a support in the middle.
At this point I also put in the roost and started throwing the tarps up over it to get a feel for what it was going to look like. You can see the roost in here - I just made supports for it out of scrap wood and attached them to the panels with fence staples. The roost itself is twelve feet long and screwed to the supports. When it gets ruined, I can just unscrew it and screw on a new board. I also put a support for it in the middle, which you'll see later after the floor is on.
If you think you're seeing guineas in these pictures, you're not crazy. They were inhabiting the hoop coop as I went, because they have to imprint on a coop for four to eight weeks before they'll reliably return. I decided to start them early.
Next up was getting the tarps securely on. Now that the coop had some occupants, it'd need to be able to shelter them. I started with the back. Overall I used three tarps on this coop, although you could use fewer. I used one for the back, and two for the main part, since I wanted to have extra to put over the part of the run closest to the coop entrance once I got the run built. I used white because it lets in plenty of light. I liked that because my last coop, even with a skylight, was a little gloomy inside, especially when the skylight got covered in snow in the winter.
To begin with, I tossed a tarp over the back and left about two feet extra coming off the bottom. The rest of the tarp covered the back and tucked up over the top of the coop, where it was held in place by some rope and the other tarps. After that, I put the second tarp over the top and left some draping down over the end. I tied this part down over the back tarp so no water could find its way in. Then I lined the whole bottom with cinder blocks to keep diggers out. Eventually all three sides not facing into the run were lined with these. They keep the tarps snug and provide a digging barrier, so it's a two-for-one.
After all the tarps were nice and snug and secure, I put in the floor. I had considered a dirt floor, but rejected that because I don't do the deep litter method and a floor is one more barrier a digging predator has to get through if he wants a chicken dinner. I used a tarp, because any wood placed on the floor would rot out after a while (it's very wet where I am during the spring). I screwed it to the wooden base so that it's not easy for a predator to get in if he does try to dig under.
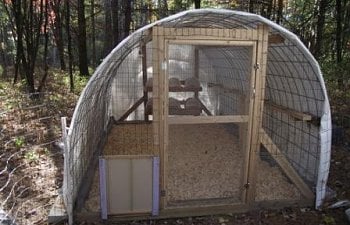
And I was done! Doesn't it look cozy and inviting?
Here's Lime the rooster investigating the new digs:
I really like this coop. I plan to add additional roosting space so the birds can spread out if they want to, and of course I'll be doing their new run off the front with cattle panels. I'll also cover most of the front with clear plastic to help keep the warmth in this winter (leaving plenty of ventilation, of course!).
That said, there are a few things I would do differently (and will, since I'm building another for my faverolles). I would use wire instead of zip ties to put the panels together. As we moved them onto the base the pressure from the panels actually snapped a bunch of zip ties and the panels shifted some. I would also run wire under the tarp to really keep predators out, and I'll be doing this on my next one. Other than that, I'm very happy with this coop!