10/11/2020
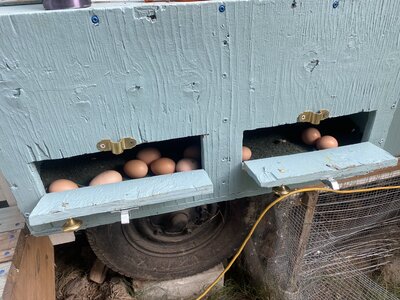
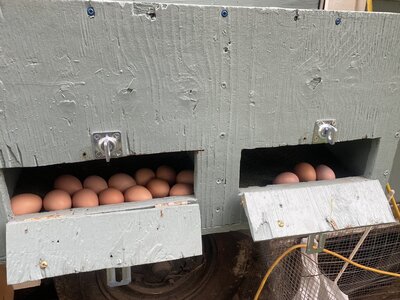
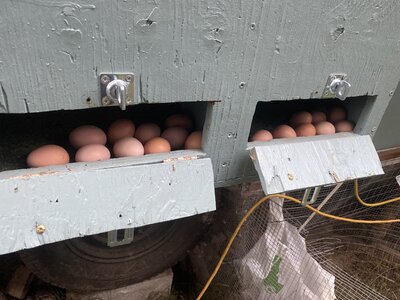
I ordered 25 straight run Black Australorps in March of this year, hoping after selecting the two best roosters, and culling out the poor-doers as someone here at BYC so aptly put it, I would end up with between 8-12 good egg producing hens. Day after day I’m happily watching the egg count slowly climb, so imagine my surprise and astonishment when it hits 21! Of course I was out of town, so no picture of those counts. Well I called the hatchery and they think somebody misread the order and sent me all pullets by mistake. But no worries, we’ll get something worked out in the spring when they’re hatching again. In the meantime I’ve got lots of eggs to share with my wonderful neighbor who is looking after them when I leave. Win-win!
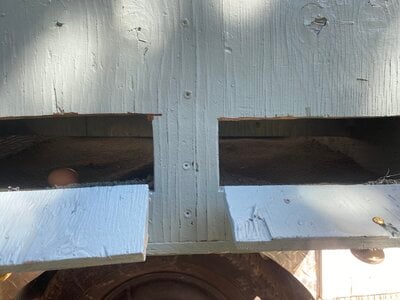
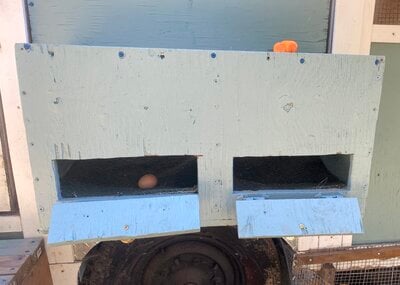
This picture also shows I switched the hardware over to a more secure hasp and carabiner.
Here is a partial list of the changes I am planning on making to the new nest boxes.
3 nest boxes across instead of 2 in each unit
2 units high instead of 3, will still equal 6 nest boxes for 12+- hens each side of the coop, but won’t be so high up and not so wide that 2 birds can cram themselves in at one time.
Inside dimensions of actual boxes will be approximately 10.5" x 13.5" x 7", plus front and rear rollout areas.
Outside access panel door will be one piece for each unit of 3 nests opening upwards. And bigger, the prototype egg door is way too small.
I will probably buy the plastic nest liner material, although I do like the carpet, so we‘ll see....
Trap devices for all nests
Ventilation / peepholes in sides of all vertical panels
Front access rail which can double as a nighttime nest block if needed (although I’ve had absolutely no attempts so far)
Rear (outside portion) insulation and seed mat or reptile heat mat on thermocube under egg collection area to prevent freezing
Dual purpose hinged storage above nests will prevent roosting and secure small canisters of snacks or medical items.
Outside awning over exterior of nest boxes of same smoke grey polycarbonate used on roof.
Hardware to secure position of boxes from movement
I’m sure I’ll add to this list as I get into the building of it.

9/21/2020 Although the system is still working great, I hope to build the new modified boxes soon. I did change to secure locking hasps with carabiners shortly after this picture.
8/26/2020
This says it all. I’m thrilled! Now I can start making the permanent nest boxes with the modifications I need.
8/28/2020
5th day, two hens laying in the (same) nest box. The second egg was so small either it wouldn’t roll or I needed to adjust the carpet.


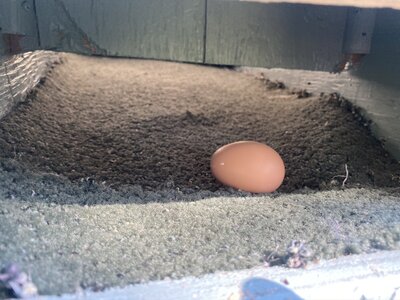
Compared to the 2 laid in the dust box (See picture of tractor tire below) eggs, these last few eggs have been perfectly clean of course, one of the biggest benefits of a roll-away nest box.

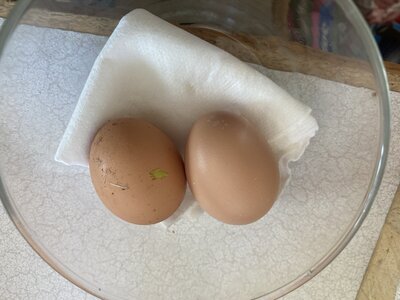
Day 4, one hen laying. Right and left clean eggs from nestbox, top and bottom(the first egg) from the dust box.

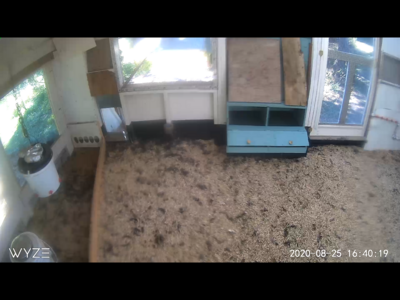
8/25/2020
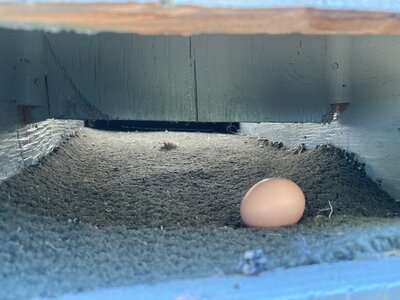
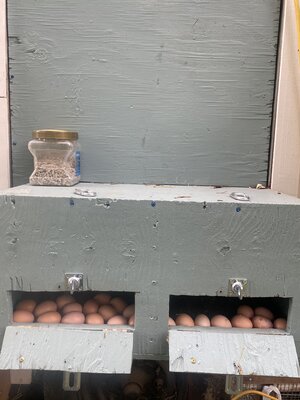
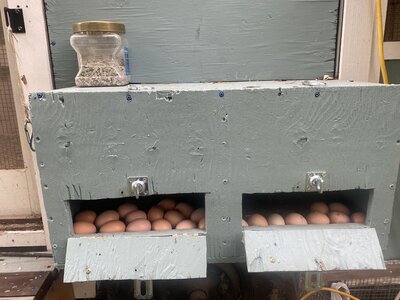
We got our second egg today so I really pushed myself to get this installed. Inside picture is from the Wyze Cam Pan. The grocery bag hanging above the nest box has a (1/3 bought as set) Deco mesh WiFi extender for the cameras. It is amazing how much better our WiFi is! We have a full signal in the coop 100’ from our router!
I’ll Keep an eye on the weather in case I need to protect that flat outside portion of the nest box from rain before I get the next (proper) section done. It wasn’t meant to be used like this, but will buy me some time to build the permanent set.


I didn’t have any AstroTurf to put on the ramps....but we have lots of leftover and scrap pieces of this nice carpet we bought off Craigslist.
So, waste not, want not....


Update and upgrades 8/24/2020
A little paint.....
The prototype is closer to being a working model now. It will hopefully still just be a temporary nest box. I hope to have it available to the hens this week comfortably before they start laying. Lol, I posted this after midnight and guess what?! Hahaha...I was too late! We heard a good hen song this morning and rushed out to find our first egg in the dust “box” (it’s a tractor tire). They will be 19 weeks old Wednesday.
So far I swapped out all the too big hinges for some nicer (and cheap but definitely used) cabinet hinges, added brass knob handles, beefed up the rear partition with some quarter-round stock, and a few other minor things.


This Reversible egg roll out prototype was made with scrap wood so I could work out and test the design.
The main idea is to have an adjustable ramp so I can direct the eggs to roll either forward, to the rear, or be able to take the ramp out altogether if I had a broody hen. I wanted the rear rollout so my neighbor could collect the eggs when I'm not home. I wanted to be able to switch it to forward roll out for when I was home and/or if I wanted to use the traps to select for breeding, etc.....And in the unlikely event, (ha!)....that I have more than two broodies (for my two planned floor brooders), I wanted to be able to take the ramp out completely so I can convert to a regular nest box as needed. ;~)

My first attempt with a two piece angled front egg door.
One piece front egg door and taller hen entryway (11/30/2014)
(11/30/2014)
Rear roll out egg door (on my coop the nest boxes will extend outwards 10" from the wall when the coop is stationary)
First a bit of background....(I tend to be long winded, so I'll try to make the photos self explanatory, however if you enjoy the stories......read on.....)
I'm getting chickens, hopefully NOT UNTIL MY COOPS DONE!!!! As a teenager I lost my chickens from using "chicken wire" (how was a 10 year old supposed to know this?) which is NO GOOD FOR PREDATORS!!!! Just so you know. Not wanting to lose them again!
And since I'm building a rather unique version of the Woods Open Air Style, https://www.backyardchickens.com/a/winged-woods-on-wheels-an-open-air-style-coop-ongoing
I needed to come up with a unique set of nest boxes.
I looked at Opa's rollout design, and like everybody else I loved it! Wow! How easy he made it for us! Thank you Opa !
https://www.backyardchickens.com/t/287684/new-rollout-nest-design-picture-heavy-edited-1-21
I am very fond of having options however and wondered why I couldn't make a reversible system, inside OR outside collection, say for winter and summer? Or if someone else is collecting the eggs for me? Hmmmm
There I was, browsing thru everyone's pictures of their rollout nest boxes and stumbled over Spudd dud's and it hit me! I took a closer look at his ramp support and thought, well now, if I make that piece there a little pointier and put it in the middle, I can make it go either way! I was so enthralled by this idea I made a little cardboard prototype out of a vinegar box as soon as I got home. I was showing it to my DH and we hit on using a rod of some sort for the pivot point. ( I used a plastic drinking straw in the cardboard version.)
Front , no egg box here in this initial rendition.....
Rear egg access doors
Looking down on pivot point with ramp removed
So, fast forward about 5 months.......
Now I'm at a point on my coop build where I need the finished dimensions of the nest boxes to continue. I only have a few more hours I can work on this prototype tomorrow before its off to work, so it's a little rough. Very rough. Sorry! It will be a couple weeks or so before I can work on it again. But you'll get the idea. ;~) I'm sharing now hoping someone else can use as well.
And Opa? If you (or anyone else for that matter) want to play with this, please do! I've been itching to post this since June but couldn't take the time to put one together until now. I already see several modifications I need to make, if I have time tomorrow I will do them. (For one I cut the egg box too tall here, I don't have enough room for the faceplate!)
My finished nest boxes will be three sets high of two across and as these are going into a mobile unit I want to be able to, on VERY rare occasions to be able to move them in about 8" from their normal position, 16" total counting both sides of the trailer, to make it street legal at 106"(8'6") wide. I must have looked at a couple hundred drawer slides and pantry slides, and didn't like any of them. Too flimsy, too many $'s, too hard to modify to my design...)Finally I found a guy who ( http://homeguides.sfgate.com/install-drawer-slide-52764.html ) shows how to build the old fashioned drawer "glides",
No rollers, just a waxed set of 1" x wood fastened into an L shape the length of the cabinet, or in this case nest boxes. (Yeah I know, the simplest ideas are sometimes the best!) I'll put those on the 3/4" plywood base and screen it to make sure no critters can use it as an access point!
So how the reversible roll out works is the ramps are essentially centered on the pivot rod. For this prototype I used what was handy, an old CB Antenna. In my finished version I may use metal rods or a wooden dowel if it's the right size/strength. I've bought an assortment of these, just no time to play with yet. I'll drill a hole through the rod at each end outside, as its span two nests, and put a cotter pin in to hold in place. You could also just use a centered 1 x 2" board crossways in the middle of the nest box. I like the rod/dowel idea so will probably stay with that. If two inches to underneath of ramp doesn't work I'll put an adjustable height device in later. Also, in the pictures I just weighted the ramp down (reverts to rear rollout without it for now) with a wood block. DH suggested a metal swizzle stick like pin (a nail would work too) for more pizazz, or as I originally planned, a small swiveling board or flat piece of rotating metal inside the front egg box to lock ramps up or down. From the front for security reasons.
The ramp lengths are cut about an inch shy of the inside depth at each end to accommodate the XPS type rigid insulation . From my research I determined this moisture resistant solid type would work best for this application
Lowes item screen shot (edited 11/30/2014, turns out Lowes doesn't offer this anymore, at least in my area

Panel at Home Depot
Lowes not only has it a little cheaper than Home Depos, but what was odd was the one at Home Depot was a tongue and groove panel, the same panel Lowes had for $18.70 was $31.95 at Home Depot. Pays to shop around!

Rigid Insulation is for in the back (who likes finding frozen eggs?), the sides too, but only up to the hen partition, and about a 1/2" bumper in the front. This will make it it a bit narrower in the back 9" for the two far outside sections of insulation as well. The ramps will have AstroTurf on them. I calculated Opa's angles for the rollout and used that to get my minimum pivot height. ~ 2". I'm thinking I might have to play with this later as well, but my TEST CHICKEN, a free range sole survivor of a neighbors flock (BLASTED RACOONS!!) and a daily visitor who loved to be cuddled, ALAS, IS NO MORE either. (###***RACOONS!) ;~(
so no test chicken!

The front and back egg boxes are 9" deep and about 12" wide, each, minus the insulation/ bumper, same partition idea of Opa's in the back, a little different design in the front.
If I was putting these in a stationary coop, I'd probably put more of them on the outside, if I was short of interior space that is.
So take a look. I've still got to cut out the back egg door, but since this is just a scrap wood prototype I'm leaving that as it is for now. Imagine the door about 5" or so high, and hinged to swing down (on the bottom set of boxes) with a 2+" high base board to keep the eggsies from rolling out, and wide enough to pull the ramps out for cleaning.
NOTE: the back partitions to keep the eggs away from the hens are not pictured here, see update below
The front face plate allows for an extra few inches to fasten the trap to ( Thank you MANOZ, wherever you are!) probably a wire type, but might make it wood. Won't get my chickens until next year so I do have time....
NOTE, AS I'm posting this on Wednesday night, I will leave off the front for now, IF I can I'll cut those tomorrow and add the pictures tomorrow night.
The front egg box has a couple inch high board (with bumper) at the base also to keep the eggs in, and the hinged part will fasten there. There will be a little rubber "curtain" on the back partition and also at the front to hide the eggs, mostly patterned after Opa's design. (Thank you Opa!)
The runway for my girls will pivot up as well to block out the nests until needed. (No picture of this yet)
What else.....Ah, dimensions....
")
Depth, I wanted big roll outs , I may not be able to get the eggs collected everyday. So rollouts are 9" each way minus 1" in back (insulation) and about a 1/2" in front. Total depth front to back 31" (measured to outside of walls)
Width, 13" + inside width for each box, plus the three walls (2 outer, 1 middle) totals about 28" or so.
Height, right now about 13" for the back egg area without the ramp installed, then in the nest area it depends on which way the ramp is positioned as to how high the "hen-room" is.
The Faceplate opening is a minimum of 6 1/2" high by about 9" wide, and forces the hen to step down as she steps in to trigger the future trap device.NOTE; on the finished set I put into the coop, the overall height will be an inch higher.
So that makes the Height inside nesting area for hens about 11" right now directly above the ramp, more room, about 12", either In front or back of that point depending on which way the ramp is set.
Also I'll router out some ventilation on the outer sides (screened, of course!) the face plate will come later as well.
Sorry this isn't completed, I was going to work on it this winter but something got me motivated to work on it today instead. Maybe someone can take this idea and run with it......
Cheers
Update (these ramps will be covered with removable pieces of Astro Turf when put into use)
Both ramps up (for rear rollout)
Both ramps down (for forward rollout)
Partitions in the back
Ramp a bit too high at 2", came down real fast. I was using hard boiled eggs though. However, the Astro Turf should help slow and cushion a bit as well.

This also shows one ramp down (forward rollout) and one up (rear rollout) although I wouldn't use them that way
Still to do;
I will cut the top of the egg box down and make it a sloped single board cover (instead of the two boards with an angle as shown) and I need to add the faceplate, recut the top of the egg box to include a lower partition, and add the trap(s). I also need to cut the rear egg access door.
I'll come back and edit more later, and if I can figure out how to make it a thread I'll see about doing that later too, if there's interest.
When I get the design the way I like it, I think I'll invest in some new wood
Update, 11/30/2014
I've cut down the nest box height by 1", made it a one piece front egg access door instead of the angled two piece, and cut out the back egg access doors. I considered cutting the walls to the egg compartment down another 1", but I decided it might make it too tight for my hands, so I've decided to add 1" to the overall height (14" instead of 13") on the next sets, which will also give the hens an extra 1" "headroom" :/
Kinda hard to see, but penciled in are the cut lines to lower the egg box walls. Considered dropping it 2" to the bottom of the two lines, but decided to increase the nest box height by 1" overall instead.
My first attempt at mitering the egg door isn't a perfect fit. I'll have to come back to it later.
These hinges are sturdy (and I couldnt beat the price of 40 hinges for $8 at goodwill!), and they're great to work out design issues with, but I'm going to put smaller ones inside the coop.
I will try to edit again for clarity soon......
Please excuse the rough appearance, it is a work in progress
Work left to do;
Add insulation
AstroTurf
Egg rollout curtains
Faceplate
Traps
Ramp securement device
Side ventilation
Hardware, handles, locks, etc
Pivot up Walkway or entry barricade
Paint
Cheers
Chipper
Edited to add Opa's link (https://www.backyardchickens.com/t/287684/new-rollout-nest-design-picture-heavy-edited-1-21)