BUILD Phase 7 - Coop Hardware Cloth, Roof & Porch
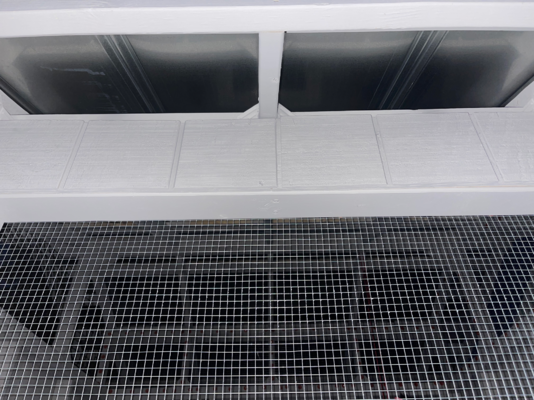
Prior to installing the roof, I installed the hardware cloth over the pony wall and the two front windows for critter control. Plus it was easier to stand on the ladder with my head above the rafters for hammering in nails! I ended up using roofing nails to hold the hardware cloth due to the plastic washers. It was the cheapest option. Looking back, I would have done it differently and use a form of roofing screws with washers (the same ones I used on the polycarbonite panels).
On the gable end of the coop, I used polycarbonate panels to cover the opening. I wanted to have great ventilation (which I do), but needed to be mindful of the weather conditions for my chickens. These panels were cut to fit around the crutch supports on the rafters.

Installing metal roofing sheets wasn't too bad. Cutting the sheets to make sure I had a straight line down the fascia board was a little challenging. Prior to installing the sheets, I pre-drilled the roofing screw holes to try and have a nice straight line...it kinda worked out!
Yes, I was installing roof sheets in the dark (I had lights though!)!

The door was interesting! I initially was going to make the door from wood and use the existing T1-11 siding. However, one day driving home from work, someone put out a storm door with all the hardware for FREE! I whipped my truck around so fast and picked up the door!
Now the door was a regular height door, but my coop door height was not. So to make it fit, I sawed off the bottom part of the storm door! I think the white door gives the coop a nice accent!
I was so mad at myself when I installed the ridge gap cover. I should have used clamps to hold down one side and put a holding screw in one end to keep it straight. Did I do that...NO! LOL!! I just started screwing in and when I got to the end, it wasn't straight! Oh well, lesson learned for next time. However, when it rains there is no water coming in...That's a plus!
Oh, yes, it started to rain when I was installing the ridge gap cover and continued until I was finished. Probably not the smartest idea, but I was determined to get this coop livable for the chickens!
Wooohooo! We have a livable coop for the chickens!
Here is their temporary setup until I get the inside situated!

Time for the porch. This was important because I didn't need anyone, including myself tripping and breaking a leg while taking care of the chickens!
Porch is complete! I need to put steps, which I still haven't done! It's on the list!

Next up, run roof and roost bars!
On the gable end of the coop, I used polycarbonate panels to cover the opening. I wanted to have great ventilation (which I do), but needed to be mindful of the weather conditions for my chickens. These panels were cut to fit around the crutch supports on the rafters.
Installing metal roofing sheets wasn't too bad. Cutting the sheets to make sure I had a straight line down the fascia board was a little challenging. Prior to installing the sheets, I pre-drilled the roofing screw holes to try and have a nice straight line...it kinda worked out!
Yes, I was installing roof sheets in the dark (I had lights though!)!
The door was interesting! I initially was going to make the door from wood and use the existing T1-11 siding. However, one day driving home from work, someone put out a storm door with all the hardware for FREE! I whipped my truck around so fast and picked up the door!
Now the door was a regular height door, but my coop door height was not. So to make it fit, I sawed off the bottom part of the storm door! I think the white door gives the coop a nice accent!
I was so mad at myself when I installed the ridge gap cover. I should have used clamps to hold down one side and put a holding screw in one end to keep it straight. Did I do that...NO! LOL!! I just started screwing in and when I got to the end, it wasn't straight! Oh well, lesson learned for next time. However, when it rains there is no water coming in...That's a plus!
Oh, yes, it started to rain when I was installing the ridge gap cover and continued until I was finished. Probably not the smartest idea, but I was determined to get this coop livable for the chickens!
Wooohooo! We have a livable coop for the chickens!
Here is their temporary setup until I get the inside situated!
Time for the porch. This was important because I didn't need anyone, including myself tripping and breaking a leg while taking care of the chickens!
Porch is complete! I need to put steps, which I still haven't done! It's on the list!
Next up, run roof and roost bars!