

We started this project with significant disagreement regarding “how big” & “how many”. She wanted 10 chickens with room for more and I wanted 4 in a 3’x4’ hut on 4x4 posts. After months of research and review of dozens of designs, we came to the finite conclusion that we still disagreed. There are many good designs available, but none quite fit her space and accouterment requirement.
In the end, as is typical, I lost.
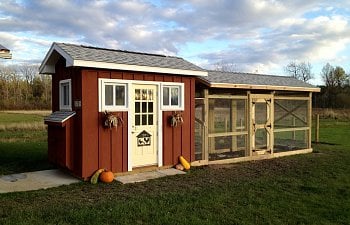
For several weeks we scratched floor plans on notepaper and relied upon my past experience remodeling and building furniture to pull it all together. In the end, we built a 6’ x 10’ stick-framed structure with a 96” eave.
During construction of a post & frame storage building, we had an additional slab poured that measured 6’ x 15’ and had a single 20a circuit run under it in conduit. This would be the home for our coop. On July 31, 2013, we began framing.
The foundation is a rectangle of treated 2x6, lying flat, attached to the 5” thick slab with ½” concrete wedge anchors placed 24” on center, with extra anchors at each end of the framing members.
2x4 joists were placed 24” o.c. and the base was leveled and squared. To provide for some level of insulation in the floor, we added 2” rigid foam insulation sheets between the floor joists, providing an R-10 barrier. This was covered with ¾” T&G plywood that was glued and secured with ring-shank flooring nails.
The walls are typical of stud-wall building construction: 92 5/8 studs with a sole plate and top plate, which when erected and secured with a second top plate, provide for an 8-foot ceiling. As we constructed the walls (framed on the ground and erected as units) we made rough openings for 5 – 24” x 24” Pella sliding windows (available at your local Big Box retailer), a Pullet-Shut automatic chicken door, a gable vent (with a thermostatic attic ventilation fan) and a 32” Dutch-Door (she was absolutely dead set on a Dutch-Door). Because the 10’ front wall houses 2-24” windows and a 32” door, it incorporates a 2x10 laminated header, constructed on-site.
The walls were erected, leveled, and squared, sitting flush with the edge of the floor. Once squared (measuring corner-to-corner), we braced them.
On one end of the coop (left as you are seeing it), we framed openings that would later accept 2 nesting boxes that measure 41” long, 14” tall x 15 ½” deep. These are divided into 3 nest boxes per unit via ½” plywood dividers and are accessible from the outside of the coop.
As I built this alone, on evenings and weekends, it wasn’t feasible to stick-frame the roof structure. As an alternative, I shop-built roof trusses out of 2x4’s and reinforced the joints with ¾” CDX, secured with construction adhesive and 2” exterior ring-shank nails.
These I could set alone and I installed them 24” O.C. along the top plate, securing them with 20P galvanized nails and hurricane straps. The trusses have a 12” overhang (or eave) and each end truss incorporates a “ladder soffit”, creating a 12” overhang around the entire circumference of the structure.
The roof is sheathed with 5/8 CDX and topped with Owens Corning architectural shingles and capped with a ridge vent to allow for proper ventilation of the insulation attic space. The fascia board is rough-sawn cedar, for durability and to match the cedar board and batten siding we applied later.
With the roof on, we sheathed the building with ½” CDX and wrapped the structure in house-wrap (can’t have drafts on her babies).

Next, we installed the door and windows, installed 1x3 nailers 16” O.C., and furred out the door and window jambs in preparation for Western Red Cedar board & batten siding to come.

On rainy days we constructed the egg boxes. These were installed from the outside, so the construction incorporates 2x2 flanges or nailers, set 4 ½ inches from the inside edge (3 ½” wall, plus ½” plywood on both sides of the wall). We primed and painted them prior to installation.
A second nailer was attached to the nest box,10” from the first to allow for the addition of 2” rigid foam insulation, providing for some insulation (R10) on that portion of the nest box that is outside of the coop wall.
The boxes were set in the exterior wall, supported with 2x4 braces and
https://www.backyardchickens.com/content/type/61/id/6096407/width/350/height/700
Leveled, squared, and secured.
Doors for the egg boxes were fabricated on-site using sandwich panels, with 1” x ¾” hardwood frames, ½” exterior panels, ¼” interior panels, and 1” of rigid foam insulation inside. These are mounted on 3” “no mortise” hinges and close against vinyl clad foam door weatherstrip that is secured in ¾” x ¾” stock. The stock has a saw kerf in it that accepts the weatherstrip, creating a seal similar to that on a refrigerator door or a commercial pre-hung exterior door. The exterior of the doors was then covered in Western Red Cedar to match the exterior of the coop.
The unit was trimmed with red cedar. The open doors are supported by red cedar slats attached to self-closing gate hinges procured locally. When the doors are closed, the hinge “stores” the support, flush against the face of the nest boxes. A roof was added to the assembly, with “Rafters” fabricated from tapered 2x12, ¾” CDX, and the same shingles used on the building roof. Deadbolts and gate hasps with carabiner clips secure the closed door against unwelcome intruders.
The exterior was covered with 1 x 12 Western Red Cedar boards, the soffit treated with ½” plywood, and the soffit boxes fabricated from cedar as well. Soffit vents were added for ventilation. The window trim, door trim & soffit trim are also 1” red cedar. Hardware cloth was applied over the window trim and then covered with additional cedar trim.
The posts were plumbed and squared with bracing.
Double 2 x 6’s form the support for more roof trusses, placed 24” O.C. and secured with 20P nails and hurricane straps. The 2 x 6's were secured to the posts with galvanized 1/2" carriage bolts. When all was level, plumb & secure, the tops of the posts were trimmed off.
The trusses on each end of the run are completely covered with ½” CDX to prevent unwanted guests from entering the run through the trusses. We thought this was a better option than trying to attach hardware cloth to part of the run.
The fascia and roof construction is the same as the main building, though lower by design. You can see the posts for the soon-to-be garden in the background. The door on the back (by the silver ladder) will allow us to let the girls out into the garden as Jody sees fit.
2x4 bracing was added between the posts to accept hardware cloth, which runs continuously from the back of the fascia board to below ground level. A 12” trench was dug around the run in order to bury the hardware cloth and deter critters that would try to dig under the perimeter wall. Treated 2x8’s were layered over the hardware cloth at grade and secured to the 2x4 bracing and the posts. Hardware cloth and treated members span the distance between the building and the run, completely enclosing the structure from below grade to the roofline.
We purchased 48” x 50’ rolls of ½” hardware cloth. Starting at the backside of the fascia trim, we stapled hardware cloth onto the rafters, back to the roof headers, and down walls, ending 12" below grade. A pneumatic stapler and stainless steel staples made a huge difference. I can’t imagine fastening this much hardware cloth with a hand stapler or screws and washers.

We added a bench across the end posts of the run so that Mom would have a perch as well.
A roost, a waterer, and some straw finish off the run.
The finishing touch to the whole project might be the look in a grandchild’s eyes as she communes with Aggie for the first time.

The inside is insulated with R-19 walls, R-30 in the ceiling, and sheathed with ½” plywood. We chose to cover the floor with very inexpensive, self-adhesive tiles to facilitate easy cleaning. The “poop” board, shown here below the roost, is covered with stainless steel sheet procured locally (Lowes) and provides for very easy cleaning.

We added trim boards to the front of the nest boxes to give the girls an easy way in and out.

Gusset supports fabricated from scrap 2x4 & ¾” CDX is screwed to the wall studs and supports both the roost and “poop board”. In the background, above the chick door, is the ceramic heater.
The artist in the family adorned the interior with wildflowers and grasses to break up all of the white and give the coop the right feel.
The interior is kept warm with a ceramic heater that only draws 3 amps, but has maintained temperatures in the mid 40’s when the ambient dropped below zero. This is a 24” square ceramic plate with a thermostat which is designed to be wall-mounted. For summer ventilation we installed a thermostatic attic soffit fan high on the end wall above the “pullet door”, venting through a soffit louver. We covered and protected this with a framework of hardwood covered with hardware cloth.
When winter approached, we elected to wrap the run in 6 mil plastic and secure it with battens. This has been very effective at protecting the “girls” from the harsh winds and blowing snow we experience here.
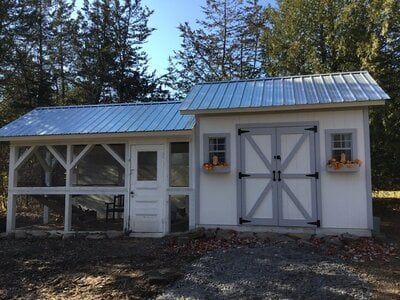
All of the research and reading we did before we started allowed us to catalog the comments of other coop builders and learn from their mistakes Page after page of things they wished they had done, features they wished they had incorporated and the key elements of several designs allowed us an advantage. The Nest Egg is warm in the winter, cool in the summer, opens to the garden as needed, and is predator-proof (so far).

") Looks like something I would try to do. Very nice!
Looks like something I would try to do. Very nice!")