A critical first step is to set four corner blocks so that they are perfectly level. Set the base framing 2x6's across the blocks and place a level on each, one at a time. My site was quite slanted, so I had to use extra 4" thick blocks for rough leveling, and do a little careful digging for fine leveling. Another pair of blocks in the middle of the long (8') span would not hurt but I did not bother.
The base frame is 2x6 pressure treated. For the length, shorten the 8' span by twice the wall width. I used 1/2" plywood for the walls, so the length of the long span is 7' 11". The length of the short span is four feet minus twice the thickness of the 2x4's, or 3' 9". My floor ended up pretty bouncy, so in retrospect, a third base piece going across in the middle would have been good. Too late now.
Shorten the length of the plywood floor by twice the wall width, so it matches the base frame. Again, this is 7' 11" for 1/2" walls. I used 3/4 exterior plywood for the floor. Screw it on thoroughly, and cover with linoleum or some other easily washable covering.
From a sheet of 1/2" exterior plywood, cut the "chicken door" gable end. This will be exactly 4' wide. The height of 72 1/2" tall at the peak is mandatory in order for the sides to fit correctly, as will be seen later. Make this exact if you want to follow my other measurements! Mark the location of the chicken door and the window and cut them out with a saber saw. (I apologize that the mechanical drawing is not to scale; I did my best with my limited graphics skills.) Then glue and screw the 2x4 skeleton in place. In addition to the pair of roof joists for this end and the other gable end, you will need two pairs for the center of the coop. You might want to cut all roof joists simultaneously. The roof joists lie flat on the plywood, and all other 2x4's stand up. See the drawing and photo. (The overlap butting of the two edge pieces is shown differently in the drawing and the photo. The drawing shows the preferred method, but the photo is fine in this low-load situation.)
Note that the window hole is 14" wide by 21" high. This fits a standard, easily obtainable playhouse window with safety glass. You have the freedom to make the chicken door hole a little bigger or smaller. My choice was fairly arbitrary.
My single biggest piece of advice is to cut out the sheet of plywood to its size, and then carefully mark (on the INSIDE side) the location of the window, door, and all 2x4 skeleton pieces. Make sure the markings make sense before doing any cutting of the two holes! Test fit the window in place, in case you need to clean up the hole for a good fit. Then use good exterior wood glue and clamps to fasten the skeleton in place. I ran a few screws in from the other (outside) side AFTER the glue had dried, just as cheap insurance.
Use the same procedure to make the human-door gable end. The small triangular ventilation hole above the door is probably superfluous, as much other ventilation is provided. But I like it. Fasten hardware cloth to cover it on the inside.
This is a good time to make a pair of roof joists that will support the roof at the center of the coop if you didn't make all of them at the same time earlier. Use the roof joists that are glued to the gable ends as templates so you can be sure that all are the same size. Don't glue them together yet. You'll see a picture of what I'm talking about soon.
Fasten the two gable ends to the base. I used a lot of exterior glue around the bottom to secure the gable end overhang to the 2x6 frame supports. Use short screws around the outside and long screws to secure the bottom plate to the base. You must temporarily support the gable ends by screwing diagonal scrap strips to them and the base as shown.
Make the roost-side skeleton. Use a framing square to make sure it is square.
When you have cut the 39 1/4" uprights, grab a pair of short scrap 2x4 pieces and place them on the ends of the upright to simulate the top and bottom plates. Place this on the base next to the gable ends and confirm that the top of this and the top plate of the gable ends perfectly line up. Adjust the length of these uprights a little if necessary (it should not be necessary!).
Rather than cutting the bottom plate to a measured 88", place an 8' 2x4 on the base and mark the exact length needed to span the gable-end bottom plates. If you did everything perfectly, the length should be 88 inches. But if you jiggled the gable ends a little when you mounted them, now is the time to compensate!
Place the completed skeleton on top of the 1/2" plywood that will be the roost side, inside up. Use a framing square to verify perfect squareness. Position the skeleton so that 6 1/4" of the side extends below the bottom of the bottom plate. This will cover the edge of the floor as well as the 2x6 base frame, exactly as with the gable-end sides. Note that the plywood side will be short 1/2" from the top of the top plate. This is correct, as it allows for the roof overhang, which will become apparent later if it is not apparent now. Be sure to center the 88" between the ends of the 96" long sheet of plywood. You will use the entire sheet, with no trimming necessary. Mark (using the skeleton) and cut the poop hole in the side.
Note the two odd blocks that I glued to the inside of this side. They are positioned so that they will sit on top of the bottom plate for this side. They serve no structural purpose whatsoever, but they help greatly when you position the wall on the skeleton later, as they keep everything lined up vertically. Rather than positioning these blocks by measuring, it's easier to put some glue on them and set them in place while the skeleton is still sitting on the plywood side. Set something small and heavy on the blocks to hold them down until the glue dries. After the glue is dry and you remove the skeleton, run a couple of long screws into the blocks from the other side for strength, as they will be supporting the full weight of the side for a little while during later assembly.
Position the skeleton on the base and screw it down well. Also run a few screws horizontally to hold it to the gable ends, especially near the top. Then position the plywood side in place on it and screw it on, optionally using glue as well (I did). Now you see the value of those two weird blocks; you just shove the plywood in place and the blocks support its weight at the correct vertical position. The only adjustment needed is left-right.
Make the egg-side skeleton similar to how you made the roost-side. Place the skeleton on top of the plywood side using the same 6 1/4" bottom overhang, and noting that the top is short by 1/2". Trace out the holes for the nest boxes and ventilation. Glue the non-structural assembly support blocks in place on the plywood side. When that glue is dry, remove the skeleton and cut out the nest box and ventilation slot holes. As with the roost side, run a couple of screws into the support blocks to add strength so that you aren't trusting just the glue to hold up the side while you assemble it later.
Screw the egg-side skeleton to the base (also using horizontal screws at the top to secure it to the gable ends). Then position the plywood side in place, allowing those lovely support blocks to hold its weight while you adjust it right-left. Then screw it down, optionally using lots of glue.
Hopefully, you have made the pair of central roof trusses already. Screw this pair to the top plate. Glue them together, along with a triangular piece of plywood on each side at the peak.
Cut four identical pieces of plywood for the roof. If you want a gable overhang, which is highly recommended, then this will be wasteful of plywood, as you will need four sheets! You could get away with two sheets if you had no gable overhang, but that's silly. I cut mine 38" wide by 54" long. This latter figure gives a 6-inch gable overhang, which seems about right, although a little more is fine and might even be preferable. The 38" width turned out to be a little too small, as I would have preferred a little more side overhang. I suggest 40", or perhaps even a little more. Nail them in place, add 1x4 end covers if you wish (it's a nice touch) and cover with the roofing of your choice, including drip edge. I used cheap and easy roll roofing. If I had more class I would have used metal, or at least that heavy orange corrugated stuff. I used it on a prior coop and it worked out well.
I painted the interior white, though that may be overkill.
Make the pair of nest box sides. I used 3/4" plywood for them as they will support a lot of weight. Glue and screw them to the egg-side of the coop, securing them well to the framing timber. The drawing shows the exterior of the coop wall as a dotted line. Also, glue short blocks to them for fastening the front.
Glue and screw the nest box bottom and front, liberally using edge blocks. Glue in partitions as desired. I used several different box widths, from 10 1/2" to 12 1/2" for variety. I may regret that later. Time will tell. I left the rightmost 'box' extra wide because I put the water trough there to keep it above the floor and out of traffic, hopefully reducing water pollution.
I'll leave the final trim work to you. I used 1x2 and 1x4 lathe as corner trim to cover misalignments and add a decorative touch. It also protects the vulnerable end grain of the plywood.
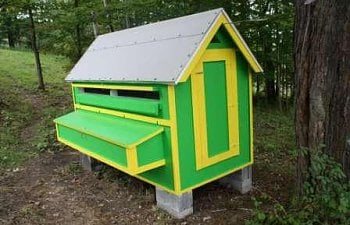
The ventilation port that runs above the nest box must be covered with hardware cloth on the inside. I made a little long door to allow closing on frigid nights. The silly-looking 2x4 that I put above it provides some additional rain suppression, plus it's a convenient way to use a bolt to latch the door shut. Be sure to hinge the poop door at the top so it opens upward, making it easier to scrape off the poop table.
I'll end with a photo of the inside, taken from the human door. Note the integrated roost bar and poop table. I'll be interested to see if that works out. On the right, you see the poop door which can open upward from the outside to allow easy cleaning of the poop table. The feeder hangs beneath it. The waterer is out of view on the left near the door, in the oversize 'nest box' dedicated to it. I still have the brooding heat lamp in there, as my girls are just a month old and we've had some cold nights. The black mat is a weather-proof outdoor dog bed warmer, which the chicks just love. Finally, if you look closely at the very top center you'll see my chick-cam. With its powerline network adapter, I can stream the live feed into the house without having to run an Ethernet cable hundreds of feet out to the coop. That way I can monitor the goings-on from any computer in the house.
I welcome comments and criticisms of this design, as I am new to this. If there is anything that I should change for the health and happiness of my girls, I'd like to hear about it!