In my quest to have all three of my flocks "mobile" and free-ranging during the warmer months, this is my build journey in the second in a series of three (with the third yet to be built). It started with an old trailer I found on CL that was used as storage:

Even though, in my opinion, I purchased the trailer for a "song," after we got it home, hubby stated that the guy I purchased it from probably should've paid us to haul it off.") I liked this particular trailer because it had wooden sides. Wood is something I can work with; metal, not so much.
I liked this particular trailer because it had wooden sides. Wood is something I can work with; metal, not so much.
The tear down began:
Most of the materials I used in this build were re-purposed. Wood from another chicken tractor project went up on the sides and front. I also added some trim to break things up between the body and the roof:
The back doors build (had to frame out before the doors could be fashioned):
Window/vent openings cut and re-purposed windows fitted and trimmed (I use heavy duty storm window hangers and regular window locks hardware):
Chicken pop door cut-out. For this tractor, I went with the Ador1 auto chicken door opener. So far I'm very happy with it!:
We were going to cut off half of the ramp but instead decided to leave it as it added an element of stability to the trailer while in motion, however, that sucker is "heavy!!!" In order to lift it on my own, we installed a hand winch that's retrofitted so that I can use a cordless drill to raise and lower:
I won't bore everyone with all the sanding and caulking I did at this point in the project. I moved to the inside. I wanted to make sure the trailer was easy to clean so, we installed a floating roost.
Up for cleaning:
Down for roosting:
Painted the bottom half a lighter color (leftover paint from another project) and installed the nesting boxes. I've since added a slanted board on top of the nesting box to keep the birds from roosting atop them. Though not shown here, I had some leftover 3/4" thick, heavy stall mats that I cut and placed on the floor:
Now, onto the "fun" part - the priming! Just about finished priming and ready for final paint. The final painting was put on hold for awhile until the heat of summer subsided:
For the bottom half, I went with New Holland Yellow; the fenders, top half and trim I used a bright white. I painted the trim between the top and bottom half as well as the front edge of the fenders a black to break up the color a bit:
Finished!!!
Front view with outside waterer (identical waterer is also on the inside):
Back view (I still have to paint the windows but for now they'll do):
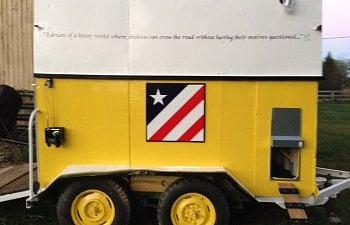
Side view. Keeping up with the theme that all of my tractors will have barn quilts that I painted. I also added one of my favorite chickeny sayings on the side. For the treads on the ladder, I used left over rubber matting:
Properly tagged:
Of course hubby installed lights:
If I were to guestimate total out-of-pocket expenses, I'd venture to say this project cost me less than $600 and a few more "wrinkles."
This Spring I'll start on the "Banty Shanty." We've already picked up another wagon I found on CL and I'm confident that I have enough materials to keep costs down.
Even though, in my opinion, I purchased the trailer for a "song," after we got it home, hubby stated that the guy I purchased it from probably should've paid us to haul it off.
I liked this particular trailer because it had wooden sides. Wood is something I can work with; metal, not so much. The tear down began:
Most of the materials I used in this build were re-purposed. Wood from another chicken tractor project went up on the sides and front. I also added some trim to break things up between the body and the roof:
The back doors build (had to frame out before the doors could be fashioned):
Window/vent openings cut and re-purposed windows fitted and trimmed (I use heavy duty storm window hangers and regular window locks hardware):
Chicken pop door cut-out. For this tractor, I went with the Ador1 auto chicken door opener. So far I'm very happy with it!:
We were going to cut off half of the ramp but instead decided to leave it as it added an element of stability to the trailer while in motion, however, that sucker is "heavy!!!" In order to lift it on my own, we installed a hand winch that's retrofitted so that I can use a cordless drill to raise and lower:
I won't bore everyone with all the sanding and caulking I did at this point in the project. I moved to the inside. I wanted to make sure the trailer was easy to clean so, we installed a floating roost.
Up for cleaning:
Down for roosting:
Painted the bottom half a lighter color (leftover paint from another project) and installed the nesting boxes. I've since added a slanted board on top of the nesting box to keep the birds from roosting atop them. Though not shown here, I had some leftover 3/4" thick, heavy stall mats that I cut and placed on the floor:
Now, onto the "fun" part - the priming! Just about finished priming and ready for final paint. The final painting was put on hold for awhile until the heat of summer subsided:
For the bottom half, I went with New Holland Yellow; the fenders, top half and trim I used a bright white. I painted the trim between the top and bottom half as well as the front edge of the fenders a black to break up the color a bit:
Finished!!!

Front view with outside waterer (identical waterer is also on the inside):
Back view (I still have to paint the windows but for now they'll do):
Side view. Keeping up with the theme that all of my tractors will have barn quilts that I painted. I also added one of my favorite chickeny sayings on the side. For the treads on the ladder, I used left over rubber matting:
Properly tagged:
Of course hubby installed lights
:
If I were to guestimate total out-of-pocket expenses, I'd venture to say this project cost me less than $600 and a few more "wrinkles."

This Spring I'll start on the "Banty Shanty." We've already picked up another wagon I found on CL and I'm confident that I have enough materials to keep costs down.