I should probably give some background before jumping into our coop build. We purchased a fixer upper with 2 acres of woods, backing into a river, exactly 3 years ago this week. We spent the first 4-5 months remodeling the first floor - my husband is pretty handy and my father owns a construction company. The three of us spent every night and weekend busting our butts; I'm not sure how someone didn't get murdered and buried out back during that time ahaha After moving in, we continued to do work - added a second bathroom, built a 2 car garage, added a ton of gardens and planted apple trees - all on our own. I've been wanting to get chickens forever but was always told a hard no. It didn't stop me from researching and knowing random chicken facts. When covid hit and my husband had to do the grocery shopping due to me being on a long shift things finally took a turn. He realized after going to 4 stores for eggs that things needed to change, we needed to add to our tiny homestead in the making.
We researched different breeds, measured the area in our yard that we thought would best, talked to different farmers in the area and decided that Barred Rock would be the best fit for us. We went with 5 hens and 1 roo - long term we'd like to hatch/sell if possible - and figured raising a roo from birth would give us a better shot at not having a jerk. If not; we have a good stew recipe.
We knew we had a ton of leftover materials from all the remodeling/building we had done, could probably get some random odds and ends from my dad's warehouse and have an endless supply of free pallets from a local company up the street. We decided a DIY coop would be the best fit for us. We'd put more into it with sweat/time than cost of materials, but it's satisfying in the end.
Husband started the build while I was on shift so not a ton of pics from that first day. He had the plans for the coop in his head and kept telling me "don't worry, I got this". He dug and set posts with concrete and installed our floorboard. It measures 8 feet by 4 feet (giving us 32 square feet). After letting the concrete harden, we moved on to adding walls. We decided to use pallets for the walls and add in additional boards when needed. Plans to have the nesting boxes outside of the coop were also discussed - we decided it would be best to have a bump out design with the ability to open the top from the outside to allow a few more additional feet inside of the coop. Oh yes, chicken math comes into play here. Remember how we originally ordered 6 chicks? Well, guess who got 9... I'll wait while you ponder. Yep. 3 extra free chicks from our local co-op due to us being the only ones wanting Barred Rock in the area and a local farmer hatching more than they had intended. We were a bit freaked out that we had already started the build but thought, well, let's move the boxes and ensure the run is large for them, we'll make it work *in a Tim Gunn voice*

We're admittedly not roofers in any way shape or form. We figured a slanted roof would be the easiest thing to built and we could then use leftover tin from our garage build for materials. It would also allow the structures to match, which is a huge deal for our town. Gotta love playing within the rules. We had some roof insultation left over from fixing our house's porch and wrapped entire structure with house wrap to help with insulation and waterproofing in the long run.
We filled in all the empty slots with additional pallet boards. We broke down at least a dozen or so pallets to use just for wood.
You can see our pieced together roof - all leftover cuts from our garage which is in the background.

You can't see it well in these pictures, but we covered the roof, the nesting boxes and the underside of the coop with hardware cloth to keep any critters and/or predators out. You'll notice it more in other pictures as we continue the build")
Anyone watch Building Off Grid? We took a page out of their book and decided for siding we would use the Japanese wood burning technique of shou sugi ban. Basically, you chare boards, brush off the outer layer of ash, add a layer of oil (this can be skipped per some people) and wahhh laaaa - water proofed, expensive looking siding. We didn't have a torch or a flame thrower (we did consider buying one, because, why not?) so it took us a bit with our fire fit. I also got to look like a chimney sweep for a weekend so that was fun.
We added trim pieces to all of the corners to help seal in the edges of the wood since they didn't meet up nicely. It would have been a bees (or murder hornet's) paradise. We made a simple door out of pallets and stained it to match the trim. We cut in a small door and added eyelet hooks to keep it open/closed. There's a simple gate latch that can be locked also to ensure the door stays shut.
You can also see two of the 3 windows we added for additional light into the coop. In each top corner of the coop, where the roof meets the side, we added a triangle window via plexi glass. It was easy to cut and easy to set. For whatever reason, we thought it would be easier to cut these in AFTER we had sided and finished everything - totally wrong idea. We should have added these in prior to siding because to be honest, it was a huge pain in the butt and a waste of time/materials.

Next we began to work on our run. As mentioned above, we have a ton of woods that begin about 15 feet from the coop. We have an abundance of hawks, foxes, racoons, deer, groundhogs and other critters roaming around constantly. You should see the Ring notifications for our backyard; some nights it looks like a Disney film. We knew we needed to bury our hardware cloth and completely enclose the run for the chickens to be safe. Enter in this really fun "ground hog" machine that digs 20 inches into the ground for you!! Who knew this existed?! We also took this opportunity to run power to our garage and added in an option to run power to the coop later on if we think we'll need it. After digging the trench for the hardware cloth, we added posts so we could frame out the entire run. We added 4 at the top of the run in a square, two posts for a human sized door to enter the run and two more corner posts at the bottom of the run. Our coop is on the bottom side of a small slope/hill in our yard so we knew it would be a not so fun adventure making sure this all connects. Our run is roughly 110 square feet, give or take, it's not a perfect rectangle around the coop due to slope. We added the first piece of hardware cloth all around the bottom and buried it. We used screws and washers to attach the hardware cloth to the posts.
After framing out the run, we added cross beams to attach our roof layer of hardware cloth. We added in a post in the middle more for peace of mind than actually function - it the long run we may bury/set this but for now, it's just about an inch into the ground.
We finished enclosing the entire run with hardware cloth using screws/washers and added in a door. The door is covered with hardware cloth and has excess pieces on the edges to ensure an extra level of protection. It uses a simple gate latch and a sliding bar lock to make it harder for racoons to attempt to get in.
We also had to figure out a way to close the gaps on our sides where the two pieces of hardware cloth met. Per city rules - we had to add some sort of "fencing" around the structure so we thought how could we combine both of these? We decided to use pallets on the outside as fencing and use a board on the inside to sandwich the hardware cloth to the pallet. We'll be staining the pallets when the weather stays nice (thanks Ohio!) You can also see in the first picture edging bricks - we've covered the entire inside edge of the run with 2 layers to help stop digging/scratching from the chicks. These were free from my parents who replaced the bricks in their own yard this year.

To finish off the roof of the run and to cover the top edges, we used reclaimed barn wood from a local farm to edge out everything. We used these beams on the roof to ensure a tight closure between pieces by using screws and washers. In the last picture you can see some bricks by the fence - our back woods use to have a green house in it and these were bricks/pipes from it. I'm going to using these as planters around the fence for some chicken safe plants

For the inside of the coop, we covered all gaps in the pallets with wood and put a water proof coating over everything. We built a few different roosting spots along the short wall and on the long wall opposite of the nesting boxes (we'll need to bump the long ones out - I didn't foresee them wanting to use these vs the others as much as they are.) We're using buckets cut in half for our nesting boxes - since our chicks are babies, we'll see how these go when they start laying and adjust if needed. We built three simple feeder tubes from PVC piping and then two smaller ones for grit and then oyster shells when needed. Husband made a waterer from PVP and nipples plus a small water bottle we had laying around. We are on the lookout for a 3 gallon water jug to replace this long term which is why the waterer is just taped into positive at the moment (that tape is water proofing/fire stopping tape so it does have a good seal). Both of these plans were found here on BYC and modified to fit our space.
The chickens aren't a fan of the waterer at the moment (the picture with their standing water was from the first day we moved them in, the nipples had not arrived yet but its all install now - it's since been moved out into the run to only give them one water source inside) so we're seeing how we can entice them to use it - any ideas? Jelly on the nipples didn't work (man, who knew I'd ever type that out... ahhahaa)
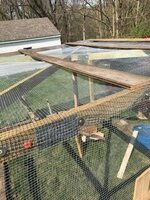
We also built a ramp and will be installing it this weekend. It will be attached via eyehooks so we can remove it as needed to clean out the coop etc.
It may have taken us 3 straight weekends of working plus some random days off during that time, but we are really happy with the way it has turned out! The chickens have been living out there full time for a week now and they don't seem to have any complaints Our coop cost was pretty low - just the cost of the hardware cloth, two or three posts, a few bags of concrete and washers. The rest of the materials we had on hand, was able to obtain for free from pallets/old barns or from local sources. We only purchased chicken specific things outside of that (such as the water nipples and items for their brooder). We'll see after long term use if we would change anything, but right now, things are good. The coop is about 8-15 degrees warmer than the outside cooler temps right now so we're hopeful it will get through our cold winters!
We researched different breeds, measured the area in our yard that we thought would best, talked to different farmers in the area and decided that Barred Rock would be the best fit for us. We went with 5 hens and 1 roo - long term we'd like to hatch/sell if possible - and figured raising a roo from birth would give us a better shot at not having a jerk. If not; we have a good stew recipe.
We knew we had a ton of leftover materials from all the remodeling/building we had done, could probably get some random odds and ends from my dad's warehouse and have an endless supply of free pallets from a local company up the street. We decided a DIY coop would be the best fit for us. We'd put more into it with sweat/time than cost of materials, but it's satisfying in the end.
Husband started the build while I was on shift so not a ton of pics from that first day. He had the plans for the coop in his head and kept telling me "don't worry, I got this". He dug and set posts with concrete and installed our floorboard. It measures 8 feet by 4 feet (giving us 32 square feet). After letting the concrete harden, we moved on to adding walls. We decided to use pallets for the walls and add in additional boards when needed. Plans to have the nesting boxes outside of the coop were also discussed - we decided it would be best to have a bump out design with the ability to open the top from the outside to allow a few more additional feet inside of the coop. Oh yes, chicken math comes into play here. Remember how we originally ordered 6 chicks? Well, guess who got 9... I'll wait while you ponder. Yep. 3 extra free chicks from our local co-op due to us being the only ones wanting Barred Rock in the area and a local farmer hatching more than they had intended. We were a bit freaked out that we had already started the build but thought, well, let's move the boxes and ensure the run is large for them, we'll make it work *in a Tim Gunn voice*
We're admittedly not roofers in any way shape or form. We figured a slanted roof would be the easiest thing to built and we could then use leftover tin from our garage build for materials. It would also allow the structures to match, which is a huge deal for our town. Gotta love playing within the rules. We had some roof insultation left over from fixing our house's porch and wrapped entire structure with house wrap to help with insulation and waterproofing in the long run.
You can't see it well in these pictures, but we covered the roof, the nesting boxes and the underside of the coop with hardware cloth to keep any critters and/or predators out. You'll notice it more in other pictures as we continue the build
Anyone watch Building Off Grid? We took a page out of their book and decided for siding we would use the Japanese wood burning technique of shou sugi ban. Basically, you chare boards, brush off the outer layer of ash, add a layer of oil (this can be skipped per some people) and wahhh laaaa - water proofed, expensive looking siding. We didn't have a torch or a flame thrower (we did consider buying one, because, why not?) so it took us a bit with our fire fit. I also got to look like a chimney sweep for a weekend so that was fun.
We added trim pieces to all of the corners to help seal in the edges of the wood since they didn't meet up nicely. It would have been a bees (or murder hornet's) paradise. We made a simple door out of pallets and stained it to match the trim. We cut in a small door and added eyelet hooks to keep it open/closed. There's a simple gate latch that can be locked also to ensure the door stays shut.
You can also see two of the 3 windows we added for additional light into the coop. In each top corner of the coop, where the roof meets the side, we added a triangle window via plexi glass. It was easy to cut and easy to set. For whatever reason, we thought it would be easier to cut these in AFTER we had sided and finished everything - totally wrong idea. We should have added these in prior to siding because to be honest, it was a huge pain in the butt and a waste of time/materials.
Next we began to work on our run. As mentioned above, we have a ton of woods that begin about 15 feet from the coop. We have an abundance of hawks, foxes, racoons, deer, groundhogs and other critters roaming around constantly. You should see the Ring notifications for our backyard; some nights it looks like a Disney film. We knew we needed to bury our hardware cloth and completely enclose the run for the chickens to be safe. Enter in this really fun "ground hog" machine that digs 20 inches into the ground for you!! Who knew this existed?! We also took this opportunity to run power to our garage and added in an option to run power to the coop later on if we think we'll need it. After digging the trench for the hardware cloth, we added posts so we could frame out the entire run. We added 4 at the top of the run in a square, two posts for a human sized door to enter the run and two more corner posts at the bottom of the run. Our coop is on the bottom side of a small slope/hill in our yard so we knew it would be a not so fun adventure making sure this all connects. Our run is roughly 110 square feet, give or take, it's not a perfect rectangle around the coop due to slope. We added the first piece of hardware cloth all around the bottom and buried it. We used screws and washers to attach the hardware cloth to the posts.
After framing out the run, we added cross beams to attach our roof layer of hardware cloth. We added in a post in the middle more for peace of mind than actually function - it the long run we may bury/set this but for now, it's just about an inch into the ground.
We finished enclosing the entire run with hardware cloth using screws/washers and added in a door. The door is covered with hardware cloth and has excess pieces on the edges to ensure an extra level of protection. It uses a simple gate latch and a sliding bar lock to make it harder for racoons to attempt to get in.
We also had to figure out a way to close the gaps on our sides where the two pieces of hardware cloth met. Per city rules - we had to add some sort of "fencing" around the structure so we thought how could we combine both of these? We decided to use pallets on the outside as fencing and use a board on the inside to sandwich the hardware cloth to the pallet. We'll be staining the pallets when the weather stays nice (thanks Ohio!) You can also see in the first picture edging bricks - we've covered the entire inside edge of the run with 2 layers to help stop digging/scratching from the chicks. These were free from my parents who replaced the bricks in their own yard this year.
To finish off the roof of the run and to cover the top edges, we used reclaimed barn wood from a local farm to edge out everything. We used these beams on the roof to ensure a tight closure between pieces by using screws and washers. In the last picture you can see some bricks by the fence - our back woods use to have a green house in it and these were bricks/pipes from it. I'm going to using these as planters around the fence for some chicken safe plants
For the inside of the coop, we covered all gaps in the pallets with wood and put a water proof coating over everything. We built a few different roosting spots along the short wall and on the long wall opposite of the nesting boxes (we'll need to bump the long ones out - I didn't foresee them wanting to use these vs the others as much as they are.) We're using buckets cut in half for our nesting boxes - since our chicks are babies, we'll see how these go when they start laying and adjust if needed. We built three simple feeder tubes from PVC piping and then two smaller ones for grit and then oyster shells when needed. Husband made a waterer from PVP and nipples plus a small water bottle we had laying around. We are on the lookout for a 3 gallon water jug to replace this long term which is why the waterer is just taped into positive at the moment (that tape is water proofing/fire stopping tape so it does have a good seal). Both of these plans were found here on BYC and modified to fit our space.
The chickens aren't a fan of the waterer at the moment (the picture with their standing water was from the first day we moved them in, the nipples had not arrived yet but its all install now - it's since been moved out into the run to only give them one water source inside) so we're seeing how we can entice them to use it - any ideas? Jelly on the nipples didn't work (man, who knew I'd ever type that out... ahhahaa)
We also built a ramp and will be installing it this weekend. It will be attached via eyehooks so we can remove it as needed to clean out the coop etc.
It may have taken us 3 straight weekends of working plus some random days off during that time, but we are really happy with the way it has turned out! The chickens have been living out there full time for a week now and they don't seem to have any complaints
Our coop cost was pretty low - just the cost of the hardware cloth, two or three posts, a few bags of concrete and washers. The rest of the materials we had on hand, was able to obtain for free from pallets/old barns or from local sources. We only purchased chicken specific things outside of that (such as the water nipples and items for their brooder). We'll see after long term use if we would change anything, but right now, things are good. The coop is about 8-15 degrees warmer than the outside cooler temps right now so we're hopeful it will get through our cold winters!