Hi,
Okay, this may not be much of an accomplishment for anyone else but you have to realize that I have had a rolling pin and pastry sheet in my cupboard for YEARS and never got the courage to use them. I always thought, Oh, I cant do it! But early this morning I decided that this was going to be the day that I would make my first batch of homemade egg noodles--I have yet to roll out some pastry dough, but I will try.
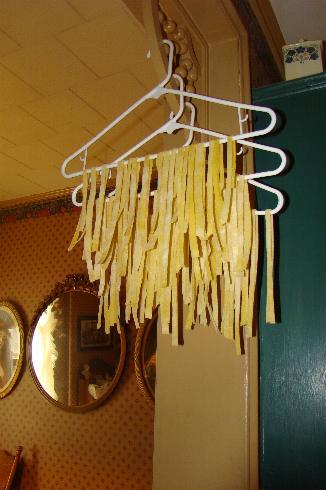
Thankfully, I had A LOT of help from all of the wonderful BYC members that shared their secrets--I did spend quite a bit of time reading up on the subject before tackling this project. The first helpful hint I picked up was to cut the noodles with a pizza cutter. The second was to dry them hanging from plastic hangers. Had it not been for this, I have no idea what I would have done as I used cake cooling racks for some of them but ran out room very quickly. I do not have a pasta drying rack and this worked perfectly, not to mention the fact that I could safely leave them hanging without my cats getting to them!

What really inspired me was when I found at the supermarket a box of Hodgson Mill Golden Semolina & Extra Fancy Durum Pasta Flour. This is a whole grain product with no preservatives, artificial coloring, flavoring, or enrichments. Now I knew I had to attempt to make those noodles!
I used the recipe printed on the back of the box, as follows:
Ingredients:
2 1/3 cups Hodgson Mill Pasta Flour
2 fresh eggs, beaten lightly
½ teaspoon salt
1 teaspoon olive (or vegetable) oil
2/3 cup warm water
Sift flour onto clean work surface or into large bowl. Make a well in center of flour and pour 2 lightly beaten eggs into well. Add salt and oil. Mixing the ingredients with fork, gradually add the warm water until the dough is soft enough to handle. If dough is too dry, slowly add a little more warm water, drop by drop. If dough is too wet, add more pasta flour. Knead until dough can be formed into a soft, workable ball, about 10 minutes. Makes 8 ounces. (I found this to be totally inaccurate, as I weighed the noodles when I finished cutting them and they came to about 1 pound, 5 ounces.) See instructions below for preparing and cooking your dough.
Resting, Rolling, Cutting and Cooking
Cover kneaded dough with plastic wrap and place in refrigerator for at least 1 hour. Divide dough into 3 pieces and roll each into an 1/8 inch thick sheet. Let rest 5 minutes. Cut into noodles with sharp knife or press through manual pasta machine (as mentioned before, I used a pizza cutter). Dry on rack (thats when I used the hangers) for at least one hour before cooking. Drop into boiling water or broth and cook for 8-12 minutes (I found I needed to use at least the maximum time and I rolled them very thin). After 8 minutes, test pasta and cook until desired tenderness. Do not overcook. When pasta is done, drain, add sauce and serve.
The end result was everyone loved them! And I am so pleased that I finally did this!
This is a picture of the flour I used (yes, we do have chicken/rooster decorations in our home!):
Here they are drying on the hangers:
This is the finished product:
I know I will make these again, I think they will be especially good in a nice pot of chicken soup. I just wish these used more eggs as my chickens have been terribly busy!
Thanks for looking--I just had to share!
Genie
Okay, this may not be much of an accomplishment for anyone else but you have to realize that I have had a rolling pin and pastry sheet in my cupboard for YEARS and never got the courage to use them. I always thought, Oh, I cant do it! But early this morning I decided that this was going to be the day that I would make my first batch of homemade egg noodles--I have yet to roll out some pastry dough, but I will try.
Thankfully, I had A LOT of help from all of the wonderful BYC members that shared their secrets--I did spend quite a bit of time reading up on the subject before tackling this project. The first helpful hint I picked up was to cut the noodles with a pizza cutter. The second was to dry them hanging from plastic hangers. Had it not been for this, I have no idea what I would have done as I used cake cooling racks for some of them but ran out room very quickly. I do not have a pasta drying rack and this worked perfectly, not to mention the fact that I could safely leave them hanging without my cats getting to them!

What really inspired me was when I found at the supermarket a box of Hodgson Mill Golden Semolina & Extra Fancy Durum Pasta Flour. This is a whole grain product with no preservatives, artificial coloring, flavoring, or enrichments. Now I knew I had to attempt to make those noodles!
I used the recipe printed on the back of the box, as follows:
Ingredients:
2 1/3 cups Hodgson Mill Pasta Flour
2 fresh eggs, beaten lightly
½ teaspoon salt
1 teaspoon olive (or vegetable) oil
2/3 cup warm water
Sift flour onto clean work surface or into large bowl. Make a well in center of flour and pour 2 lightly beaten eggs into well. Add salt and oil. Mixing the ingredients with fork, gradually add the warm water until the dough is soft enough to handle. If dough is too dry, slowly add a little more warm water, drop by drop. If dough is too wet, add more pasta flour. Knead until dough can be formed into a soft, workable ball, about 10 minutes. Makes 8 ounces. (I found this to be totally inaccurate, as I weighed the noodles when I finished cutting them and they came to about 1 pound, 5 ounces.) See instructions below for preparing and cooking your dough.
Resting, Rolling, Cutting and Cooking
Cover kneaded dough with plastic wrap and place in refrigerator for at least 1 hour. Divide dough into 3 pieces and roll each into an 1/8 inch thick sheet. Let rest 5 minutes. Cut into noodles with sharp knife or press through manual pasta machine (as mentioned before, I used a pizza cutter). Dry on rack (thats when I used the hangers) for at least one hour before cooking. Drop into boiling water or broth and cook for 8-12 minutes (I found I needed to use at least the maximum time and I rolled them very thin). After 8 minutes, test pasta and cook until desired tenderness. Do not overcook. When pasta is done, drain, add sauce and serve.
The end result was everyone loved them! And I am so pleased that I finally did this!
This is a picture of the flour I used (yes, we do have chicken/rooster decorations in our home!):

Here they are drying on the hangers:
This is the finished product:

I know I will make these again, I think they will be especially good in a nice pot of chicken soup. I just wish these used more eggs as my chickens have been terribly busy!
Thanks for looking--I just had to share!


