Hi All,
I just finished my latest additions to my chicken coop and pen.
Electric Fence
I have been concerned with our dogs digging under the pen wire and the Antelope Squirrels feasting at night.
So, I extended my electric fence to run along the ground of the exposed pen sides.

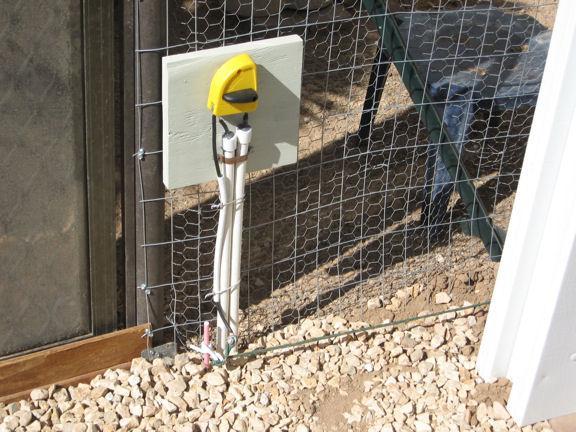
This image shows the underground insulated wire coming from the outside fence.
I have the wire inside 1/2" Schedule 40 pipe. A hole was cut at the top of a cap to route the wire. This was
connected to a switch as a safety precaution. A wire was connected to the main woven cord of the electric
fence.
This is a close up view of the insulators for the electric fence.
My supplies were purchased from Kencove Farm supplies. I used a fiberglass rod to mount the cable
and stand-offs. I could adjust the cable height from the ground by moving the rod up, or down.
Mounted to it are the plastic (insulated) stand-offs. Not shown, are stainless steel wires to hold the
rod in place with the pen fence.
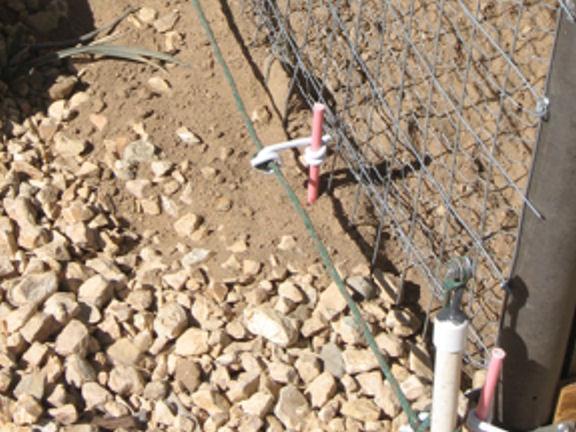
Another view of the cable and stand-offs near the ground.
Chicken Door
I used an Ideal Pet Products Extra Large Pet Door (10-1/2" X 15") purchased from Home Depot.
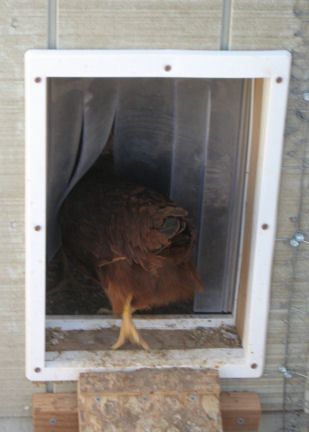
The exterior view of the Chicken Door showing the clear plastic flap.
Another view showing a RIR pullet entering the coop. Note the cuts made in the flap.
I installed the door by rough framing with 2X4's. My final trim was completed using 1/4" plywood.
I have added aluminum flashing for looks and protection with some of my dog doors. Both sides of the
doors were attached with decking screws.
While the chicks were growing, I left the clear plastic flap off and covered the door at night. This caused
the chicks to get familiar with the door. After I covered the top of the pen and completed the electric fence,
I added the plastic flap. This was after I cut the plastic to look and act like warehouse doors that I have
seen. Before the flap was cut into five pieces, I removed the bottom closure bar. The center flap was
pulled up and tacked above the door for the first two days (and nights). BTW, since the flock is protected,
I leave the door open day and night. This gives early exit and ventilation to the coop. After the second day,
I dropped the center flap after the flock was accustom to the flaps. Now, they come and go as they please.
By Sunset, they are back inside the coop for the night. I have set a timer for the lights to come on and go
off two hours after Sunset and two hours before Sunrise; depending on the time of the year (as calculated
by the digital timer used.) This is so the pullets will be familiar with lights when they start laying.
If I have left something out, or you have questions about this project, please contact me.
Dick.
Phelan, CA
I just finished my latest additions to my chicken coop and pen.
Electric Fence
I have been concerned with our dogs digging under the pen wire and the Antelope Squirrels feasting at night.
So, I extended my electric fence to run along the ground of the exposed pen sides.
This image shows the underground insulated wire coming from the outside fence.
I have the wire inside 1/2" Schedule 40 pipe. A hole was cut at the top of a cap to route the wire. This was
connected to a switch as a safety precaution. A wire was connected to the main woven cord of the electric
fence.
This is a close up view of the insulators for the electric fence.
My supplies were purchased from Kencove Farm supplies. I used a fiberglass rod to mount the cable
and stand-offs. I could adjust the cable height from the ground by moving the rod up, or down.
Mounted to it are the plastic (insulated) stand-offs. Not shown, are stainless steel wires to hold the
rod in place with the pen fence.

Another view of the cable and stand-offs near the ground.
Chicken Door
I used an Ideal Pet Products Extra Large Pet Door (10-1/2" X 15") purchased from Home Depot.

The exterior view of the Chicken Door showing the clear plastic flap.
Another view showing a RIR pullet entering the coop. Note the cuts made in the flap.
I installed the door by rough framing with 2X4's. My final trim was completed using 1/4" plywood.
I have added aluminum flashing for looks and protection with some of my dog doors. Both sides of the
doors were attached with decking screws.
While the chicks were growing, I left the clear plastic flap off and covered the door at night. This caused
the chicks to get familiar with the door. After I covered the top of the pen and completed the electric fence,
I added the plastic flap. This was after I cut the plastic to look and act like warehouse doors that I have
seen. Before the flap was cut into five pieces, I removed the bottom closure bar. The center flap was
pulled up and tacked above the door for the first two days (and nights). BTW, since the flock is protected,
I leave the door open day and night. This gives early exit and ventilation to the coop. After the second day,
I dropped the center flap after the flock was accustom to the flaps. Now, they come and go as they please.
By Sunset, they are back inside the coop for the night. I have set a timer for the lights to come on and go
off two hours after Sunset and two hours before Sunrise; depending on the time of the year (as calculated
by the digital timer used.) This is so the pullets will be familiar with lights when they start laying.
If I have left something out, or you have questions about this project, please contact me.
Dick.
Phelan, CA


