Adventure in homemade Incubator Assembly

Knighstar679

Crowing
Jun 12, 2018
2,393
6,321
431
Seneca Falls, NY
I had a homemade incubator that I have been reworking for two weeks as I read things on here.

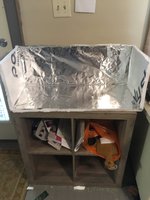
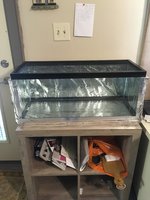
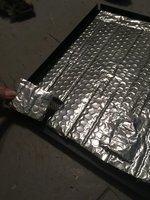
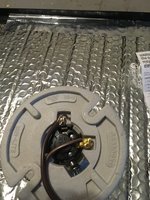
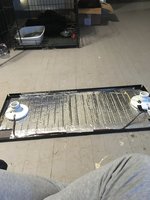
Here is my first set up. It consists of a ten gallon tank, heat light used for reptiles, and installation from my basement. It seemed like a good little set up until it over heated to 106 and killed my first set of eggs.
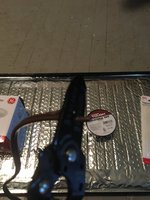
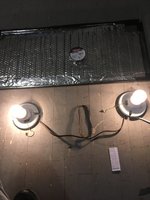
Temp was wildly erratic and I could not get it evened out. I tried a couple lights on either end but the temp kept swinging up and down a lot. Then today the lights died and my heat lights started falling apart when I took the lights out.
I did the math it wasn’t workable to repay replacements for it. So I took it all back to the store and broke down and bought an incukit from incubator warehouse. The amount was about the same as I was going to spend and will be more reliable.
42FA1317-E068-4308-AD9E-62E4487BE357.jpeg
 
3FB410B4-25B1-492F-BFD5-4303D77C70DA.jpeg

In this I am going to include my steps to convert a 20 gallon fish tank to a incubator.

Here is what I started with;
20 gallon long fish tank $40 at Petco
Reflecting insulation board $16 at Home Depot
HVAC tape I got from Walmart
Mesh heat screen for the top $13 at my local pet store (Petco was out)
A razor blade for cutting

The picture shows all the stuff to start with.
 
That’s pretty much what my first bator was as well. Except i used a water heater thermostat. I did end up hatching a couple chicks but it was by no means a good hatch.
There’s a reason most diy Bators are made with coolers. It keeps the temps from swinging too much.
My new diy bator has a better thermostat, and I made it out of an airtight rubbermade bin that I poked vent holes in top and bottom, added a fan and light bulb, and then insulated the crap out of it. I feel like I saved money on it, but only because the shipping costs are expensive to get things to my area.
My first run was not great, the eggs ended up scrambled, I think from the cheap egg turner I got from China.
I’m on my second batch, hand turning this time, and they seem to be on track.
I hope your new set up works well for you!

Thanks, I figured there are so many people who I have seen recently who are in my shoes that I would post my adventure into this making an incubator thing.
 
First Step is to cut out the sides to be the right length of for the 20 gallon. I had to remember to add in two inches to account for the form board on either side when cutting the back and an inch when cutting the sides.

After that was done I took a large piece of the form board shiny side down and set my tank on top of it so that I could get a good idea where it would need to sit and where the sides where going to go.

Then I put the sides together. I used glue for it. Namely a hot glue gun and gorilla glue. I ran a couple of beads on each side that was smooth and stuck the sides to the back, and held it there for several minutes. YOu don't have to take this option, you could stick to trusty old HVAC tape (my favorite tape when dealing with heating stuff). But I wanted it a little more secure and decided to glue it in place so it would wiggle less as i fitted other parts together.
1423436-e7a1473cdc0cb0b6a1a725747c9c8bf8.jpg


Once the side and back where together I did a loose fit of it around the tank and grabbed my glue gun again and began running a bead into the corners to hold it some. I did use a bit of duct tape to help hold it together while the glue cooled. After that I inserted my glue gun into the seams between the bottom and the sides and put more hot glue there to hold it better and make it a bit more solid.
1423439-61738f5ea09944c8590b751d6c99f5a3.jpg


You will notice in the picture that I have an over hang on nearly all edges that is planned. I wanted to make sure there was enough form board around the tank to cover all the edges.

After though i pulled out my razor and began to trim as close as I could to the tank. Because once it is done I plan to HVAC tape all the seams and edges to keep the heat in. That is easier if the edge is closer to the tank.
1423441-32df8799a2031ca03b950318e498f856.jpg
1423444-448f37c913f7bf2d02797b9ddf05e994.jpg


I can't cut a straight line even with a guide so I made due with what me and my razor blade could do. :D

Here it is all trimmed.
1423447-81000e1c85b1e555106e03b26ba86e0b.jpg


I made sure to cut below the black lid part so that the lid could go on easily. There is a gap but it is nothing that my handy HVAC tape can't fix.
1423448-05bbd181171d17902a16b6ee2b820856.jpg
 

Attachments

  • 004.JPG
    004.JPG
    358.4 KB · Views: 4
  • 006.JPG
    006.JPG
    497.4 KB · Views: 3
  • 007.JPG
    007.JPG
    387.9 KB · Views: 3
  • 008.JPG
    008.JPG
    363.1 KB · Views: 3
  • 009.JPG
    009.JPG
    454.3 KB · Views: 3
  • 010.JPG
    010.JPG
    424.3 KB · Views: 3
I used a styrofoam box with a few holes for ventilation and a heat lamp. It seems to work well and chicks will start hatching in a few days so we'll see how it goes. :jumpy
 
I used a styrofoam box with a few holes for ventilation and a heat lamp. It seems to work well and chicks will start hatching in a few days so we'll see how it goes. :jumpy

I opted not to do a styrofoam box. I was not a fan of all the pores that stuff could get into and grow. I wanted something that I could sterilize well and didn't have any place for bacteria to grow and hide. But basicly I am making a 3/4 styrofoam box. If fish tanks came in them I would have cheated and just grabbed one of those and went to town. But it seems the fish companies are wise to what their boxes could be used for the brats!

Best of luck on your hatch!!!!
 
For my next stage I needed foil, HVAC tape, and a razor blade.

So I wanted to line my board with something to one reflect heat back into the tank, and two get rid of the annoying words the company printed on the back of the form board. So I decided to go with foil. It was simple easy and cheap, plus I needed some for a cook out that is happening on Saturday so it was a win win.

I did the same thing I did with the form board. I rolled out the foil and cut it to fit each side. Then I tac taped it up.
1423476-9b12c65dd0dee2adf60622fcf24f244b.jpg
1423477-510ef1db3be826aeb5ef3618196762be.jpg


After that I ran tape along edge of the edges and sides of the form board and the foil to lock it in place and clean up the look. I also didn't want little stryofoam balls falling off the incubator all over my floor, which would have happened. So I ran the tape over ever seam and edge to lock it all in place and keep it together. Also to help avoid heat seeping out of the joints while the incubator is running.

1423481-97cc1287b7f4ca48592eecc6190e5a60.jpg


I put the tank into my box I made and as you can see i have a large gap at the top where the glass is visible which also means heat can seep out pretty easily. I went and cover those joints in tap making sure that there were no more gaps visable by the time I was done.

1423484-ccdfcb7636ae99fd49c7d1b381eb4013.jpg


Because I had a bit of a gap on the front I ran the tape along the front of the incubator to seal that, and to lock it into the foam board and make sure that the tank wasn't moving and going anywhere outside of the insulation board.

1423485-9d23d7443091c6e8cef24372e38ce085.jpg


Here is what the incubator looks like at the moment. I am still working on the top, which will include lights to help me see, insulation to stop heat from escaping, and the installation of the Incukit Mini into this system.

The Incukit Mini only ran me $65 with express shipping so that I could get it faster.

After that I will show you what I plan to do for the set up inside for my hatching tray, Humidity, and temp monitoring. Because temp is king on hatching eggs from everything I have read.
 

Attachments

  • 011.JPG
    011.JPG
    407.7 KB · Views: 4
  • 012.JPG
    012.JPG
    353.5 KB · Views: 3
  • 013.JPG
    013.JPG
    432.4 KB · Views: 3
  • 014.JPG
    014.JPG
    403.8 KB · Views: 4
  • 015.JPG
    015.JPG
    400.3 KB · Views: 3
I put together most of the top tonight and got the lighting working.

For this step I needed bubble foil insulation, HVAC tape, my glue gun and gorilla glue, two ceramic lighting fixtures, two lamp replacement wires, wire cutters, wire strippers, and electrical tape.
1423581-d103fad9ecb16dea853b497579959c4e.jpg


First I started out by measuring and cutting the bubble foil insulation. I also cut out holes for air exchange and to run my wires and hoses through for water and power.
1423582-d438124568f1f0c3176a308ebb649586.jpg
1423583-8def3986ac9774eec126121fc3871610.jpg


Once all that was done I HVAC tapped it in place, making sure there was a good seal on all the edges touching the metal face of the lid.

Next I laid out all my stuff for the lighting.

1423584-5cc7f8d09733fb97d9706e945959bf39.jpg


I had an idea of how i wanted it to work. I wanted a twin lighting system set up to my desktop dimmer so i could decrease the light or turn it off with out going into the incubator.

First let me start off by saying I am not very electrically inclined. So all i did was follow the directions on the ceramic lights and the replacement electrical lamp cords.
1423584-5cc7f8d09733fb97d9706e945959bf39.jpg


I started by cutting off the end of one of the lamp cords and then measuring out how much of the cord i was going to need to reach from one light to the next with out cutting across the center as that is where my Incukit is going. Anything extra I cut off.

I then stripped the wires as need so they could be attached to the lighting units.

1423585-54890961b321372cdf455dfa15f31639.jpg
1423587-94fa7cb862af2a1578933479d6f418df.jpg
1423593-c3f163a5b1693f15d417742cc0e5b45b.jpg
 

Attachments

  • 016.JPG
    016.JPG
    568.2 KB · Views: 3
  • 017.JPG
    017.JPG
    417.3 KB · Views: 3
  • 018.JPG
    018.JPG
    545.7 KB · Views: 2
  • 019.JPG
    019.JPG
    434.4 KB · Views: 1
  • 020.JPG
    020.JPG
    417.4 KB · Views: 4
  • 022.JPG
    022.JPG
    461.2 KB · Views: 2
  • 024.JPG
    024.JPG
    428 KB · Views: 3
Once the two units were connected together I did a tight light to see if it would work.
1423613-be64bc4213690683f299a42a6973aa62.jpg

After that was set I went to figuring out lighting placement on the lid.
1423616-95a462c17ee0897c8f313e472745c62e.jpg
1423621-d2b201c19aea0eb477be65df2beaf574.jpg
1423617-44fe40e806ec98d79319d3d20879202a.jpg

TO connect the lights to the lid I opted to choose to use gorilla glue. It is some pretty strong stuff and it was pretty sure I could get it to hold the fixture which isn't that heavy. That being said I was very free with the glue on the bottom of the fixture making sure to avoid anyplace with wires. After that was done I took to sealing around the fixture with the hot glue to give it a bit stronger hold to the insulation base.
Here is what it looks like with the lighting set up from both the top and the side.
1423622-2dd67a256139f55db8f747b8931b8b09.jpg
1423623-1f08fca2aeb7e4993dd8e773ba40f040.jpg


I did make sure to clip out the mesh screen to feed the wires through and covered any sharp parts with tape.

So now all I have to do is the inside and set up my Incukit.

How do you think it is going? Is there anything I am forgetting at this point that I need to make sure I address?
 

Attachments

  • 025.JPG
    025.JPG
    395 KB · Views: 2
  • 026.JPG
    026.JPG
    483.2 KB · Views: 3
  • 027.JPG
    027.JPG
    406.1 KB · Views: 3
  • 028.JPG
    028.JPG
    480.7 KB · Views: 2
  • 029.JPG
    029.JPG
    292.8 KB · Views: 2
  • 030.JPG
    030.JPG
    363.8 KB · Views: 1

New posts New threads Active threads

Back
Top Bottom