In another thread I saw requests for a popular brooder built by DaddysChickens. She has pictures on that thread, "BROODER THREAD" page 145, posts number 1442 and 1445. I think it's a great (but simple) design where you can easily divide it for multiple broods, isolate a sick chick, or use the entire floor as they grow bigger.
I hope no one minds if I stick my nose in .... you see, I'm an old coot with carpentry experience and nothing but time on my hands.
This brooder is designed to be placed on a table or counter about two or three feet off the ground, whatever height is comfortable for you to clean it, etc. Backed against a wall would be nice so that heat lights can be hung from wall brackets above, like the afore mentioned brooder of previously stated popularity. It's eight feet long, two feet high and two feet deep. You can make it a different size if you like but here's the basic how-do-I-put-it-together.
Before we start I'd like to mention that I don't know what tools you have. If you're able to rip 2x4s down to 2x2s, that's what I'd do, build it out of 2x2s where I'm showing 2x4s. But let's keep it as simple as possible for those with just a couple of hand tools.
Materials needed: Seven 2x4s eight feet long, four 1x2s eight feet long, one 4x8 foot sheet of plywood 1/4 inch thick, forty eight 3 inch deck screws or construction screws, twelve 2-1/2 inch construction screws for the cover, wood glue, and two pair of small hinges (1-1/2 inches long), and screen of your choice 2 by 12 feet. Oops, amended to say another 2x8 feet of screen for the cover.

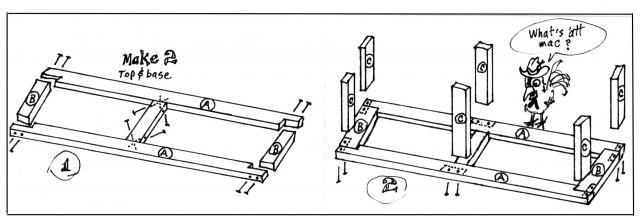
In picture (1) we're making the bottom. Two 8 foot 2x4's and two 20 and a half inch 2x4s. Notch the ends of the 8 footers as shown (otherwise it's hard to screw them together and have a strong joint.) Make the notch the width of the board fitting into it (3-1/2") and halfway through the 8 footer (1-3/4"). (We'll get to that fifth little board in the center in just a minute. AND we're going to make TWO of these things, one for the bottom of the brooder and one for the top of the brooder.)
OK when we have those first four pieces made, lets glue and screw them together. Get some yellow wood glue like Elmer's, there's a lot of brands and they're all good. What did you say ... you don't need to glue it? A small bottle costs about five bucks, it takes three seconds to apply it, and your brooder will be 947 times stronger. Yes you need to. You won't be sorry when it never gets loose and floppy, and your friends say that it's built like a brick outhouse. Take the time to pre-drill for the screws. It keeps the boards from cracking and draws them tightly together. Drill the first board of the two you're putting together, but NOT the second. Use a drill bit that's about the same size as the screw shaft near the head. (A little bigger or a little smaller is fine.) Drill 2 holes for two screws in each joint as shown in my fine little drawing. Smear glue on both surfaces of all four pieces where they join and screw everything together. When the four 2x4s are together measure across the center where that fifth short 2x4 goes, (place it in the center of the 8 foot length), cut a piece and pre-drill it at an angle as shown. Driving them in at an angle like that is called toe nailing if you're nailing. I guess we're toe screwing. Whatever. With the glue it makes a strong union.
Now do it all again. Remember? We need two of these things. One is the bottom of the brooder, the other is the top of the brooder.
OK. We've graduated to picture two. Cut six pieces 20-1/2 inches long for the uprights marked (C) in the drawing. When they're put between the top and bottom, the total height should be 24 inches. Screen or metal hardware cloth comes in 24 inch wide rolls, and you will be putting some around the front and sides .... right? Right. It'll fit.
Drill two holes in the brooder base for each joint in the corners and in the middle front and back (like in my loverly drawing). It's important to position the corner 2x4s as shown because it gives the box frame diagonal strength. Glue the joints and screw the uprights to the base. Now drill the second 2 by 8 foot thing which is the brooder top where the uprights will screw onto it, glue the top of the six uprights, place that 2 by 8 foot thing (which is the brooder top) on top of the uprights and screw it in place. You'll probably need to gently but firmly pull the uprights into place on the top frame, one by one as you screw down into them. Get them all flush with the outside edge of that top frame piece.
If at any time you don't know what the heck I'm saying, look at the drawings and that might clear things up. Except it won't help about positioning the top of the brooder, it ain't in drawing (2) but you can imagine placing it on top of the uprights.
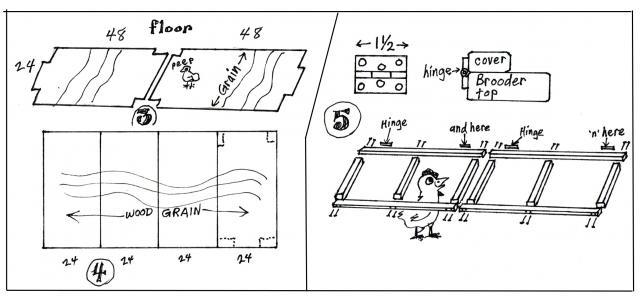
This is the best time to install the brooder floor. Cut that 4 x 8 foot sheet of plywood into four pieces that are 2 x 4 feet (picture (4). This will make it easier to install (than two by eight footers) and the grain will be going the best way for strength (picture (3). Use two of them for the floor. Measure for the notches and struggle, cut notches and fit them in place and struggle, and nail or screw them down. Hopefully you are now done with all of the struggling.
Nail the other two pieces of plywood to the back of the brooder frame for a solid back wall. This gives the brooder box diagonal strength in the other direction. You can put screen around the front and sides, or more plywood on the sides and screen only on the front if you like. That might make it less drafty in the brooder.
We're making the cover in two halves. Hopefully that will keep the number of escapees down when you have it open. The cover doesn't have to be heavy. I would use 1 x 2 inch boards. Again, if you don't have the tools to rip lumber down you can buy furring strips. They're 1 x 2 inches and 8 feet long, but they're pretty junky wood .... so plan to spend a few minutes going through the pile for some nice straight ones that don't have huge knots. They'll work just fine. Cut your two straightest ones in half and lay them flat on top of the brooder, positioned along the front and back edges. Measure for the shorter pieces so the cover frame will be flush with the outside edge of the brooder all the way around. You should be able to cut all six pieces the same size (about 21 inches). (My drawing shows two screws in every joint on the cover, but the 1x2s are to small for two, so use one screw in each joint.) Pre-drill, glue, and do all the stuff you're so good at by now. When you have them screwed together position them on top of the brooder. They might be kitty-whumpass (not laying straight and flat). If so, temporarily tack them in place to the brooder. When the glue dries, if they're still not laying right install the screen on them while they're tacked in position. If they still don't behave after you have the screen on, throw them in the driveway and drive over them until you feel better.
Now that the covers are perfect and beautiful, you'll want to hinge them. There's no need to buy big honkin' hinges. The cheapest little ones you can find, about an inch and a half long, will be plenty strong enough. Screw 'em on the back of the cover and the brooder as shown in pic (5).
OK. You've graduated with honors. From here on it's up to you to paint it purple or raise baby goats in it.
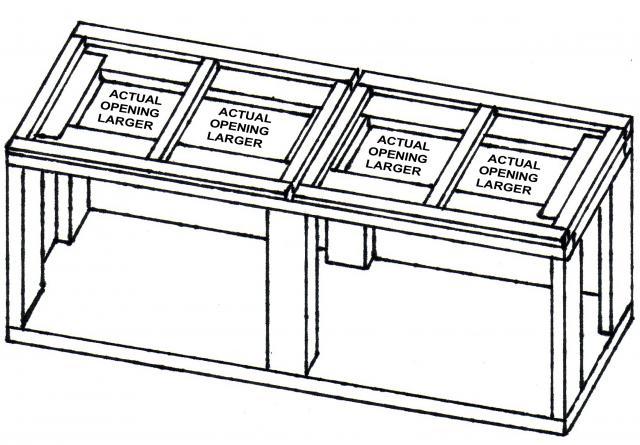
The widths of 2x4s in the finished brooder drawing have been exaggerated to show clearly their orientation. That means the actual top opening isn't narrow as it appears.
I edited to add the last drawing.
I hope no one minds if I stick my nose in .... you see, I'm an old coot with carpentry experience and nothing but time on my hands.
This brooder is designed to be placed on a table or counter about two or three feet off the ground, whatever height is comfortable for you to clean it, etc. Backed against a wall would be nice so that heat lights can be hung from wall brackets above, like the afore mentioned brooder of previously stated popularity. It's eight feet long, two feet high and two feet deep. You can make it a different size if you like but here's the basic how-do-I-put-it-together.
Before we start I'd like to mention that I don't know what tools you have. If you're able to rip 2x4s down to 2x2s, that's what I'd do, build it out of 2x2s where I'm showing 2x4s. But let's keep it as simple as possible for those with just a couple of hand tools.
Materials needed: Seven 2x4s eight feet long, four 1x2s eight feet long, one 4x8 foot sheet of plywood 1/4 inch thick, forty eight 3 inch deck screws or construction screws, twelve 2-1/2 inch construction screws for the cover, wood glue, and two pair of small hinges (1-1/2 inches long), and screen of your choice 2 by 12 feet. Oops, amended to say another 2x8 feet of screen for the cover.
In picture (1) we're making the bottom. Two 8 foot 2x4's and two 20 and a half inch 2x4s. Notch the ends of the 8 footers as shown (otherwise it's hard to screw them together and have a strong joint.) Make the notch the width of the board fitting into it (3-1/2") and halfway through the 8 footer (1-3/4"). (We'll get to that fifth little board in the center in just a minute. AND we're going to make TWO of these things, one for the bottom of the brooder and one for the top of the brooder.)
OK when we have those first four pieces made, lets glue and screw them together. Get some yellow wood glue like Elmer's, there's a lot of brands and they're all good. What did you say ... you don't need to glue it? A small bottle costs about five bucks, it takes three seconds to apply it, and your brooder will be 947 times stronger. Yes you need to. You won't be sorry when it never gets loose and floppy, and your friends say that it's built like a brick outhouse. Take the time to pre-drill for the screws. It keeps the boards from cracking and draws them tightly together. Drill the first board of the two you're putting together, but NOT the second. Use a drill bit that's about the same size as the screw shaft near the head. (A little bigger or a little smaller is fine.) Drill 2 holes for two screws in each joint as shown in my fine little drawing. Smear glue on both surfaces of all four pieces where they join and screw everything together. When the four 2x4s are together measure across the center where that fifth short 2x4 goes, (place it in the center of the 8 foot length), cut a piece and pre-drill it at an angle as shown. Driving them in at an angle like that is called toe nailing if you're nailing. I guess we're toe screwing. Whatever. With the glue it makes a strong union.
Now do it all again. Remember? We need two of these things. One is the bottom of the brooder, the other is the top of the brooder.
OK. We've graduated to picture two. Cut six pieces 20-1/2 inches long for the uprights marked (C) in the drawing. When they're put between the top and bottom, the total height should be 24 inches. Screen or metal hardware cloth comes in 24 inch wide rolls, and you will be putting some around the front and sides .... right? Right. It'll fit.
Drill two holes in the brooder base for each joint in the corners and in the middle front and back (like in my loverly drawing). It's important to position the corner 2x4s as shown because it gives the box frame diagonal strength. Glue the joints and screw the uprights to the base. Now drill the second 2 by 8 foot thing which is the brooder top where the uprights will screw onto it, glue the top of the six uprights, place that 2 by 8 foot thing (which is the brooder top) on top of the uprights and screw it in place. You'll probably need to gently but firmly pull the uprights into place on the top frame, one by one as you screw down into them. Get them all flush with the outside edge of that top frame piece.
If at any time you don't know what the heck I'm saying, look at the drawings and that might clear things up. Except it won't help about positioning the top of the brooder, it ain't in drawing (2) but you can imagine placing it on top of the uprights.
This is the best time to install the brooder floor. Cut that 4 x 8 foot sheet of plywood into four pieces that are 2 x 4 feet (picture (4). This will make it easier to install (than two by eight footers) and the grain will be going the best way for strength (picture (3). Use two of them for the floor. Measure for the notches and struggle, cut notches and fit them in place and struggle, and nail or screw them down. Hopefully you are now done with all of the struggling.
Nail the other two pieces of plywood to the back of the brooder frame for a solid back wall. This gives the brooder box diagonal strength in the other direction. You can put screen around the front and sides, or more plywood on the sides and screen only on the front if you like. That might make it less drafty in the brooder.
We're making the cover in two halves. Hopefully that will keep the number of escapees down when you have it open. The cover doesn't have to be heavy. I would use 1 x 2 inch boards. Again, if you don't have the tools to rip lumber down you can buy furring strips. They're 1 x 2 inches and 8 feet long, but they're pretty junky wood .... so plan to spend a few minutes going through the pile for some nice straight ones that don't have huge knots. They'll work just fine. Cut your two straightest ones in half and lay them flat on top of the brooder, positioned along the front and back edges. Measure for the shorter pieces so the cover frame will be flush with the outside edge of the brooder all the way around. You should be able to cut all six pieces the same size (about 21 inches). (My drawing shows two screws in every joint on the cover, but the 1x2s are to small for two, so use one screw in each joint.) Pre-drill, glue, and do all the stuff you're so good at by now. When you have them screwed together position them on top of the brooder. They might be kitty-whumpass (not laying straight and flat). If so, temporarily tack them in place to the brooder. When the glue dries, if they're still not laying right install the screen on them while they're tacked in position. If they still don't behave after you have the screen on, throw them in the driveway and drive over them until you feel better.
Now that the covers are perfect and beautiful, you'll want to hinge them. There's no need to buy big honkin' hinges. The cheapest little ones you can find, about an inch and a half long, will be plenty strong enough. Screw 'em on the back of the cover and the brooder as shown in pic (5).
OK. You've graduated with honors. From here on it's up to you to paint it purple or raise baby goats in it.
The widths of 2x4s in the finished brooder drawing have been exaggerated to show clearly their orientation. That means the actual top opening isn't narrow as it appears.
I edited to add the last drawing.

Last edited:

