BROODER thread! Post pics of your brooders!

Pics
Our chicks will hopefully be here on Friday. They shipped today. We were initially going to build a draft guard and brood them in their coop; but the weather has not cooperated with us to get the coop finished. After much debate, it was decided the chicks would start out in....tada! the harley shed. The harley has temporarily been moved to the screened porch. Did I mention that my SO is the most generous and patient man there ever was?
love.gif

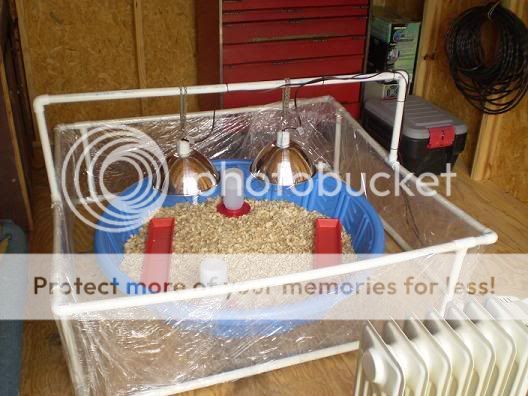
We started out with a wading pool that is approx. 4 ft. in diameter. We built the draft guard frame out of 3/4" PVC pipe and wrapped it in heavy duty plastic sheeting. Although we have hung 2 brooder lights, judging by the temperature readings we are getting so far, it looks like we will rarely need more than one. Therefore, we arranged them in such a way that they slide easily across the cross bar. That way we can slide the extra one out of the way and center the one we'll be using. The shed also has supplemental heat. We're hoping that this will last them at least 3 weeks until we can get their coop finished. An added bonus to the PVC draft guard is that it's lightweight and portable. I intend to use it as a "playpen" for the chicks on nice days when I can put them in the yard. Also, we didn't glue the joints of the PVC together, so that it can be used elsewhere on the farm once it's usefulness for the chicks is done. This does require that we check for tightness of the fittings daily.
What do y'all think?

P4090017.jpg
 
Here's our chick brooder ~ Just a huge clear job from Wallyworld, cost of about $12 ~ (hubby Wood Genius cut out the lid, and attached a screen for me)~


IMG_0032.JPG


We just put paper towels on the bottom, and then scatter wood shavings ~ And, although I had heard that it was possible to use just a regular high-wattage bulb to maintain tmeps in a plastic brooder like this, it didn't seem to work for us. That could be because we heat with a woodstove, and consequently our house doesn't maintain a constant heat of 70 F. So we spent the extra $20 and bought a heat lamp with the 250W bulb, and just raise it or lower it, ( or even turn it off sometimes if the house gets too hot from the woodstove) just gauging the way the chicks are behaving as to whether they need more or less heat.

IMG_0054_1.


Since we had PLANNED to start with just 5 chicks, and then decided that each child should get 2 of a kind incase of mortality & all, and then I decided that I wanted one or two of my own, which upped it to 12, and then one little one died, so naturally I had to go out & replace it, which led us to the last 5 ( which were on special at Cal Ranch, as ~assorted~ or more like ~unknowns~) we now have 16 little chicks, and are going to have to rethink the whole brooder thing in another week, as this one will likely be too small. Thankfully, Wood Genius is working on a nice coop, which should be finished soon.

~Red
:)^-- {:>)=
 
This is a great thread!
I joined this forum bc of the wonderful ideas this thread has given me.

I'll post my contraption soon!
 
Here is my brooder. I made it out of left overs from when I built the new fireplace surround.

I started with a 3x5 sheet of concrete backer board. I put a few 2x4 flat across some saw horses to support the board.
When we bought our stone for the fireplace, the boxes the stone came in were really heavy duty boxes, they had 2x3 in the corners.
I took out the 2x3 and used them to build the support for the walls
I cut up one box and used it for the walls.

I have a couple of cats that I was worried about getting in there with the chicks.
So I took some 1x3 and made a frame then covered it with chicken wire.

100_1411.jpg


100_1407.jpg
 
Here is mine when it was still nice and clean.....I pretty much took the idea from some of you!!!!
BunnyandChicks2008012.jpg


Here is our guard poodle mix Captain.....
BunnyandChicks2008062.jpg
 
Last edited:
The Buff-Os outgrew the Mudroom Brooder very quickly. I spent all weekend building a 3x version in the backroom on the garage. Cement floor with drain for easy cleaning. Totally enclosed for night protection and
I boxed-in an area for heat retention until the cold nights are over with.
Big_Brooder_Open.jpg

Big_Brooder_Closed.jpg
 
I've seen this one here before, done by someone else, but here' s our outside brooder, We have 29 chicks outside in a converted wooden shed/building right now - snug as can be - but we're only using one of the lights, at 50 Watts, cause it's so warm here for now
smile.png
It's cute watching the chicks come in and out, and later, they supposedly jump on the top to play!

Oh yeah, this is the smallest version of this plan at 2ft by 2 ft and is supposed to be suitable for up to 50 chicks! I just hop in with em, lift the lid for a while, and we play!

Brooderintheshed.jpg
 
Last edited:
Here is my Brooder I made my husband make it for me. He says the chickens are my thing but he has been there to help me the whole way.
They are now kept in an airtight wooden shed that will eventually be a chicken coop. I can wait! My Rooster will be here tomorrow! Yay!

100_1978.jpg
 
This is a great thread! My chicks won't be here for another month, and we're busy finishing up the coop right now. I've been trying to figure out what to use for a brooder, and about 2 pages into this, I remembered an old tool box for the back of a truck that my husband has behind a shed. Then I saw someone post that they had used exactly that! So that's what I'm planning to use. My husband even agreed to give it to me for the chicks. I'll get it all cleaned up and try to post pictures here soon.

Thanks for all the good info on this forum. I'm really glad I found y'all!

Penny
 

New posts New threads Active threads

Back
Top Bottom