First Post on here, but I wanted to share some pics for the brooder that I just finished today. I used a shipping crate that we get in from time to time and cut it down to size to fit my needs. I used 1/4" hardware cloth to finish it up. As you will see in the first pic, I did put a hinged clean out door on one end to make it easy to sweep out, and hinged the top. I will get some pine shavings in there before I get some chicks. I haven't decided on where to buy from yet. The total size is 42"x 60".
One question, is that enough light? Temp is staying around 95 give or take a degree. I have the light on a chain that I can adjust. I may put another lamp in there to provide some additional lighting as I don't want to leave all the lights on in my workshop all the time.
We used something similar, old retired wood fruit boxes the packing houses give away for free. My problem was it was too wide across and I couldn't catch the chicks to tame them. We are using a longer more narrow brooder now.
Everyone's brooders are so cool! Mine is a very simple brooder. We made it for 2 broody hens. They each got their own side. We have a divider in the middle that we take out once the chicks get bigger and more active so they have lots of space to run (once we took the moms out). My brooder is currently put away in the garage, with a bunch of stuff piled in it. I will have to take some pictures when I get it out and clean it up at the end of April. I need to make the brooder taller once we have it out. We made it 14 inches tall, and the moms had trouble standing. Not that big of a deal if we just have chicks in it though.
We have always brooded chicks in the old standard way using the cramped and crowded metal box/cage.
We would hatch them out and then transfer them. After a couple of weeks we would transfer them to a bigger pen and when they were a couple of months old they went to the barn.
It wasn't the best way. Chicks were lost. It was a pain for them and a pain for us because of the cramped quarters and problematic access.
This year we changed all that. What better place to brood the chicks than in the barn and let them see and be seen by the other chickens so there would be no adjustment period?
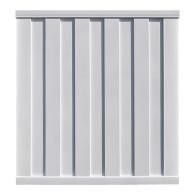
We had the plans and were buying the lumber when we found the clearance rack. These were on sale. Marked down from $70.00 each to $20.00 each This is a 6 foot by 6 foot plastic fence panel. It is double walled so it is insulated. We bought six.
We used four for the brooder ROOM. Three walls and one pane for a hinged door. We put chicken wire 24 inches high inside the door so we could open the door, go inside and do everything that was needed with no chicks leaving.
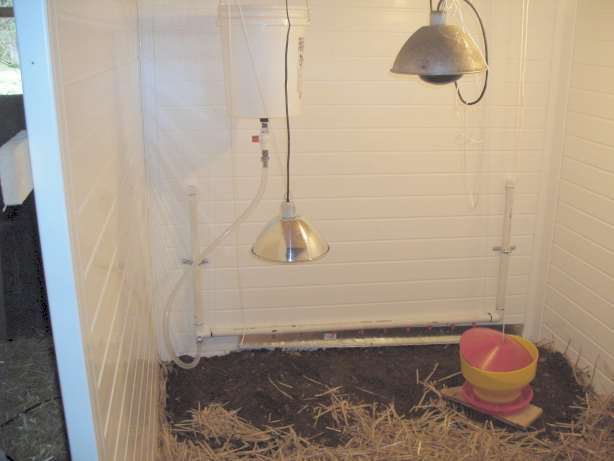
The roof of the room is plywood with two infrared heat lamps suspended on adjustable ropes.
There is also a small white light so they can see better
There is a water tray made from gutter against the back wall that is fed by chicken watering nipples.
There is a 6 pound capacity chick feeder
The floor in the back 2 feet is thick dirt.
The front 4 feet is thick hay.
We just happened to have a broody bantam silkie who was setting on two eggs.
We put 48 day old chicks in the brooder and shut the door.
We removed the Silkie's eggs and replaced them with two chicks.
Six hours later we put her inside the brooder with the rest of the chicks.
After the chicks got big enough so they couldn't slip through the chicken wire we would leave the door part way open for socialisation for a couple of hours a day.
We never lost a single chick and these are the most socialised chicks ever. They learned everything from 'mama' and were not afraid of the big chickens when they came out of their house.
The big chickens were actually hiding from them.
That was four months ago and now they roam the pasture like crazy but still make it difficult to walk when you go to the barn.
Brooder picture
The fourth panel is hinged in the front to use as a door, This picture was taken as I was assembling it. AfterI finished inside I attached chicken wire across the front 24 inches high so I could get in and out and do things without losing chicks. This was in January when we put the chicks in so it was really cold but the adjustable height heat lamps, the broody hen and the enclosed insulted panels kept it really nice and warm. When they were big enough to choose whether they wanted the heat or the barn we walled off a section of the barn 10 feet by 20 feet and left an 8 foot opening that had fencing on it so they could run in their space and not get lost in the barn. When they started sleeping away from the heat we turned them off.
We have always brooded chicks in the old standard way using the cramped and crowded metal box/cage.
We would hatch them out and then transfer them. After a couple of weeks we would transfer them to a bigger pen and when they were a couple of months old they went to the barn.
It wasn't the best way. Chicks were lost. It was a pain for them and a pain for us because of the cramped quarters and problematic access.
This year we changed all that. What better place to brood the chicks than in the barn and let them see and be seen by the other chickens so there would be no adjustment period?
We had the plans and were buying the lumber when we found the clearance rack. These were on sale. Marked down from $70.00 each to $20.00 each This is a 6 foot by 6 foot plastic fence panel. It is double walled so it is insulated. We bought six.
We used four for the brooder ROOM. Three walls and one pane for a hinged door. We put chicken wire 24 inches high inside the door so we could open the door, go inside and do everything that was needed with no chicks leaving.
The roof of the room is plywood with two infrared heat lamps suspended on adjustable ropes.
There is also a small white light so they can see better
There is a water tray made from gutter against the back wall that is fed by chicken watering nipples.
There is a 6 pound capacity chick feeder
The floor in the back 2 feet is thick dirt.
The front 4 feet is thick hay.
We just happened to have a broody bantam silkie who was setting on two eggs.
We put 48 day old chicks in the brooder and shut the door.
We removed the Silkie's eggs and replaced them with two chicks.
Six hours later we put her inside the brooder with the rest of the chicks.
After the chicks got big enough so they couldn't slip through the chicken wire we would leave the door part way open for socialisation for a couple of hours a day.
We never lost a single chick and these are the most socialised chicks ever. They learned everything from 'mama' and were not afraid of the big chickens when they came out of their house.
The big chickens were actually hiding from them.
That was four months ago and now they roam the pasture like crazy but still make it difficult to walk when you go to the barn.
Brooder picture
The fourth panel is hinged in the front to use as a door, This picture was taken as I was assembling it. AfterI finished inside I attached chicken wire across the front 24 inches high so I could get in and out and do things without losing chicks. This was in January when we put the chicks in so it was really cold but the adjustable height heat lamps, the broody hen and the enclosed insulted panels kept it really nice and warm. When they were big enough to choose whether they wanted the heat or the barn we walled off a section of the barn 10 feet by 20 feet and left an 8 foot opening that had fencing on it so they could run in their space and not get lost in the barn. When they started sleeping away from the heat we turned them off.
We have always brooded chicks in the old standard way using the cramped and crowded metal box/cage.
We would hatch them out and then transfer them. After a couple of weeks we would transfer them to a bigger pen and when they were a couple of months old they went to the barn.
It wasn't the best way. Chicks were lost. It was a pain for them and a pain for us because of the cramped quarters and problematic access.
This year we changed all that. What better place to brood the chicks than in the barn and let them see and be seen by the other chickens so there would be no adjustment period?
We had the plans and were buying the lumber when we found the clearance rack. These were on sale. Marked down from $70.00 each to $20.00 each
This is a 6 foot by 6 foot plastic fence panel. It is double walled so it is insulated. We bought six.
We used four for the brooder ROOM. Three walls and one pane for a hinged door. We put chicken wire 24 inches high inside the door so we could open the door, go inside and do everything that was needed with no chicks leaving.
The roof of the room is plywood with two infrared heat lamps suspended on adjustable ropes.
There is also a small white light so they can see better
There is a water tray made from gutter against the back wall that is fed by chicken watering nipples.
There is a 6 pound capacity chick feeder
The floor in the back 2 feet is thick dirt.
The front 4 feet is thick hay.
We just happened to have a broody bantam silkie who was setting on two eggs.
We put 48 day old chicks in the brooder and shut the door.
We removed the Silkie's eggs and replaced them with two chicks.
Six hours later we put her inside the brooder with the rest of the chicks.
After the chicks got big enough so they couldn't slip through the chicken wire we would leave the door part way open for socialisation for a couple of hours a day.
We never lost a single chick and these are the most socialised chicks ever. They learned everything from 'mama' and were not afraid of the big chickens when they came out of their house.
The big chickens were actually hiding from them.
That was four months ago and now they roam the pasture like crazy but still make it difficult to walk when you go to the barn.
Brooder picture
The fourth panel is hinged in the front to use as a door, This picture was taken as I was assembling it. AfterI finished inside I attached chicken wire across the front 24 inches high so I could get in and out and do things without losing chicks. This was in January when we put the chicks in so it was really cold but the adjustable height heat lamps, the broody hen and the enclosed insulted panels kept it really nice and warm. When they were big enough to choose whether they wanted the heat or the barn we walled off a section of the barn 10 feet by 20 feet and left an 8 foot opening that had fencing on it so they could run in their space and not get lost in the barn. When they started sleeping away from the heat we turned them off.
We have always brooded chicks in the old standard way using the cramped and crowded metal box/cage. We would hatch them out and then transfer them. After a couple of weeks we would transfer them to a bigger pen and when they were a couple of months old they went to the barn. It wasn't the best way. Chicks were lost. It was a pain for them and a pain for us because of the cramped quarters and problematic access. This year we changed all that. What better place to brood the chicks than in the barn and let them see and be seen by the other chickens so there would be no adjustment period? We had the plans and were buying the lumber when we found the clearance rack. These were on sale. Marked down from $70.00 each to $20.00 each This is a 6 foot by 6 foot plastic fence panel. It is double walled so it is insulated. We bought six. We used four for the brooder ROOM. Three walls and one pane for a hinged door. We put chicken wire 24 inches high inside the door so we could open the door, go inside and do everything that was needed with no chicks leaving. The roof of the room is plywood with two infrared heat lamps suspended on adjustable ropes. There is also a small white light so they can see better There is a water tray made from gutter against the back wall that is fed by chicken watering nipples. There is a 6 pound capacity chick feeder The floor in the back 2 feet is thick dirt. The front 4 feet is thick hay. We just happened to have a broody bantam silkie who was setting on two eggs. We put 48 day old chicks in the brooder and shut the door. We removed the Silkie's eggs and replaced them with two chicks. Six hours later we put her inside the brooder with the rest of the chicks. After the chicks got big enough so they couldn't slip through the chicken wire we would leave the door part way open for socialisation for a couple of hours a day. We never lost a single chick and these are the most socialised chicks ever. They learned everything from 'mama' and were not afraid of the big chickens when they came out of their house. The big chickens were actually hiding from them. That was four months ago and now they roam the pasture like crazy but still make it difficult to walk when you go to the barn. Brooder picture The fourth panel is hinged in the front to use as a door, This picture was taken as I was assembling it. AfterI finished inside I attached chicken wire across the front 24 inches high so I could get in and out and do things without losing chicks. This was in January when we put the chicks in so it was really cold but the adjustable height heat lamps, the broody hen and the enclosed insulted panels kept it really nice and warm. When they were big enough to choose whether they wanted the heat or the barn we walled off a section of the barn 10 feet by 20 feet and left an 8 foot opening that had fencing on it so they could run in their space and not get lost in the barn. When they started sleeping away from the heat we turned them off. We have always brooded chicks in the old standard way using the cramped and crowded metal box/cage. We would hatch them out and then transfer them. After a couple of weeks we would transfer them to a bigger pen and when they were a couple of months old they went to the barn. It wasn't the best way. Chicks were lost. It was a pain for them and a pain for us because of the cramped quarters and problematic access. This year we changed all that. What better place to brood the chicks than in the barn and let them see and be seen by the other chickens so there would be no adjustment period? We had the plans and were buying the lumber when we found the clearance rack. These were on sale. Marked down from $70.00 each to $20.00 each This is a 6 foot by 6 foot plastic fence panel. It is double walled so it is insulated. We bought six. We used four for the brooder ROOM. Three walls and one pane for a hinged door. We put chicken wire 24 inches high inside the door so we could open the door, go inside and do everything that was needed with no chicks leaving. The roof of the room is plywood with two infrared heat lamps suspended on adjustable ropes. There is also a small white light so they can see better There is a water tray made from gutter against the back wall that is fed by chicken watering nipples. There is a 6 pound capacity chick feeder The floor in the back 2 feet is thick dirt. The front 4 feet is thick hay. We just happened to have a broody bantam silkie who was setting on two eggs. We put 48 day old chicks in the brooder and shut the door. We removed the Silkie's eggs and replaced them with two chicks. Six hours later we put her inside the brooder with the rest of the chicks. After the chicks got big enough so they couldn't slip through the chicken wire we would leave the door part way open for socialisation for a couple of hours a day. We never lost a single chick and these are the most socialised chicks ever. They learned everything from 'mama' and were not afraid of the big chickens when they came out of their house. The big chickens were actually hiding from them. That was four months ago and now they roam the pasture like crazy but still make it difficult to walk when you go to the barn. Brooder picture The fourth panel is hinged in the front to use as a door, This picture was taken as I was assembling it. AfterI finished inside I attached chicken wire across the front 24 inches high so I could get in and out and do things without losing chicks. This was in January when we put the chicks in so it was really cold but the adjustable height heat lamps, the broody hen and the enclosed insulted panels kept it really nice and warm. When they were big enough to choose whether they wanted the heat or the barn we walled off a section of the barn 10 feet by 20 feet and left an 8 foot opening that had fencing on it so they could run in their space and not get lost in the barn. When they started sleeping away from the heat we turned them off. We have always brooded chicks in the old standard way using the cramped and crowded metal box/cage. We would hatch them out and then transfer them. After a couple of weeks we would transfer them to a bigger pen and when they were a couple of months old they went to the barn. It wasn't the best way. Chicks were lost. It was a pain for them and a pain for us because of the cramped quarters and problematic access. This year we changed all that. What better place to brood the chicks than in the barn and let them see and be seen by the other chickens so there would be no adjustment period? We had the plans and were buying the lumber when we found the clearance rack. These were on sale. Marked down from $70.00 each to $20.00 each This is a 6 foot by 6 foot plastic fence panel. It is double walled so it is insulated. We bought six. We used four for the brooder ROOM. Three walls and one pane for a hinged door. We put chicken wire 24 inches high inside the door so we could open the door, go inside and do everything that was needed with no chicks leaving. The roof of the room is plywood with two infrared heat lamps suspended on adjustable ropes. There is also a small white light so they can see better There is a water tray made from gutter against the back wall that is fed by chicken watering nipples. There is a 6 pound capacity chick feeder The floor in the back 2 feet is thick dirt. The front 4 feet is thick hay. We just happened to have a broody bantam silkie who was setting on two eggs. We put 48 day old chicks in the brooder and shut the door. We removed the Silkie's eggs and replaced them with two chicks. Six hours later we put her inside the brooder with the rest of the chicks. After the chicks got big enough so they couldn't slip through the chicken wire we would leave the door part way open for socialisation for a couple of hours a day. We never lost a single chick and these are the most socialised chicks ever. They learned everything from 'mama' and were not afraid of the big chickens when they came out of their house. The big chickens were actually hiding from them. That was four months ago and now they roam the pasture like crazy but still make it difficult to walk when you go to the barn. Brooder picture The fourth panel is hinged in the front to use as a door, This picture was taken as I was assembling it. AfterI finished inside I attached chicken wire across the front 24 inches high so I could get in and out and do things without losing chicks. This was in January when we put the chicks in so it was really cold but the adjustable height heat lamps, the broody hen and the enclosed insulted panels kept it really nice and warm. When they were big enough to choose whether they wanted the heat or the barn we walled off a section of the barn 10 feet by 20 feet and left an 8 foot opening that had fencing on it so they could run in their space and not get lost in the barn. When they started sleeping away from the heat we turned them off. We have always brooded chicks in the old standard way using the cramped and crowded metal box/cage. We would hatch them out and then transfer them. After a couple of weeks we would transfer them to a bigger pen and when they were a couple of months old they went to the barn. It wasn't the best way. Chicks were lost. It was a pain for them and a pain for us because of the cramped quarters and problematic access. This year we changed all that. What better place to brood the chicks than in the barn and let them see and be seen by the other chickens so there would be no adjustment period? We had the plans and were buying the lumber when we found the clearance rack. These were on sale. Marked down from $70.00 each to $20.00 each This is a 6 foot by 6 foot plastic fence panel. It is double walled so it is insulated. We bought six. We used four for the brooder ROOM. Three walls and one pane for a hinged door. We put chicken wire 24 inches high inside the door so we could open the door, go inside and do everything that was needed with no chicks leaving. The roof of the room is plywood with two infrared heat lamps suspended on adjustable ropes. There is also a small white light so they can see better There is a water tray made from gutter against the back wall that is fed by chicken watering nipples. There is a 6 pound capacity chick feeder The floor in the back 2 feet is thick dirt. The front 4 feet is thick hay. We just happened to have a broody bantam silkie who was setting on two eggs. We put 48 day old chicks in the brooder and shut the door. We removed the Silkie's eggs and replaced them with two chicks. Six hours later we put her inside the brooder with the rest of the chicks. After the chicks got big enough so they couldn't slip through the chicken wire we would leave the door part way open for socialisation for a couple of hours a day. We never lost a single chick and these are the most socialised chicks ever. They learned everything from 'mama' and were not afraid of the big chickens when they came out of their house. The big chickens were actually hiding from them. That was four months ago and now they roam the pasture like crazy but still make it difficult to walk when you go to the barn. Brooder picture The fourth panel is hinged in the front to use as a door, This picture was taken as I was assembling it. AfterI finished inside I attached chicken wire across the front 24 inches high so I could get in and out and do things without losing chicks. This was in January when we put the chicks in so it was really cold but the adjustable height heat lamps, the broody hen and the enclosed insulted panels kept it really nice and warm. When they were big enough to choose whether they wanted the heat or the barn we walled off a section of the barn 10 feet by 20 feet and left an 8 foot opening that had fencing on it so they could run in their space and not get lost in the barn. When they started sleeping away from the heat we turned them off. We have always brooded chicks in the old standard way using the cramped and crowded metal box/cage. We would hatch them out and then transfer them. After a couple of weeks we would transfer them to a bigger pen and when they were a couple of months old they went to the barn. It wasn't the best way. Chicks were lost. It was a pain for them and a pain for us because of the cramped quarters and problematic access. This year we changed all that. What better place to brood the chicks than in the barn and let them see and be seen by the other chickens so there would be no adjustment period? We had the plans and were buying the lumber when we found the clearance rack. These were on sale. Marked down from $70.00 each to $20.00 each This is a 6 foot by 6 foot plastic fence panel. It is double walled so it is insulated. We bought six. We used four for the brooder ROOM. Three walls and one pane for a hinged door. We put chicken wire 24 inches high inside the door so we could open the door, go inside and do everything that was needed with no chicks leaving. The roof of the room is plywood with two infrared heat lamps suspended on adjustable ropes. There is also a small white light so they can see better There is a water tray made from gutter against the back wall that is fed by chicken watering nipples. There is a 6 pound capacity chick feeder The floor in the back 2 feet is thick dirt. The front 4 feet is thick hay. We just happened to have a broody bantam silkie who was setting on two eggs. We put 48 day old chicks in the brooder and shut the door. We removed the Silkie's eggs and replaced them with two chicks. Six hours later we put her inside the brooder with the rest of the chicks. After the chicks got big enough so they couldn't slip through the chicken wire we would leave the door part way open for socialisation for a couple of hours a day. We never lost a single chick and these are the most socialised chicks ever. They learned everything from 'mama' and were not afraid of the big chickens when they came out of their house. The big chickens were actually hiding from them. That was four months ago and now they roam the pasture like crazy but still make it difficult to walk when you go to the barn. Brooder picture The fourth panel is hinged in the front to use as a door, This picture was taken as I was assembling it. AfterI finished inside I attached chicken wire across the front 24 inches high so I could get in and out and do things without losing chicks. This was in January when we put the chicks in so it was really cold but the adjustable height heat lamps, the broody hen and the enclosed insulted panels kept it really nice and warm. When they were big enough to choose whether they wanted the heat or the barn we walled off a section of the barn 10 feet by 20 feet and left an 8 foot opening that had fencing on it so they could run in their space and not get lost in the barn. When they started sleeping away from the heat we turned them off. We have always brooded chicks in the old standard way using the cramped and crowded metal box/cage. We would hatch them out and then transfer them. After a couple of weeks we would transfer them to a bigger pen and when they were a couple of months old they went to the barn. It wasn't the best way. Chicks were lost. It was a pain for them and a pain for us because of the cramped quarters and problematic access. This year we changed all that. What better place to brood the chicks than in the barn and let them see and be seen by the other chickens so there would be no adjustment period? We had the plans and were buying the lumber when we found the clearance rack. These were on sale. Marked down from $70.00 each to $20.00 each This is a 6 foot by 6 foot plastic fence panel. It is double walled so it is insulated. We bought six. We used four for the brooder ROOM. Three walls and one pane for a hinged door. We put chicken wire 24 inches high inside the door so we could open the door, go inside and do everything that was needed with no chicks leaving. The roof of the room is plywood with two infrared heat lamps suspended on adjustable ropes. There is also a small white light so they can see better There is a water tray made from gutter against the back wall that is fed by chicken watering nipples. There is a 6 pound capacity chick feeder The floor in the back 2 feet is thick dirt. The front 4 feet is thick hay. We just happened to have a broody bantam silkie who was setting on two eggs. We put 48 day old chicks in the brooder and shut the door. We removed the Silkie's eggs and replaced them with two chicks. Six hours later we put her inside the brooder with the rest of the chicks. After the chicks got big enough so they couldn't slip through the chicken wire we would leave the door part way open for socialisation for a couple of hours a day. We never lost a single chick and these are the most socialised chicks ever. They learned everything from 'mama' and were not afraid of the big chickens when they came out of their house. The big chickens were actually hiding from them. That was four months ago and now they roam the pasture like crazy but still make it difficult to walk when you go to the barn. Brooder picture The fourth panel is hinged in the front to use as a door, This picture was taken as I was assembling it. AfterI finished inside I attached chicken wire across the front 24 inches high so I could get in and out and do things without losing chicks. This was in January when we put the chicks in so it was really cold but the adjustable height heat lamps, the broody hen and the enclosed insulted panels kept it really nice and warm. When they were big enough to choose whether they wanted the heat or the barn we walled off a section of the barn 10 feet by 20 feet and left an 8 foot opening that had fencing on it so they could run in their space and not get lost in the barn. When they started sleeping away from the heat we turned them off. We have always brooded chicks in the old standard way using the cramped and crowded metal box/cage. We would hatch them out and then transfer them. After a couple of weeks we would transfer them to a bigger pen and when they were a couple of months old they went to the barn. It wasn't the best way. Chicks were lost. It was a pain for them and a pain for us because of the cramped quarters and problematic access. This year we changed all that. What better place to brood the chicks than in the barn and let them see and be seen by the other chickens so there would be no adjustment period? We had the plans and were buying the lumber when we found the clearance rack. These were on sale. Marked down from $70.00 each to $20.00 each This is a 6 foot by 6 foot plastic fence panel. It is double walled so it is insulated. We bought six. We used four for the brooder ROOM. Three walls and one pane for a hinged door. We put chicken wire 24 inches high inside the door so we could open the door, go inside and do everything that was needed with no chicks leaving. The roof of the room is plywood with two infrared heat lamps suspended on adjustable ropes. There is also a small white light so they can see better There is a water tray made from gutter against the back wall that is fed by chicken watering nipples. There is a 6 pound capacity chick feeder The floor in the back 2 feet is thick dirt. The front 4 feet is thick hay. We just happened to have a broody bantam silkie who was setting on two eggs. We put 48 day old chicks in the brooder and shut the door. We removed the Silkie's eggs and replaced them with two chicks. Six hours later we put her inside the brooder with the rest of the chicks. After the chicks got big enough so they couldn't slip through the chicken wire we would leave the door part way open for socialisation for a couple of hours a day. We never lost a single chick and these are the most socialised chicks ever. They learned everything from 'mama' and were not afraid of the big chickens when they came out of their house. The big chickens were actually hiding from them. That was four months ago and now they roam the pasture like crazy but still make it difficult to walk when you go to the barn. Brooder picture The fourth panel is hinged in the front to use as a door, This picture was taken as I was assembling it. AfterI finished inside I attached chicken wire across the front 24 inches high so I could get in and out and do things without losing chicks. This was in January when we put the chicks in so it was really cold but the adjustable height heat lamps, the broody hen and the enclosed insulted panels kept it really nice and warm. When they were big enough to choose whether they wanted the heat or the barn we walled off a section of the barn 10 feet by 20 feet and left an 8 foot opening that had fencing on it so they could run in their space and not get lost in the barn. When they started sleeping away from the heat we turned them off. We have always brooded chicks in the old standard way using the cramped and crowded metal box/cage. We would hatch them out and then transfer them. After a couple of weeks we would transfer them to a bigger pen and when they were a couple of months old they went to the barn. It wasn't the best way. Chicks were lost. It was a pain for them and a pain for us because of the cramped quarters and problematic access. This year we changed all that. What better place to brood the chicks than in the barn and let them see and be seen by the other chickens so there would be no adjustment period? We had the plans and were buying the lumber when we found the clearance rack. These were on sale. Marked down from $70.00 each to $20.00 each This is a 6 foot by 6 foot plastic fence panel. It is double walled so it is insulated. We bought six. We used four for the brooder ROOM. Three walls and one pane for a hinged door. We put chicken wire 24 inches high inside the door so we could open the door, go inside and do everything that was needed with no chicks leaving. The roof of the room is plywood with two infrared heat lamps suspended on adjustable ropes. There is also a small white light so they can see better There is a water tray made from gutter against the back wall that is fed by chicken watering nipples. There is a 6 pound capacity chick feeder The floor in the back 2 feet is thick dirt. The front 4 feet is thick hay. We just happened to have a broody bantam silkie who was setting on two eggs. We put 48 day old chicks in the brooder and shut the door. We removed the Silkie's eggs and replaced them with two chicks. Six hours later we put her inside the brooder with the rest of the chicks. After the chicks got big enough so they couldn't slip through the chicken wire we would leave the door part way open for socialisation for a couple of hours a day. We never lost a single chick and these are the most socialised chicks ever. They learned everything from 'mama' and were not afraid of the big chickens when they came out of their house. The big chickens were actually hiding from them. That was four months ago and now they roam the pasture like crazy but still make it difficult to walk when you go to the barn. Brooder picture The fourth panel is hinged in the front to use as a door, This picture was taken as I was assembling it. AfterI finished inside I attached chicken wire across the front 24 inches high so I could get in and out and do things without losing chicks. This was in January when we put the chicks in so it was really cold but the adjustable height heat lamps, the broody hen and the enclosed insulted panels kept it really nice and warm. When they were big enough to choose whether they wanted the heat or the barn we walled off a section of the barn 10 feet by 20 feet and left an 8 foot opening that had fencing on it so they could run in their space and not get lost in the barn. When they started sleeping away from the heat we turned them off. We have always brooded chicks in the old standard way using the cramped and crowded metal box/cage. We would hatch them out and then transfer them. After a couple of weeks we would transfer them to a bigger pen and when they were a couple of months old they went to the barn. It wasn't the best way. Chicks were lost. It was a pain for them and a pain for us because of the cramped quarters and problematic access. This year we changed all that. What better place to brood the chicks than in the barn and let them see and be seen by the other chickens so there would be no adjustment period? We had the plans and were buying the lumber when we found the clearance rack. These were on sale. Marked down from $70.00 each to $20.00 each This is a 6 foot by 6 foot plastic fence panel. It is double walled so it is insulated. We bought six. We used four for the brooder ROOM. Three walls and one pane for a hinged door. We put chicken wire 24 inches high inside the door so we could open the door, go inside and do everything that was needed with no chicks leaving. The roof of the room is plywood with two infrared heat lamps suspended on adjustable ropes. There is also a small white light so they can see better There is a water tray made from gutter against the back wall that is fed by chicken watering nipples. There is a 6 pound capacity chick feeder The floor in the back 2 feet is thick dirt. The front 4 feet is thick hay. We just happened to have a broody bantam silkie who was setting on two eggs. We put 48 day old chicks in the brooder and shut the door. We removed the Silkie's eggs and replaced them with two chicks. Six hours later we put her inside the brooder with the rest of the chicks. After the chicks got big enough so they couldn't slip through the chicken wire we would leave the door part way open for socialisation for a couple of hours a day. We never lost a single chick and these are the most socialised chicks ever. They learned everything from 'mama' and were not afraid of the big chickens when they came out of their house. The big chickens were actually hiding from them. That was four months ago and now they roam the pasture like crazy but still make it difficult to walk when you go to the barn. Brooder picture The fourth panel is hinged in the front to use as a door, This picture was taken as I was assembling it. AfterI finished inside I attached chicken wire across the front 24 inches high so I could get in and out and do things without losing chicks. This was in January when we put the chicks in so it was really cold but the adjustable height heat lamps, the broody hen and the enclosed insulted panels kept it really nice and warm. When they were big enough to choose whether they wanted the heat or the barn we walled off a section of the barn 10 feet by 20 feet and left an 8 foot opening that had fencing on it so they could run in their space and not get lost in the barn. When they started sleeping away from the heat we turned them off. We have always brooded chicks in the old standard way using the cramped and crowded metal box/cage. We would hatch them out and then transfer them. After a couple of weeks we would transfer them to a bigger pen and when they were a couple of months old they went to the barn. It wasn't the best way. Chicks were lost. It was a pain for them and a pain for us because of the cramped quarters and problematic access. This year we changed all that. What better place to brood the chicks than in the barn and let them see and be seen by the other chickens so there would be no adjustment period? We had the plans and were buying the lumber when we found the clearance rack. These were on sale. Marked down from $70.00 each to $20.00 each This is a 6 foot by 6 foot plastic fence panel. It is double walled so it is insulated. We bought six. We used four for the brooder ROOM. Three walls and one pane for a hinged door. We put chicken wire 24 inches high inside the door so we could open the door, go inside and do everything that was needed with no chicks leaving. The roof of the room is plywood with two infrared heat lamps suspended on adjustable ropes. There is also a small white light so they can see better There is a water tray made from gutter against the back wall that is fed by chicken watering nipples. There is a 6 pound capacity chick feeder The floor in the back 2 feet is thick dirt. The front 4 feet is thick hay. We just happened to have a broody bantam silkie who was setting on two eggs. We put 48 day old chicks in the brooder and shut the door. We removed the Silkie's eggs and replaced them with two chicks. Six hours later we put her inside the brooder with the rest of the chicks. After the chicks got big enough so they couldn't slip through the chicken wire we would leave the door part way open for socialisation for a couple of hours a day. We never lost a single chick and these are the most socialised chicks ever. They learned everything from 'mama' and were not afraid of the big chickens when they came out of their house. The big chickens were actually hiding from them. That was four months ago and now they roam the pasture like crazy but still make it difficult to walk when you go to the barn. Brooder picture The fourth panel is hinged in the front to use as a door, This picture was taken as I was assembling it. AfterI finished inside I attached chicken wire across the front 24 inches high so I could get in and out and do things without losing chicks. This was in January when we put the chicks in so it was really cold but the adjustable height heat lamps, the broody hen and the enclosed insulted panels kept it really nice and warm. When they were big enough to choose whether they wanted the heat or the barn we walled off a section of the barn 10 feet by 20 feet and left an 8 foot opening that had fencing on it so they could run in their space and not get lost in the barn. When they started sleeping away from the heat we turned them off. We have always brooded chicks in the old standard way using the cramped and crowded metal box/cage. We would hatch them out and then transfer them. After a couple of weeks we would transfer them to a bigger pen and when they were a couple of months old they went to the barn. It wasn't the best way. Chicks were lost. It was a pain for them and a pain for us because of the cramped quarters and problematic access. This year we changed all that. What better place to brood the chicks than in the barn and let them see and be seen by the other chickens so there would be no adjustment period? We had the plans and were buying the lumber when we found the clearance rack. These were on sale. Marked down from $70.00 each to $20.00 each This is a 6 foot by 6 foot plastic fence panel. It is double walled so it is insulated. We bought six. We used four for the brooder ROOM. Three walls and one pane for a hinged door. We put chicken wire 24 inches high inside the door so we could open the door, go inside and do everything that was needed with no chicks leaving. The roof of the room is plywood with two infrared heat lamps suspended on adjustable ropes. There is also a small white light so they can see better There is a water tray made from gutter against the back wall that is fed by chicken watering nipples. There is a 6 pound capacity chick feeder The floor in the back 2 feet is thick dirt. The front 4 feet is thick hay. We just happened to have a broody bantam silkie who was setting on two eggs. We put 48 day old chicks in the brooder and shut the door. We removed the Silkie's eggs and replaced them with two chicks. Six hours later we put her inside the brooder with the rest of the chicks. After the chicks got big enough so they couldn't slip through the chicken wire we would leave the door part way open for socialisation for a couple of hours a day. We never lost a single chick and these are the most socialised chicks ever. They learned everything from 'mama' and were not afraid of the big chickens when they came out of their house. The big chickens were actually hiding from them. That was four months ago and now they roam the pasture like crazy but still make it difficult to walk when you go to the barn. Brooder picture The fourth panel is hinged in the front to use as a door, This picture was taken as I was assembling it. AfterI finished inside I attached chicken wire across the front 24 inches high so I could get in and out and do things without losing chicks. This was in January when we put the chicks in so it was really cold but the adjustable height heat lamps, the broody hen and the enclosed insulted panels kept it really nice and warm. When they were big enough to choose whether they wanted the heat or the barn we walled off a section of the barn 10 feet by 20 feet and left an 8 foot opening that had fencing on it so they could run in their space and not get lost in the barn. When they started sleeping away from the heat we turned them off. We have always brooded chicks in the old standard way using the cramped and crowded metal box/cage. We would hatch them out and then transfer them. After a couple of weeks we would transfer them to a bigger pen and when they were a couple of months old they went to the barn. It wasn't the best way. Chicks were lost. It was a pain for them and a pain for us because of the cramped quarters and problematic access. This year we changed all that. What better place to brood the chicks than in the barn and let them see and be seen by the other chickens so there would be no adjustment period? We had the plans and were buying the lumber when we found the clearance rack. These were on sale. Marked down from $70.00 each to $20.00 each This is a 6 foot by 6 foot plastic fence panel. It is double walled so it is insulated. We bought six. We used four for the brooder ROOM. Three walls and one pane for a hinged door. We put chicken wire 24 inches high inside the door so we could open the door, go inside and do everything that was needed with no chicks leaving. The roof of the room is plywood with two infrared heat lamps suspended on adjustable ropes. There is also a small white light so they can see better There is a water tray made from gutter against the back wall that is fed by chicken watering nipples. There is a 6 pound capacity chick feeder The floor in the back 2 feet is thick dirt. The front 4 feet is thick hay. We just happened to have a broody bantam silkie who was setting on two eggs. We put 48 day old chicks in the brooder and shut the door. We removed the Silkie's eggs and replaced them with two chicks. Six hours later we put her inside the brooder with the rest of the chicks. After the chicks got big enough so they couldn't slip through the chicken wire we would leave the door part way open for socialisation for a couple of hours a day. We never lost a single chick and these are the most socialised chicks ever. They learned everything from 'mama' and were not afraid of the big chickens when they came out of their house. The big chickens were actually hiding from them. That was four months ago and now they roam the pasture like crazy but still make it difficult to walk when you go to the barn. Brooder picture The fourth panel is hinged in the front to use as a door, This picture was taken as I was assembling it. AfterI finished inside I attached chicken wire across the front 24 inches high so I could get in and out and do things without losing chicks. This was in January when we put the chicks in so it was really cold but the adjustable height heat lamps, the broody hen and the enclosed insulted panels kept it really nice and warm. When they were big enough to choose whether they wanted the heat or the barn we walled off a section of the barn 10 feet by 20 feet and left an 8 foot opening that had fencing on it so they could run in their space and not get lost in the barn. When they started sleeping away from the heat we turned them off. We have always brooded chicks in the old standard way using the cramped and crowded metal box/cage. We would hatch them out and then transfer them. After a couple of weeks we would transfer them to a bigger pen and when they were a couple of months old they went to the barn. It wasn't the best way. Chicks were lost. It was a pain for them and a pain for us because of the cramped quarters and problematic access. This year we changed all that. What better place to brood the chicks than in the barn and let them see and be seen by the other chickens so there would be no adjustment period? We had the plans and were buying the lumber when we found the clearance rack. These were on sale. Marked down from $70.00 each to $20.00 each This is a 6 foot by 6 foot plastic fence panel. It is double walled so it is insulated. We bought six. We used four for the brooder ROOM. Three walls and one pane for a hinged door. We put chicken wire 24 inches high inside the door so we could open the door, go inside and do everything that was needed with no chicks leaving. The roof of the room is plywood with two infrared heat lamps suspended on adjustable ropes. There is also a small white light so they can see better There is a water tray made from gutter against the back wall that is fed by chicken watering nipples. There is a 6 pound capacity chick feeder The floor in the back 2 feet is thick dirt. The front 4 feet is thick hay. We just happened to have a broody bantam silkie who was setting on two eggs. We put 48 day old chicks in the brooder and shut the door. We removed the Silkie's eggs and replaced them with two chicks. Six hours later we put her inside the brooder with the rest of the chicks. After the chicks got big enough so they couldn't slip through the chicken wire we would leave the door part way open for socialisation for a couple of hours a day. We never lost a single chick and these are the most socialised chicks ever. They learned everything from 'mama' and were not afraid of the big chickens when they came out of their house. The big chickens were actually hiding from them. That was four months ago and now they roam the pasture like crazy but still make it difficult to walk when you go to the barn. Brooder picture The fourth panel is hinged in the front to use as a door, This picture was taken as I was assembling it. AfterI finished inside I attached chicken wire across the front 24 inches high so I could get in and out and do things without losing chicks. This was in January when we put the chicks in so it was really cold but the adjustable height heat lamps, the broody hen and the enclosed insulted panels kept it really nice and warm. When they were big enough to choose whether they wanted the heat or the barn we walled off a section of the barn 10 feet by 20 feet and left an 8 foot opening that had fencing on it so they could run in their space and not get lost in the barn. When they started sleeping away from the heat we turned them off. We have always brooded chicks in the old standard way using the cramped and crowded metal box/cage. We would hatch them out and then transfer them. After a couple of weeks we would transfer them to a bigger pen and when they were a couple of months old they went to the barn. It wasn't the best way. Chicks were lost. It was a pain for them and a pain for us because of the cramped quarters and problematic access. This year we changed all that. What better place to brood the chicks than in the barn and let them see and be seen by the other chickens so there would be no adjustment period? We had the plans and were buying the lumber when we found the clearance rack. These were on sale. Marked down from $70.00 each to $20.00 each This is a 6 foot by 6 foot plastic fence panel. It is double walled so it is insulated. We bought six. We used four for the brooder ROOM. Three walls and one pane for a hinged door. We put chicken wire 24 inches high inside the door so we could open the door, go inside and do everything that was needed with no chicks leaving. The roof of the room is plywood with two infrared heat lamps suspended on adjustable ropes. There is also a small white light so they can see better There is a water tray made from gutter against the back wall that is fed by chicken watering nipples. There is a 6 pound capacity chick feeder The floor in the back 2 feet is thick dirt. The front 4 feet is thick hay. We just happened to have a broody bantam silkie who was setting on two eggs. We put 48 day old chicks in the brooder and shut the door. We removed the Silkie's eggs and replaced them with two chicks. Six hours later we put her inside the brooder with the rest of the chicks. After the chicks got big enough so they couldn't slip through the chicken wire we would leave the door part way open for socialisation for a couple of hours a day. We never lost a single chick and these are the most socialised chicks ever. They learned everything from 'mama' and were not afraid of the big chickens when they came out of their house. The big chickens were actually hiding from them. That was four months ago and now they roam the pasture like crazy but still make it difficult to walk when you go to the barn. Brooder picture The fourth panel is hinged in the front to use as a door, This picture was taken as I was assembling it. AfterI finished inside I attached chicken wire across the front 24 inches high so I could get in and out and do things without losing chicks. This was in January when we put the chicks in so it was really cold but the adjustable height heat lamps, the broody hen and the enclosed insulted panels kept it really nice and warm. When they were big enough to choose whether they wanted the heat or the barn we walled off a section of the barn 10 feet by 20 feet and left an 8 foot opening that had fencing on it so they could run in their space and not get lost in the barn. When they started sleeping away from the heat we turned them off. We have always brooded chicks in the old standard way using the cramped and crowded metal box/cage. We would hatch them out and then transfer them. After a couple of weeks we would transfer them to a bigger pen and when they were a couple of months old they went to the barn. It wasn't the best way. Chicks were lost. It was a pain for them and a pain for us because of the cramped quarters and problematic access. This year we changed all that. What better place to brood the chicks than in the barn and let them see and be seen by the other chickens so there would be no adjustment period? We had the plans and were buying the lumber when we found the clearance rack. These were on sale. Marked down from $70.00 each to $20.00 each This is a 6 foot by 6 foot plastic fence panel. It is double walled so it is insulated. We bought six. We used four for the brooder ROOM. Three walls and one pane for a hinged door. We put chicken wire 24 inches high inside the door so we could open the door, go inside and do everything that was needed with no chicks leaving. The roof of the room is plywood with two infrared heat lamps suspended on adjustable ropes. There is also a small white light so they can see better There is a water tray made from gutter against the back wall that is fed by chicken watering nipples. There is a 6 pound capacity chick feeder The floor in the back 2 feet is thick dirt. The front 4 feet is thick hay. We just happened to have a broody bantam silkie who was setting on two eggs. We put 48 day old chicks in the brooder and shut the door. We removed the Silkie's eggs and replaced them with two chicks. Six hours later we put her inside the brooder with the rest of the chicks. After the chicks got big enough so they couldn't slip through the chicken wire we would leave the door part way open for socialisation for a couple of hours a day. We never lost a single chick and these are the most socialised chicks ever. They learned everything from 'mama' and were not afraid of the big chickens when they came out of their house. The big chickens were actually hiding from them. That was four months ago and now they roam the pasture like crazy but still make it difficult to walk when you go to the barn. Brooder picture The fourth panel is hinged in the front to use as a door, This picture was taken as I was assembling it. AfterI finished inside I attached chicken wire across the front 24 inches high so I could get in and out and do things without losing chicks. This was in January when we put the chicks in so it was really cold but the adjustable height heat lamps, the broody hen and the enclosed insulted panels kept it really nice and warm. When they were big enough to choose whether they wanted the heat or the barn we walled off a section of the barn 10 feet by 20 feet and left an 8 foot opening that had fencing on it so they could run in their space and not get lost in the barn. When they started sleeping away from the heat we turned them off. We have always brooded chicks in the old standard way using the cramped and crowded metal box/cage. We would hatch them out and then transfer them. After a couple of weeks we would transfer them to a bigger pen and when they were a couple of months old they went to the barn. It wasn't the best way. Chicks were lost. It was a pain for them and a pain for us because of the cramped quarters and problematic access. This year we changed all that. What better place to brood the chicks than in the barn and let them see and be seen by the other chickens so there would be no adjustment period? We had the plans and were buying the lumber when we found the clearance rack. These were on sale. Marked down from $70.00 each to $20.00 each This is a 6 foot by 6 foot plastic fence panel. It is double walled so it is insulated. We bought six. We used four for the brooder ROOM. Three walls and one pane for a hinged door. We put chicken wire 24 inches high inside the door so we could open the door, go inside and do everything that was needed with no chicks leaving. The roof of the room is plywood with two infrared heat lamps suspended on adjustable ropes. There is also a small white light so they can see better There is a water tray made from gutter against the back wall that is fed by chicken watering nipples. There is a 6 pound capacity chick feeder The floor in the back 2 feet is thick dirt. The front 4 feet is thick hay. We just happened to have a broody bantam silkie who was setting on two eggs. We put 48 day old chicks in the brooder and shut the door. We removed the Silkie's eggs and replaced them with two chicks. Six hours later we put her inside the brooder with the rest of the chicks. After the chicks got big enough so they couldn't slip through the chicken wire we would leave the door part way open for socialisation for a couple of hours a day. We never lost a single chick and these are the most socialised chicks ever. They learned everything from 'mama' and were not afraid of the big chickens when they came out of their house. The big chickens were actually hiding from them. That was four months ago and now they roam the pasture like crazy but still make it difficult to walk when you go to the barn. Brooder picture The fourth panel is hinged in the front to use as a door, This picture was taken as I was assembling it. AfterI finished inside I attached chicken wire across the front 24 inches high so I could get in and out and do things without losing chicks. This was in January when we put the chicks in so it was really cold but the adjustable height heat lamps, the broody hen and the enclosed insulted panels kept it really nice and warm. When they were big enough to choose whether they wanted the heat or the barn we walled off a section of the barn 10 feet by 20 feet and left an 8 foot opening that had fencing on it so they could run in their space and not get lost in the barn. When they started sleeping away from the heat we turned them off. We have always brooded chicks in the old standard way using the cramped and crowded metal box/cage. We would hatch them out and then transfer them. After a couple of weeks we would transfer them to a bigger pen and when they were a couple of months old they went to the barn. It wasn't the best way. Chicks were lost. It was a pain for them and a pain for us because of the cramped quarters and problematic access. This year we changed all that. What better place to brood the chicks than in the barn and let them see and be seen by the other chickens so there would be no adjustment period? We had the plans and were buying the lumber when we found the clearance rack. These were on sale. Marked down from $70.00 each to $20.00 each This is a 6 foot by 6 foot plastic fence panel. It is double walled so it is insulated. We bought six. We used four for the brooder ROOM. Three walls and one pane for a hinged door. We put chicken wire 24 inches high inside the door so we could open the door, go inside and do everything that was needed with no chicks leaving. The roof of the room is plywood with two infrared heat lamps suspended on adjustable ropes. There is also a small white light so they can see better There is a water tray made from gutter against the back wall that is fed by chicken watering nipples. There is a 6 pound capacity chick feeder The floor in the back 2 feet is thick dirt. The front 4 feet is thick hay. We just happened to have a broody bantam silkie who was setting on two eggs. We put 48 day old chicks in the brooder and shut the door. We removed the Silkie's eggs and replaced them with two chicks. Six hours later we put her inside the brooder with the rest of the chicks. After the chicks got big enough so they couldn't slip through the chicken wire we would leave the door part way open for socialisation for a couple of hours a day. We never lost a single chick and these are the most socialised chicks ever. They learned everything from 'mama' and were not afraid of the big chickens when they came out of their house. The big chickens were actually hiding from them. That was four months ago and now they roam the pasture like crazy but still make it difficult to walk when you go to the barn. Brooder picture The fourth panel is hinged in the front to use as a door, This picture was taken as I was assembling it. AfterI finished inside I attached chicken wire across the front 24 inches high so I could get in and out and do things without losing chicks. This was in January when we put the chicks in so it was really cold but the adjustable height heat lamps, the broody hen and the enclosed insulted panels kept it really nice and warm. When they were big enough to choose whether they wanted the heat or the barn we walled off a section of the barn 10 feet by 20 feet and left an 8 foot opening that had fencing on it so they could run in their space and not get lost in the barn. When they started sleeping away from the heat we turned them off. We have always brooded chicks in the old standard way using the cramped and crowded metal box/cage. We would hatch them out and then transfer them. After a couple of weeks we would transfer them to a bigger pen and when they were a couple of months old they went to the barn. It wasn't the best way. Chicks were lost. It was a pain for them and a pain for us because of the cramped quarters and problematic access. This year we changed all that. What better place to brood the chicks than in the barn and let them see and be seen by the other chickens so there would be no adjustment period? We had the plans and were buying the lumber when we found the clearance rack. These were on sale. Marked down from $70.00 each to $20.00 each This is a 6 foot by 6 foot plastic fence panel. It is double walled so it is insulated. We bought six. We used four for the brooder ROOM. Three walls and one pane for a hinged door. We put chicken wire 24 inches high inside the door so we could open the door, go inside and do everything that was needed with no chicks leaving. The roof of the room is plywood with two infrared heat lamps suspended on adjustable ropes. There is also a small white light so they can see better There is a water tray made from gutter against the back wall that is fed by chicken watering nipples. There is a 6 pound capacity chick feeder The floor in the back 2 feet is thick dirt. The front 4 feet is thick hay. We just happened to have a broody bantam silkie who was setting on two eggs. We put 48 day old chicks in the brooder and shut the door. We removed the Silkie's eggs and replaced them with two chicks. Six hours later we put her inside the brooder with the rest of the chicks. After the chicks got big enough so they couldn't slip through the chicken wire we would leave the door part way open for socialisation for a couple of hours a day. We never lost a single chick and these are the most socialised chicks ever. They learned everything from 'mama' and were not afraid of the big chickens when they came out of their house. The big chickens were actually hiding from them. That was four months ago and now they roam the pasture like crazy but still make it difficult to walk when you go to the barn. Brooder picture The fourth panel is hinged in the front to use as a door, This picture was taken as I was assembling it. AfterI finished inside I attached chicken wire across the front 24 inches high so I could get in and out and do things without losing chicks. This was in January when we put the chicks in so it was really cold but the adjustable height heat lamps, the broody hen and the enclosed insulted panels kept it really nice and warm. When they were big enough to choose whether they wanted the heat or the barn we walled off a section of the barn 10 feet by 20 feet and left an 8 foot opening that had fencing on it so they could run in their space and not get lost in the barn. When they started sleeping away from the heat we turned them off. We have always brooded chicks in the old standard way using the cramped and crowded metal box/cage. We would hatch them out and then transfer them. After a couple of weeks we would transfer them to a bigger pen and when they were a couple of months old they went to the barn. It wasn't the best way. Chicks were lost. It was a pain for them and a pain for us because of the cramped quarters and problematic access. This year we changed all that. What better place to brood the chicks than in the barn and let them see and be seen by the other chickens so there would be no adjustment period? We had the plans and were buying the lumber when we found the clearance rack. These were on sale. Marked down from $70.00 each to $20.00 each This is a 6 foot by 6 foot plastic fence panel. It is double walled so it is insulated. We bought six. We used four for the brooder ROOM. Three walls and one pane for a hinged door. We put chicken wire 24 inches high inside the door so we could open the door, go inside and do everything that was needed with no chicks leaving. The roof of the room is plywood with two infrared heat lamps suspended on adjustable ropes. There is also a small white light so they can see better There is a water tray made from gutter against the back wall that is fed by chicken watering nipples. There is a 6 pound capacity chick feeder The floor in the back 2 feet is thick dirt. The front 4 feet is thick hay. We just happened to have a broody bantam silkie who was setting on two eggs. We put 48 day old chicks in the brooder and shut the door. We removed the Silkie's eggs and replaced them with two chicks. Six hours later we put her inside the brooder with the rest of the chicks. After the chicks got big enough so they couldn't slip through the chicken wire we would leave the door part way open for socialisation for a couple of hours a day. We never lost a single chick and these are the most socialised chicks ever. They learned everything from 'mama' and were not afraid of the big chickens when they came out of their house. The big chickens were actually hiding from them. That was four months ago and now they roam the pasture like crazy but still make it difficult to walk when you go to the barn. Brooder picture The fourth panel is hinged in the front to use as a door, This picture was taken as I was assembling it. AfterI finished inside I attached chicken wire across the front 24 inches high so I could get in and out and do things without losing chicks. This was in January when we put the chicks in so it was really cold but the adjustable height heat lamps, the broody hen and the enclosed insulted panels kept it really nice and warm. When they were big enough to choose whether they wanted the heat or the barn we walled off a section of the barn 10 feet by 20 feet and left an 8 foot opening that had fencing on it so they could run in their space and not get lost in the barn. When they started sleeping away from the heat we turned them off. We have always brooded chicks in the old standard way using the cramped and crowded metal box/cage. We would hatch them out and then transfer them. After a couple of weeks we would transfer them to a bigger pen and when they were a couple of months old they went to the barn. It wasn't the best way. Chicks were lost. It was a pain for them and a pain for us because of the cramped quarters and problematic access. This year we changed all that. What better place to brood the chicks than in the barn and let them see and be seen by the other chickens so there would be no adjustment period? We had the plans and were buying the lumber when we found the clearance rack. These were on sale. Marked down from $70.00 each to $20.00 each This is a 6 foot by 6 foot plastic fence panel. It is double walled so it is insulated. We bought six. We used four for the brooder ROOM. Three walls and one pane for a hinged door. We put chicken wire 24 inches high inside the door so we could open the door, go inside and do everything that was needed with no chicks leaving. The roof of the room is plywood with two infrared heat lamps suspended on adjustable ropes. There is also a small white light so they can see better There is a water tray made from gutter against the back wall that is fed by chicken watering nipples. There is a 6 pound capacity chick feeder The floor in the back 2 feet is thick dirt. The front 4 feet is thick hay. We just happened to have a broody bantam silkie who was setting on two eggs. We put 48 day old chicks in the brooder and shut the door. We removed the Silkie's eggs and replaced them with two chicks. Six hours later we put her inside the brooder with the rest of the chicks. After the chicks got big enough so they couldn't slip through the chicken wire we would leave the door part way open for socialisation for a couple of hours a day. We never lost a single chick and these are the most socialised chicks ever. They learned everything from 'mama' and were not afraid of the big chickens when they came out of their house. The big chickens were actually hiding from them. That was four months ago and now they roam the pasture like crazy but still make it difficult to walk when you go to the barn. Brooder picture The fourth panel is hinged in the front to use as a door, This picture was taken as I was assembling it. AfterI finished inside I attached chicken wire across the front 24 inches high so I could get in and out and do things without losing chicks. This was in January when we put the chicks in so it was really cold but the adjustable height heat lamps, the broody hen and the enclosed insulted panels kept it really nice and warm. When they were big enough to choose whether they wanted the heat or the barn we walled off a section of the barn 10 feet by 20 feet and left an 8 foot opening that had fencing on it so they could run in their space and not get lost in the barn. When they started sleeping away from the heat we turned them off. We have always brooded chicks in the old standard way using the cramped and crowded metal box/cage. We would hatch them out and then transfer them. After a couple of weeks we would transfer them to a bigger pen and when they were a couple of months old they went to the barn. It wasn't the best way. Chicks were lost. It was a pain for them and a pain for us because of the cramped quarters and problematic access. This year we changed all that. What better place to brood the chicks than in the barn and let them see and be seen by the other chickens so there would be no adjustment period? We had the plans and were buying the lumber when we found the clearance rack. These were on sale. Marked down from $70.00 each to $20.00 each This is a 6 foot by 6 foot plastic fence panel. It is double walled so it is insulated. We bought six. We used four for the brooder ROOM. Three walls and one pane for a hinged door. We put chicken wire 24 inches high inside the door so we could open the door, go inside and do everything that was needed with no chicks leaving. The roof of the room is plywood with two infrared heat lamps suspended on adjustable ropes. There is also a small white light so they can see better There is a water tray made from gutter against the back wall that is fed by chicken watering nipples. There is a 6 pound capacity chick feeder The floor in the back 2 feet is thick dirt. The front 4 feet is thick hay. We just happened to have a broody bantam silkie who was setting on two eggs. We put 48 day old chicks in the brooder and shut the door. We removed the Silkie's eggs and replaced them with two chicks. Six hours later we put her inside the brooder with the rest of the chicks. After the chicks got big enough so they couldn't slip through the chicken wire we would leave the door part way open for socialisation for a couple of hours a day. We never lost a single chick and these are the most socialised chicks ever. They learned everything from 'mama' and were not afraid of the big chickens when they came out of their house. The big chickens were actually hiding from them. That was four months ago and now they roam the pasture like crazy but still make it difficult to walk when you go to the barn. Brooder picture The fourth panel is hinged in the front to use as a door, This picture was taken as I was assembling it. AfterI finished inside I attached chicken wire across the front 24 inches high so I could get in and out and do things without losing chicks. This was in January when we put the chicks in so it was really cold but the adjustable height heat lamps, the broody hen and the enclosed insulted panels kept it really nice and warm. When they were big enough to choose whether they wanted the heat or the barn we walled off a section of the barn 10 feet by 20 feet and left an 8 foot opening that had fencing on it so they could run in their space and not get lost in the barn. When they started sleeping away from the heat we turned them off. We have always brooded chicks in the old standard way using the cramped and crowded metal box/cage. We would hatch them out and then transfer them. After a couple of weeks we would transfer them to a bigger pen and when they were a couple of months old they went to the barn. It wasn't the best way. Chicks were lost. It was a pain for them and a pain for us because of the cramped quarters and problematic access. This year we changed all that. What better place to brood the chicks than in the barn and let them see and be seen by the other chickens so there would be no adjustment period? We had the plans and were buying the lumber when we found the clearance rack. These were on sale. Marked down from $70.00 each to $20.00 each This is a 6 foot by 6 foot plastic fence panel. It is double walled so it is insulated. We bought six. We used four for the brooder ROOM. Three walls and one pane for a hinged door. We put chicken wire 24 inches high inside the door so we could open the door, go inside and do everything that was needed with no chicks leaving. The roof of the room is plywood with two infrared heat lamps suspended on adjustable ropes. There is also a small white light so they can see better There is a water tray made from gutter against the back wall that is fed by chicken watering nipples. There is a 6 pound capacity chick feeder The floor in the back 2 feet is thick dirt. The front 4 feet is thick hay. We just happened to have a broody bantam silkie who was setting on two eggs. We put 48 day old chicks in the brooder and shut the door. We removed the Silkie's eggs and replaced them with two chicks. Six hours later we put her inside the brooder with the rest of the chicks. After the chicks got big enough so they couldn't slip through the chicken wire we would leave the door part way open for socialisation for a couple of hours a day. We never lost a single chick and these are the most socialised chicks ever. They learned everything from 'mama' and were not afraid of the big chickens when they came out of their house. The big chickens were actually hiding from them. That was four months ago and now they roam the pasture like crazy but still make it difficult to walk when you go to the barn. Brooder picture The fourth panel is hinged in the front to use as a door, This picture was taken as I was assembling it. AfterI finished inside I attached chicken wire across the front 24 inches high so I could get in and out and do things without losing chicks. This was in January when we put the chicks in so it was really cold but the adjustable height heat lamps, the broody hen and the enclosed insulted panels kept it really nice and warm. When they were big enough to choose whether they wanted the heat or the barn we walled off a section of the barn 10 feet by 20 feet and left an 8 foot opening that had fencing on it so they could run in their space and not get lost in the barn. When they started sleeping away from the heat we turned them off. We have always brooded chicks in the old standard way using the cramped and crowded metal box/cage. We would hatch them out and then transfer them. After a couple of weeks we would transfer them to a bigger pen and when they were a couple of months old they went to the barn. It wasn't the best way. Chicks were lost. It was a pain for them and a pain for us because of the cramped quarters and problematic access. This year we changed all that. What better place to brood the chicks than in the barn and let them see and be seen by the other chickens so there would be no adjustment period? We had the plans and were buying the lumber when we found the clearance rack. These were on sale. Marked down from $70.00 each to $20.00 each This is a 6 foot by 6 foot plastic fence panel. It is double walled so it is insulated. We bought six. We used four for the brooder ROOM. Three walls and one pane for a hinged door. We put chicken wire 24 inches high inside the door so we could open the door, go inside and do everything that was needed with no chicks leaving. The roof of the room is plywood with two infrared heat lamps suspended on adjustable ropes. There is also a small white light so they can see better There is a water tray made from gutter against the back wall that is fed by chicken watering nipples. There is a 6 pound capacity chick feeder The floor in the back 2 feet is thick dirt. The front 4 feet is thick hay. We just happened to have a broody bantam silkie who was setting on two eggs. We put 48 day old chicks in the brooder and shut the door. We removed the Silkie's eggs and replaced them with two chicks. Six hours later we put her inside the brooder with the rest of the chicks. After the chicks got big enough so they couldn't slip through the chicken wire we would leave the door part way open for socialisation for a couple of hours a day. We never lost a single chick and these are the most socialised chicks ever. They learned everything from 'mama' and were not afraid of the big chickens when they came out of their house. The big chickens were actually hiding from them. That was four months ago and now they roam the pasture like crazy but still make it difficult to walk when you go to the barn. Brooder picture The fourth panel is hinged in the front to use as a door, This picture was taken as I was assembling it. AfterI finished inside I attached chicken wire across the front 24 inches high so I could get in and out and do things without losing chicks. This was in January when we put the chicks in so it was really cold but the adjustable height heat lamps, the broody hen and the enclosed insulted panels kept it really nice and warm. When they were big enough to choose whether they wanted the heat or the barn we walled off a section of the barn 10 feet by 20 feet and left an 8 foot opening that had fencing on it so they could run in their space and not get lost in the barn. When they started sleeping away from the heat we turned them off. We have always brooded chicks in the old standard way using the cramped and crowded metal box/cage. We would hatch them out and then transfer them. After a couple of weeks we would transfer them to a bigger pen and when they were a couple of months old they went to the barn. It wasn't the best way. Chicks were lost. It was a pain for them and a pain for us because of the cramped quarters and problematic access. This year we changed all that. What better place to brood the chicks than in the barn and let them see and be seen by the other chickens so there would be no adjustment period? We had the plans and were buying the lumber when we found the clearance rack. These were on sale. Marked down from $70.00 each to $20.00 each This is a 6 foot by 6 foot plastic fence panel. It is double walled so it is insulated. We bought six. We used four for the brooder ROOM. Three walls and one pane for a hinged door. We put chicken wire 24 inches high inside the door so we could open the door, go inside and do everything that was needed with no chicks leaving. The roof of the room is plywood with two infrared heat lamps suspended on adjustable ropes. There is also a small white light so they can see better There is a water tray made from gutter against the back wall that is fed by chicken watering nipples. There is a 6 pound capacity chick feeder The floor in the back 2 feet is thick dirt. The front 4 feet is thick hay. We just happened to have a broody bantam silkie who was setting on two eggs. We put 48 day old chicks in the brooder and shut the door. We removed the Silkie's eggs and replaced them with two chicks. Six hours later we put her inside the brooder with the rest of the chicks. After the chicks got big enough so they couldn't slip through the chicken wire we would leave the door part way open for socialisation for a couple of hours a day. We never lost a single chick and these are the most socialised chicks ever. They learned everything from 'mama' and were not afraid of the big chickens when they came out of their house. The big chickens were actually hiding from them. That was four months ago and now they roam the pasture like crazy but still make it difficult to walk when you go to the barn. Brooder picture The fourth panel is hinged in the front to use as a door, This picture was taken as I was assembling it. AfterI finished inside I attached chicken wire across the front 24 inches high so I could get in and out and do things without losing chicks. This was in January when we put the chicks in so it was really cold but the adjustable height heat lamps, the broody hen and the enclosed insulted panels kept it really nice and warm. When they were big enough to choose whether they wanted the heat or the barn we walled off a section of the barn 10 feet by 20 feet and left an 8 foot opening that had fencing on it so they could run in their space and not get lost in the barn. When they started sleeping away from the heat we turned them off. We have always brooded chicks in the old standard way using the cramped and crowded metal box/cage. We would hatch them out and then transfer them. After a couple of weeks we would transfer them to a bigger pen and when they were a couple of months old they went to the barn. It wasn't the best way. Chicks were lost. It was a pain for them and a pain for us because of the cramped quarters and problematic access. This year we changed all that. What better place to brood the chicks than in the barn and let them see and be seen by the other chickens so there would be no adjustment period? We had the plans and were buying the lumber when we found the clearance rack. These were on sale. Marked down from $70.00 each to $20.00 each This is a 6 foot by 6 foot plastic fence panel. It is double walled so it is insulated. We bought six. We used four for the brooder ROOM. Three walls and one pane for a hinged door. We put chicken wire 24 inches high inside the door so we could open the door, go inside and do everything that was needed with no chicks leaving. The roof of the room is plywood with two infrared heat lamps suspended on adjustable ropes. There is also a small white light so they can see better There is a water tray made from gutter against the back wall that is fed by chicken watering nipples. There is a 6 pound capacity chick feeder The floor in the back 2 feet is thick dirt. The front 4 feet is thick hay. We just happened to have a broody bantam silkie who was setting on two eggs. We put 48 day old chicks in the brooder and shut the door. We removed the Silkie's eggs and replaced them with two chicks. Six hours later we put her inside the brooder with the rest of the chicks. After the chicks got big enough so they couldn't slip through the chicken wire we would leave the door part way open for socialisation for a couple of hours a day. We never lost a single chick and these are the most socialised chicks ever. They learned everything from 'mama' and were not afraid of the big chickens when they came out of their house. The big chickens were actually hiding from them. That was four months ago and now they roam the pasture like crazy but still make it difficult to walk when you go to the barn. Brooder picture The fourth panel is hinged in the front to use as a door, This picture was taken as I was assembling it. AfterI finished inside I attached chicken wire across the front 24 inches high so I could get in and out and do things without losing chicks. This was in January when we put the chicks in so it was really cold but the adjustable height heat lamps, the broody hen and the enclosed insulted panels kept it really nice and warm. When they were big enough to choose whether they wanted the heat or the barn we walled off a section of the barn 10 feet by 20 feet and left an 8 foot opening that had fencing on it so they could run in their space and not get lost in the barn. When they started sleeping away from the heat we turned them off. We have always brooded chicks in the old standard way using the cramped and crowded metal box/cage. We would hatch them out and then transfer them. After a couple of weeks we would transfer them to a bigger pen and when they were a couple of months old they went to the barn. It wasn't the best way. Chicks were lost. It was a pain for them and a pain for us because of the cramped quarters and problematic access. This year we changed all that. What better place to brood the chicks than in the barn and let them see and be seen by the other chickens so there would be no adjustment period? We had the plans and were buying the lumber when we found the clearance rack. These were on sale. Marked down from $70.00 each to $20.00 each This is a 6 foot by 6 foot plastic fence panel. It is double walled so it is insulated. We bought six. We used four for the brooder ROOM. Three walls and one pane for a hinged door. We put chicken wire 24 inches high inside the door so we could open the door, go inside and do everything that was needed with no chicks leaving. The roof of the room is plywood with two infrared heat lamps suspended on adjustable ropes. There is also a small white light so they can see better There is a water tray made from gutter against the back wall that is fed by chicken watering nipples. There is a 6 pound capacity chick feeder The floor in the back 2 feet is thick dirt. The front 4 feet is thick hay. We just happened to have a broody bantam silkie who was setting on two eggs. We put 48 day old chicks in the brooder and shut the door. We removed the Silkie's eggs and replaced them with two chicks. Six hours later we put her inside the brooder with the rest of the chicks. After the chicks got big enough so they couldn't slip through the chicken wire we would leave the door part way open for socialisation for a couple of hours a day. We never lost a single chick and these are the most socialised chicks ever. They learned everything from 'mama' and were not afraid of the big chickens when they came out of their house. The big chickens were actually hiding from them. That was four months ago and now they roam the pasture like crazy but still make it difficult to walk when you go to the barn. Brooder picture The fourth panel is hinged in the front to use as a door, This picture was taken as I was assembling it. AfterI finished inside I attached chicken wire across the front 24 inches high so I could get in and out and do things without losing chicks. This was in January when we put the chicks in so it was really cold but the adjustable height heat lamps, the broody hen and the enclosed insulted panels kept it really nice and warm. When they were big enough to choose whether they wanted the heat or the barn we walled off a section of the barn 10 feet by 20 feet and left an 8 foot opening that had fencing on it so they could run in their space and not get lost in the barn. When they started sleeping away from the heat we turned them off. We have always brooded chicks in the old standard way using the cramped and crowded metal box/cage. We would hatch them out and then transfer them. After a couple of weeks we would transfer them to a bigger pen and when they were a couple of months old they went to the barn. It wasn't the best way. Chicks were lost. It was a pain for them and a pain for us because of the cramped quarters and problematic access. This year we changed all that. What better place to brood the chicks than in the barn and let them see and be seen by the other chickens so there would be no adjustment period? We had the plans and were buying the lumber when we found the clearance rack. These were on sale. Marked down from $70.00 each to $20.00 each This is a 6 foot by 6 foot plastic fence panel. It is double walled so it is insulated. We bought six. We used four for the brooder ROOM. Three walls and one pane for a hinged door. We put chicken wire 24 inches high inside the door so we could open the door, go inside and do everything that was needed with no chicks leaving. The roof of the room is plywood with two infrared heat lamps suspended on adjustable ropes. There is also a small white light so they can see better There is a water tray made from gutter against the back wall that is fed by chicken watering nipples. There is a 6 pound capacity chick feeder The floor in the back 2 feet is thick dirt. The front 4 feet is thick hay. We just happened to have a broody bantam silkie who was setting on two eggs. We put 48 day old chicks in the brooder and shut the door. We removed the Silkie's eggs and replaced them with two chicks. Six hours later we put her inside the brooder with the rest of the chicks. After the chicks got big enough so they couldn't slip through the chicken wire we would leave the door part way open for socialisation for a couple of hours a day. We never lost a single chick and these are the most socialised chicks ever. They learned everything from 'mama' and were not afraid of the big chickens when they came out of their house. The big chickens were actually hiding from them. That was four months ago and now they roam the pasture like crazy but still make it difficult to walk when you go to the barn. Brooder picture The fourth panel is hinged in the front to use as a door, This picture was taken as I was assembling it. AfterI finished inside I attached chicken wire across the front 24 inches high so I could get in and out and do things without losing chicks. This was in January when we put the chicks in so it was really cold but the adjustable height heat lamps, the broody hen and the enclosed insulted panels kept it really nice and warm. When they were big enough to choose whether they wanted the heat or the barn we walled off a section of the barn 10 feet by 20 feet and left an 8 foot opening that had fencing on it so they could run in their space and not get lost in the barn. When they started sleeping away from the heat we turned them off. We have always brooded chicks in the old standard way using the cramped and crowded metal box/cage. We would hatch them out and then transfer them. After a couple of weeks we would transfer them to a bigger pen and when they were a couple of months old they went to the barn. It wasn't the best way. Chicks were lost. It was a pain for them and a pain for us because of the cramped quarters and problematic access. This year we changed all that. What better place to brood the chicks than in the barn and let them see and be seen by the other chickens so there would be no adjustment period? We had the plans and were buying the lumber when we found the clearance rack. These were on sale. Marked down from $70.00 each to $20.00 each This is a 6 foot by 6 foot plastic fence panel. It is double walled so it is insulated. We bought six. We used four for the brooder ROOM. Three walls and one pane for a hinged door. We put chicken wire 24 inches high inside the door so we could open the door, go inside and do everything that was needed with no chicks leaving. The roof of the room is plywood with two infrared heat lamps suspended on adjustable ropes. There is also a small white light so they can see better There is a water tray made from gutter against the back wall that is fed by chicken watering nipples. There is a 6 pound capacity chick feeder The floor in the back 2 feet is thick dirt. The front 4 feet is thick hay. We just happened to have a broody bantam silkie who was setting on two eggs. We put 48 day old chicks in the brooder and shut the door. We removed the Silkie's eggs and replaced them with two chicks. Six hours later we put her inside the brooder with the rest of the chicks. After the chicks got big enough so they couldn't slip through the chicken wire we would leave the door part way open for socialisation for a couple of hours a day. We never lost a single chick and these are the most socialised chicks ever. They learned everything from 'mama' and were not afraid of the big chickens when they came out of their house. The big chickens were actually hiding from them. That was four months ago and now they roam the pasture like crazy but still make it difficult to walk when you go to the barn. Brooder picture The fourth panel is hinged in the front to use as a door, This picture was taken as I was assembling it. AfterI finished inside I attached chicken wire across the front 24 inches high so I could get in and out and do things without losing chicks. This was in January when we put the chicks in so it was really cold but the adjustable height heat lamps, the broody hen and the enclosed insulted panels kept it really nice and warm. When they were big enough to choose whether they wanted the heat or the barn we walled off a section of the barn 10 feet by 20 feet and left an 8 foot opening that had fencing on it so they could run in their space and not get lost in the barn. When they started sleeping away from the heat we turned them off. We have always brooded chicks in the old standard way using the cramped and crowded metal box/cage. We would hatch them out and then transfer them. After a couple of weeks we would transfer them to a bigger pen and when they were a couple of months old they went to the barn. It wasn't the best way. Chicks were lost. It was a pain for them and a pain for us because of the cramped quarters and problematic access. This year we changed all that. What better place to brood the chicks than in the barn and let them see and be seen by the other chickens so there would be no adjustment period? We had the plans and were buying the lumber when we found the clearance rack. These were on sale. Marked down from $70.00 each to $20.00 each This is a 6 foot by 6 foot plastic fence panel. It is double walled so it is insulated. We bought six. We used four for the brooder ROOM. Three walls and one pane for a hinged door. We put chicken wire 24 inches high inside the door so we could open the door, go inside and do everything that was needed with no chicks leaving. The roof of the room is plywood with two infrared heat lamps suspended on adjustable ropes. There is also a small white light so they can see better There is a water tray made from gutter against the back wall that is fed by chicken watering nipples. There is a 6 pound capacity chick feeder The floor in the back 2 feet is thick dirt. The front 4 feet is thick hay. We just happened to have a broody bantam silkie who was setting on two eggs. We put 48 day old chicks in the brooder and shut the door. We removed the Silkie's eggs and replaced them with two chicks. Six hours later we put her inside the brooder with the rest of the chicks. After the chicks got big enough so they couldn't slip through the chicken wire we would leave the door part way open for socialisation for a couple of hours a day. We never lost a single chick and these are the most socialised chicks ever. They learned everything from 'mama' and were not afraid of the big chickens when they came out of their house. The big chickens were actually hiding from them. That was four months ago and now they roam the pasture like crazy but still make it difficult to walk when you go to the barn. Brooder picture The fourth panel is hinged in the front to use as a door, This picture was taken as I was assembling it. AfterI finished inside I attached chicken wire across the front 24 inches high so I could get in and out and do things without losing chicks. This was in January when we put the chicks in so it was really cold but the adjustable height heat lamps, the broody hen and the enclosed insulted panels kept it really nice and warm. When they were big enough to choose whether they wanted the heat or the barn we walled off a section of the barn 10 feet by 20 feet and left an 8 foot opening that had fencing on it so they could run in their space and not get lost in the barn. When they started sleeping away from the heat we turned them off. We have always brooded chicks in the old standard way using the cramped and crowded metal box/cage. We would hatch them out and then transfer them. After a couple of weeks we would transfer them to a bigger pen and when they were a couple of months old they went to the barn. It wasn't the best way. Chicks were lost. It was a pain for them and a pain for us because of the cramped quarters and problematic access. This year we changed all that. What better place to brood the chicks than in the barn and let them see and be seen by the other chickens so there would be no adjustment period? We had the plans and were buying the lumber when we found the clearance rack. These were on sale. Marked down from $70.00 each to $20.00 each This is a 6 foot by 6 foot plastic fence panel. It is double walled so it is insulated. We bought six. We used four for the brooder ROOM. Three walls and one pane for a hinged door. We put chicken wire 24 inches high inside the door so we could open the door, go inside and do everything that was needed with no chicks leaving. The roof of the room is plywood with two infrared heat lamps suspended on adjustable ropes. There is also a small white light so they can see better There is a water tray made from gutter against the back wall that is fed by chicken watering nipples. There is a 6 pound capacity chick feeder The floor in the back 2 feet is thick dirt. The front 4 feet is thick hay. We just happened to have a broody bantam silkie who was setting on two eggs. We put 48 day old chicks in the brooder and shut the door. We removed the Silkie's eggs and replaced them with two chicks. Six hours later we put her inside the brooder with the rest of the chicks. After the chicks got big enough so they couldn't slip through the chicken wire we would leave the door part way open for socialisation for a couple of hours a day. We never lost a single chick and these are the most socialised chicks ever. They learned everything from 'mama' and were not afraid of the big chickens when they came out of their house. The big chickens were actually hiding from them. That was four months ago and now they roam the pasture like crazy but still make it difficult to walk when you go to the barn. Brooder picture The fourth panel is hinged in the front to use as a door, This picture was taken as I was assembling it. AfterI finished inside I attached chicken wire across the front 24 inches high so I could get in and out and do things without losing chicks. This was in January when we put the chicks in so it was really cold but the adjustable height heat lamps, the broody hen and the enclosed insulted panels kept it really nice and warm. When they were big enough to choose whether they wanted the heat or the barn we walled off a section of the barn 10 feet by 20 feet and left an 8 foot opening that had fencing on it so they could run in their space and not get lost in the barn. When they started sleeping away from the heat we turned them off. We have always brooded chicks in the old standard way using the cramped and crowded metal box/cage. We would hatch them out and then transfer them. After a couple of weeks we would transfer them to a bigger pen and when they were a couple of months old they went to the barn. It wasn't the best way. Chicks were lost. It was a pain for them and a pain for us because of the cramped quarters and problematic access. This year we changed all that. What better place to brood the chicks than in the barn and let them see and be seen by the other chickens so there would be no adjustment period? We had the plans and were buying the lumber when we found the clearance rack. These were on sale. Marked down from $70.00 each to $20.00 each This is a 6 foot by 6 foot plastic fence panel. It is double walled so it is insulated. We bought six. We used four for the brooder ROOM. Three walls and one pane for a hinged door. We put chicken wire 24 inches high inside the door so we could open the door, go inside and do everything that was needed with no chicks leaving. The roof of the room is plywood with two infrared heat lamps suspended on adjustable ropes. There is also a small white light so they can see better There is a water tray made from gutter against the back wall that is fed by chicken watering nipples. There is a 6 pound capacity chick feeder The floor in the back 2 feet is thick dirt. The front 4 feet is thick hay. We just happened to have a broody bantam silkie who was setting on two eggs. We put 48 day old chicks in the brooder and shut the door. We removed the Silkie's eggs and replaced them with two chicks. Six hours later we put her inside the brooder with the rest of the chicks. After the chicks got big enough so they couldn't slip through the chicken wire we would leave the door part way open for socialisation for a couple of hours a day. We never lost a single chick and these are the most socialised chicks ever. They learned everything from 'mama' and were not afraid of the big chickens when they came out of their house. The big chickens were actually hiding from them. That was four months ago and now they roam the pasture like crazy but still make it difficult to walk when you go to the barn. Brooder picture The fourth panel is hinged in the front to use as a door, This picture was taken as I was assembling it. AfterI finished inside I attached chicken wire across the front 24 inches high so I could get in and out and do things without losing chicks. This was in January when we put the chicks in so it was really cold but the adjustable height heat lamps, the broody hen and the enclosed insulted panels kept it really nice and warm. When they were big enough to choose whether they wanted the heat or the barn we walled off a section of the barn 10 feet by 20 feet and left an 8 foot opening that had fencing on it so they could run in their space and not get lost in the barn. When they started sleeping away from the heat we turned them off. We have always brooded chicks in the old standard way using the cramped and crowded metal box/cage. We would hatch them out and then transfer them. After a couple of weeks we would transfer them to a bigger pen and when they were a couple of months old they went to the barn. It wasn't the best way. Chicks were lost. It was a pain for them and a pain for us because of the cramped quarters and problematic access. This year we changed all that. What better place to brood the chicks than in the barn and let them see and be seen by the other chickens so there would be no adjustment period? We had the plans and were buying the lumber when we found the clearance rack. These were on sale. Marked down from $70.00 each to $20.00 each This is a 6 foot by 6 foot plastic fence panel. It is double walled so it is insulated. We bought six. We used four for the brooder ROOM. Three walls and one pane for a hinged door. We put chicken wire 24 inches high inside the door so we could open the door, go inside and do everything that was needed with no chicks leaving. The roof of the room is plywood with two infrared heat lamps suspended on adjustable ropes. There is also a small white light so they can see better There is a water tray made from gutter against the back wall that is fed by chicken watering nipples. There is a 6 pound capacity chick feeder The floor in the back 2 feet is thick dirt. The front 4 feet is thick hay. We just happened to have a broody bantam silkie who was setting on two eggs. We put 48 day old chicks in the brooder and shut the door. We removed the Silkie's eggs and replaced them with two chicks. Six hours later we put her inside the brooder with the rest of the chicks. After the chicks got big enough so they couldn't slip through the chicken wire we would leave the door part way open for socialisation for a couple of hours a day. We never lost a single chick and these are the most socialised chicks ever. They learned everything from 'mama' and were not afraid of the big chickens when they came out of their house. The big chickens were actually hiding from them. That was four months ago and now they roam the pasture like crazy but still make it difficult to walk when you go to the barn. Brooder picture The fourth panel is hinged in the front to use as a door, This picture was taken as I was assembling it. AfterI finished inside I attached chicken wire across the front 24 inches high so I could get in and out and do things without losing chicks. This was in January when we put the chicks in so it was really cold but the adjustable height heat lamps, the broody hen and the enclosed insulted panels kept it really nice and warm. When they were big enough to choose whether they wanted the heat or the barn we walled off a section of the barn 10 feet by 20 feet and left an 8 foot opening that had fencing on it so they could run in their space and not get lost in the barn. When they started sleeping away from the heat we turned them off. We have always brooded chicks in the old standard way using the cramped and crowded metal box/cage. We would hatch them out and then transfer them. After a couple of weeks we would transfer them to a bigger pen and when they were a couple of months old they went to the barn. It wasn't the best way. Chicks were lost. It was a pain for them and a pain for us because of the cramped quarters and problematic access. This year we changed all that. What better place to brood the chicks than in the barn and let them see and be seen by the other chickens so there would be no adjustment period? We had the plans and were buying the lumber when we found the clearance rack. These were on sale. Marked down from $70.00 each to $20.00 each This is a 6 foot by 6 foot plastic fence panel. It is double walled so it is insulated. We bought six. We used four for the brooder ROOM. Three walls and one pane for a hinged door. We put chicken wire 24 inches high inside the door so we could open the door, go inside and do everything that was needed with no chicks leaving. The roof of the room is plywood with two infrared heat lamps suspended on adjustable ropes. There is also a small white light so they can see better There is a water tray made from gutter against the back wall that is fed by chicken watering nipples. There is a 6 pound capacity chick feeder The floor in the back 2 feet is thick dirt. The front 4 feet is thick hay. We just happened to have a broody bantam silkie who was setting on two eggs. We put 48 day old chicks in the brooder and shut the door. We removed the Silkie's eggs and replaced them with two chicks. Six hours later we put her inside the brooder with the rest of the chicks. After the chicks got big enough so they couldn't slip through the chicken wire we would leave the door part way open for socialisation for a couple of hours a day. We never lost a single chick and these are the most socialised chicks ever. They learned everything from 'mama' and were not afraid of the big chickens when they came out of their house. The big chickens were actually hiding from them. That was four months ago and now they roam the pasture like crazy but still make it difficult to walk when you go to the barn. Brooder picture The fourth panel is hinged in the front to use as a door, This picture was taken as I was assembling it. AfterI finished inside I attached chicken wire across the front 24 inches high so I could get in and out and do things without losing chicks. This was in January when we put the chicks in so it was really cold but the adjustable height heat lamps, the broody hen and the enclosed insulted panels kept it really nice and warm. When they were big enough to choose whether they wanted the heat or the barn we walled off a section of the barn 10 feet by 20 feet and left an 8 foot opening that had fencing on it so they could run in their space and not get lost in the barn. When they started sleeping away from the heat we turned them off. We have always brooded chicks in the old standard way using the cramped and crowded metal box/cage. We would hatch them out and then transfer them. After a couple of weeks we would transfer them to a bigger pen and when they were a couple of months old they went to the barn. It wasn't the best way. Chicks were lost. It was a pain for them and a pain for us because of the cramped quarters and problematic access. This year we changed all that. What better place to brood the chicks than in the barn and let them see and be seen by the other chickens so there would be no adjustment period? We had the plans and were buying the lumber when we found the clearance rack. These were on sale. Marked down from $70.00 each to $20.00 each This is a 6 foot by 6 foot plastic fence panel. It is double walled so it is insulated. We bought six. We used four for the brooder ROOM. Three walls and one pane for a hinged door. We put chicken wire 24 inches high inside the door so we could open the door, go inside and do everything that was needed with no chicks leaving. The roof of the room is plywood with two infrared heat lamps suspended on adjustable ropes. There is also a small white light so they can see better There is a water tray made from gutter against the back wall that is fed by chicken watering nipples. There is a 6 pound capacity chick feeder The floor in the back 2 feet is thick dirt. The front 4 feet is thick hay. We just happened to have a broody bantam silkie who was setting on two eggs. We put 48 day old chicks in the brooder and shut the door. We removed the Silkie's eggs and replaced them with two chicks. Six hours later we put her inside the brooder with the rest of the chicks. After the chicks got big enough so they couldn't slip through the chicken wire we would leave the door part way open for socialisation for a couple of hours a day. We never lost a single chick and these are the most socialised chicks ever. They learned everything from 'mama' and were not afraid of the big chickens when they came out of their house. The big chickens were actually hiding from them. That was four months ago and now they roam the pasture like crazy but still make it difficult to walk when you go to the barn. Brooder picture The fourth panel is hinged in the front to use as a door, This picture was taken as I was assembling it. AfterI finished inside I attached chicken wire across the front 24 inches high so I could get in and out and do things without losing chicks. This was in January when we put the chicks in so it was really cold but the adjustable height heat lamps, the broody hen and the enclosed insulted panels kept it really nice and warm. When they were big enough to choose whether they wanted the heat or the barn we walled off a section of the barn 10 feet by 20 feet and left an 8 foot opening that had fencing on it so they could run in their space and not get lost in the barn. When they started sleeping away from the heat we turned them off. We have always brooded chicks in the old standard way using the cramped and crowded metal box/cage. We would hatch them out and then transfer them. After a couple of weeks we would transfer them to a bigger pen and when they were a couple of months old they went to the barn. It wasn't the best way. Chicks were lost. It was a pain for them and a pain for us because of the cramped quarters and problematic access. This year we changed all that. What better place to brood the chicks than in the barn and let them see and be seen by the other chickens so there would be no adjustment period? We had the plans and were buying the lumber when we found the clearance rack. These were on sale. Marked down from $70.00 each to $20.00 each This is a 6 foot by 6 foot plastic fence panel. It is double walled so it is insulated. We bought six. We used four for the brooder ROOM. Three walls and one pane for a hinged door. We put chicken wire 24 inches high inside the door so we could open the door, go inside and do everything that was needed with no chicks leaving. The roof of the room is plywood with two infrared heat lamps suspended on adjustable ropes. There is also a small white light so they can see better There is a water tray made from gutter against the back wall that is fed by chicken watering nipples. There is a 6 pound capacity chick feeder The floor in the back 2 feet is thick dirt. The front 4 feet is thick hay. We just happened to have a broody bantam silkie who was setting on two eggs. We put 48 day old chicks in the brooder and shut the door. We removed the Silkie's eggs and replaced them with two chicks. Six hours later we put her inside the brooder with the rest of the chicks. After the chicks got big enough so they couldn't slip through the chicken wire we would leave the door part way open for socialisation for a couple of hours a day. We never lost a single chick and these are the most socialised chicks ever. They learned everything from 'mama' and were not afraid of the big chickens when they came out of their house. The big chickens were actually hiding from them. That was four months ago and now they roam the pasture like crazy but still make it difficult to walk when you go to the barn. Brooder picture The fourth panel is hinged in the front to use as a door, This picture was taken as I was assembling it. AfterI finished inside I attached chicken wire across the front 24 inches high so I could get in and out and do things without losing chicks. This was in January when we put the chicks in so it was really cold but the adjustable height heat lamps, the broody hen and the enclosed insulted panels kept it really nice and warm. When they were big enough to choose whether they wanted the heat or the barn we walled off a section of the barn 10 feet by 20 feet and left an 8 foot opening that had fencing on it so they could run in their space and not get lost in the barn. When they started sleeping away from the heat we turned them off. We have always brooded chicks in the old standard way using the cramped and crowded metal box/cage. We would hatch them out and then transfer them. After a couple of weeks we would transfer them to a bigger pen and when they were a couple of months old they went to the barn. It wasn't the best way. Chicks were lost. It was a pain for them and a pain for us because of the cramped quarters and problematic access. This year we changed all that. What better place to brood the chicks than in the barn and let them see and be seen by the other chickens so there would be no adjustment period? We had the plans and were buying the lumber when we found the clearance rack. These were on sale. Marked down from $70.00 each to $20.00 each This is a 6 foot by 6 foot plastic fence panel. It is double walled so it is insulated. We bought six. We used four for the brooder ROOM. Three walls and one pane for a hinged door. We put chicken wire 24 inches high inside the door so we could open the door, go inside and do everything that was needed with no chicks leaving. The roof of the room is plywood with two infrared heat lamps suspended on adjustable ropes. There is also a small white light so they can see better There is a water tray made from gutter against the back wall that is fed by chicken watering nipples. There is a 6 pound capacity chick feeder The floor in the back 2 feet is thick dirt. The front 4 feet is thick hay. We just happened to have a broody bantam silkie who was setting on two eggs. We put 48 day old chicks in the brooder and shut the door. We removed the Silkie's eggs and replaced them with two chicks. Six hours later we put her inside the brooder with the rest of the chicks. After the chicks got big enough so they couldn't slip through the chicken wire we would leave the door part way open for socialisation for a couple of hours a day. We never lost a single chick and these are the most socialised chicks ever. They learned everything from 'mama' and were not afraid of the big chickens when they came out of their house. The big chickens were actually hiding from them. That was four months ago and now they roam the pasture like crazy but still make it difficult to walk when you go to the barn. Brooder picture The fourth panel is hinged in the front to use as a door, This picture was taken as I was assembling it. AfterI finished inside I attached chicken wire across the front 24 inches high so I could get in and out and do things without losing chicks. This was in January when we put the chicks in so it was really cold but the adjustable height heat lamps, the broody hen and the enclosed insulted panels kept it really nice and warm. When they were big enough to choose whether they wanted the heat or the barn we walled off a section of the barn 10 feet by 20 feet and left an 8 foot opening that had fencing on it so they could run in their space and not get lost in the barn. When they started sleeping away from the heat we turned them off. We have always brooded chicks in the old standard way using the cramped and crowded metal box/cage. We would hatch them out and then transfer them. After a couple of weeks we would transfer them to a bigger pen and when they were a couple of months old they went to the barn. It wasn't the best way. Chicks were lost. It was a pain for them and a pain for us because of the cramped quarters and problematic access. This year we changed all that. What better place to brood the chicks than in the barn and let them see and be seen by the other chickens so there would be no adjustment period? We had the plans and were buying the lumber when we found the clearance rack. These were on sale. Marked down from $70.00 each to $20.00 each This is a 6 foot by 6 foot plastic fence panel. It is double walled so it is insulated. We bought six. We used four for the brooder ROOM. Three walls and one pane for a hinged door. We put chicken wire 24 inches high inside the door so we could open the door, go inside and do everything that was needed with no chicks leaving. The roof of the room is plywood with two infrared heat lamps suspended on adjustable ropes. There is also a small white light so they can see better There is a water tray made from gutter against the back wall that is fed by chicken watering nipples. There is a 6 pound capacity chick feeder The floor in the back 2 feet is thick dirt. The front 4 feet is thick hay. We just happened to have a broody bantam silkie who was setting on two eggs. We put 48 day old chicks in the brooder and shut the door. We removed the Silkie's eggs and replaced them with two chicks. Six hours later we put her inside the brooder with the rest of the chicks. After the chicks got big enough so they couldn't slip through the chicken wire we would leave the door part way open for socialisation for a couple of hours a day. We never lost a single chick and these are the most socialised chicks ever. They learned everything from 'mama' and were not afraid of the big chickens when they came out of their house. The big chickens were actually hiding from them. That was four months ago and now they roam the pasture like crazy but still make it difficult to walk when you go to the barn. Brooder picture The fourth panel is hinged in the front to use as a door, This picture was taken as I was assembling it. AfterI finished inside I attached chicken wire across the front 24 inches high so I could get in and out and do things without losing chicks. This was in January when we put the chicks in so it was really cold but the adjustable height heat lamps, the broody hen and the enclosed insulted panels kept it really nice and warm. When they were big enough to choose whether they wanted the heat or the barn we walled off a section of the barn 10 feet by 20 feet and left an 8 foot opening that had fencing on it so they could run in their space and not get lost in the barn. When they started sleeping away from the heat we turned them off. We have always brooded chicks in the old standard way using the cramped and crowded metal box/cage. We would hatch them out and then transfer them. After a couple of weeks we would transfer them to a bigger pen and when they were a couple of months old they went to the barn. It wasn't the best way. Chicks were lost. It was a pain for them and a pain for us because of the cramped quarters and problematic access. This year we changed all that. What better place to brood the chicks than in the barn and let them see and be seen by the other chickens so there would be no adjustment period? We had the plans and were buying the lumber when we found the clearance rack. These were on sale. Marked down from $70.00 each to $20.00 each This is a 6 foot by 6 foot plastic fence panel. It is double walled so it is insulated. We bought six. We used four for the brooder ROOM. Three walls and one pane for a hinged door. We put chicken wire 24 inches high inside the door so we could open the door, go inside and do everything that was needed with no chicks leaving. The roof of the room is plywood with two infrared heat lamps suspended on adjustable ropes. There is also a small white light so they can see better There is a water tray made from gutter against the back wall that is fed by chicken watering nipples. There is a 6 pound capacity chick feeder The floor in the back 2 feet is thick dirt. The front 4 feet is thick hay. We just happened to have a broody bantam silkie who was setting on two eggs. We put 48 day old chicks in the brooder and shut the door. We removed the Silkie's eggs and replaced them with two chicks. Six hours later we put her inside the brooder with the rest of the chicks. After the chicks got big enough so they couldn't slip through the chicken wire we would leave the door part way open for socialisation for a couple of hours a day. We never lost a single chick and these are the most socialised chicks ever. They learned everything from 'mama' and were not afraid of the big chickens when they came out of their house. The big chickens were actually hiding from them. That was four months ago and now they roam the pasture like crazy but still make it difficult to walk when you go to the barn. Brooder picture The fourth panel is hinged in the front to use as a door, This picture was taken as I was assembling it. AfterI finished inside I attached chicken wire across the front 24 inches high so I could get in and out and do things without losing chicks. This was in January when we put the chicks in so it was really cold but the adjustable height heat lamps, the broody hen and the enclosed insulted panels kept it really nice and warm. When they were big enough to choose whether they wanted the heat or the barn we walled off a section of the barn 10 feet by 20 feet and left an 8 foot opening that had fencing on it so they could run in their space and not get lost in the barn. When they started sleeping away from the heat we turned them off. We have always brooded chicks in the old standard way using the cramped and crowded metal box/cage. We would hatch them out and then transfer them. After a couple of weeks we would transfer them to a bigger pen and when they were a couple of months old they went to the barn. It wasn't the best way. Chicks were lost. It was a pain for them and a pain for us because of the cramped quarters and problematic access. This year we changed all that. What better place to brood the chicks than in the barn and let them see and be seen by the other chickens so there would be no adjustment period? We had the plans and were buying the lumber when we found the clearance rack. These were on sale. Marked down from $70.00 each to $20.00 each This is a 6 foot by 6 foot plastic fence panel. It is double walled so it is insulated. We bought six. We used four for the brooder ROOM. Three walls and one pane for a hinged door. We put chicken wire 24 inches high inside the door so we could open the door, go inside and do everything that was needed with no chicks leaving. The roof of the room is plywood with two infrared heat lamps suspended on adjustable ropes. There is also a small white light so they can see better There is a water tray made from gutter against the back wall that is fed by chicken watering nipples. There is a 6 pound capacity chick feeder The floor in the back 2 feet is thick dirt. The front 4 feet is thick hay. We just happened to have a broody bantam silkie who was setting on two eggs. We put 48 day old chicks in the brooder and shut the door. We removed the Silkie's eggs and replaced them with two chicks. Six hours later we put her inside the brooder with the rest of the chicks. After the chicks got big enough so they couldn't slip through the chicken wire we would leave the door part way open for socialisation for a couple of hours a day. We never lost a single chick and these are the most socialised chicks ever. They learned everything from 'mama' and were not afraid of the big chickens when they came out of their house. The big chickens were actually hiding from them. That was four months ago and now they roam the pasture like crazy but still make it difficult to walk when you go to the barn. Brooder picture The fourth panel is hinged in the front to use as a door, This picture was taken as I was assembling it. AfterI finished inside I attached chicken wire across the front 24 inches high so I could get in and out and do things without losing chicks. This was in January when we put the chicks in so it was really cold but the adjustable height heat lamps, the broody hen and the enclosed insulted panels kept it really nice and warm. When they were big enough to choose whether they wanted the heat or the barn we walled off a section of the barn 10 feet by 20 feet and left an 8 foot opening that had fencing on it so they could run in their space and not get lost in the barn. When they started sleeping away from the heat we turned them off. We have always brooded chicks in the old standard way using the cramped and crowded metal box/cage. We would hatch them out and then transfer them. After a couple of weeks we would transfer them to a bigger pen and when they were a couple of months old they went to the barn. It wasn't the best way. Chicks were lost. It was a pain for them and a pain for us because of the cramped quarters and problematic access. This year we changed all that. What better place to brood the chicks than in the barn and let them see and be seen by the other chickens so there would be no adjustment period? We had the plans and were buying the lumber when we found the clearance rack. These were on sale. Marked down from $70.00 each to $20.00 each This is a 6 foot by 6 foot plastic fence panel. It is double walled so it is insulated. We bought six. We used four for the brooder ROOM. Three walls and one pane for a hinged door. We put chicken wire 24 inches high inside the door so we could open the door, go inside and do everything that was needed with no chicks leaving. The roof of the room is plywood with two infrared heat lamps suspended on adjustable ropes. There is also a small white light so they can see better There is a water tray made from gutter against the back wall that is fed by chicken watering nipples. There is a 6 pound capacity chick feeder The floor in the back 2 feet is thick dirt. The front 4 feet is thick hay. We just happened to have a broody bantam silkie who was setting on two eggs. We put 48 day old chicks in the brooder and shut the door. We removed the Silkie's eggs and replaced them with two chicks. Six hours later we put her inside the brooder with the rest of the chicks. After the chicks got big enough so they couldn't slip through the chicken wire we would leave the door part way open for socialisation for a couple of hours a day. We never lost a single chick and these are the most socialised chicks ever. They learned everything from 'mama' and were not afraid of the big chickens when they came out of their house. The big chickens were actually hiding from them. That was four months ago and now they roam the pasture like crazy but still make it difficult to walk when you go to the barn. Brooder picture The fourth panel is hinged in the front to use as a door, This picture was taken as I was assembling it. AfterI finished inside I attached chicken wire across the front 24 inches high so I could get in and out and do things without losing chicks. This was in January when we put the chicks in so it was really cold but the adjustable height heat lamps, the broody hen and the enclosed insulted panels kept it really nice and warm. When they were big enough to choose whether they wanted the heat or the barn we walled off a section of the barn 10 feet by 20 feet and left an 8 foot opening that had fencing on it so they could run in their space and not get lost in the barn. When they started sleeping away from the heat we turned them off. We have always brooded chicks in the old standard way using the cramped and crowded metal box/cage. We would hatch them out and then transfer them. After a couple of weeks we would transfer them to a bigger pen and when they were a couple of months old they went to the barn. It wasn't the best way. Chicks were lost. It was a pain for them and a pain for us because of the cramped quarters and problematic access. This year we changed all that. What better place to brood the chicks than in the barn and let them see and be seen by the other chickens so there would be no adjustment period? We had the plans and were buying the lumber when we found the clearance rack. These were on sale. Marked down from $70.00 each to $20.00 each This is a 6 foot by 6 foot plastic fence panel. It is double walled so it is insulated. We bought six. We used four for the brooder ROOM. Three walls and one pane for a hinged door. We put chicken wire 24 inches high inside the door so we could open the door, go inside and do everything that was needed with no chicks leaving. The roof of the room is plywood with two infrared heat lamps suspended on adjustable ropes. There is also a small white light so they can see better There is a water tray made from gutter against the back wall that is fed by chicken watering nipples. There is a 6 pound capacity chick feeder The floor in the back 2 feet is thick dirt. The front 4 feet is thick hay. We just happened to have a broody bantam silkie who was setting on two eggs. We put 48 day old chicks in the brooder and shut the door. We removed the Silkie's eggs and replaced them with two chicks. Six hours later we put her inside the brooder with the rest of the chicks. After the chicks got big enough so they couldn't slip through the chicken wire we would leave the door part way open for socialisation for a couple of hours a day. We never lost a single chick and these are the most socialised chicks ever. They learned everything from 'mama' and were not afraid of the big chickens when they came out of their house. The big chickens were actually hiding from them. That was four months ago and now they roam the pasture like crazy but still make it difficult to walk when you go to the barn. Brooder picture The fourth panel is hinged in the front to use as a door, This picture was taken as I was assembling it. AfterI finished inside I attached chicken wire across the front 24 inches high so I could get in and out and do things without losing chicks. This was in January when we put the chicks in so it was really cold but the adjustable height heat lamps, the broody hen and the enclosed insulted panels kept it really nice and warm. When they were big enough to choose whether they wanted the heat or the barn we walled off a section of the barn 10 feet by 20 feet and left an 8 foot opening that had fencing on it so they could run in their space and not get lost in the barn. When they started sleeping away from the heat we turned them off. We have always brooded chicks in the old standard way using the cramped and crowded metal box/cage. We would hatch them out and then transfer them. After a couple of weeks we would transfer them to a bigger pen and when they were a couple of months old they went to the barn. It wasn't the best way. Chicks were lost. It was a pain for them and a pain for us because of the cramped quarters and problematic access. This year we changed all that. What better place to brood the chicks than in the barn and let them see and be seen by the other chickens so there would be no adjustment period? We had the plans and were buying the lumber when we found the clearance rack. These were on sale. Marked down from $70.00 each to $20.00 each This is a 6 foot by 6 foot plastic fence panel. It is double walled so it is insulated. We bought six. We used four for the brooder ROOM. Three walls and one pane for a hinged door. We put chicken wire 24 inches high inside the door so we could open the door, go inside and do everything that was needed with no chicks leaving. The roof of the room is plywood with two infrared heat lamps suspended on adjustable ropes. There is also a small white light so they can see better There is a water tray made from gutter against the back wall that is fed by chicken watering nipples. There is a 6 pound capacity chick feeder The floor in the back 2 feet is thick dirt. The front 4 feet is thick hay. We just happened to have a broody bantam silkie who was setting on two eggs. We put 48 day old chicks in the brooder and shut the door. We removed the Silkie's eggs and replaced them with two chicks. Six hours later we put her inside the brooder with the rest of the chicks. After the chicks got big enough so they couldn't slip through the chicken wire we would leave the door part way open for socialisation for a couple of hours a day. We never lost a single chick and these are the most socialised chicks ever. They learned everything from 'mama' and were not afraid of the big chickens when they came out of their house. The big chickens were actually hiding from them. That was four months ago and now they roam the pasture like crazy but still make it difficult to walk when you go to the barn. Brooder picture The fourth panel is hinged in the front to use as a door, This picture was taken as I was assembling it. AfterI finished inside I attached chicken wire across the front 24 inches high so I could get in and out and do things without losing chicks. This was in January when we put the chicks in so it was really cold but the adjustable height heat lamps, the broody hen and the enclosed insulted panels kept it really nice and warm. When they were big enough to choose whether they wanted the heat or the barn we walled off a section of the barn 10 feet by 20 feet and left an 8 foot opening that had fencing on it so they could run in their space and not get lost in the barn. When they started sleeping away from the heat we turned them off. We have always brooded chicks in the old standard way using the cramped and crowded metal box/cage. We would hatch them out and then transfer them. After a couple of weeks we would transfer them to a bigger pen and when they were a couple of months old they went to the barn. It wasn't the best way. Chicks were lost. It was a pain for them and a pain for us because of the cramped quarters and problematic access. This year we changed all that. What better place to brood the chicks than in the barn and let them see and be seen by the other chickens so there would be no adjustment period? We had the plans and were buying the lumber when we found the clearance rack. These were on sale. Marked down from $70.00 each to $20.00 each This is a 6 foot by 6 foot plastic fence panel. It is double walled so it is insulated. We bought six. We used four for the brooder ROOM. Three walls and one pane for a hinged door. We put chicken wire 24 inches high inside the door so we could open the door, go inside and do everything that was needed with no chicks leaving. The roof of the room is plywood with two infrared heat lamps suspended on adjustable ropes. There is also a small white light so they can see better There is a water tray made from gutter against the back wall that is fed by chicken watering nipples. There is a 6 pound capacity chick feeder The floor in the back 2 feet is thick dirt. The front 4 feet is thick hay. We just happened to have a broody bantam silkie who was setting on two eggs. We put 48 day old chicks in the brooder and shut the door. We removed the Silkie's eggs and replaced them with two chicks. Six hours later we put her inside the brooder with the rest of the chicks. After the chicks got big enough so they couldn't slip through the chicken wire we would leave the door part way open for socialisation for a couple of hours a day. We never lost a single chick and these are the most socialised chicks ever. They learned everything from 'mama' and were not afraid of the big chickens when they came out of their house. The big chickens were actually hiding from them. That was four months ago and now they roam the pasture like crazy but still make it difficult to walk when you go to the barn. Brooder picture The fourth panel is hinged in the front to use as a door, This picture was taken as I was assembling it. AfterI finished inside I attached chicken wire across the front 24 inches high so I could get in and out and do things without losing chicks. This was in January when we put the chicks in so it was really cold but the adjustable height heat lamps, the broody hen and the enclosed insulted panels kept it really nice and warm. When they were big enough to choose whether they wanted the heat or the barn we walled off a section of the barn 10 feet by 20 feet and left an 8 foot opening that had fencing on it so they could run in their space and not get lost in the barn. When they started sleeping away from the heat we turned them off. We have always brooded chicks in the old standard way using the cramped and crowded metal box/cage. We would hatch them out and then transfer them. After a couple of weeks we would transfer them to a bigger pen and when they were a couple of months old they went to the barn. It wasn't the best way. Chicks were lost. It was a pain for them and a pain for us because of the cramped quarters and problematic access. This year we changed all that. What better place to brood the chicks than in the barn and let them see and be seen by the other chickens so there would be no adjustment period? We had the plans and were buying the lumber when we found the clearance rack. These were on sale. Marked down from $70.00 each to $20.00 each This is a 6 foot by 6 foot plastic fence panel. It is double walled so it is insulated. We bought six. We used four for the brooder ROOM. Three walls and one pane for a hinged door. We put chicken wire 24 inches high inside the door so we could open the door, go inside and do everything that was needed with no chicks leaving. The roof of the room is plywood with two infrared heat lamps suspended on adjustable ropes. There is also a small white light so they can see better There is a water tray made from gutter against the back wall that is fed by chicken watering nipples. There is a 6 pound capacity chick feeder The floor in the back 2 feet is thick dirt. The front 4 feet is thick hay. We just happened to have a broody bantam silkie who was setting on two eggs. We put 48 day old chicks in the brooder and shut the door. We removed the Silkie's eggs and replaced them with two chicks. Six hours later we put her inside the brooder with the rest of the chicks. After the chicks got big enough so they couldn't slip through the chicken wire we would leave the door part way open for socialisation for a couple of hours a day. We never lost a single chick and these are the most socialised chicks ever. They learned everything from 'mama' and were not afraid of the big chickens when they came out of their house. The big chickens were actually hiding from them. That was four months ago and now they roam the pasture like crazy but still make it difficult to walk when you go to the barn. Brooder picture The fourth panel is hinged in the front to use as a door, This picture was taken as I was assembling it. AfterI finished inside I attached chicken wire across the front 24 inches high so I could get in and out and do things without losing chicks. This was in January when we put the chicks in so it was really cold but the adjustable height heat lamps, the broody hen and the enclosed insulted panels kept it really nice and warm. When they were big enough to choose whether they wanted the heat or the barn we walled off a section of the barn 10 feet by 20 feet and left an 8 foot opening that had fencing on it so they could run in their space and not get lost in the barn. When they started sleeping away from the heat we turned them off. We have always brooded chicks in the old standard way using the cramped and crowded metal box/cage. We would hatch them out and then transfer them. After a couple of weeks we would transfer them to a bigger pen and when they were a couple of months old they went to the barn. It wasn't the best way. Chicks were lost. It was a pain for them and a pain for us because of the cramped quarters and problematic access. This year we changed all that. What better place to brood the chicks than in the barn and let them see and be seen by the other chickens so there would be no adjustment period? We had the plans and were buying the lumber when we found the clearance rack. These were on sale. Marked down from $70.00 each to $20.00 each This is a 6 foot by 6 foot plastic fence panel. It is double walled so it is insulated. We bought six. We used four for the brooder ROOM. Three walls and one pane for a hinged door. We put chicken wire 24 inches high inside the door so we could open the door, go inside and do everything that was needed with no chicks leaving. The roof of the room is plywood with two infrared heat lamps suspended on adjustable ropes. There is also a small white light so they can see better There is a water tray made from gutter against the back wall that is fed by chicken watering nipples. There is a 6 pound capacity chick feeder The floor in the back 2 feet is thick dirt. The front 4 feet is thick hay. We just happened to have a broody bantam silkie who was setting on two eggs. We put 48 day old chicks in the brooder and shut the door. We removed the Silkie's eggs and replaced them with two chicks. Six hours later we put her inside the brooder with the rest of the chicks. After the chicks got big enough so they couldn't slip through the chicken wire we would leave the door part way open for socialisation for a couple of hours a day. We never lost a single chick and these are the most socialised chicks ever. They learned everything from 'mama' and were not afraid of the big chickens when they came out of their house. The big chickens were actually hiding from them. That was four months ago and now they roam the pasture like crazy but still make it difficult to walk when you go to the barn. Brooder picture The fourth panel is hinged in the front to use as a door, This picture was taken as I was assembling it. AfterI finished inside I attached chicken wire across the front 24 inches high so I could get in and out and do things without losing chicks. This was in January when we put the chicks in so it was really cold but the adjustable height heat lamps, the broody hen and the enclosed insulted panels kept it really nice and warm. When they were big enough to choose whether they wanted the heat or the barn we walled off a section of the barn 10 feet by 20 feet and left an 8 foot opening that had fencing on it so they could run in their space and not get lost in the barn. When they started sleeping away from the heat we turned them off. We have always brooded chicks in the old standard way using the cramped and crowded metal box/cage. We would hatch them out and then transfer them. After a couple of weeks we would transfer them to a bigger pen and when they were a couple of months old they went to the barn. It wasn't the best way. Chicks were lost. It was a pain for them and a pain for us because of the cramped quarters and problematic access. This year we changed all that. What better place to brood the chicks than in the barn and let them see and be seen by the other chickens so there would be no adjustment period? We had the plans and were buying the lumber when we found the clearance rack. These were on sale. Marked down from $70.00 each to $20.00 each This is a 6 foot by 6 foot plastic fence panel. It is double walled so it is insulated. We bought six. We used four for the brooder ROOM. Three walls and one pane for a hinged door. We put chicken wire 24 inches high inside the door so we could open the door, go inside and do everything that was needed with no chicks leaving. The roof of the room is plywood with two infrared heat lamps suspended on adjustable ropes. There is also a small white light so they can see better There is a water tray made from gutter against the back wall that is fed by chicken watering nipples. There is a 6 pound capacity chick feeder The floor in the back 2 feet is thick dirt. The front 4 feet is thick hay. We just happened to have a broody bantam silkie who was setting on two eggs. We put 48 day old chicks in the brooder and shut the door. We removed the Silkie's eggs and replaced them with two chicks. Six hours later we put her inside the brooder with the rest of the chicks. After the chicks got big enough so they couldn't slip through the chicken wire we would leave the door part way open for socialisation for a couple of hours a day. We never lost a single chick and these are the most socialised chicks ever. They learned everything from 'mama' and were not afraid of the big chickens when they came out of their house. The big chickens were actually hiding from them. That was four months ago and now they roam the pasture like crazy but still make it difficult to walk when you go to the barn. Brooder picture The fourth panel is hinged in the front to use as a door, This picture was taken as I was assembling it. AfterI finished inside I attached chicken wire across the front 24 inches high so I could get in and out and do things without losing chicks. This was in January when we put the chicks in so it was really cold but the adjustable height heat lamps, the broody hen and the enclosed insulted panels kept it really nice and warm. When they were big enough to choose whether they wanted the heat or the barn we walled off a section of the barn 10 feet by 20 feet and left an 8 foot opening that had fencing on it so they could run in their space and not get lost in the barn. When they started sleeping away from the heat we turned them off. We have always brooded chicks in the old standard way using the cramped and crowded metal box/cage. We would hatch them out and then transfer them. After a couple of weeks we would transfer them to a bigger pen and when they were a couple of months old they went to the barn. It wasn't the best way. Chicks were lost. It was a pain for them and a pain for us because of the cramped quarters and problematic access. This year we changed all that. What better place to brood the chicks than in the barn and let them see and be seen by the other chickens so there would be no adjustment period? We had the plans and were buying the lumber when we found the clearance rack. These were on sale. Marked down from $70.00 each to $20.00 each This is a 6 foot by 6 foot plastic fence panel. It is double walled so it is insulated. We bought six. We used four for the brooder ROOM. Three walls and one pane for a hinged door. We put chicken wire 24 inches high inside the door so we could open the door, go inside and do everything that was needed with no chicks leaving. The roof of the room is plywood with two infrared heat lamps suspended on adjustable ropes. There is also a small white light so they can see better There is a water tray made from gutter against the back wall that is fed by chicken watering nipples. There is a 6 pound capacity chick feeder The floor in the back 2 feet is thick dirt. The front 4 feet is thick hay. We just happened to have a broody bantam silkie who was setting on two eggs. We put 48 day old chicks in the brooder and shut the door. We removed the Silkie's eggs and replaced them with two chicks. Six hours later we put her inside the brooder with the rest of the chicks. After the chicks got big enough so they couldn't slip through the chicken wire we would leave the door part way open for socialisation for a couple of hours a day. We never lost a single chick and these are the most socialised chicks ever. They learned everything from 'mama' and were not afraid of the big chickens when they came out of their house. The big chickens were actually hiding from them. That was four months ago and now they roam the pasture like crazy but still make it difficult to walk when you go to the barn. Brooder picture The fourth panel is hinged in the front to use as a door, This picture was taken as I was assembling it. AfterI finished inside I attached chicken wire across the front 24 inches high so I could get in and out and do things without losing chicks. This was in January when we put the chicks in so it was really cold but the adjustable height heat lamps, the broody hen and the enclosed insulted panels kept it really nice and warm. When they were big enough to choose whether they wanted the heat or the barn we walled off a section of the barn 10 feet by 20 feet and left an 8 foot opening that had fencing on it so they could run in their space and not get lost in the barn. When they started sleeping away from the heat we turned them off. We have always brooded chicks in the old standard way using the cramped and crowded metal box/cage. We would hatch them out and then transfer them. After a couple of weeks we would transfer them to a bigger pen and when they were a couple of months old they went to the barn. It wasn't the best way. Chicks were lost. It was a pain for them and a pain for us because of the cramped quarters and problematic access. This year we changed all that. What better place to brood the chicks than in the barn and let them see and be seen by the other chickens so there would be no adjustment period? We had the plans and were buying the lumber when we found the clearance rack. These were on sale. Marked down from $70.00 each to $20.00 each This is a 6 foot by 6 foot plastic fence panel. It is double walled so it is insulated. We bought six. We used four for the brooder ROOM. Three walls and one pane for a hinged door. We put chicken wire 24 inches high inside the door so we could open the door, go inside and do everything that was needed with no chicks leaving. The roof of the room is plywood with two infrared heat lamps suspended on adjustable ropes. There is also a small white light so they can see better There is a water tray made from gutter against the back wall that is fed by chicken watering nipples. There is a 6 pound capacity chick feeder The floor in the back 2 feet is thick dirt. The front 4 feet is thick hay. We just happened to have a broody bantam silkie who was setting on two eggs. We put 48 day old chicks in the brooder and shut the door. We removed the Silkie's eggs and replaced them with two chicks. Six hours later we put her inside the brooder with the rest of the chicks. After the chicks got big enough so they couldn't slip through the chicken wire we would leave the door part way open for socialisation for a couple of hours a day. We never lost a single chick and these are the most socialised chicks ever. They learned everything from 'mama' and were not afraid of the big chickens when they came out of their house. The big chickens were actually hiding from them. That was four months ago and now they roam the pasture like crazy but still make it difficult to walk when you go to the barn. Brooder picture The fourth panel is hinged in the front to use as a door, This picture was taken as I was assembling it. AfterI finished inside I attached chicken wire across the front 24 inches high so I could get in and out and do things without losing chicks. This was in January when we put the chicks in so it was really cold but the adjustable height heat lamps, the broody hen and the enclosed insulted panels kept it really nice and warm. When they were big enough to choose whether they wanted the heat or the barn we walled off a section of the barn 10 feet by 20 feet and left an 8 foot opening that had fencing on it so they could run in their space and not get lost in the barn. When they started sleeping away from the heat we turned them off. We have always brooded chicks in the old standard way using the cramped and crowded metal box/cage. We would hatch them out and then transfer them. After a couple of weeks we would transfer them to a bigger pen and when they were a couple of months old they went to the barn. It wasn't the best way. Chicks were lost. It was a pain for them and a pain for us because of the cramped quarters and problematic access. This year we changed all that. What better place to brood the chicks than in the barn and let them see and be seen by the other chickens so there would be no adjustment period? We had the plans and were buying the lumber when we found the clearance rack. These were on sale. Marked down from $70.00 each to $20.00 each This is a 6 foot by 6 foot plastic fence panel. It is double walled so it is insulated. We bought six. We used four for the brooder ROOM. Three walls and one pane for a hinged door. We put chicken wire 24 inches high inside the door so we could open the door, go inside and do everything that was needed with no chicks leaving. The roof of the room is plywood with two infrared heat lamps suspended on adjustable ropes. There is also a small white light so they can see better There is a water tray made from gutter against the back wall that is fed by chicken watering nipples. There is a 6 pound capacity chick feeder The floor in the back 2 feet is thick dirt. The front 4 feet is thick hay. We just happened to have a broody bantam silkie who was setting on two eggs. We put 48 day old chicks in the brooder and shut the door. We removed the Silkie's eggs and replaced them with two chicks. Six hours later we put her inside the brooder with the rest of the chicks. After the chicks got big enough so they couldn't slip through the chicken wire we would leave the door part way open for socialisation for a couple of hours a day. We never lost a single chick and these are the most socialised chicks ever. They learned everything from 'mama' and were not afraid of the big chickens when they came out of their house. The big chickens were actually hiding from them. That was four months ago and now they roam the pasture like crazy but still make it difficult to walk when you go to the barn. Brooder picture The fourth panel is hinged in the front to use as a door, This picture was taken as I was assembling it. AfterI finished inside I attached chicken wire across the front 24 inches high so I could get in and out and do things without losing chicks. This was in January when we put the chicks in so it was really cold but the adjustable height heat lamps, the broody hen and the enclosed insulted panels kept it really nice and warm. When they were big enough to choose whether they wanted the heat or the barn we walled off a section of the barn 10 feet by 20 feet and left an 8 foot opening that had fencing on it so they could run in their space and not get lost in the barn. When they started sleeping away from the heat we turned them off. We have always brooded chicks in the old standard way using the cramped and crowded metal box/cage. We would hatch them out and then transfer them. After a couple of weeks we would transfer them to a bigger pen and when they were a couple of months old they went to the barn. It wasn't the best way. Chicks were lost. It was a pain for them and a pain for us because of the cramped quarters and problematic access. This year we changed all that. What better place to brood the chicks than in the barn and let them see and be seen by the other chickens so there would be no adjustment period? We had the plans and were buying the lumber when we found the clearance rack. These were on sale. Marked down from $70.00 each to $20.00 each This is a 6 foot by 6 foot plastic fence panel. It is double walled so it is insulated. We bought six. We used four for the brooder ROOM. Three walls and one pane for a hinged door. We put chicken wire 24 inches high inside the door so we could open the door, go inside and do everything that was needed with no chicks leaving. The roof of the room is plywood with two infrared heat lamps suspended on adjustable ropes. There is also a small white light so they can see better There is a water tray made from gutter against the back wall that is fed by chicken watering nipples. There is a 6 pound capacity chick feeder The floor in the back 2 feet is thick dirt. The front 4 feet is thick hay. We just happened to have a broody bantam silkie who was setting on two eggs. We put 48 day old chicks in the brooder and shut the door. We removed the Silkie's eggs and replaced them with two chicks. Six hours later we put her inside the brooder with the rest of the chicks. After the chicks got big enough so they couldn't slip through the chicken wire we would leave the door part way open for socialisation for a couple of hours a day. We never lost a single chick and these are the most socialised chicks ever. They learned everything from 'mama' and were not afraid of the big chickens when they came out of their house. The big chickens were actually hiding from them. That was four months ago and now they roam the pasture like crazy but still make it difficult to walk when you go to the barn. Brooder picture The fourth panel is hinged in the front to use as a door, This picture was taken as I was assembling it. AfterI finished inside I attached chicken wire across the front 24 inches high so I could get in and out and do things without losing chicks. This was in January when we put the chicks in so it was really cold but the adjustable height heat lamps, the broody hen and the enclosed insulted panels kept it really nice and warm. When they were big enough to choose whether they wanted the heat or the barn we walled off a section of the barn 10 feet by 20 feet and left an 8 foot opening that had fencing on it so they could run in their space and not get lost in the barn. When they started sleeping away from the heat we turned them off. We have always brooded chicks in the old standard way using the cramped and crowded metal box/cage. We would hatch them out and then transfer them. After a couple of weeks we would transfer them to a bigger pen and when they were a couple of months old they went to the barn. It wasn't the best way. Chicks were lost. It was a pain for them and a pain for us because of the cramped quarters and problematic access. This year we changed all that. What better place to brood the chicks than in the barn and let them see and be seen by the other chickens so there would be no adjustment period? We had the plans and were buying the lumber when we found the clearance rack. These were on sale. Marked down from $70.00 each to $20.00 each This is a 6 foot by 6 foot plastic fence panel. It is double walled so it is insulated. We bought six. We used four for the brooder ROOM. Three walls and one pane for a hinged door. We put chicken wire 24 inches high inside the door so we could open the door, go inside and do everything that was needed with no chicks leaving. The roof of the room is plywood with two infrared heat lamps suspended on adjustable ropes. There is also a small white light so they can see better There is a water tray made from gutter against the back wall that is fed by chicken watering nipples. There is a 6 pound capacity chick feeder The floor in the back 2 feet is thick dirt. The front 4 feet is thick hay. We just happened to have a broody bantam silkie who was setting on two eggs. We put 48 day old chicks in the brooder and shut the door. We removed the Silkie's eggs and replaced them with two chicks. Six hours later we put her inside the brooder with the rest of the chicks. After the chicks got big enough so they couldn't slip through the chicken wire we would leave the door part way open for socialisation for a couple of hours a day. We never lost a single chick and these are the most socialised chicks ever. They learned everything from 'mama' and were not afraid of the big chickens when they came out of their house. The big chickens were actually hiding from them. That was four months ago and now they roam the pasture like crazy but still make it difficult to walk when you go to the barn. Brooder picture The fourth panel is hinged in the front to use as a door, This picture was taken as I was assembling it. AfterI finished inside I attached chicken wire across the front 24 inches high so I could get in and out and do things without losing chicks. This was in January when we put the chicks in so it was really cold but the adjustable height heat lamps, the broody hen and the enclosed insulted panels kept it really nice and warm. When they were big enough to choose whether they wanted the heat or the barn we walled off a section of the barn 10 feet by 20 feet and left an 8 foot opening that had fencing on it so they could run in their space and not get lost in the barn. When they started sleeping away from the heat we turned them off. We have always brooded chicks in the old standard way using the cramped and crowded metal box/cage. We would hatch them out and then transfer them. After a couple of weeks we would transfer them to a bigger pen and when they were a couple of months old they went to the barn. It wasn't the best way. Chicks were lost. It was a pain for them and a pain for us because of the cramped quarters and problematic access. This year we changed all that. What better place to brood the chicks than in the barn and let them see and be seen by the other chickens so there would be no adjustment period? We had the plans and were buying the lumber when we found the clearance rack. These were on sale. Marked down from $70.00 each to $20.00 each This is a 6 foot by 6 foot plastic fence panel. It is double walled so it is insulated. We bought six. We used four for the brooder ROOM. Three walls and one pane for a hinged door. We put chicken wire 24 inches high inside the door so we could open the door, go inside and do everything that was needed with no chicks leaving. The roof of the room is plywood with two infrared heat lamps suspended on adjustable ropes. There is also a small white light so they can see better There is a water tray made from gutter against the back wall that is fed by chicken watering nipples. There is a 6 pound capacity chick feeder The floor in the back 2 feet is thick dirt. The front 4 feet is thick hay. We just happened to have a broody bantam silkie who was setting on two eggs. We put 48 day old chicks in the brooder and shut the door. We removed the Silkie's eggs and replaced them with two chicks. Six hours later we put her inside the brooder with the rest of the chicks. After the chicks got big enough so they couldn't slip through the chicken wire we would leave the door part way open for socialisation for a couple of hours a day. We never lost a single chick and these are the most socialised chicks ever. They learned everything from 'mama' and were not afraid of the big chickens when they came out of their house. The big chickens were actually hiding from them. That was four months ago and now they roam the pasture like crazy but still make it difficult to walk when you go to the barn. Brooder picture The fourth panel is hinged in the front to use as a door, This picture was taken as I was assembling it. AfterI finished inside I attached chicken wire across the front 24 inches high so I could get in and out and do things without losing chicks. This was in January when we put the chicks in so it was really cold but the adjustable height heat lamps, the broody hen and the enclosed insulted panels kept it really nice and warm. When they were big enough to choose whether they wanted the heat or the barn we walled off a section of the barn 10 feet by 20 feet and left an 8 foot opening that had fencing on it so they could run in their space and not get lost in the barn. When they started sleeping away from the heat we turned them off. We have always brooded chicks in the old standard way using the cramped and crowded metal box/cage. We would hatch them out and then transfer them. After a couple of weeks we would transfer them to a bigger pen and when they were a couple of months old they went to the barn. It wasn't the best way. Chicks were lost. It was a pain for them and a pain for us because of the cramped quarters and problematic access. This year we changed all that. What better place to brood the chicks than in the barn and let them see and be seen by the other chickens so there would be no adjustment period? We had the plans and were buying the lumber when we found the clearance rack. These were on sale. Marked down from $70.00 each to $20.00 each This is a 6 foot by 6 foot plastic fence panel. It is double walled so it is insulated. We bought six. We used four for the brooder ROOM. Three walls and one pane for a hinged door. We put chicken wire 24 inches high inside the door so we could open the door, go inside and do everything that was needed with no chicks leaving. The roof of the room is plywood with two infrared heat lamps suspended on adjustable ropes. There is also a small white light so they can see better There is a water tray made from gutter against the back wall that is fed by chicken watering nipples. There is a 6 pound capacity chick feeder The floor in the back 2 feet is thick dirt. The front 4 feet is thick hay. We just happened to have a broody bantam silkie who was setting on two eggs. We put 48 day old chicks in the brooder and shut the door. We removed the Silkie's eggs and replaced them with two chicks. Six hours later we put her inside the brooder with the rest of the chicks. After the chicks got big enough so they couldn't slip through the chicken wire we would leave the door part way open for socialisation for a couple of hours a day. We never lost a single chick and these are the most socialised chicks ever. They learned everything from 'mama' and were not afraid of the big chickens when they came out of their house. The big chickens were actually hiding from them. That was four months ago and now they roam the pasture like crazy but still make it difficult to walk when you go to the barn. Brooder picture The fourth panel is hinged in the front to use as a door, This picture was taken as I was assembling it. AfterI finished inside I attached chicken wire across the front 24 inches high so I could get in and out and do things without losing chicks. This was in January when we put the chicks in so it was really cold but the adjustable height heat lamps, the broody hen and the enclosed insulted panels kept it really nice and warm. When they were big enough to choose whether they wanted the heat or the barn we walled off a section of the barn 10 feet by 20 feet and left an 8 foot opening that had fencing on it so they could run in their space and not get lost in the barn. When they started sleeping away from the heat we turned them off. We have always brooded chicks in the old standard way using the cramped and crowded metal box/cage. We would hatch them out and then transfer them. After a couple of weeks we would transfer them to a bigger pen and when they were a couple of months old they went to the barn. It wasn't the best way. Chicks were lost. It was a pain for them and a pain for us because of the cramped quarters and problematic access. This year we changed all that. What better place to brood the chicks than in the barn and let them see and be seen by the other chickens so there would be no adjustment period? We had the plans and were buying the lumber when we found the clearance rack. These were on sale. Marked down from $70.00 each to $20.00 each This is a 6 foot by 6 foot plastic fence panel. It is double walled so it is insulated. We bought six. We used four for the brooder ROOM. Three walls and one pane for a hinged door. We put chicken wire 24 inches high inside the door so we could open the door, go inside and do everything that was needed with no chicks leaving. The roof of the room is plywood with two infrared heat lamps suspended on adjustable ropes. There is also a small white light so they can see better There is a water tray made from gutter against the back wall that is fed by chicken watering nipples. There is a 6 pound capacity chick feeder The floor in the back 2 feet is thick dirt. The front 4 feet is thick hay. We just happened to have a broody bantam silkie who was setting on two eggs. We put 48 day old chicks in the brooder and shut the door. We removed the Silkie's eggs and replaced them with two chicks. Six hours later we put her inside the brooder with the rest of the chicks. After the chicks got big enough so they couldn't slip through the chicken wire we would leave the door part way open for socialisation for a couple of hours a day. We never lost a single chick and these are the most socialised chicks ever. They learned everything from 'mama' and were not afraid of the big chickens when they came out of their house. The big chickens were actually hiding from them. That was four months ago and now they roam the pasture like crazy but still make it difficult to walk when you go to the barn. Brooder picture The fourth panel is hinged in the front to use as a door, This picture was taken as I was assembling it. AfterI finished inside I attached chicken wire across the front 24 inches high so I could get in and out and do things without losing chicks. This was in January when we put the chicks in so it was really cold but the adjustable height heat lamps, the broody hen and the enclosed insulted panels kept it really nice and warm. When they were big enough to choose whether they wanted the heat or the barn we walled off a section of the barn 10 feet by 20 feet and left an 8 foot opening that had fencing on it so they could run in their space and not get lost in the barn. When they started sleeping away from the heat we turned them off. We have always brooded chicks in the old standard way using the cramped and crowded metal box/cage. We would hatch them out and then transfer them. After a couple of weeks we would transfer them to a bigger pen and when they were a couple of months old they went to the barn. It wasn't the best way. Chicks were lost. It was a pain for them and a pain for us because of the cramped quarters and problematic access. This year we changed all that. What better place to brood the chicks than in the barn and let them see and be seen by the other chickens so there would be no adjustment period? We had the plans and were buying the lumber when we found the clearance rack. These were on sale. Marked down from $70.00 each to $20.00 each This is a 6 foot by 6 foot plastic fence panel. It is double walled so it is insulated. We bought six. We used four for the brooder ROOM. Three walls and one pane for a hinged door. We put chicken wire 24 inches high inside the door so we could open the door, go inside and do everything that was needed with no chicks leaving. The roof of the room is plywood with two infrared heat lamps suspended on adjustable ropes. There is also a small white light so they can see better There is a water tray made from gutter against the back wall that is fed by chicken watering nipples. There is a 6 pound capacity chick feeder The floor in the back 2 feet is thick dirt. The front 4 feet is thick hay. We just happened to have a broody bantam silkie who was setting on two eggs. We put 48 day old chicks in the brooder and shut the door. We removed the Silkie's eggs and replaced them with two chicks. Six hours later we put her inside the brooder with the rest of the chicks. After the chicks got big enough so they couldn't slip through the chicken wire we would leave the door part way open for socialisation for a couple of hours a day. We never lost a single chick and these are the most socialised chicks ever. They learned everything from 'mama' and were not afraid of the big chickens when they came out of their house. The big chickens were actually hiding from them. That was four months ago and now they roam the pasture like crazy but still make it difficult to walk when you go to the barn. Brooder picture The fourth panel is hinged in the front to use as a door, This picture was taken as I was assembling it. AfterI finished inside I attached chicken wire across the front 24 inches high so I could get in and out and do things without losing chicks. This was in January when we put the chicks in so it was really cold but the adjustable height heat lamps, the broody hen and the enclosed insulted panels kept it really nice and warm. When they were big enough to choose whether they wanted the heat or the barn we walled off a section of the barn 10 feet by 20 feet and left an 8 foot opening that had fencing on it so they could run in their space and not get lost in the barn. When they started sleeping away from the heat we turned them off. We have always brooded chicks in the old standard way using the cramped and crowded metal box/cage. We would hatch them out and then transfer them. After a couple of weeks we would transfer them to a bigger pen and when they were a couple of months old they went to the barn. It wasn't the best way. Chicks were lost. It was a pain for them and a pain for us because of the cramped quarters and problematic access. This year we changed all that. What better place to brood the chicks than in the barn and let them see and be seen by the other chickens so there would be no adjustment period? We had the plans and were buying the lumber when we found the clearance rack. These were on sale. Marked down from $70.00 each to $20.00 each This is a 6 foot by 6 foot plastic fence panel. It is double walled so it is insulated. We bought six. We used four for the brooder ROOM. Three walls and one pane for a hinged door. We put chicken wire 24 inches high inside the door so we could open the door, go inside and do everything that was needed with no chicks leaving. The roof of the room is plywood with two infrared heat lamps suspended on adjustable ropes. There is also a small white light so they can see better There is a water tray made from gutter against the back wall that is fed by chicken watering nipples. There is a 6 pound capacity chick feeder The floor in the back 2 feet is thick dirt. The front 4 feet is thick hay. We just happened to have a broody bantam silkie who was setting on two eggs. We put 48 day old chicks in the brooder and shut the door. We removed the Silkie's eggs and replaced them with two chicks. Six hours later we put her inside the brooder with the rest of the chicks. After the chicks got big enough so they couldn't slip through the chicken wire we would leave the door part way open for socialisation for a couple of hours a day. We never lost a single chick and these are the most socialised chicks ever. They learned everything from 'mama' and were not afraid of the big chickens when they came out of their house. The big chickens were actually hiding from them. That was four months ago and now they roam the pasture like crazy but still make it difficult to walk when you go to the barn. Brooder picture The fourth panel is hinged in the front to use as a door, This picture was taken as I was assembling it. AfterI finished inside I attached chicken wire across the front 24 inches high so I could get in and out and do things without losing chicks. This was in January when we put the chicks in so it was really cold but the adjustable height heat lamps, the broody hen and the enclosed insulted panels kept it really nice and warm. When they were big enough to choose whether they wanted the heat or the barn we walled off a section of the barn 10 feet by 20 feet and left an 8 foot opening that had fencing on it so they could run in their space and not get lost in the barn. When they started sleeping away from the heat we turned them off. We have always brooded chicks in the old standard way using the cramped and crowded metal box/cage. We would hatch them out and then transfer them. After a couple of weeks we would transfer them to a bigger pen and when they were a couple of months old they went to the barn. It wasn't the best way. Chicks were lost. It was a pain for them and a pain for us because of the cramped quarters and problematic access. This year we changed all that. What better place to brood the chicks than in the barn and let them see and be seen by the other chickens so there would be no adjustment period? We had the plans and were buying the lumber when we found the clearance rack. These were on sale. Marked down from $70.00 each to $20.00 each This is a 6 foot by 6 foot plastic fence panel. It is double walled so it is insulated. We bought six. We used four for the brooder ROOM. Three walls and one pane for a hinged door. We put chicken wire 24 inches high inside the door so we could open the door, go inside and do everything that was needed with no chicks leaving. The roof of the room is plywood with two infrared heat lamps suspended on adjustable ropes. There is also a small white light so they can see better There is a water tray made from gutter against the back wall that is fed by chicken watering nipples. There is a 6 pound capacity chick feeder The floor in the back 2 feet is thick dirt. The front 4 feet is thick hay. We just happened to have a broody bantam silkie who was setting on two eggs. We put 48 day old chicks in the brooder and shut the door. We removed the Silkie's eggs and replaced them with two chicks. Six hours later we put her inside the brooder with the rest of the chicks. After the chicks got big enough so they couldn't slip through the chicken wire we would leave the door part way open for socialisation for a couple of hours a day. We never lost a single chick and these are the most socialised chicks ever. They learned everything from 'mama' and were not afraid of the big chickens when they came out of their house. The big chickens were actually hiding from them. That was four months ago and now they roam the pasture like crazy but still make it difficult to walk when you go to the barn. Brooder picture The fourth panel is hinged in the front to use as a door, This picture was taken as I was assembling it. AfterI finished inside I attached chicken wire across the front 24 inches high so I could get in and out and do things without losing chicks. This was in January when we put the chicks in so it was really cold but the adjustable height heat lamps, the broody hen and the enclosed insulted panels kept it really nice and warm. When they were big enough to choose whether they wanted the heat or the barn we walled off a section of the barn 10 feet by 20 feet and left an 8 foot opening that had fencing on it so they could run in their space and not get lost in the barn. When they started sleeping away from the heat we turned them off. We have always brooded chicks in the old standard way using the cramped and crowded metal box/cage. We would hatch them out and then transfer them. After a couple of weeks we would transfer them to a bigger pen and when they were a couple of months old they went to the barn. It wasn't the best way. Chicks were lost. It was a pain for them and a pain for us because of the cramped quarters and problematic access. This year we changed all that. What better place to brood the chicks than in the barn and let them see and be seen by the other chickens so there would be no adjustment period? We had the plans and were buying the lumber when we found the clearance rack. These were on sale. Marked down from $70.00 each to $20.00 each This is a 6 foot by 6 foot plastic fence panel. It is double walled so it is insulated. We bought six. We used four for the brooder ROOM. Three walls and one pane for a hinged door. We put chicken wire 24 inches high inside the door so we could open the door, go inside and do everything that was needed with no chicks leaving. The roof of the room is plywood with two infrared heat lamps suspended on adjustable ropes. There is also a small white light so they can see better There is a water tray made from gutter against the back wall that is fed by chicken watering nipples. There is a 6 pound capacity chick feeder The floor in the back 2 feet is thick dirt. The front 4 feet is thick hay. We just happened to have a broody bantam silkie who was setting on two eggs. We put 48 day old chicks in the brooder and shut the door. We removed the Silkie's eggs and replaced them with two chicks. Six hours later we put her inside the brooder with the rest of the chicks. After the chicks got big enough so they couldn't slip through the chicken wire we would leave the door part way open for socialisation for a couple of hours a day. We never lost a single chick and these are the most socialised chicks ever. They learned everything from 'mama' and were not afraid of the big chickens when they came out of their house. The big chickens were actually hiding from them. That was four months ago and now they roam the pasture like crazy but still make it difficult to walk when you go to the barn. Brooder picture The fourth panel is hinged in the front to use as a door, This picture was taken as I was assembling it. AfterI finished inside I attached chicken wire across the front 24 inches high so I could get in and out and do things without losing chicks. This was in January when we put the chicks in so it was really cold but the adjustable height heat lamps, the broody hen and the enclosed insulted panels kept it really nice and warm. When they were big enough to choose whether they wanted the heat or the barn we walled off a section of the barn 10 feet by 20 feet and left an 8 foot opening that had fencing on it so they could run in their space and not get lost in the barn. When they started sleeping away from the heat we turned them off. We have always brooded chicks in the old standard way using the cramped and crowded metal box/cage. We would hatch them out and then transfer them. After a couple of weeks we would transfer them to a bigger pen and when they were a couple of months old they went to the barn. It wasn't the best way. Chicks were lost. It was a pain for them and a pain for us because of the cramped quarters and problematic access. This year we changed all that. What better place to brood the chicks than in the barn and let them see and be seen by the other chickens so there would be no adjustment period? We had the plans and were buying the lumber when we found the clearance rack. These were on sale. Marked down from $70.00 each to $20.00 each This is a 6 foot by 6 foot plastic fence panel. It is double walled so it is insulated. We bought six. We used four for the brooder ROOM. Three walls and one pane for a hinged door. We put chicken wire 24 inches high inside the door so we could open the door, go inside and do everything that was needed with no chicks leaving. The roof of the room is plywood with two infrared heat lamps suspended on adjustable ropes. There is also a small white light so they can see better There is a water tray made from gutter against the back wall that is fed by chicken watering nipples. There is a 6 pound capacity chick feeder The floor in the back 2 feet is thick dirt. The front 4 feet is thick hay. We just happened to have a broody bantam silkie who was setting on two eggs. We put 48 day old chicks in the brooder and shut the door. We removed the Silkie's eggs and replaced them with two chicks. Six hours later we put her inside the brooder with the rest of the chicks. After the chicks got big enough so they couldn't slip through the chicken wire we would leave the door part way open for socialisation for a couple of hours a day. We never lost a single chick and these are the most socialised chicks ever. They learned everything from 'mama' and were not afraid of the big chickens when they came out of their house. The big chickens were actually hiding from them. That was four months ago and now they roam the pasture like crazy but still make it difficult to walk when you go to the barn. Brooder picture The fourth panel is hinged in the front to use as a door, This picture was taken as I was assembling it. AfterI finished inside I attached chicken wire across the front 24 inches high so I could get in and out and do things without losing chicks. This was in January when we put the chicks in so it was really cold but the adjustable height heat lamps, the broody hen and the enclosed insulted panels kept it really nice and warm. When they were big enough to choose whether they wanted the heat or the barn we walled off a section of the barn 10 feet by 20 feet and left an 8 foot opening that had fencing on it so they could run in their space and not get lost in the barn. When they started sleeping away from the heat we turned them off. We have always brooded chicks in the old standard way using the cramped and crowded metal box/cage. We would hatch them out and then transfer them. After a couple of weeks we would transfer them to a bigger pen and when they were a couple of months old they went to the barn. It wasn't the best way. Chicks were lost. It was a pain for them and a pain for us because of the cramped quarters and problematic access. This year we changed all that. What better place to brood the chicks than in the barn and let them see and be seen by the other chickens so there would be no adjustment period? We had the plans and were buying the lumber when we found the clearance rack. These were on sale. Marked down from $70.00 each to $20.00 each This is a 6 foot by 6 foot plastic fence panel. It is double walled so it is insulated. We bought six. We used four for the brooder ROOM. Three walls and one pane for a hinged door. We put chicken wire 24 inches high inside the door so we could open the door, go inside and do everything that was needed with no chicks leaving. The roof of the room is plywood with two infrared heat lamps suspended on adjustable ropes. There is also a small white light so they can see better There is a water tray made from gutter against the back wall that is fed by chicken watering nipples. There is a 6 pound capacity chick feeder The floor in the back 2 feet is thick dirt. The front 4 feet is thick hay. We just happened to have a broody bantam silkie who was setting on two eggs. We put 48 day old chicks in the brooder and shut the door. We removed the Silkie's eggs and replaced them with two chicks. Six hours later we put her inside the brooder with the rest of the chicks. After the chicks got big enough so they couldn't slip through the chicken wire we would leave the door part way open for socialisation for a couple of hours a day. We never lost a single chick and these are the most socialised chicks ever. They learned everything from 'mama' and were not afraid of the big chickens when they came out of their house. The big chickens were actually hiding from them. That was four months ago and now they roam the pasture like crazy but still make it difficult to walk when you go to the barn. Brooder picture The fourth panel is hinged in the front to use as a door, This picture was taken as I was assembling it. AfterI finished inside I attached chicken wire across the front 24 inches high so I could get in and out and do things without losing chicks. This was in January when we put the chicks in so it was really cold but the adjustable height heat lamps, the broody hen and the enclosed insulted panels kept it really nice and warm. When they were big enough to choose whether they wanted the heat or the barn we walled off a section of the barn 10 feet by 20 feet and left an 8 foot opening that had fencing on it so they could run in their space and not get lost in the barn. When they started sleeping away from the heat we turned them off. We have always brooded chicks in the old standard way using the cramped and crowded metal box/cage. We would hatch them out and then transfer them. After a couple of weeks we would transfer them to a bigger pen and when they were a couple of months old they went to the barn. It wasn't the best way. Chicks were lost. It was a pain for them and a pain for us because of the cramped quarters and problematic access. This year we changed all that. What better place to brood the chicks than in the barn and let them see and be seen by the other chickens so there would be no adjustment period? We had the plans and were buying the lumber when we found the clearance rack. These were on sale. Marked down from $70.00 each to $20.00 each This is a 6 foot by 6 foot plastic fence panel. It is double walled so it is insulated. We bought six. We used four for the brooder ROOM. Three walls and one pane for a hinged door. We put chicken wire 24 inches high inside the door so we could open the door, go inside and do everything that was needed with no chicks leaving. The roof of the room is plywood with two infrared heat lamps suspended on adjustable ropes. There is also a small white light so they can see better There is a water tray made from gutter against the back wall that is fed by chicken watering nipples. There is a 6 pound capacity chick feeder The floor in the back 2 feet is thick dirt. The front 4 feet is thick hay. We just happened to have a broody bantam silkie who was setting on two eggs. We put 48 day old chicks in the brooder and shut the door. We removed the Silkie's eggs and replaced them with two chicks. Six hours later we put her inside the brooder with the rest of the chicks. After the chicks got big enough so they couldn't slip through the chicken wire we would leave the door part way open for socialisation for a couple of hours a day. We never lost a single chick and these are the most socialised chicks ever. They learned everything from 'mama' and were not afraid of the big chickens when they came out of their house. The big chickens were actually hiding from them. That was four months ago and now they roam the pasture like crazy but still make it difficult to walk when you go to the barn. Brooder picture The fourth panel is hinged in the front to use as a door, This picture was taken as I was assembling it. AfterI finished inside I attached chicken wire across the front 24 inches high so I could get in and out and do things without losing chicks. This was in January when we put the chicks in so it was really cold but the adjustable height heat lamps, the broody hen and the enclosed insulted panels kept it really nice and warm. When they were big enough to choose whether they wanted the heat or the barn we walled off a section of the barn 10 feet by 20 feet and left an 8 foot opening that had fencing on it so they could run in their space and not get lost in the barn. When they started sleeping away from the heat we turned them off. We have always brooded chicks in the old standard way using the cramped and crowded metal box/cage. We would hatch them out and then transfer them. After a couple of weeks we would transfer them to a bigger pen and when they were a couple of months old they went to the barn. It wasn't the best way. Chicks were lost. It was a pain for them and a pain for us because of the cramped quarters and problematic access. This year we changed all that. What better place to brood the chicks than in the barn and let them see and be seen by the other chickens so there would be no adjustment period? We had the plans and were buying the lumber when we found the clearance rack. These were on sale. Marked down from $70.00 each to $20.00 each This is a 6 foot by 6 foot plastic fence panel. It is double walled so it is insulated. We bought six. We used four for the brooder ROOM. Three walls and one pane for a hinged door. We put chicken wire 24 inches high inside the door so we could open the door, go inside and do everything that was needed with no chicks leaving. The roof of the room is plywood with two infrared heat lamps suspended on adjustable ropes. There is also a small white light so they can see better There is a water tray made from gutter against the back wall that is fed by chicken watering nipples. There is a 6 pound capacity chick feeder The floor in the back 2 feet is thick dirt. The front 4 feet is thick hay. We just happened to have a broody bantam silkie who was setting on two eggs. We put 48 day old chicks in the brooder and shut the door. We removed the Silkie's eggs and replaced them with two chicks. Six hours later we put her inside the brooder with the rest of the chicks. After the chicks got big enough so they couldn't slip through the chicken wire we would leave the door part way open for socialisation for a couple of hours a day. We never lost a single chick and these are the most socialised chicks ever. They learned everything from 'mama' and were not afraid of the big chickens when they came out of their house. The big chickens were actually hiding from them. That was four months ago and now they roam the pasture like crazy but still make it difficult to walk when you go to the barn. Brooder picture The fourth panel is hinged in the front to use as a door, This picture was taken as I was assembling it. AfterI finished inside I attached chicken wire across the front 24 inches high so I could get in and out and do things without losing chicks. This was in January when we put the chicks in so it was really cold but the adjustable height heat lamps, the broody hen and the enclosed insulted panels kept it really nice and warm. When they were big enough to choose whether they wanted the heat or the barn we walled off a section of the barn 10 feet by 20 feet and left an 8 foot opening that had fencing on it so they could run in their space and not get lost in the barn. When they started sleeping away from the heat we turned them off. We have always brooded chicks in the old standard way using the cramped and crowded metal box/cage. We would hatch them out and then transfer them. After a couple of weeks we would transfer them to a bigger pen and when they were a couple of months old they went to the barn. It wasn't the best way. Chicks were lost. It was a pain for them and a pain for us because of the cramped quarters and problematic access. This year we changed all that. What better place to brood the chicks than in the barn and let them see and be seen by the other chickens so there would be no adjustment period? We had the plans and were buying the lumber when we found the clearance rack. These were on sale. Marked down from $70.00 each to $20.00 each This is a 6 foot by 6 foot plastic fence panel. It is double walled so it is insulated. We bought six. We used four for the brooder ROOM. Three walls and one pane for a hinged door. We put chicken wire 24 inches high inside the door so we could open the door, go inside and do everything that was needed with no chicks leaving. The roof of the room is plywood with two infrared heat lamps suspended on adjustable ropes. There is also a small white light so they can see better There is a water tray made from gutter against the back wall that is fed by chicken watering nipples. There is a 6 pound capacity chick feeder The floor in the back 2 feet is thick dirt. The front 4 feet is thick hay. We just happened to have a broody bantam silkie who was setting on two eggs. We put 48 day old chicks in the brooder and shut the door. We removed the Silkie's eggs and replaced them with two chicks. Six hours later we put her inside the brooder with the rest of the chicks. After the chicks got big enough so they couldn't slip through the chicken wire we would leave the door part way open for socialisation for a couple of hours a day. We never lost a single chick and these are the most socialised chicks ever. They learned everything from 'mama' and were not afraid of the big chickens when they came out of their house. The big chickens were actually hiding from them. That was four months ago and now they roam the pasture like crazy but still make it difficult to walk when you go to the barn. Brooder picture The fourth panel is hinged in the front to use as a door, This picture was taken as I was assembling it. AfterI finished inside I attached chicken wire across the front 24 inches high so I could get in and out and do things without losing chicks. This was in January when we put the chicks in so it was really cold but the adjustable height heat lamps, the broody hen and the enclosed insulted panels kept it really nice and warm. When they were big enough to choose whether they wanted the heat or the barn we walled off a section of the barn 10 feet by 20 feet and left an 8 foot opening that had fencing on it so they could run in their space and not get lost in the barn. When they started sleeping away from the heat we turned them off. We have always brooded chicks in the old standard way using the cramped and crowded metal box/cage. We would hatch them out and then transfer them. After a couple of weeks we would transfer them to a bigger pen and when they were a couple of months old they went to the barn. It wasn't the best way. Chicks were lost. It was a pain for them and a pain for us because of the cramped quarters and problematic access. This year we changed all that. What better place to brood the chicks than in the barn and let them see and be seen by the other chickens so there would be no adjustment period? We had the plans and were buying the lumber when we found the clearance rack. These were on sale. Marked down from $70.00 each to $20.00 each This is a 6 foot by 6 foot plastic fence panel. It is double walled so it is insulated. We bought six. We used four for the brooder ROOM. Three walls and one pane for a hinged door. We put chicken wire 24 inches high inside the door so we could open the door, go inside and do everything that was needed with no chicks leaving. The roof of the room is plywood with two infrared heat lamps suspended on adjustable ropes. There is also a small white light so they can see better There is a water tray made from gutter against the back wall that is fed by chicken watering nipples. There is a 6 pound capacity chick feeder The floor in the back 2 feet is thick dirt. The front 4 feet is thick hay. We just happened to have a broody bantam silkie who was setting on two eggs. We put 48 day old chicks in the brooder and shut the door. We removed the Silkie's eggs and replaced them with two chicks. Six hours later we put her inside the brooder with the rest of the chicks. After the chicks got big enough so they couldn't slip through the chicken wire we would leave the door part way open for socialisation for a couple of hours a day. We never lost a single chick and these are the most socialised chicks ever. They learned everything from 'mama' and were not afraid of the big chickens when they came out of their house. The big chickens were actually hiding from them. That was four months ago and now they roam the pasture like crazy but still make it difficult to walk when you go to the barn. Brooder picture The fourth panel is hinged in the front to use as a door, This picture was taken as I was assembling it. AfterI finished inside I attached chicken wire across the front 24 inches high so I could get in and out and do things without losing chicks. This was in January when we put the chicks in so it was really cold but the adjustable height heat lamps, the broody hen and the enclosed insulted panels kept it really nice and warm. When they were big enough to choose whether they wanted the heat or the barn we walled off a section of the barn 10 feet by 20 feet and left an 8 foot opening that had fencing on it so they could run in their space and not get lost in the barn. When they started sleeping away from the heat we turned them off. We have always brooded chicks in the old standard way using the cramped and crowded metal box/cage. We would hatch them out and then transfer them. After a couple of weeks we would transfer them to a bigger pen and when they were a couple of months old they went to the barn. It wasn't the best way. Chicks were lost. It was a pain for them and a pain for us because of the cramped quarters and problematic access. This year we changed all that. What better place to brood the chicks than in the barn and let them see and be seen by the other chickens so there would be no adjustment period? We had the plans and were buying the lumber when we found the clearance rack. These were on sale. Marked down from $70.00 each to $20.00 each This is a 6 foot by 6 foot plastic fence panel. It is double walled so it is insulated. We bought six. We used four for the brooder ROOM. Three walls and one pane for a hinged door. We put chicken wire 24 inches high inside the door so we could open the door, go inside and do everything that was needed with no chicks leaving. The roof of the room is plywood with two infrared heat lamps suspended on adjustable ropes. There is also a small white light so they can see better There is a water tray made from gutter against the back wall that is fed by chicken watering nipples. There is a 6 pound capacity chick feeder The floor in the back 2 feet is thick dirt. The front 4 feet is thick hay. We just happened to have a broody bantam silkie who was setting on two eggs. We put 48 day old chicks in the brooder and shut the door. We removed the Silkie's eggs and replaced them with two chicks. Six hours later we put her inside the brooder with the rest of the chicks. After the chicks got big enough so they couldn't slip through the chicken wire we would leave the door part way open for socialisation for a couple of hours a day. We never lost a single chick and these are the most socialised chicks ever. They learned everything from 'mama' and were not afraid of the big chickens when they came out of their house. The big chickens were actually hiding from them. That was four months ago and now they roam the pasture like crazy but still make it difficult to walk when you go to the barn. Brooder picture The fourth panel is hinged in the front to use as a door, This picture was taken as I was assembling it. AfterI finished inside I attached chicken wire across the front 24 inches high so I could get in and out and do things without losing chicks. This was in January when we put the chicks in so it was really cold but the adjustable height heat lamps, the broody hen and the enclosed insulted panels kept it really nice and warm. When they were big enough to choose whether they wanted the heat or the barn we walled off a section of the barn 10 feet by 20 feet and left an 8 foot opening that had fencing on it so they could run in their space and not get lost in the barn. When they started sleeping away from the heat we turned them off. We have always brooded chicks in the old standard way using the cramped and crowded metal box/cage. We would hatch them out and then transfer them. After a couple of weeks we would transfer them to a bigger pen and when they were a couple of months old they went to the barn. It wasn't the best way. Chicks were lost. It was a pain for them and a pain for us because of the cramped quarters and problematic access. This year we changed all that. What better place to brood the chicks than in the barn and let them see and be seen by the other chickens so there would be no adjustment period? We had the plans and were buying the lumber when we found the clearance rack. These were on sale. Marked down from $70.00 each to $20.00 each This is a 6 foot by 6 foot plastic fence panel. It is double walled so it is insulated. We bought six. We used four for the brooder ROOM. Three walls and one pane for a hinged door. We put chicken wire 24 inches high inside the door so we could open the door, go inside and do everything that was needed with no chicks leaving. The roof of the room is plywood with two infrared heat lamps suspended on adjustable ropes. There is also a small white light so they can see better There is a water tray made from gutter against the back wall that is fed by chicken watering nipples. There is a 6 pound capacity chick feeder The floor in the back 2 feet is thick dirt. The front 4 feet is thick hay. We just happened to have a broody bantam silkie who was setting on two eggs. We put 48 day old chicks in the brooder and shut the door. We removed the Silkie's eggs and replaced them with two chicks. Six hours later we put her inside the brooder with the rest of the chicks. After the chicks got big enough so they couldn't slip through the chicken wire we would leave the door part way open for socialisation for a couple of hours a day. We never lost a single chick and these are the most socialised chicks ever. They learned everything from 'mama' and were not afraid of the big chickens when they came out of their house. The big chickens were actually hiding from them. That was four months ago and now they roam the pasture like crazy but still make it difficult to walk when you go to the barn. Brooder picture The fourth panel is hinged in the front to use as a door, This picture was taken as I was assembling it. AfterI finished inside I attached chicken wire across the front 24 inches high so I could get in and out and do things without losing chicks. This was in January when we put the chicks in so it was really cold but the adjustable height heat lamps, the broody hen and the enclosed insulted panels kept it really nice and warm. When they were big enough to choose whether they wanted the heat or the barn we walled off a section of the barn 10 feet by 20 feet and left an 8 foot opening that had fencing on it so they could run in their space and not get lost in the barn. When they started sleeping away from the heat we turned them off. We have always brooded chicks in the old standard way using the cramped and crowded metal box/cage. We would hatch them out and then transfer them. After a couple of weeks we would transfer them to a bigger pen and when they were a couple of months old they went to the barn. It wasn't the best way. Chicks were lost. It was a pain for them and a pain for us because of the cramped quarters and problematic access. This year we changed all that. What better place to brood the chicks than in the barn and let them see and be seen by the other chickens so there would be no adjustment period? We had the plans and were buying the lumber when we found the clearance rack. These were on sale. Marked down from $70.00 each to $20.00 each This is a 6 foot by 6 foot plastic fence panel. It is double walled so it is insulated. We bought six. We used four for the brooder ROOM. Three walls and one pane for a hinged door. We put chicken wire 24 inches high inside the door so we could open the door, go inside and do everything that was needed with no chicks leaving. The roof of the room is plywood with two infrared heat lamps suspended on adjustable ropes. There is also a small white light so they can see better There is a water tray made from gutter against the back wall that is fed by chicken watering nipples. There is a 6 pound capacity chick feeder The floor in the back 2 feet is thick dirt. The front 4 feet is thick hay. We just happened to have a broody bantam silkie who was setting on two eggs. We put 48 day old chicks in the brooder and shut the door. We removed the Silkie's eggs and replaced them with two chicks. Six hours later we put her inside the brooder with the rest of the chicks. After the chicks got big enough so they couldn't slip through the chicken wire we would leave the door part way open for socialisation for a couple of hours a day. We never lost a single chick and these are the most socialised chicks ever. They learned everything from 'mama' and were not afraid of the big chickens when they came out of their house. The big chickens were actually hiding from them. That was four months ago and now they roam the pasture like crazy but still make it difficult to walk when you go to the barn. Brooder picture The fourth panel is hinged in the front to use as a door, This picture was taken as I was assembling it. AfterI finished inside I attached chicken wire across the front 24 inches high so I could get in and out and do things without losing chicks. This was in January when we put the chicks in so it was really cold but the adjustable height heat lamps, the broody hen and the enclosed insulted panels kept it really nice and warm. When they were big enough to choose whether they wanted the heat or the barn we walled off a section of the barn 10 feet by 20 feet and left an 8 foot opening that had fencing on it so they could run in their space and not get lost in the barn. When they started sleeping away from the heat we turned them off. We have always brooded chicks in the old standard way using the cramped and crowded metal box/cage. We would hatch them out and then transfer them. After a couple of weeks we would transfer them to a bigger pen and when they were a couple of months old they went to the barn. It wasn't the best way. Chicks were lost. It was a pain for them and a pain for us because of the cramped quarters and problematic access. This year we changed all that. What better place to brood the chicks than in the barn and let them see and be seen by the other chickens so there would be no adjustment period? We had the plans and were buying the lumber when we found the clearance rack. These were on sale. Marked down from $70.00 each to $20.00 each This is a 6 foot by 6 foot plastic fence panel. It is double walled so it is insulated. We bought six. We used four for the brooder ROOM. Three walls and one pane for a hinged door. We put chicken wire 24 inches high inside the door so we could open the door, go inside and do everything that was needed with no chicks leaving. The roof of the room is plywood with two infrared heat lamps suspended on adjustable ropes. There is also a small white light so they can see better There is a water tray made from gutter against the back wall that is fed by chicken watering nipples. There is a 6 pound capacity chick feeder The floor in the back 2 feet is thick dirt. The front 4 feet is thick hay. We just happened to have a broody bantam silkie who was setting on two eggs. We put 48 day old chicks in the brooder and shut the door. We removed the Silkie's eggs and replaced them with two chicks. Six hours later we put her inside the brooder with the rest of the chicks. After the chicks got big enough so they couldn't slip through the chicken wire we would leave the door part way open for socialisation for a couple of hours a day. We never lost a single chick and these are the most socialised chicks ever. They learned everything from 'mama' and were not afraid of the big chickens when they came out of their house. The big chickens were actually hiding from them. That was four months ago and now they roam the pasture like crazy but still make it difficult to walk when you go to the barn. Brooder picture The fourth panel is hinged in the front to use as a door, This picture was taken as I was assembling it. AfterI finished inside I attached chicken wire across the front 24 inches high so I could get in and out and do things without losing chicks. This was in January when we put the chicks in so it was really cold but the adjustable height heat lamps, the broody hen and the enclosed insulted panels kept it really nice and warm. When they were big enough to choose whether they wanted the heat or the barn we walled off a section of the barn 10 feet by 20 feet and left an 8 foot opening that had fencing on it so they could run in their space and not get lost in the barn. When they started sleeping away from the heat we turned them off. We have always brooded chicks in the old standard way using the cramped and crowded metal box/cage. We would hatch them out and then transfer them. After a couple of weeks we would transfer them to a bigger pen and when they were a couple of months old they went to the barn. It wasn't the best way. Chicks were lost. It was a pain for them and a pain for us because of the cramped quarters and problematic access. This year we changed all that. What better place to brood the chicks than in the barn and let them see and be seen by the other chickens so there would be no adjustment period? We had the plans and were buying the lumber when we found the clearance rack. These were on sale. Marked down from $70.00 each to $20.00 each This is a 6 foot by 6 foot plastic fence panel. It is double walled so it is insulated. We bought six. We used four for the brooder ROOM. Three walls and one pane for a hinged door. We put chicken wire 24 inches high inside the door so we could open the door, go inside and do everything that was needed with no chicks leaving. The roof of the room is plywood with two infrared heat lamps suspended on adjustable ropes. There is also a small white light so they can see better There is a water tray made from gutter against the back wall that is fed by chicken watering nipples. There is a 6 pound capacity chick feeder The floor in the back 2 feet is thick dirt. The front 4 feet is thick hay. We just happened to have a broody bantam silkie who was setting on two eggs. We put 48 day old chicks in the brooder and shut the door. We removed the Silkie's eggs and replaced them with two chicks. Six hours later we put her inside the brooder with the rest of the chicks. After the chicks got big enough so they couldn't slip through the chicken wire we would leave the door part way open for socialisation for a couple of hours a day. We never lost a single chick and these are the most socialised chicks ever. They learned everything from 'mama' and were not afraid of the big chickens when they came out of their house. The big chickens were actually hiding from them. That was four months ago and now they roam the pasture like crazy but still make it difficult to walk when you go to the barn. Brooder picture The fourth panel is hinged in the front to use as a door, This picture was taken as I was assembling it. AfterI finished inside I attached chicken wire across the front 24 inches high so I could get in and out and do things without losing chicks. This was in January when we put the chicks in so it was really cold but the adjustable height heat lamps, the broody hen and the enclosed insulted panels kept it really nice and warm. When they were big enough to choose whether they wanted the heat or the barn we walled off a section of the barn 10 feet by 20 feet and left an 8 foot opening that had fencing on it so they could run in their space and not get lost in the barn. When they started sleeping away from the heat we turned them off. We have always brooded chicks in the old standard way using the cramped and crowded metal box/cage. We would hatch them out and then transfer them. After a couple of weeks we would transfer them to a bigger pen and when they were a couple of months old they went to the barn. It wasn't the best way. Chicks were lost. It was a pain for them and a pain for us because of the cramped quarters and problematic access. This year we changed all that. What better place to brood the chicks than in the barn and let them see and be seen by the other chickens so there would be no adjustment period? We had the plans and were buying the lumber when we found the clearance rack. These were on sale. Marked down from $70.00 each to $20.00 each This is a 6 foot by 6 foot plastic fence panel. It is double walled so it is insulated. We bought six. We used four for the brooder ROOM. Three walls and one pane for a hinged door. We put chicken wire 24 inches high inside the door so we could open the door, go inside and do everything that was needed with no chicks leaving. The roof of the room is plywood with two infrared heat lamps suspended on adjustable ropes. There is also a small white light so they can see better There is a water tray made from gutter against the back wall that is fed by chicken watering nipples. There is a 6 pound capacity chick feeder The floor in the back 2 feet is thick dirt. The front 4 feet is thick hay. We just happened to have a broody bantam silkie who was setting on two eggs. We put 48 day old chicks in the brooder and shut the door. We removed the Silkie's eggs and replaced them with two chicks. Six hours later we put her inside the brooder with the rest of the chicks. After the chicks got big enough so they couldn't slip through the chicken wire we would leave the door part way open for socialisation for a couple of hours a day. We never lost a single chick and these are the most socialised chicks ever. They learned everything from 'mama' and were not afraid of the big chickens when they came out of their house. The big chickens were actually hiding from them. That was four months ago and now they roam the pasture like crazy but still make it difficult to walk when you go to the barn. Brooder picture The fourth panel is hinged in the front to use as a door, This picture was taken as I was assembling it. AfterI finished inside I attached chicken wire across the front 24 inches high so I could get in and out and do things without losing chicks. This was in January when we put the chicks in so it was really cold but the adjustable height heat lamps, the broody hen and the enclosed insulted panels kept it really nice and warm. When they were big enough to choose whether they wanted the heat or the barn we walled off a section of the barn 10 feet by 20 feet and left an 8 foot opening that had fencing on it so they could run in their space and not get lost in the barn. When they started sleeping away from the heat we turned them off. We have always brooded chicks in the old standard way using the cramped and crowded metal box/cage. We would hatch them out and then transfer them. After a couple of weeks we would transfer them to a bigger pen and when they were a couple of months old they went to the barn. It wasn't the best way. Chicks were lost. It was a pain for them and a pain for us because of the cramped quarters and problematic access. This year we changed all that. What better place to brood the chicks than in the barn and let them see and be seen by the other chickens so there would be no adjustment period? We had the plans and were buying the lumber when we found the clearance rack. These were on sale. Marked down from $70.00 each to $20.00 each This is a 6 foot by 6 foot plastic fence panel. It is double walled so it is insulated. We bought six. We used four for the brooder ROOM. Three walls and one pane for a hinged door. We put chicken wire 24 inches high inside the door so we could open the door, go inside and do everything that was needed with no chicks leaving. The roof of the room is plywood with two infrared heat lamps suspended on adjustable ropes. There is also a small white light so they can see better There is a water tray made from gutter against the back wall that is fed by chicken watering nipples. There is a 6 pound capacity chick feeder The floor in the back 2 feet is thick dirt. The front 4 feet is thick hay. We just happened to have a broody bantam silkie who was setting on two eggs. We put 48 day old chicks in the brooder and shut the door. We removed the Silkie's eggs and replaced them with two chicks. Six hours later we put her inside the brooder with the rest of the chicks. After the chicks got big enough so they couldn't slip through the chicken wire we would leave the door part way open for socialisation for a couple of hours a day. We never lost a single chick and these are the most socialised chicks ever. They learned everything from 'mama' and were not afraid of the big chickens when they came out of their house. The big chickens were actually hiding from them. That was four months ago and now they roam the pasture like crazy but still make it difficult to walk when you go to the barn. Brooder picture The fourth panel is hinged in the front to use as a door, This picture was taken as I was assembling it. AfterI finished inside I attached chicken wire across the front 24 inches high so I could get in and out and do things without losing chicks. This was in January when we put the chicks in so it was really cold but the adjustable height heat lamps, the broody hen and the enclosed insulted panels kept it really nice and warm. When they were big enough to choose whether they wanted the heat or the barn we walled off a section of the barn 10 feet by 20 feet and left an 8 foot opening that had fencing on it so they could run in their space and not get lost in the barn. When they started sleeping away from the heat we turned them off. We have always brooded chicks in the old standard way using the cramped and crowded metal box/cage. We would hatch them out and then transfer them. After a couple of weeks we would transfer them to a bigger pen and when they were a couple of months old they went to the barn. It wasn't the best way. Chicks were lost. It was a pain for them and a pain for us because of the cramped quarters and problematic access. This year we changed all that. What better place to brood the chicks than in the barn and let them see and be seen by the other chickens so there would be no adjustment period? We had the plans and were buying the lumber when we found the clearance rack. These were on sale. Marked down from $70.00 each to $20.00 each This is a 6 foot by 6 foot plastic fence panel. It is double walled so it is insulated. We bought six. We used four for the brooder ROOM. Three walls and one pane for a hinged door. We put chicken wire 24 inches high inside the door so we could open the door, go inside and do everything that was needed with no chicks leaving. The roof of the room is plywood with two infrared heat lamps suspended on adjustable ropes. There is also a small white light so they can see better There is a water tray made from gutter against the back wall that is fed by chicken watering nipples. There is a 6 pound capacity chick feeder The floor in the back 2 feet is thick dirt. The front 4 feet is thick hay. We just happened to have a broody bantam silkie who was setting on two eggs. We put 48 day old chicks in the brooder and shut the door. We removed the Silkie's eggs and replaced them with two chicks. Six hours later we put her inside the brooder with the rest of the chicks. After the chicks got big enough so they couldn't slip through the chicken wire we would leave the door part way open for socialisation for a couple of hours a day. We never lost a single chick and these are the most socialised chicks ever. They learned everything from 'mama' and were not afraid of the big chickens when they came out of their house. The big chickens were actually hiding from them. That was four months ago and now they roam the pasture like crazy but still make it difficult to walk when you go to the barn. Brooder picture The fourth panel is hinged in the front to use as a door, This picture was taken as I was assembling it. AfterI finished inside I attached chicken wire across the front 24 inches high so I could get in and out and do things without losing chicks. This was in January when we put the chicks in so it was really cold but the adjustable height heat lamps, the broody hen and the enclosed insulted panels kept it really nice and warm. When they were big enough to choose whether they wanted the heat or the barn we walled off a section of the barn 10 feet by 20 feet and left an 8 foot opening that had fencing on it so they could run in their space and not get lost in the barn. When they started sleeping away from the heat we turned them off. We have always brooded chicks in the old standard way using the cramped and crowded metal box/cage. We would hatch them out and then transfer them. After a couple of weeks we would transfer them to a bigger pen and when they were a couple of months old they went to the barn. It wasn't the best way. Chicks were lost. It was a pain for them and a pain for us because of the cramped quarters and problematic access. This year we changed all that. What better place to brood the chicks than in the barn and let them see and be seen by the other chickens so there would be no adjustment period? We had the plans and were buying the lumber when we found the clearance rack. These were on sale. Marked down from $70.00 each to $20.00 each This is a 6 foot by 6 foot plastic fence panel. It is double walled so it is insulated. We bought six. We used four for the brooder ROOM. Three walls and one pane for a hinged door. We put chicken wire 24 inches high inside the door so we could open the door, go inside and do everything that was needed with no chicks leaving. The roof of the room is plywood with two infrared heat lamps suspended on adjustable ropes. There is also a small white light so they can see better There is a water tray made from gutter against the back wall that is fed by chicken watering nipples. There is a 6 pound capacity chick feeder The floor in the back 2 feet is thick dirt. The front 4 feet is thick hay. We just happened to have a broody bantam silkie who was setting on two eggs. We put 48 day old chicks in the brooder and shut the door. We removed the Silkie's eggs and replaced them with two chicks. Six hours later we put her inside the brooder with the rest of the chicks. After the chicks got big enough so they couldn't slip through the chicken wire we would leave the door part way open for socialisation for a couple of hours a day. We never lost a single chick and these are the most socialised chicks ever. They learned everything from 'mama' and were not afraid of the big chickens when they came out of their house. The big chickens were actually hiding from them. That was four months ago and now they roam the pasture like crazy but still make it difficult to walk when you go to the barn. Brooder picture The fourth panel is hinged in the front to use as a door, This picture was taken as I was assembling it. AfterI finished inside I attached chicken wire across the front 24 inches high so I could get in and out and do things without losing chicks. This was in January when we put the chicks in so it was really cold but the adjustable height heat lamps, the broody hen and the enclosed insulted panels kept it really nice and warm. When they were big enough to choose whether they wanted the heat or the barn we walled off a section of the barn 10 feet by 20 feet and left an 8 foot opening that had fencing on it so they could run in their space and not get lost in the barn. When they started sleeping away from the heat we turned them off. We have always brooded chicks in the old standard way using the cramped and crowded metal box/cage. We would hatch them out and then transfer them. After a couple of weeks we would transfer them to a bigger pen and when they were a couple of months old they went to the barn. It wasn't the best way. Chicks were lost. It was a pain for them and a pain for us because of the cramped quarters and problematic access. This year we changed all that. What better place to brood the chicks than in the barn and let them see and be seen by the other chickens so there would be no adjustment period? We had the plans and were buying the lumber when we found the clearance rack. These were on sale. Marked down from $70.00 each to $20.00 each This is a 6 foot by 6 foot plastic fence panel. It is double walled so it is insulated. We bought six. We used four for the brooder ROOM. Three walls and one pane for a hinged door. We put chicken wire 24 inches high inside the door so we could open the door, go inside and do everything that was needed with no chicks leaving. The roof of the room is plywood with two infrared heat lamps suspended on adjustable ropes. There is also a small white light so they can see better There is a water tray made from gutter against the back wall that is fed by chicken watering nipples. There is a 6 pound capacity chick feeder The floor in the back 2 feet is thick dirt. The front 4 feet is thick hay. We just happened to have a broody bantam silkie who was setting on two eggs. We put 48 day old chicks in the brooder and shut the door. We removed the Silkie's eggs and replaced them with two chicks. Six hours later we put her inside the brooder with the rest of the chicks. After the chicks got big enough so they couldn't slip through the chicken wire we would leave the door part way open for socialisation for a couple of hours a day. We never lost a single chick and these are the most socialised chicks ever. They learned everything from 'mama' and were not afraid of the big chickens when they came out of their house. The big chickens were actually hiding from them. That was four months ago and now they roam the pasture like crazy but still make it difficult to walk when you go to the barn. Brooder picture The fourth panel is hinged in the front to use as a door, This picture was taken as I was assembling it. After I finished inside I attached chicken wire across the front 24 inches high so I could get in and out and do things without losing chicks. This was in January when we put the chicks in so it was really cold but the adjustable height heat lamps, the broody hen and the enclosed insulted panels kept it really nice and warm. When they were big enough to choose whether they wanted the heat or the barn we walled off a section of the barn 10 feet by 20 feet and left an 8 foot opening that had fencing on it so they could run in their space and not get lost in the barn. When they started sleeping away from the heat we turned them off. We haven't done large batches of chicks since but every time a hen starts setting we plop her in here to keep the other chickens away so the chicks can get big enough with mama's attention to come out into the real world
I tried this awhile ago and it went crazy for 20 minutes and posted a blank????? We have always brooded chicks in the old standard way using the cramped and crowded metal box/cage.
We would hatch them out and then transfer them. After a couple of weeks we would transfer them to a bigger pen and when they were a couple of months old they went to the barn.
It wasn't the best way. Chicks were lost. It was a pain for them and a pain for us because of the cramped quarters and problematic access.
This year we changed all that. What better place to brood the chicks than in the barn and let them see and be seen by the other chickens so there would be no adjustment period?
We had the plans and were buying the lumber when we found the clearance rack. These were on sale. Marked down from $70.00 each to $20.00 each
This is a 6 foot by 6 foot plastic fence panel. It is double walled so it is insulated. We bought six.
We used four for the brooder ROOM. Three walls and one pane for a hinged door. We put chicken wire 24 inches high inside the door so we could open the door, go inside and do everything that was needed with no chicks leaving.
The roof of the room is plywood with two infrared heat lamps suspended on adjustable ropes.
There is also a small white light so they can see better
There is a water tray made from gutter against the back wall that is fed by chicken watering nipples.
There is a 6 pound capacity chick feeder
The floor in the back 2 feet is thick dirt.
The front 4 feet is thick hay.
We just happened to have a broody bantam silkie who was setting on two eggs.
We put 48 day old chicks in the brooder and shut the door.
We removed the Silkie's eggs and replaced them with two chicks.
Six hours later we put her inside the brooder with the rest of the chicks.
After the chicks got big enough so they couldn't slip through the chicken wire we would leave the door part way open for socialisation for a couple of hours a day.
We never lost a single chick and these are the most socialised chicks ever. They learned everything from 'mama' and were not afraid of the big chickens when they came out of their house.
The big chickens were actually hiding from them.
That was four months ago and now they roam the pasture like crazy but still make it difficult to walk when you go to the barn.
Brooder picture
The fourth panel is hinged in the front to use as a door, This picture was taken as I was assembling it. AfterI finished inside I attached chicken wire across the front 24 inches high so I could get in and out and do things without losing chicks. This was in January when we put the chicks in so it was really cold but the adjustable height heat lamps, the broody hen and the enclosed insulted panels kept it really nice and warm. When they were big enough to choose whether they wanted the heat or the barn we walled off a section of the barn 10 feet by 20 feet and left an 8 foot opening that had fencing on it so they could run in their space and not get lost in the barn. When they started sleeping away from the heat we turned them off.
Right now we only use it for setting hens to keep the rest of the flock away
My brooder is SUPER simple. I took that roll of cardboard McMurray sends in their starter kit. Cut it in half. Taped the two halves together to double the height and then made a circle and taped it together. It makes a fairly high sided good sized circle. Filled the circle with pine shavings, hung the brooder lamp over it but off to the side and that was it. I am hoping this can contain them
until they are ready to go outside in a couple weeks. They are almost 3 weeks old now. We were going to borrow a lumber/wire brooder from friends but neither of us owns a vehicle large enough to move it.

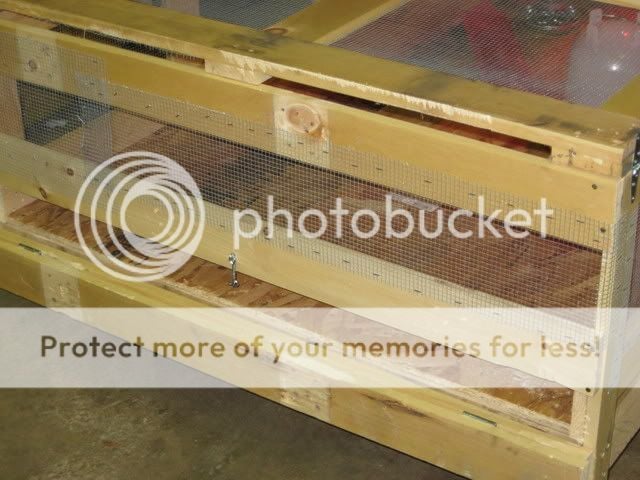
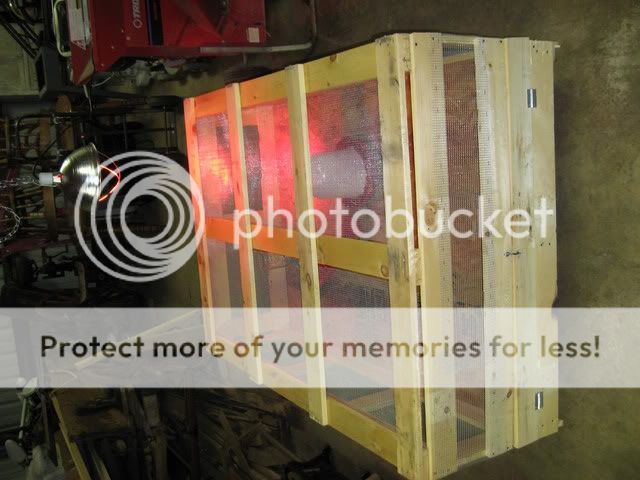
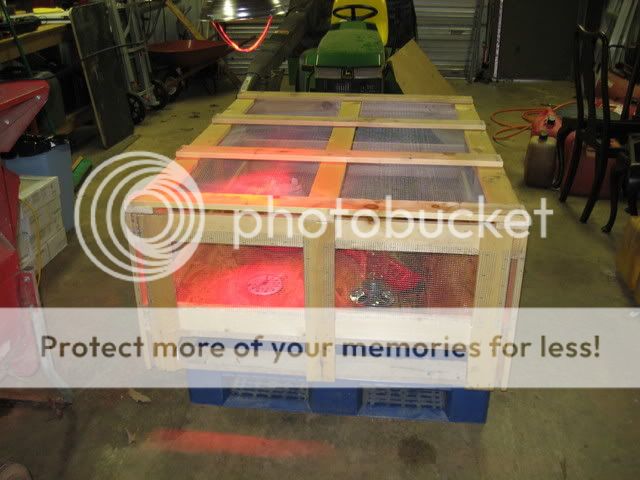
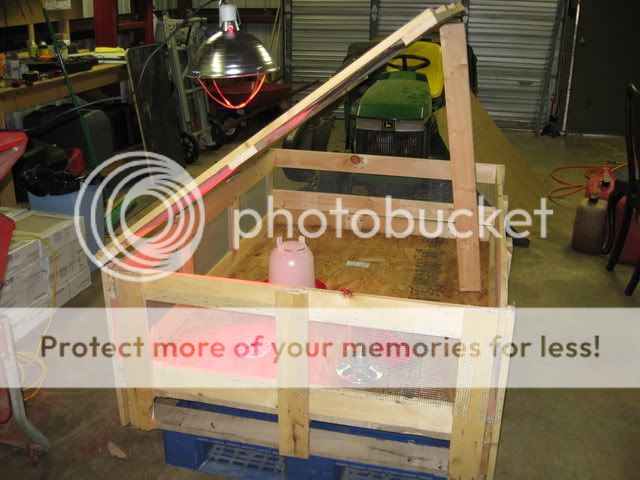
")