ONE OSB / Plywood sheet, interior space is 4x2ft (8sq ft) Suitable for 2 layers and a rooster (3 total, 2x nesting boxes)
Not my design, but here is a link https://piwakawakavalley.co.nz/building-a-chicken-coop/
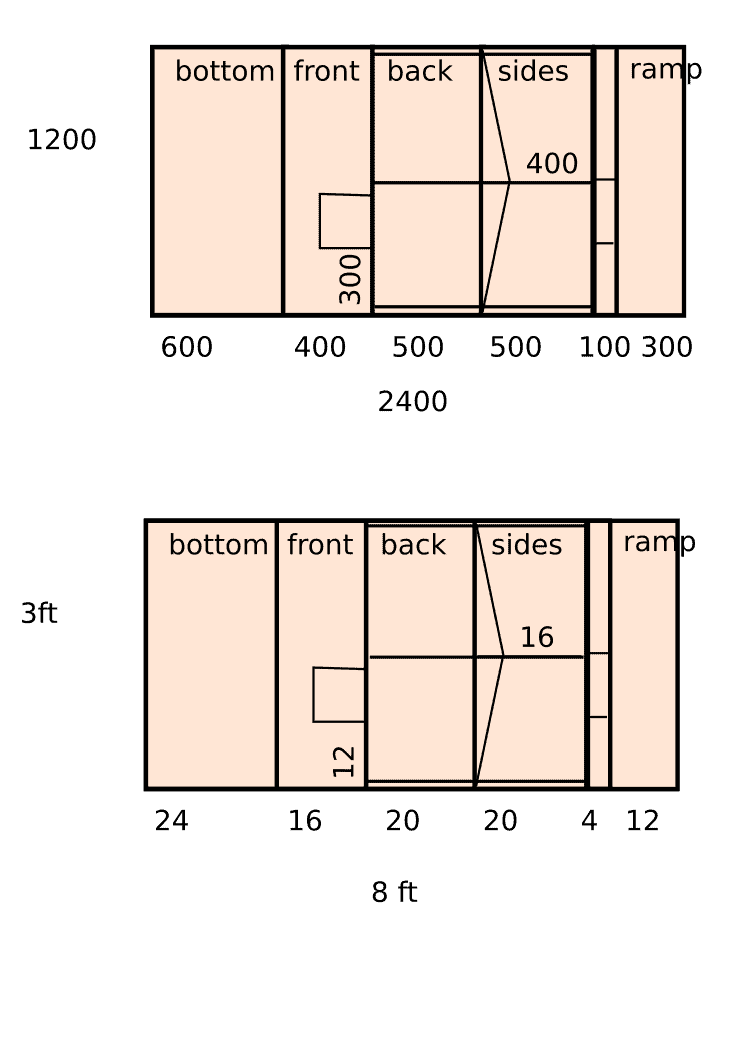
NOTE: Small typo, the designer uses metric and confuses 1200mm is equal to 3ft >> The correction is 1200, is equal to 4ft
-------
Re-Post of Article/Plan:

On the edges of the back and sides you will need to cut the thickness of your timber off the edges so that the sides fit inside the front and back, and the back doors have some room to open and shut.
To assemble the chicken house simply use self tapping screws to attach the sides and front to the bottom and to each other.
Cut the nesting box edging from the thin leftover 4inch/100mm strip and screw through the side and front.
Attach feet to the bottom and use hinges and the latches to attach the doors.
- I made mine from 4x8ft OSB Sheet, in 5/8" (which reduced total coop cost to $40 Canadian)
- DONT use Particle Board = it will fall apart when wet
- DONT MDF/HDF its toxic with formaldehyde off-gassing
- Nesting box is "basic/minimal"
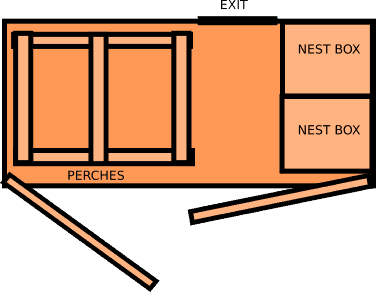
- Perches are NOT supplied by plan (unless a 1" strip is cut from ramps side & used to make them, thats what I did)
- Expects a "safe" run area (no large predator's able to rip up the coop door)
- Its not winterized but winterizing it to R25 would only take a half more OSB sheet and one 4x8ft panel of rigid R12.5 (+ a heap lamp or pv unit)
Not my design, but here is a link https://piwakawakavalley.co.nz/building-a-chicken-coop/
NOTE: Small typo, the designer uses metric and confuses 1200mm is equal to 3ft >> The correction is 1200, is equal to 4ft
-------
Re-Post of Article/Plan:
For the coop you will need
1 sheet of 18mm ply
You can use treated or natural ply wood. If it is untreated then I recommend that you at least paint the outside to help make it last longer.50x25mm/2×1 inch timber
I used this to make the perches, you could use whatever you have around – even natural branches work.Roofing iron
I used pieces of roofing iron that fitted exactly on the top of our house as they were designed to also go in a roofed run, if they are going to be the only roof be sure to cut it big enough to overlap the walls a little to let the rain run off.2×4 or legs
We hung our coops in an existing structure, but you can add legs a high as you like – from a few inches to quite tall. If you want it tall be sure to add some angle bracing, or concrete the posts in to the ground so it doesn’t fall over.Other bits
4 hinges, 35mm screws, roofing screws, 2 latches, saw, measuring tap, screwdriver/drill, pencil, tape measure, straight edge to draw lines along and a spare pair of hands for cutting the big sheet.
INSIDE
Ply Cutting Sheet
Get the PDF here.On the edges of the back and sides you will need to cut the thickness of your timber off the edges so that the sides fit inside the front and back, and the back doors have some room to open and shut.
To assemble the chicken house simply use self tapping screws to attach the sides and front to the bottom and to each other.
Cut the nesting box edging from the thin leftover 4inch/100mm strip and screw through the side and front.
Attach feet to the bottom and use hinges and the latches to attach the doors.


