construction of my pen/coop, suggestions welcomed

Sianara, Thanks for the replt, and the advice too.
I'd love to put the pop door on the left side too, but, I want to keep the door brace as one straight solid board to help prevent "door sag" as it ages.
I have also thought about putting the pop door on the right hand, side wall ,of the coop, to do just as you suggested, and prevent having the ramp smack in the middle of the run. That may be the better option.

Also, Although the pen is 12" x 24", I think we have decided to limit the flock to 8 or no more than 10 birds, due to them being all standard size "Monsters" LOL!
We may even look towards the rest of them being Bantams.

I was doing some reading on the various birds that we already have and was seeing that most of them should be up towards 7 to 8 lbs. each. Is that corretct ?
Man, if so, they are going to be bigger that I had expected!
 
Last edited:
Ron,

I went back and re-read your original post and see at that time you were thinking of 6-8 hens but with all the other birds you mentioned I was a little concerned that it was going to be too many animals in too small of a space. That said, if you only have 10 hens of the large breeds - no other animals (australorps are big girls, I had one for 6 years and she just died last fall, still miss Marianne) it is 28.8 sq ft per bird. I see you also just mentioned possibly bantams too and I would suggest you could try a mix of say 4 big hens and maybe 4 bantam hens in there (which would effectively be 6 large hens as far as space goes) and would give you approximately 48 sq ft per bird. If you buy the standard and bantam chicks at the same time you shouldn't have any problem with mixing the two sizes.

In my experience you only need 2 nest boxes for 6-8 hens.

One word of caution with the Polish. I've had them before and my most favorite hen was Cosette a white polish who died 4 years ago, anyway, I had a huge problem with the other hens really, really picking on the polish insofar as they would pluck their head feathers out and often I would come out there to find the polish hiding somewhere with bloody heads. It was a huge stress for me and it was my first time with chickens too! The worst offenders were the two white leghorns (which I would NEVER have that breed again, they are waaaaayyyyy too picky and high strung, just big trouble makers
sad.png
!). Also, my polish were extremely shy and intimidated easily. It was not a good mix of birds for a first timer.

Of the breeds you mentioned I have now/or have had:
1 australorp (8+ lbs)
5 ameraucanas (5-6 lbs) These are TRUE ameraucanas not what hatcheries sell as araucanas which are essentially Easter Eggers!
3 polish (4-5 lbs).

My neighbor has:
wyandottes (8+ lbs)
orpingtons (7-8 lbs)
RI reds (7 lbs). They are big hens and as such take up more space and also EAT more than the others
lol.png


On the other hand, bantams are small, eat much less and STILL give you lots of eggs. I hadn't collected eggs since Sunday (had to work the last two days and was snowing when I got home blah, blah, blah which is why I didn't get out there) ANYWAY... From my two flocks of 16 bantams hens I collected 24 eggs in 2.5 days!!! They give more eggs than all my big hens do! (Plus, if you're on Weight Watchers, one bantam egg is only one point!
lol.png
)


Of the bantam breeds I have the following and I would recommend any of them as good back yard chickens: 2 porcelain d'uccle hens, 1 quail d'anver hen, 2 (mille fleur) d'uccle hens with 1 same rooster and the other bantam flock is: 1 red cochin frizzle rooster with 2 hens same breed, 2 buff japanese hens, 1 silver sebright, 2 EE hens, 2 quail d'anver hens.

Anyway, that's my 2 cents. Good luck and keep us posted on your coop progress and don't forget to add pix when you get your chicks!

Sianara
 
Last edited:
Ron, what a great coop and run. Good job. Not sure if you've done the roosts in the coop yet, but being a gardner you might want to look at this: https://www.backyardchickens.com/web/viewblog.php?id=2427. Look at "inside the coop". Those roosts are over hardware cloth (and they don't walk on it), so that the majority of their poop, which is at night, will go to one section, and can pile up and be easily scooped up for fertilizer every month or so. It would be very easy to do this with your raised floor. Next coop I build, it's one thing I'll be doing.
 
Bison, thanks for posting that link. Great idea! I'll see if I can incorporate that into my plans on our new coop.
Ron, I agree that a side door would be best. Maybe 12" x14"? The ramp could be attached to the bottom frame.
 
Guess I'd better update this thread with a few of the latest pics.
Gable pieces, (above the doors and side wall) are up, Roost's are now in, Poop Decks, and Roost Ladders are soon to follow...

IMG_1137.jpg


IMG_1136.jpg


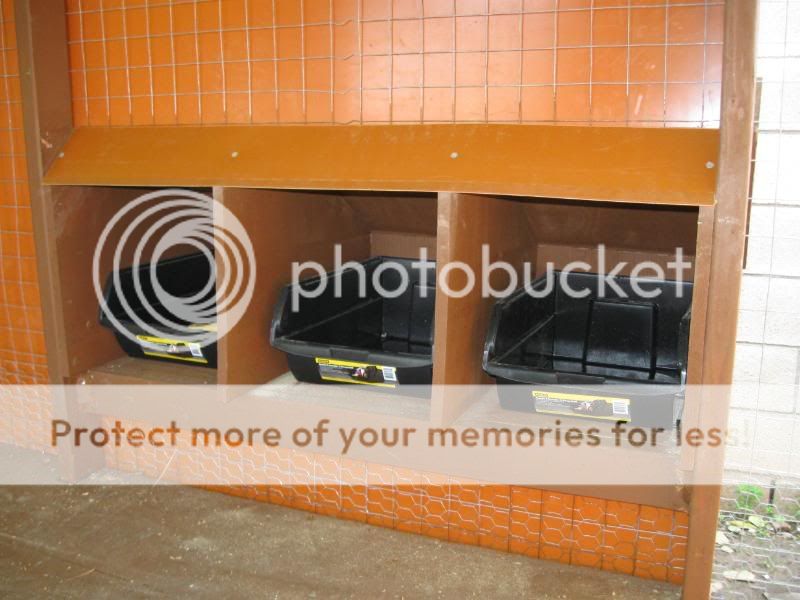
I also trimmed the dividers on the nesting boxes to a 45 degree angle, and mounted a piece of my plastic paneling.
The purpose for this was two fold.

1- to make the nesting boxes feel a bit more enclosed for the hens, while still having ample headroom inside the nesting boxes.

2- to hopefully prevent the birds from trying to roost on the top edge of the nesting boxes.

IMG_1126.jpg


IMG_1128.jpg
 
Little update here.
Progress has been slow due to I've actually had some customers lately keeping me busy.
Oh yeah,... there was also the clogged sewer to the house, which resulted in the entire weekend being shot, toilets getting removed and replaced, and my concrete truck having a minor problem causing me to lose another full day. Dosen't everybody around me realize that I'd really like to FINISH MY COOP !?!?!?!?! LOL!
Oh well, all in good time I guess.

I re-thought the roost layout, and decided that I didn't like way it was built.
So I tore it out, made longer roost mounts and mounted the Poop Deck supports to the bottom.
I realize that most folks suggest to have the Poop Decks a little lower than I have mine, But the reason seems to mostly be for easier access for scraping off the Decks.

my Poop Decks are going to be made from fitted plastic panels, and are going to slide on/off of the lower frame work shown here.
so I figured that with them being removable, I could get away with having them just 4" below the roost's.

IMG_1193.jpg


IMG_1195.jpg


hopefully, there wont be anymore "Domestic Disasters" to hinder some more progress tommorow.
 
Looks very nice. What are you doing about ventilation? I know you have a tarp there for now up top, but you say you want to put a corrugated material up top in the near furture.

I also like the use of recycled materials. Being in CA means not having to insulate like we need to here in Washington.
 
The tubs came from Lowes, they are made by Stanley Tools, and are called "Stacking Bins". I liked them for the size, and the lowered front edge. I think they will make for a good cleanable nest box.

Ventilation is provided through a large panel/window tha opens at the back of the coop, on the upper left side.
I just finished it today, and will have a pic of it later on. I am considering mounting a tempurature controlled cylinder, to open and close the window automatically.
The cylinders are the same type that are used for the roof vents on a greenhouse.

I will also be cutting in lower vents with grills near the bottoms of the 2 large doors, and have also looked at some solar powered exhaust fans, that may help keep the air moving inside the coop during our 100 degree summer days. (heck, it was 92 here yesterday, and 90 today !) This is WAAAY too early for these higher temps. Hopefully it will cool down a bit through the rest of the week.

Once the corrugated roof panels go on, I may put a second temp cylinder to make the entire roof open up during the day, and automatically close at night.
 
Last edited:

New posts New threads Active threads

Back
Top Bottom