Coop Building Reference Table....(suggestion area only)

I've updated the outline some this morning. Nothing detailed but just some overview sub-sections that we can address 1 by 1 as soon as I have some free time (after the coop is built). Look them over and let me know what you think, additional items to add, etc..
 
Jeff, you're doing a great job, keep up the good work!!

thumbsup.gif
 
Geez. Had 'puter problems & thought when I got back up & running I'd have a bunch of email notices to the topic & nothin'. Anyway, I was working on an equation for ventalation & it sounds like Pat is totally against the idea. Pat, all we are trying to do is set basic standards. You are correct in that there are many variables, but that is exactly why higher mathematics are use. Diferential equations....the integral of.....sorta thing. The equation I found is for livestock buildings. It simplifies the variables, and probaly a bit too much. It's not the absolute answer to every situation or location. What I would say is it's minimum, & if the ventaltion being considered doesn't at least meet the value of the equation, one needs to step back & redesign. I'll have to dig the paper up,,,,,,,since the DSW cleared the desk off.
smile.png
I'm thinking Purdue U. but don't hold me to that. I've talked with our extension agent, too, & and he recommends as much as possible, just as you do, Pat. He also understands that there's only so much space in a 10 lb bag. Many of the coops I see being built are small & humble, and space usage is at a premium. My thoughts are we try to help combine all the requirements, including ventalation, in such a way as to help people build a coop that works for them & their peeps. And I appreciate your offer to link up your page on venting.
thumbsup.gif

Now where the heck is this thing going? BioBob, I like your suggestion. I prefer to screw more than nail. And I think for novices, they might find it a bit easier than swinging the hammer. Even if they have to pre-drill, it couldl make it a more pleasurable experience!
celebrate.gif
 
the problem with any kind of magic ventilation equation is that it's going to encourage people to just use the formula, which would be a starting point at best, rather than try to understand all the variables and why they make the number they got out of the equation wrong.

$0.02
 
Ray,

Between my regular work and the coop construction I just haven't had time to focus on this project but I will get back to it as soon as the coop is out of the way....I PROMISE. Discussions can continue in the mean time, the list is on the first post to this subject and if members want to discuss anyone of the items on the list, I can come back later and pull the information out for the project. Please don't let me stop the group from discussing the varies issues of construction so we can move forward on this, I'll get back as soon as I'm done with the coop.

As far as ventilation goes, couldn't we at least provide different options for ventilation and have a list of Pros and Cons to each one of them. Also list the base theory behind ventilation and air flow? (example that comes to mind is, you don't want an intake vent on the same wall as an exhaust vent since that would lead to "dead zones" within the coop.
 
Since we have lights, electric fences, and now fans in and around our chicken houses and they are all a pontential fire hazzard then at this point we should consider the attributes of an Automatic Fire Supression System. A fire supression system is always on the job if a fire were to occur whether it be from an electrical problem, lightning, or some other source the supression system would quickly extinguish the fire. Not only will our chicken houses be saved but our chickens who we spend so much time, money, and enegry on would be saved! They will probably be a little wet but they will dry out. Also all of the equipment inside the house should be able to survive a little water where as in a fire it would be completly destroyed. Now I understand that there are climate concerns that come along with having a Fire Sprinkler System mainly with the water freezing in the pipes so therefore in climates that have temeratures subject to freezing we can install either a Dry-Type sprinkler system or an Antifreeze system. We will also need to add a Sprinkler control room to our chicken coops and that will have to be heated with more than a lamp. So those of you who are planning a new coop keep this in mind.

This is just idea to help protect our flocks. I can go into more details if anyone is interested.
 
Good Morning Spunky:

I think RedHawk is trying to establish a MINIMUM requirement, and I favor the idea.

How would one know how much ventilation to add if they did not know the absolute minimum required.

I don't see any problem with adding the note "These calculations are the ABSOLUTE MINIMUM for your design and the number of fowl you intend to house". "More is better, just remember to Predator proof it well"

MY .02.
 
I'm a Long Island Volly Fireman (been one for 41 years). The idea of a dry/wet system for fire control is a good one. Smoke detectors wired/IR from the coop to the house might be a cheaper way to go in cold climates. A "fire hose" outside the coop, just in case.
 
I'll take a swing at the rafter/stairs simplification.

OK, first you take the cosecant squared of the left hypotenuse and afix the re-encabulator to the phase shifter....

Just kidding.
big_smile.png


Think of a rafter, or a set of stairs, as a series of "steps" getting from point A to point B, both in the vertical and the horizontal dimension. In carpenter lingo, the horizontal distance is the 'run'; and the vertical distance is the 'rise'.

Let's look at the rafter first.

The first thing you have to know is: How wide is the span to be raftered over? You can just measure the horizontal distance directly, outside to outside, on the top plates (or even on the bottom plates, assuming the walls are plumb). Let's say it is 12 feet, or 144 inches. If you are building a shed roof, that's your run portion of the rise to run relationship. If you are building a straight gable roof, your run would be 72 inches (144"/2).

Next, you have to know: How tall will your roof be? The roof height might be dictated by building codes, existing structure, or physics (water doesn't run uphill). Most of the time, you will want at least a 3/12 pitch, that is: for every 12 inches of run (horizontal distance), the roof will rise 3 inches (vertical distance). If a roof is too shallow of a pitch, it will sometimes leak in a blowing rain. I generally like a 4/12 pitch roof; it sheds water easily, but isn't too steep to walk on comfortably.

For example, if we have a 4/12 shed roof spanning 144 inches, or 12 feet, the total rise will be 4 feet.

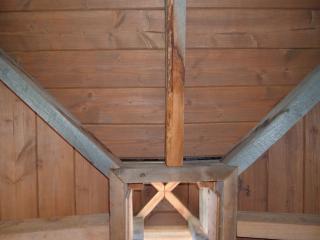
In order to layout the rafter, I would use a framing square (or a speed square). The Framing Square has a short narrow blade of 18" and a longer (24"), wider blade. The angles of the 4/12 rafter are drawn on the board by aligning the number 4 on the short blade and the number 12 on the wider blade on the same edge of the rafter. Use the outside edge of the square; you can position the square on the top of the rafter, or the bottom. The vertical cut of the rafter is drawn along the skinny blade.

The top point of your rafter cut, the highest point of your rafter, at the peak of your roof, will be your reference point. Next, you have to calculate how long to make your rafter. There are some tables engraved into the sides of higher end framing squares, but basically, just apply the ol' Pythagorean Theorem. a squared plus b squared equals c squared.

In our example, the square root of (144*144 plus 48*48) equals the length of the rafter along the line of the roof itself. The length of our rafter is 151.789 inches, or about 151 and 7/8ths inches. OK, so go ahead and cut your top rafter cut, hook your trusty, rusty tape on the peak of the cut, and make a mark along the same edge of the rafter at 151 and 7/8ths inches. Use your framing square in the same orientation (on the 4 and the 12) to make another vertical line at that point. These two lines should be parallel with each other.

If you are using 2x4's for the top plate, you probably want the rafter to sit down on the plate for the full 3 1/2 width of the plate. Hold your framing square along the length of the line you just drew at the bottom of the rafter and inch it up and down until you have a 3 1/2 inch long line at right angles to the vertical line. Draw your horizontal line there; the little notch is called the 'birds mouth' of the rafter.

That's basically it for rafters. Don't forget to add in whatever overhang(s) you want, using the same numbers on the square. Also, if you are building a gable roof, you have to subtract half the thickness of the ridge board from the horizontal length of the rafter. I usually just figure the rafter out and cut it, then hold a piece of 1x4 along the vertical cut at the top of the rafter, mark it and cut it off.

Cut a couple rafters (4 for a gable roof) and try them out with a ridge board. Once you are assured they will fit all around, use one of them for a pattern and cut away.

I hope this was useful. Feel free to correct, amplify, or expand at will. I'll get onto the stairs in a followup post.


P.S.

There are such a thing called 'Carpenter's nuts', which are small brass blocks you can clamp onto the framing square to always keep the same angle without a bunch of squinting for each alignment of the square. They are pretty useful.

In my example, the numbers all worked out quite handily (what a coincidence). To figure out what is the rise to run on less cooperative number, use a cross multiplication formula.

Say your run was 123 inches and your rise was 54 inches, you would set it up like: 54/123 is to x/12 and cross multiply to find x (the rise) (54*12)/ 123 = rise = 5.268 or about a 5 1/4 rise to 12" run. On your framing square you would use 5 1/4" on the narrow blade and 12" on the wide blade to establish your vertical rafter cuts.

edited for mathematical clarity
 
Last edited:
Camille's dad here. That last post on cutting rafters was good. I am an old school carpenter and I believe in K.I.S.S. The steps from point a to point b analogy is perfect. Cutting stair stringers is so similar to cutting rafters. On stairs you have rise and run,same as rafters. Measure the total rise I.E. bottom of stairs or landing to top of stairs. This should be done as accurately as possible by using a level. Unless the landing is a level pad that extends all the way under the top of the stairs you must extend a level and straightedge from the top of stair elevation to where the stairs will land. Comfortable stair rises are about 7". Divide this elevation measurement, in inches, by 7 and you will get a number that is probably not only an integer. Remember the number to the left of the decimal point and subtract it leaving the part to the right of the decimal point. Multiply this number by 16 and you will have the number of 1/16ths you need to add to 7 to get your rise.Make your run 11" as 2 2x6's is 11" that was easy. Now you should have a rise and run that you can mark all the way down your stringer.If you used your framing square for your rafters this should be easy. Mark with a razor knife as pencil lines are too fat and will make it easier to introduce errors. First step off the number of rises and runs you need +1. Stand back and make sure you understand what you have done. you have lines where the bottom of your treads will go. You don't really have to cut these lines. I recommend using simpson stair brackets and 1 1/2 x 1/4" lag screws. The brackets are bolted along the 11" lines on your stringer. If you mess up doing it this way, you unbolt and no materials are ruined. If you cut and you mess up, bummer. Make your bottom seat cut 1 1/2 inches less than your rise from the top of the bottom bracket if you are using 2x material for your stairs.
I hope this makes sense to anyone that reads it. I've done approx 100s of stair systems some are cut ins some brackets some made of timbers, logs etc. If you make sure you understand what you are doing before you cut anything you should be fine. feel free to e-mail me with any carpentry questions and I would be thrilled to help any BYCers. I love chicken people! I will give my phone # if you e-mail me first and talk you through any tough spots.
As far as my coop goes I have a 6'x6' square footprint. The floor is trex laid down with 1/4" spaces The framing is 4X4 post and beam, roof framing is 2x6 rough sawn w/2x6 t&g for the roof sheeting. The shingles were leftovers from reroofing my house. My next door neighbor built the little cupola on top while I shingled the roof. He is a pretty good carpenter too. The pic of the inside of the roof shows the hip rafters cut into the square frame of the cupola. The coop is really predator proof and the girls are locked up at night. The run is not but all I have to worry about are nocturnal beasts.


34473_dscf2084.jpg
 
Last edited:

New posts New threads Active threads

Back
Top Bottom