Counter tops and flooring - what do you have

Ms Bear- A quick answer because I am walking out the door. But I will write more later.

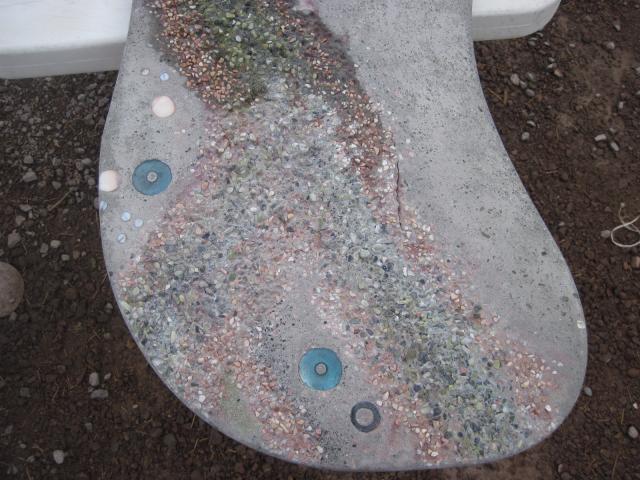
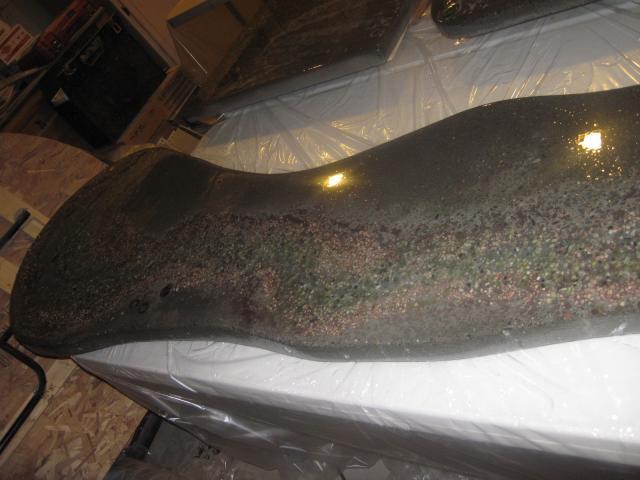
Made forms with melamine boards.
Rounded with bender board or garden barriers. Found most at garage sales
smile.png

Used Quickcrete countertop blend. It has the bonders and emacifiers (sp?) in it.
Larger peices had steel supports inside the concrete.
Used small pea-sized gravel and craft sand from Micheal's.
Also imbedded shells, beads, cogs, screws, and little cars (for the kids) all over. I like it when people "discover" the stuff.
 
I used the Quikrete 5000, with the cheng concrete additives, which included both fibers and color. You can do it so many ways. Google it.

LareePQG, The curves are amazing.
love.gif
I was doing a traditional bungalow kitchen, so didn't get quite so fancy. (the corner stove was bad enough.) I also used melamine to make the forms. It gives you a pretty smooth surface to begin with. To get a little bullnose on the edge, I used silicone sealant in the forms, and shaped it (while wet) with a plexiglas rod. The size of the rod determines the roundness of the bullnose. I also reinforced all pieces with both rebar and remesh.

For getting it smooth, I used diamond grinding pads, and wet ground it outside (!) Start with 50 grit (especially if you have hidden artifacts and pebbles that need to be exposed) and work toward 1500 (or even 3000) and the surface will shine even before you apply a sealant and wax.

Getting it inside requires many friends, (whom you will feed and adore later!)
big_smile.png
 
Last edited:
Quote:
im there with you..my kitchen sucks so bad..the countertops are peeling away, the cabinets are scratched and we have to repaint the whole thing..it looks like its from a 3rd world something or other, i dont know.
as soon as we get our new homebuyers tax credit, that will be history though!!
 
That is just so neat! I love how you are salvaging stuff. My cabinets were from craigslist. Hubby is building the set back hutch from vintage popular. He also brings home lighting fixtures that have nice shape and I give them a new finish. We have two gorgeous chandeliers in the boys' bedrooms that were brass in a previous life. One was painted white then antiqued with stain. The other was painted black. Hubby scored a nice light for the laundry room. Im matching it to the kitchen fixtures before we install it.

He found these frames ready to be dumped.
DSC_0285.jpg


After some of Erin's TLC ..
DSC_0003.jpg


and voila!
DSC_0017.jpg


Hubby just told me about a grinder that can work the corners... so, this is seeming much more doable. I really like the shells and pebbles in the concrete.
 
Glad I found this post. Lots of ideas.
Hubby and I are going to start building our dream house this summer. Going to have it dry in and work on when we can afford it.
Gotta get out of this 100+ year old slapped together homestead shacks. Too many things going wrong with it to fix. Really no way to salvage it.
 
Quote:
wood wood wood and a cast iron sink as well. Floors are 1950's heart pine (in bad shape, but it's character) and counter is new butcher block that I purchased from Ikea. I love it!!

My countertop
10858_596897091831_55007926_34237360_485422_n.jpg


SANY0929.JPG


Floors:
22341_607045404531_55007926_34538284_8097019_n.jpg


25228_610443025671_55007926_34622556_7108688_n.jpg
 
OrphManor- That is pretty much what we did for our rounded edges. I am tall so all the countertops are 2 inches above normal, and the island is 4 inches taller than normal. I don't want to be working and accidentally cut my Joeypouch!

Here is a quick progression:
Form and support

The garden edging is screwed into the side of the melamine board. The "curviest" curves needed additionall support. We cured it on the ground and put cinderblocks around the egdes.

Poured and fru-fru added in (use twice as much as you want, as you will grind most of the fru fru out)


After curing


Polished and Apoxy
 
Last edited:
First off, Laree, I LOVE your counter tops. Well, I LOVE your whole kitchen!!!

I highly recommend NOT getting 4" ceramic tiles. They are a pain to keep clean unless you go with dark tile and dark grout. We have 4" white ceramic times with very thin, white grout. It's a pain. My mom wanted granite counter tops and, like you, didn't want to spend the money for them. So, she used either 12" or 18" granite tiles (don't remember the size). It was gorgeous and the maintenance was much easier (figure a 12" tile can hold 9 4" tiles, so it is basically 9 times less grout...similarly an 18" tile is a little more than 16 4" tiles, so that is ~16 times less grout!). With the narrow grout lines, it was stunning and looked just as nice as solid granite counter tops, but much cheaper!!!

Ohhh!! The flooring. We have a random-sized ceramic floor (6" square, 6" x 12" and 12" x 12") for our kitchen and the bathrooms are all 6" x 12" in a brick pattern. Our grout is "dirt" colored (the manufacturer called it "mushroom"), so while the grout requires upkeep (we aren't the best at remembering to seal the grout every few months), it doesn't show stains as easily. The rest of our house is wood floors, but the risk of wood floors in the kitchen and bathrooms scared me (all I could envision was a leaking dishwasher and warped floors!).
 
Last edited:
I guess I am biased against tile, because every tile floor I have ever been on had uneven tiles to trip you, and hang up things on the edges, and if there was a floor drain it was NOT the lowest point in the floor so water pooled beside the drain.....I'm anti-tile for more reasons than cleaning the grout. I'd have solid concrete before I put in tile - it actually looks nice if you wax or seal it.

If my antique boards get out of line I can just sand them down a bit!
lol.png
 

New posts New threads Active threads

Back
Top Bottom