How do we install slider windows?

catchthewind

Songster
8 Years
Jan 27, 2011
366
5
113
Vancouver Island
This seems like a bit of a daft question, but I've searched and searched and keep coming up with "install the slider windows and then...." with no mention on exactly how to go about that. We are just a software developer and a biologist-turned-stay-at-home mom.
tongue.png
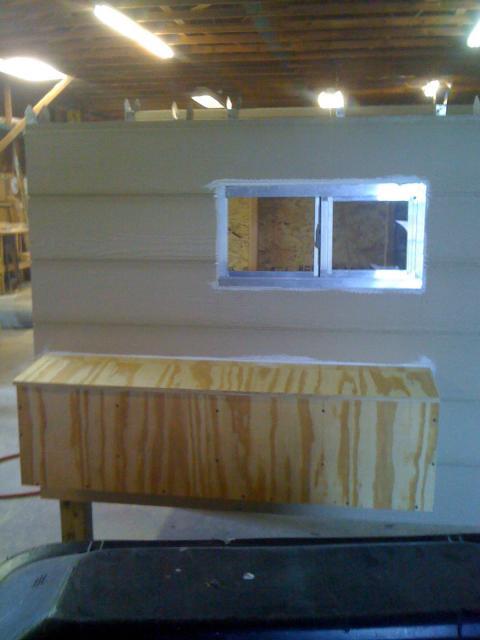
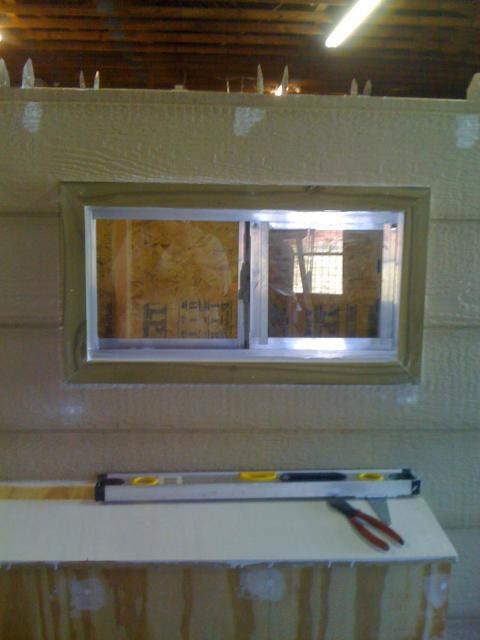
-0-Looking at how it's done in houses doesn't really help because it's not really relevant to a plywood chicken coop. So, exactly how do we install slider windows? I've seen reference to installing them backwards (so they slide on the outside), is that a good idea even for a walk-in coop?

Do we have to frame out around the hole for the slider, or would nailing it just into the plywood be enough?

Do we caulk around the hole and then slide the window in, or put the window in and then caulk? One of the holes is just slightly too big for the window. Not so much that we won't be able to nail it in properly, but it will definitely need a good caulking job (and some trim
wink.png
).

And what would be the best way to get the hardware cloth on? I've seen some people say they just installed the hardware cloth over the bottom part of the hole, does that mean they wouldn't have secured the top part of the hardware cloth? Can we sort of wrap the cloth around the frame of the window before we push it in the hole or is there an easier way?

I think I'm going to take pictures along the way if we ever get this figured out to post.
roll.png
 
These are storeboughten prehung windows, like you would put in a house or garage or whatever, yes? (if not, ignore the whole rest of the post
tongue.png
)

Do the rough-in opening a little bit larger than the window unit itself, making sure that header and, um, whatever you call the sill that the window unit sits on, are properly constructed/attached. Consult basic DIY books for this part. Unless this is a teeny small window, not really the kind I'm talking about here, you will need stud structure framed around the opening even if for some reason you lack that in your coop in general (maybe it is a very small reach-in coop?)

Put window unit in the opening. If you do it backwards, the disadvantage is the flashing and drainage holes end up wrong way round; this may be ok for a coop as opposed to a house, but just be aware you're doing it. Shim to fill any gaps, then screw thru the whole shebang (window unit frame, shim, stud) to secure it. Caulk if you wish, fill gaps with spray-foam insulation if you wish, or just say 'dude, it's a coop' and figure that trim/siding are sufficient coverage of gaps, depending on situation.

Exception: if this IS a teeny reach-in coop and a small window, you may not need to frame out the opening as fully as if it were larger; still, you need SOMETHING of a 2x4ish nature, not just plywood, to attach the window into.

And what would be the best way to get the hardware cloth on? I've seen some people say they just installed the hardware cloth over the bottom part of the hole, does that mean they wouldn't have secured the top part of the hardware cloth? Can we sort of wrap the cloth around the frame of the window before we push it in the hole or is there an easier way?

I wouldn't wrap the hardwarecloth around the window when installing the window, that seems likely to be very insecure. The usual thing would be to put the hardware cloth on after window is installed, either inside or outside as per your choice (it's a tradeoff), securing it to the stud framing around the outside of the window so you can use good stout hardware. If you choose to only put hardwarecloth across the bottom half, IMO it would be real smart to run a piece of wood across the middle so that (as you say) the upper edge can be attached to SOMETHING, otherwise it is a weak spot.

Good luck, have fun,


Pat, biologist-turned-stay-at-home-mom with sysadmin husband
smile.png
 
Last edited:
Thanks so much Pat! That's really helpful. Ours is the big greenhouse-turned-chicken-coop coop.
wink.png
We already have the windows cut out. One is just a little too big, the other the window fits perfectly. So the one that's a little too big is actually better?

The sliders are for the two front windows:


And one of the windows:
78213_img_0465.jpg


Pat, biologist-turned-stay-at-home-mom with sysadmin husband

That's inspiring.
wink.png
Maybe there's hope for us yet!​
 
Quote:
Oh! D'oh. Sorry, sometimes I remember names and sometimes not so much
tongue.png


That is looking really good by the way, it's going to make a great coop!

One is just a little too big, the other the window fits perfectly. So the one that's a little too big is actually better?

No, as long as you can get them each IN there, that's fine
smile.png
(The usual main reason for framing the opening a bit overlarge is to avoid the opposite mistake, as wood does not stretch well LOL; also, to a minor extent, so you have room to insulate in there if it is a house, but this is NOT a house so that is not highly relevant)

For that type, you can just fit it into the opening and nail thru the holes in the flashing/flanges/whatever-you-wanna-call it, and it'll be fine... just make sure that's going into 2x4 not merely into plywood.

Good luck, have fun,

Pat​
 
Quote:
Oh! D'oh. Sorry, sometimes I remember names and sometimes not so much
tongue.png


That is looking really good by the way, it's going to make a great coop!

Thank you! We're pretty proud of it so far. And no worries, with the number of people you respond to and help out every day I certainly wouldn't expect you to remember all the names and coops. :p

One is just a little too big, the other the window fits perfectly. So the one that's a little too big is actually better?

No, as long as you can get them each IN there, that's fine
smile.png
(The usual main reason for framing the opening a bit overlarge is to avoid the opposite mistake, as wood does not stretch well LOL; also, to a minor extent, so you have room to insulate in there if it is a house, but this is NOT a house so that is not highly relevant)

For that type, you can just fit it into the opening and nail thru the holes in the flashing/flanges/whatever-you-wanna-call it, and it'll be fine... just make sure that's going into 2x4 not merely into plywood.​

Okay, makes sense. I think we can do this.
wink.png


Btw, my husband and I got a kick out of your "Dude, it's a coop" statement. That's sort of been our motto through this whole thing. I think caulk and trim are going to be our best friends.
wink.png
 
Looking good, and Pat is on track, as always!


Our saying is "Remember, we aren't building a piano, here!".

DH, a painter pro, reminds his crews, "We ain't painting the Sistine Chapel here!"
 
ranchhand, I especially like the Sistine Chapel one! Could have used it while painting the ceiling in the coop. I hate painting ceilings at the best of times, but a plywood ceiling with rafters... ugh. I ended up splurging and buying spray paint, and it was worth every penny. It doesn't look fantastic if you really look at it, but... it's a coop. Who's going to be examining the ceiling?

dbounds, thanks so much for the visuals! It's helpful to see the process.
 
I just installed the window in my coop build yesterday, and did a ton of research first, so can add one little tidbit. Put a bead of caulk on the inside of the fin (the part that sticks out around the window that you nail through) on the sides and top. It will end up between the fin and 2x4 when the window is installed. You want to apply enough that when you place the window in the hole, the caulk will come out through the pre-drilled nailing holes and the edge of the fin. This will help seal the window where it meets the framing (or in your case siding) while still allowing any moisture to drain out the bottom. It's just one extra layer of protection to keep the moisture out of the coop.

edited for clarity
 
Last edited:

New posts New threads Active threads

Back
Top Bottom