Hi Everyone, been awhile since I've been here.I had to take a break cause it is SO ADDICTIVE! Anyways, my niece is wanting to build an incubator & hatch some of our eggs as a school science project. Any tips on how to do this would be greatly appreciated. Also how do I know if my eggs are fertile as I DO have 2 roo's that LOVE the ladies but the ladies don't always let the lovin happen...if you know what I mean. man the are little but tough my hens! god I love them! have a good day all! April
Thanx for the link!! Some pretty fancy ones on there. Your looks great! I can't wait for the kids to try this.I hope it works.
Here's a link to my thread. This thread has about everything you would need to know to build a really good incubator. Read the whole thread though for all of the information. I will help you in any way if you find yourself stuck or confused with something. Just PM me for any help.
WHen it comes to building an incubtor, we all pitch in and help each other. I read every thing and then looked at what I already had for supplies to keep the expense down. Old cooler, drill and bits, plywood, glass from an old picture, etc. I used a WHT as I could easily buy it at Home Depot. and a bottle lamp from Walmart.
Miss prissy has good directions on a simple construction.
You'll need to try different size light bulbs to get the temp for the size of your container; ensure that the chicks cannot touch the bulb--ouch!
Fans--PC fans are more expensive to buy than simple desk fans.
Remember ventilation holes. I place tape over some and open others to regulate the temperature.
Love mine and it's still cooking away with the last of my eggs for this year!!
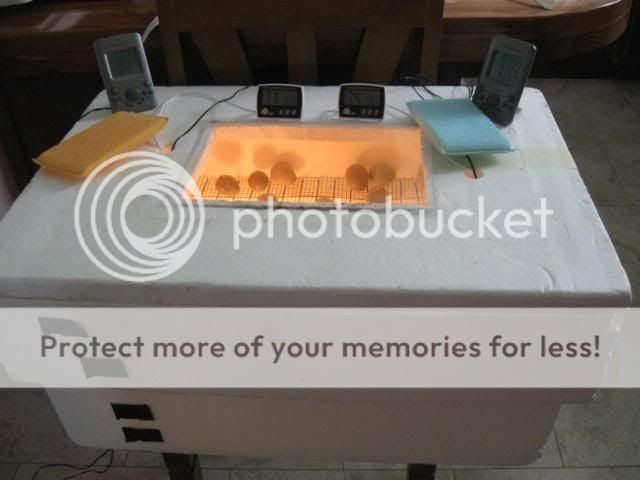
Cut a hole in the top of the styrofoam box so you can see into the box and watch the eggs. Lay the glass into the ledged hole. This is also how you can open your bator and turn your eggs.
Then cut some holes in the side of the styrofoam box for ventilation.
Cut a hole in the back of the box for the light bulb. Buy one of those light bulb holders that you has a plug directly connected to it. Plug this into the dimmer switch and then plug the dimmer switch into the outlet. The dimmer switch is very important as it control the temperature.
You don't need a fan. Don't even waste your money.
Put a piece of foil behind the light bulb so it doesn't melt the styrofoam.
Make sure you place the thermometer in a good spot so you can see it without opening the bator. I used a thermometer that had a digital reader and a sensor. The sensor i put in the bator and it send the temperature reading to the digital reader which is outside the box.
Once everything is set up, turn on the light bulb, add the water bowl with the water and do a test run for a day. Try to keep the temp at 100 degrees and the humidity around 40-50. If the temp is too high, use the dimmer switch. If you have dimmed the light bulb down all the way and the temp is still too hot, buy a smaller light bulb or poke more holes into the bator.
When the temp can keep a steady 100 degrees or at least close to this, you can add the eggs and start the process.
Well, I think a fan is needed when dealing with a light bulb, not so much a heating element in a styro foam incubator, but a light bulb gets to hot for the styrofoam. I set a 40 watt light bulb in a mini fridge in my uninsulated unheated shed during the middle of winter, the temps were 18 outside, and the fridge got to 120+ degrees. If you were to use the dimmer I would talk to cmom about the wiring if you are unsure, and she could help you I'm sure. I think the big dimmer switches that connect to the light switch in the wall are the one you want to use. I seen a video on youtube about a woman with a homemade still-air incubator and the temperature was regulated with a dimmer switch that plugs into the wall, and I don't think she hatched any eggs.
Yea I used the same dimmer switch that woman used in the YouTube video I believe. For a small egg hatching process you don't want to deal with wiring. The light bulb conveniently plugs into the dimmer and then the dimmer plugs into the outlet. All materials can be found at lowes. I've hatched over 200 eggs using this method. I just started hatching this year as well. The fan is only needed to circulate temperature. You don't want any hot or cold spots. Fans are necessary for bigger bators. When you only want to hatch 1-20 eggs at a time you don't really need one. The only reason I don't use one however is because I couldn't find one and didnt want to pay for or set one up. By all means add a fan. It couldn't hurt. But if u have vent holes you'll be fine. And yes, styrofoam holds heat extremely well. The first time I did a test run the temp was well over 150 degrees and that was with the dimmer all the way down. I had to switch to the smallest size light bulb. I believe it was a small 20 watt bulb. This was perfect.
Quote:
THIS! ... this is exactly how I hatched my 1st eggs ... and old cooler, an old lamp, and a dimmer switch ... I had a pretty low hatch rate, i think 4 or 5 out of a dozen.... but good enough for a school project.