I wish I felt confident doing that. I even have a cooler that plugged in and heats and cools so it might be a great one. I built my coop, but electric stuff gets me. With my coop it was just one outlet and plug light.
Looking forward to the pictures.
ask around! friends family, communicate! ask on CL, some of my best items have been made from items I ASKED for on CL, post an add in general sales asking for items you are looking for!And you will be surprised what your friends and family have that would love to get rid of!
GREAT thermostat and it’s cheap, about $15. And it includes a probe that you will set at the level of your eggs in the incubator. You can find them here: Digital Thermometers 110 VOLT Digital Thermostat and Solid State Relay Wiring Diagram found here Wiring Diagram Video SEE VIDEO HERE... YouTUBE Links to the Solid State Relays EBay Solid State Relays
Heat Source = Light Bulbs!
We use CERAMIC Light SOCKETS already with the wires, see below... You can also use lamp kits. We use TWO lights! Why? If one lamp blows we still have the other that will continue to heat the incubator to its correct temp and can save your entire hatch. This is HIGHLY recommended if you hatch expensive eggs or shipped eggs. We use two 40 Watt Bulb! Refer to thermostat wiring diagrams for installation. Placement of the lamps should be towards the top of the cooler but NOT close enough to melt it. You don’t want them low directly over your eggs.
If you didn't install a double, I HIGHLY SUGGEST YOU do two lights in one of these!!
THEY DO BLOW, and they blow your hatch could easily be lost!
Fan Installation
You will need a 12v dc pc Computer cooling fan, new or used.
You can find them for a few bucks here: cheap less than 5 bucks shipped FANS on ebay
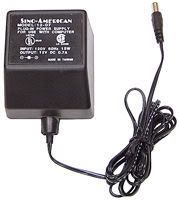
You will ALSO need a 120v input 12v DC output USED adaptor/transformer/inverter. We used one from an old phone. You will snip off the end and wire it to the pc fan. Wire the black to the black and the red to the other mixed color wire. Secure w/ electrical tape and wire nuts. Location should be where it can blow across the bottoms of BOTH bulbs so that the heat is quickly dispersed and this also will reduce HOT SPOTS in the incubator under the bulbs.
We use Plexiglas. not sure on cost? Glass from a cheap picture frame or window will work too! The bigger the viewing area the better! We use clear sealant, in the pic above it is still wet but has since dried clear.
Ventilation Holes
Yes, you NEED THEM! Please refer to: Hatching 101 ~ Ventilation Section
We have ¼” holes all around the bottom of the cooler and the same along the top, refer to above pic. We also have the drain plug, and we drilled three ½” holes on the sides near the top, one is close to the fan but not directly behind it for more air exchange.
Wire Platform and Water Wells
You can cut wire so that it is shaped like an open box and fits in the bottom of the incubator, just remember to make it high enough so you can fit water dishes in the bottom, Remember surface area is more important than depth when trying to up the humidity. Please refer to: Hatching 101 ~ Humidity Section
thats what I thought with that shipped batch I had, and I got one, but it was my fault because I knocked over that polish egg by accident and it died the next day, keep them upright and only turn the stable ones and very gently, never roll them or wiggle to check air cells, just candle from top, if you see growth keep on truckin!
thats what I thought with that shipped batch I had, and I got one, but it was my fault because I knocked over that polish egg by accident and it died the next day, keep them upright and only turn the stable ones and very gently, never roll them or wiggle to check air cells, just candle from top, if you see growth keep on truckin! sorry they got so messed up, such a bummer
I think if they had been LF eggs They would've done better. They were in a Styrofoam egg carton and each egg was wrapped in a paper towel and I don't think it provided enough stability. Plus there was no indication on the outside of the box that it contained live eggs so it probably wasn't treated as gentley as it should've been.
I think it's funny how we both disappeared at the same time...people will talk....
you guys think I'm off?
Momma called it "special" my favorite flavor is Windex.....
You think I'm angry?


 sorry they got so messed up, such a bummer


