After (literally) years of planning I am within a month of having my dream of chickens come true!
 Despite the many plans/ideas/set-ups I have considered over that time (you can see my history of posts, it has been all over the place) I’m ending up with a pre-made shed. I had asked my dad if he would help me with the coop construction and he said “sure” then told me to go buy a shed and he would pay for it.

Soooo, we are getting a 10’x16’ shed that will be installed sometime over the next week (the gravel pad is going in right now as I type). The first 4’ of the shed is actually a porch, so I have 10’x12’ for the coop. After much contemplation, referencing back to everyone’s suggestions, and rearranging items this is what I’ve come up with.
My main goals:
- To start with 8 chicks (the minimum number I can get from Meyer hatchery in the winter), but be able to comfortably fit up to 16 chicken
- Be able to brood and/or isolate inside the coop (not quarantine)
- Be able to access feed, water, and nest boxes without entering the coop (this is mainly for when we have friends watching them)
- Have storage for feed, bedding, and cleaning tools in the coop
- Have poop trays
- Have a community nest box, possibly a roll-out one (will wait and see if it is needed)
- Make coop maintenance and clean-up easy (hinged poop trays, lift out roosts, sweep through clean-out door, painted/sealed floors and walls)
- Coop and run should be predator safe (I realize predator proof is virtually impossible, I live in the country and I am planning on a certain amount of loss)
- Have a run large enough for short periods of confinement of 16 chickens (for a week’s vacation when friends are watching them)
- Have a yard for free ranging
- Use mostly rainwater collection for fresh water
Constraints:
- Central Texas, hot weather
- Run must be on right side of coop due to yard layout
- Predators include bobcats, house cats, foxes, skunks, coyotes, wild dogs, hawks, and rattlesnakes (that we’ve seen/heard/smelt) and raccoons, weasels (least and long-tailed), opossums, and owls (that we’ve read about).
- Electricity will be run to the coop
- Water spigot 50’ from coop
- Highly visible from the house, the coop is essentially facing the house across our driveway and small “front” yard
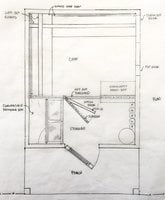
I haven’t shown any windows/ventilation on the plans as I will be adding it them the coop is in place. The shed windows available were fairly expensive, only opened from the inside, and didn’t open all the way. I will be adding about 96 sq.ft. of ventilated window area and another 6 sq.ft. of gable venting.
The plan shows a storage vestibule separated from the main coop area by chicken wire (chicken wire will only be used INSIDE the coop to limit chicken access to areas. The left side of the vestibule area is the brooder. It will be about 3’x4’ and counter height, the brooder will have a “chick door” connecting the brooder to the main coop (I think I read this on one of Blooie’s threads). When not in use as a brooder or isolation pen the top half and front doors of the brooder will fold back to allow for a 18” working counter and easier access to the shelves above. The right side of the vestibule has access to the nesting boxes, water tank for the nipple bar, and through wall PVC feeders (feeders and water nipples are accessed from the covered run, chickens will have access to the run 24/7)
The door between the vestibule and main coop will be a Dutch door so that I can toss treats into the coop. The bottom portion of the door will be raised up with a large lift-out threshold (in case I want to do deep litter, I’m leaving my options open at this point). As you enter the coop portion the community nest box is to your right with the pop door next to it. To your left is a large 24” deep poop tray at about waist height, the same type of poop tray will be on the wall opposite.
The run will be approximately 10’x20’, covered, enclosed in hardware cloth, and skirted with a 3’ no-dig apron. It will have a people door on one end.
I would love to hear any constructive criticism or helpful comments. If you have any questions please feel free to ask.


 . They are enclosed (le sigh) but I am prepared to cut them open if necessary to ventilate.