Instructions and list of materials to build a plucker:
1 belt (size, and length will depend on motor pulley, and 6 pulley)
2 3 PVC caps
2 7/8 pillow block bearings (I got mine from EBay)
1 36 piece of galvanized ½ pipe
2 ¼ blots 5 long
2 ¼ lock nuts
4 ¼washers
48 plucker fingers (I got mine from EBay)
4 ½ lag screws 3 long
4 ½ washers
1 6 pulley (I got mine from a mower deck pulley from a riding mower build by MTD)
1 ¾ HP, 1725 RPM electric motor (Mine is a blower motor)
1 20 long 3 PVC joint
1 7/8 wood spade drill bit
1 ¼ metal bit 6 long
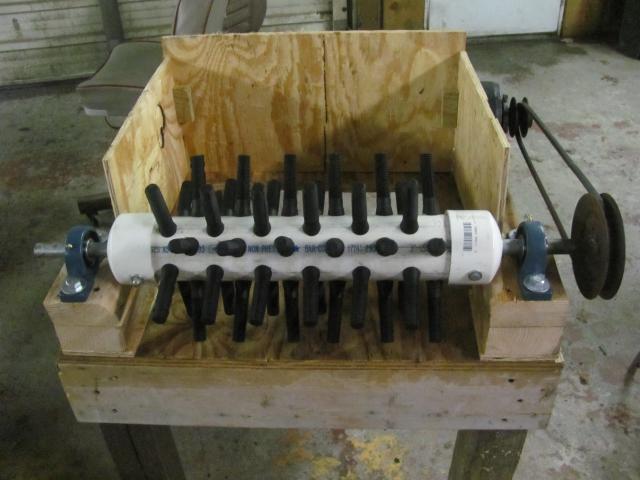
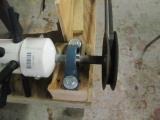
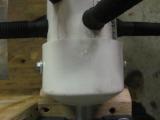
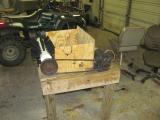
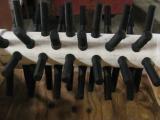
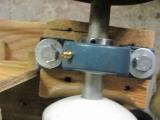
Take PVC pipe, space 8 lines evenly around pipe, these are the lines to follow for the fingers mounting, put one PVC cap on the joint of pipe and space 2 1/2 from cap and put a mark, space another2 ½ from that mark and put another mark, do 6 of these per line for the fingers (the marks are the middle of the boles for the fingers). From one line to the other stagger your fingers, but make sure to keep the 2 ½ between fingers on the same line. After holes are drilled using a 7/8 spade drill bit, take same bit and drill hole in both PVC caps, center hole on caps. Mount all fingers to pipe by pulling fingers from the inside of pipe to the outside of pipe, after fingers are installed put both caps on. Take assembled PVC pipe and caps and insert the galvanized pipe through the holes in the PVC caps, center PVC assembly on the galvanized pipe, drill a hole through the PVC cap, PVC pipe, and the galvanized pipe, put bolt through hole and put nut on, go to other side of PVC and drill hole there. Take galvanized pipe back off, weld pulley to end of galvanized pipe (make sure to remove the outside layer of galvanized pipe with a grinder or sand paper because you cannot weld to this). After cooling, put one bearing on Galvanized pipe, then PVC assembly (mount with bolts on both ends), and put on other bearing. Get whatever stand you are going to use and space PVC assembly up enough so that the finger do not touch anything (mine came out to be roughly 3 high). Space bearing away for hitting anything and mount bearings to stand with the lag screws, tighten the set screws in the bearings. Put belt on the motor, and on the pulley attached to the galvanized pipe, tighten belt and mount motor (how you mount you motor will vary depending on motor, mine is mounted with 4 bolts). Put power to motor and you are ready to go. If you have any more questions feel free to Email me with them or post a reply and I will try to clear them up for you.

1 belt (size, and length will depend on motor pulley, and 6 pulley)
2 3 PVC caps
2 7/8 pillow block bearings (I got mine from EBay)
1 36 piece of galvanized ½ pipe
2 ¼ blots 5 long
2 ¼ lock nuts
4 ¼washers
48 plucker fingers (I got mine from EBay)
4 ½ lag screws 3 long
4 ½ washers
1 6 pulley (I got mine from a mower deck pulley from a riding mower build by MTD)
1 ¾ HP, 1725 RPM electric motor (Mine is a blower motor)
1 20 long 3 PVC joint
1 7/8 wood spade drill bit
1 ¼ metal bit 6 long
Take PVC pipe, space 8 lines evenly around pipe, these are the lines to follow for the fingers mounting, put one PVC cap on the joint of pipe and space 2 1/2 from cap and put a mark, space another2 ½ from that mark and put another mark, do 6 of these per line for the fingers (the marks are the middle of the boles for the fingers). From one line to the other stagger your fingers, but make sure to keep the 2 ½ between fingers on the same line. After holes are drilled using a 7/8 spade drill bit, take same bit and drill hole in both PVC caps, center hole on caps. Mount all fingers to pipe by pulling fingers from the inside of pipe to the outside of pipe, after fingers are installed put both caps on. Take assembled PVC pipe and caps and insert the galvanized pipe through the holes in the PVC caps, center PVC assembly on the galvanized pipe, drill a hole through the PVC cap, PVC pipe, and the galvanized pipe, put bolt through hole and put nut on, go to other side of PVC and drill hole there. Take galvanized pipe back off, weld pulley to end of galvanized pipe (make sure to remove the outside layer of galvanized pipe with a grinder or sand paper because you cannot weld to this). After cooling, put one bearing on Galvanized pipe, then PVC assembly (mount with bolts on both ends), and put on other bearing. Get whatever stand you are going to use and space PVC assembly up enough so that the finger do not touch anything (mine came out to be roughly 3 high). Space bearing away for hitting anything and mount bearings to stand with the lag screws, tighten the set screws in the bearings. Put belt on the motor, and on the pulley attached to the galvanized pipe, tighten belt and mount motor (how you mount you motor will vary depending on motor, mine is mounted with 4 bolts). Put power to motor and you are ready to go. If you have any more questions feel free to Email me with them or post a reply and I will try to clear them up for you.


Last edited:


