Killing, Plucking, Eviscerating, & Cutting Up Your Chicken - Graphic!

Pics
WOW!! this was great, i have a rooster in a suburban house, and well, as you can guess, the neighbours have complained. I have had him since he was 3 weeks old, so dont want to really get rid of him, but the noise is preventing me from keeping him now. I decided, i may as well (since having spent money on food and upkeep and time) to eat him. And this is really great advice.
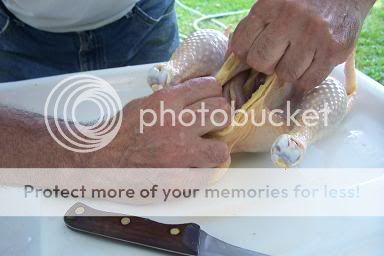
On a few points though, If i dont have a 'cutting cone' thingo. is it really all that important? and as far as most of the prep, as far as plucking prepareing goes,IS it almost similar to gutting/preparing fish? or is there something that oyu have to do (due to it being poultry)? I eat a lot of 'fresh' meat per say, but am jsut being cautious due to the poultry factor.

Thanks though for a great and detailed system :)


I don't have a cone. I tie their feet and hang them from a strong branch off a cherry tree in my backyard. I hold them on their back in my arms until they're relaxed, tie their feet then slowly lower my arms until they are hanging. They will flap a few times after I cut their neck, but so far they haven't broken any wings against the tree trunk.

I saw someone else on BYC used a flowerpot as a cone.

Good luck.

The last time I processed my big year and a half old rooster, I tried using a killing cone made from a gallon milk jug. I cut off the bottom and stuck it's head thru the pour hold and it worked fine. I have two cockerels I'm going to process this weekend (sons of the above mentioned roo) and I think I will use the milk jugs again.

CG
 
This is how I open up the back end:


Open Up The Back End

Now we come to the really exciting part of butchering a chicken, or at least the start of it. Before you can reach into the chicken’s body cavity and pull out its insides, you need to cut an opening at the back end.


My approach to this is to cut a small opening with the knife, then reach into the opening and tear it wider. The less cutting you do, the less chance there is that you’ll cut into an intestine or some other internal organ that you shouldn’t cut into.


So here we are at the posterior of the bird, with the knife in position to make a slice:


Directly below my knife in the picture is the cloaca of the bird. The cloaca is also sometimes called the "vent." Frankly speaking, it is the bird's butt hole. That is as frank as I will get.


Notice that I am pinching and lifting the skin above the knife. And notice also that my knife blade is angled up a bit. That’s what you want to do: lift the skin and slice up into the lifted part. By doing it that way, you avoid cutting into any internal organs. Here’s another view of the cutting position:


Now, in this next picture you can see that I have made a horizontal slice. I have cut through the skin and underlying yellow fat just enough to make a small opening into the body cavity.


Please Note: When you cut into the bird’s body cavity, no liquid should come out. If liquid (i.e. yellow-colored water) does come pouring out of the opening, the bird is sick. Throw it away. I have had this happen on two birds in ten years.


Here is another angle on the cut, showing just how much of an opening cut I make.


That’s all you need. Then you work your finger tips into the opening and enlarge it enough to get a grip on the top and bottom of the cut, as shown here:


See how I have two fingers on one hand and two fingers on the other hand in the body cavity and I am pulling the opening to make it larger? That’s what you do.


Here is where I need to warn you of something important. If the chicken has had access to food prior to butchering, there will be fecal matter (a.k.a, FEMAT) in its intestine. That being the case, when you tear the opening larger, you are going to put pressure on the intestine, and FEMAT will be forced out the vent.


FEMAT escape is disgusting but it is to be expected: FEMAT happens. When it does, stop what you are doing, position the bird’s back end under the faucet and thoroughly flush all FEMAT away, being very careful not to let it enter the body cavity. If you get FEMAT on your work surface, flush it away with lots of fresh water and a rinse of diluted bleach solution. Problem solved.


Here’s a picture of the body cavity opened up sufficiently:


Here’s another picture of the opened up chicken. My right hand is poised to plunge in. That’s the next step……


The extra skin left at the end - I cut in the centre and tuck the legs into it. Looks nice and pretty when packaged like that.

Like so:


When you are pulling the opening more, is the skin stretching or tearing?

Very good pictures. Your bird looks more like grocery store birds than mine do. Part of it I assume is the breed (I have easter eggers, with the occasional mixed breed) and part of it is my critical eye that is tried of working on them after two hours (it takes me that long
hmm.png
).

I don't know how to do it, but these pictures need to be added to the beginning with the original post for easy reference.

CG
Those are not my pictures. I just copied and pasted from a blog that I followed The skin is tearing and probably stretching a bit as well. :)


This is one of my first ones - before I figured out to tuck their feet and properly present it ;)

But the meat birds I raise are CX. I do dual purpose roosters as well for soup
 
Last edited:
Thanks. Does it matter what the outside temp is or the time of year to butcher?

I want to raise my own meat chickens next year. Home grown tastes so much better than store bought. I also need to put together a butchering/cleaning station.

I remember seeing my dad wring a chicken's neck and helping my mom pluck a chicken 55 years ago but I've never butchered and cleaned anything except a fish.
 
Personally I have decided Autumn/Winter/Early Spring is the right time.

The associated smells are going to be less, Flies are near non existent, Chicken soup is much more welcome on a cold evening!

It is 18:10 hear in the UK so dinner time my other half is just serving up a Roast Chicken as I type!
This white one far left to be precise

 
What an awesome thread! Melinda and I are getting ready to do our very first batch of broilers and this is certainly a help. We've done a few mature birds from our layer flock, but those are done one at a time and "presentation" was beside the point, as they go straight into the crock-pot with veggies for a hearty soup/stew.

Since I never use a water bath to dip them into, our first round will probably be done "dry" and then we'll try the bath and see how much a difference it makes. I'd like our broilers to look nice because if we decide to give some to family/friends I'd like them to have a well presented product.

Thanks to the OP and those of you who added for the great pics!!!
 
Does anyone have advice on what temperature the scalding water should be at higher elevations? I used to scald at 150 degrees when I was close to sea level, but that didn't seem to work well now that I've moved to 7,000 feet.

I managed to get through processing 8 birds this fall, but would like to raise 50 or so this spring. I can't imagine doing it if I have as many struggles as I did this year!
Tell me what was the most difficult. It doesn't have to be! I have been raising birds for food since 1983 off and on.
I take notes each time about what would have made it faster, easier and more humane.
Since I hatch and raise so many, I have such a large supply of roosters I may only do "meaties" 2 times a year now if that.
I wouldn't think the water temp should change. When you do the pull test to see if the wing or tail feathers pull easily they are ready.
the farthest wingtips at the joint will tell you the most, as well as the tail feathers.
The trick is short frequent dunks (15-20 seconds) and swishes, check, dunk, swish, repeat. When the tail feathers pull easily dunk in ice water.
I HATE plucking since I have stiff hands from arthritis, so I have tried very hard to make it easy for me.
 
Thanks for your input.

How did you do with your first chicken butchering job?

Do you have help or do you do all the processes yourself?

I want to raise my own meat chickens next year but I know I will have to do ALL the work myself.

Do you have any recommendations on setting up a work station for killing, plucking, eviscerating, & cutting up the chicken? Should it be done out of sight of the other chickens?
What equipment will I need, or what can I get by with, since I live off the grid?

How long will it take to kill and clean my first chicken?
 
I need your input.

How did you do with your first chicken butchering job?

Do you have help or do you do all the processes yourself?

I want to raise my own meat chickens next year but I know I will have to do ALL the work myself.

Do you have any recommendations on setting up a work station for killing, plucking, eviscerating, & cutting up the chicken?

Should it be done out of sight of the other chickens?

What equipment will I need, or what can I get by with, since I live off the grid?

How long will it take to kill and clean my first chicken?

I need all the encouragement I can get.
(BTW I'm 65 years old and live in the middle of nowhere off the grid).
 

New posts New threads Active threads

Back
Top Bottom