My Coop/Run Build Thread - On the Cheap/Free with Documentation and Photos

Gbsmith002

In the Brooder
May 3, 2017
7
3
19
Hello all.

Been creeping for a couple/few years gathering passive information and finally won over my wife to have a coop.
Its always been one reason or another not to, including my reasoning, not to start yet...
We revisited the situation recently and came to an agreement that if here was no significant money spent then we could move forward.

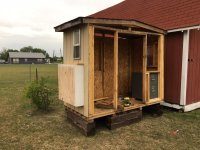
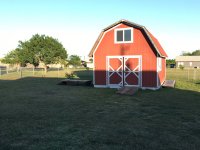
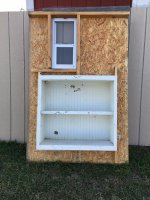
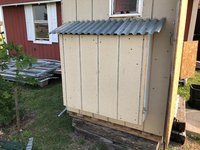
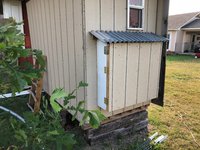
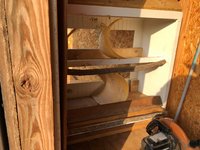
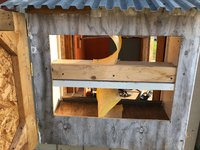
This thread will serve as documentation of our build, cost associated with it and my time for others to understand our process.
Please bare with us as we build as we have a busy life (with a current 7 mo. infant) and there will be periods of no progress.

I hope you enjoy it. Feel free to comment or ask questions. Please do NOT post your own pictures unless asked or post a link. Id like to make it somewhat easily navigable for others. Ill also try to edit this original post regularly to state specific progress by page of this thread.

Last week we took a step in and started the process... Please see the following post for our first plunge into Back Yard Chickens.

Enjoy!
 
Our first step/plunge into the process:

I recently have been scanning Craigslist / Facebook Market for Free/Cheap pre-existing structures to convert.


This was challenging due to a number of reasons:
1) The City of Austin has recently passed a bill/regulation/law whatever allowing residences to have: backyard chickens, a credit/check of $75 for your coop and free classes.... I'm sure its been crazy at those classes... But that's a different subject. With this once "free" coops are going like hot cakes and sometimes for crazy money... As I live near (not even in a real suburb - but close enough to have ATX as a resource) ATX this had thrown a wrench into our build...

See more here: http://www.twcnews.com/tx/austin/news/2017/04/14/get-paid-to-raise-backyard-chickens-in-austin.html

2) People want crazy money for me to haul off their junk... Again, another different subject.

3) And lastly, time to handle the potential coop.

Solutions to these challenges:
1) & 2) above: I resorted to searching for "Dog Houses", "Sheds", "Playscapes" & "Playhouses".
This small change in search provided us a larger amount of possible structures that could be relatively cheap to convert...

3) Sometimes you gotta bite the bullet and do it... Even if its in the middle of a work day, which is what I did, to get the perfect coop in my eyes. So I jumped on it like hotcakes and committed.


After a few (lucky) hard days of searching we stumbled on this:


After messaging the owner and setting up a time we worked out the details for me to come claim it. It has small windows for ventilation and looked complete... Note that it was FREE! Score!

When I arrived onsite I found that it was going to be a bit difficult then previously thought... Which made me glad that I brought alot of tools, a borrowed enclosed trailer and made it happen.

In reviewing the shed I found about 50 hornets in multiple nest (probably about 7-10 total). I was not prepared for this and had to ask the owners if they had spray or somethign. If not, I was gonna spray them with a garden house and have everything wet after pushing them out, which I wasn't looking forward to because they would most likely not stop them completely and then all the material would be soaked... More on this in a minute. Thankfully despite the owner not having spray, they went out and grabbed some for me as I was prepping. Once they were back I started hammering them 1 nest at a time. This process added up to about 15 or so minutes. Moving on...

Here is the condition in better detail:


Basically you are seeing the back of the house. Just left of this photo was the "back yard" fence. Probably a total of 10' in depth (including the shed) to work within. This is due to a the property plotting in the subdivision... Basically they stuck 2 houses on about .3 or .4 of an acre.

Here is a rough video of its inside and other details:
0.jpg


As you can see in the short video (provided by the owner - sorry I didn't get more photos while I was there...) there was a good amount of junk in it still when I arrived...

This included: a large amount of field mice drops, nasty carpet with embbed junk, a none function security camera and other random junk. Special note, bring a mask if your gonna do something similar...

With the facts mentioned above I started fully disassembling it into workable panels to transport the shed to the front easement of the property. I basically used the hand truck/dolly and dragged some of it. Cedar trees in the route (bottle necked a one point to about 3.5'W) and the owners outdoor furniture added to the fun. The total route length was about 35 - 45 yards - but "as the crow flies", about 20 - 25 yards.

Thankfully this unit was assembled with primarily screws.

Process:
1) I studied the shed and its previous assembly to understand how to go about the disassemble
2) I removed the door from the unit, see the picture above.
3) I then removed the roof from the walls. I had to "remove" a few screws with a HD crowbar & hammer due to the limit space (on the back of the unit).
4) Then disassembled it into 2 sections at the peak by removing the small support braces and the top peak shingles. Then trucked it to the trailer at the front.
5) I then removed the small cabinet & the carpet "countertop" a shown in the video. Thankfully the cabinet was not built-in. This will serve as our future nesting boxes - score! I just set these to the side for later clean up and removed the remaining mice dung infest carpet and misc junk...
5) Moved to the front door wall. Removed the screws from the: base frame wood "plate" and side wall framing. Then trucked it to the trailer.
6) I then removed the wall closest to us in the pictures as to make an easier path for the other panels. I was able to keep the base wood "plate" with the walls due to easier access this time. After trying to remove it I found hidden fasteners behind the siding. I didnt want to remove the siding to keep the strength to the wall panels so I got my HD crowbar & hammer and started hammering away at ~5 per corner. Then trucked it to the trailer.
7) At this point I was able to move the shed with the dolly due to the weight reduction. I moved it away from the wall and things got alot smoother from here.
8) Then moved to the opposite wall repeating step #6.
9) Then removed the back wall. I knew this was going to be more challenging as it would weigh more and not easily broken down further without damage / scabbing later. So I heaved it (with wood base plate) in 1 piece and drug the wall.
10) I then did the same for the floor (made of 3/4"? plywood, 2x4s running side to side & planter timbers.

I then took some cedar limbs (sp*?) that they had laying down from the spring cleaning... These will be for the roost. Another score!

Cleaned up my mess, packed up and split. Ran by sonic for a drink/ snack and went home to see my baby girl, wife and unload.

Total Cost / Running Tab:

Total Direct Material Cost: $0

Indirect Material Cost:
~$25 in fuel round trip...
~$5 in sonic food junk...

Total Indirect Material Cost: $30

Hypothetical Labor Rates @ ~$15/Hr of a general carpenter:
Total Labor in Drive Time: 1.75 Hrs = ~$26
Total Labor in Working Onsite from ~1:15 to 5PM: ~$64.

Total Hypo Labor Cost: $90

As I an doing all the labor we net: $30.

More coming soon (hopefully)...
Gbsmith
 
Last edited:
Sorry for the slow response.
Been crazy busy...

Alright. Got everything back to the house and started assembly. I am much further along then these pictures... But no time to post so LMK if you have any questions and ill try my best to remember/explain.

Here is the base of my coop. I had free left over railroad ties (free via craigslist a year or so ago) from an old project that have been pretty much fully weathered with very little leftover pesticides... Simply cut in half (or so) and stacked and screwed down & with rebar. I did this to expand the yard/run and provide 24/7 shade for the hens. See "Base 1" & "Base 2". Notice that Base 2 shows the backside of the base. I later came back and mimicked the front support as the span was too great without some sort of support. More or on this below.

You can see my overall yard and placement "Base 3". Took a few hours to set everything for the base of the coop.

After this I cut in the free base cabinet (my future nesting boxes) that was with the shed when I got it. I added more framing later to support it internally.

Assembly:
Basically repeated the original tear down in reverse - but it went much quicker as I had been through it once.

I did apply the front wall cladding and door with a few screws to protect it from rain... but I pull it and the door off when I work on the internals.

Assembly took a few short hours for a few evenings.

After assembly I placed a file cabinet into the front wall. Ill cut the door in and apply trim later for this. I claimed this from a free craigslist ad. I plan on having Meal Worms & possibly crickets within the drawers. As you can see in "File Drawer" photo I have sealed it to the modified wall framing for any possible in critters/predators that may try to get in... Not pretty, but it'll work. Side note, on the way to get this unit I saw 4 tires on the side of the road (rural pollution for ya...) and picked up 2 of them. Ill be using these as dust baths later...

After all of this I asked my pops (who raised chickens in the past) if he had any left over materials he doesn't plan on using in the future... He said he probably will never raise chickens again (too many projects on the fire) and just use the space for storage... Said to take whatever I wanted from his old coop. Score!

I grabbed: 2 standard feeders, reclaimed water barrel with spigot & PCV connections, & finally (drum roll please!) an automatic door opener with solar panel & timer!! But... he did say that he never got it to run and didn't have time for it (which is ironic in general as it would save tons of time! ha). Regardless, there is like 6 wires... As long as the mechanism works I should be able to make this thing work - even if a new timer or solar panel is needed. This photo is from his coop, not mine so I still have to cut it in. He also said he had some H20 dispensers but we couldn't find them... But he said he'd be on the look out. Crossing my fingers.

Final notes... I have been very surprised how much help with materials and goofdd timing. Making connections and scouring: Facebook Market Place, Craiglist & our Family has made this project successful, all with upcycling, which has helped reduce our local land fill. It also helps that I have time and am not in a rush and wait for my opportunity on key items. Just food for thought.

Currently I have had the following items donated: shed with base cabinets, 2 tires, file drawer, reclaimed water system, auto door, feeders, railroad ties, landscaping timbers (in next post), metal roofing (in next post) & a 16' trampoline (more on this later - its for the yard). I bought a small trash can (for $3) & clear 4-drawer tote stack (for $5) from the person I got the metal file stack from as well. These will be in the next upcoming posts.

I am currently in search of: Chicken Wire, H2O dispensers & any misc hardware such as latches.
 

Attachments

  • Base 1.jpg
    Base 1.jpg
    744.9 KB · Views: 26
  • Base 2.jpg
    Base 2.jpg
    871.2 KB · Views: 24
  • Base 3.jpg
    Base 3.jpg
    498.3 KB · Views: 26
  • Nest Box.jpg
    Nest Box.jpg
    572.4 KB · Views: 26
  • Assemb 1.jpg
    Assemb 1.jpg
    478.4 KB · Views: 26
  • Assemb 2.jpg
    Assemb 2.jpg
    447.5 KB · Views: 24
  • File Drawer.jpg
    File Drawer.jpg
    559.8 KB · Views: 26
  • Reclaimed Water.jpg
    Reclaimed Water.jpg
    629 KB · Views: 24
  • Base 1.jpg
    Base 1.jpg
    744.9 KB · Views: 25
  • Base 2.jpg
    Base 2.jpg
    871.2 KB · Views: 24
  • Base 3.jpg
    Base 3.jpg
    498.3 KB · Views: 25
  • Nest Box.jpg
    Nest Box.jpg
    572.4 KB · Views: 25
  • Assemb 1.jpg
    Assemb 1.jpg
    478.4 KB · Views: 25
  • Assemb 2.jpg
    Assemb 2.jpg
    447.5 KB · Views: 25
  • File Drawer.jpg
    File Drawer.jpg
    559.8 KB · Views: 25
  • Reclaimed Water.jpg
    Reclaimed Water.jpg
    629 KB · Views: 25
  • Auto Door.jpg
    Auto Door.jpg
    535.7 KB · Views: 25
Total Cost / Running Tab:

Total Direct Material Cost: $8
$3 for Trash Can...
$5 for Totes...

Indirect Material Cost:
~$10 in fuel round trip...
Total Indirect Material Cost: $40

Hypothetical Labor Rates @ ~$15/Hr of a general carpenter:
Total Labor in Drive Time: .5 Hrs = ~$10
Total Labor in Working: 10 Hours = ~$150

Total Hypo Labor Cost: $250

As I an doing all the labor we net: $78
 
if there is one thing I'd spend money on it's hardware cloth! if you can score it for free then all the more power to you. Also, I would suggest avoiding leaving space under the shed where rats can live. rats and coons seem to be the two hardest to deal with, especially after they get established. I wouldn't leave any gaps where a female rat can get through and gorge herself on feed, doing so pretty much takes care of the coons. I could go on about rats, for a long time, take them seriously or they can spiral out of control at the drop of a hat.
 
Long time no see!
Man life is crazy... Finally got back into the groove on this thang.

Well, I cant find my roofing photos as I had mentioned in the past... But ill take some new ones and post them in my next update.

Here is my most recent work...
Basically the shed was all just studs with exterior siding. As I was a General Contractor in the past I have some materials lying a round... This time I nabbed some insulation from one of my other projects to help my hens out and kill the drafting that some encounter. In addition, it should help kill some on this Texas sun when all the windows are open.

As you can see I have a bunch of different colored wall panels. This is due to the fact that I want something some what cleanable and provide an extra line of defense to all who try and work themselves into the coop... I currently work at a cabinet shops so all these materials were free to me (however, we daily give materials away that are perfectly good but inefficient for us to use and they end up at the curb so you might think about that in your build). Continuing on I may have been sloppy cutting the marmoleum... but again this is more for function then looks at this point. Ill eventually put pond or shower liner down on the bottom and use contact adhesive / liquid nail to seal this puppy up and help with deep litter...

Then I move to the roast. The cedar was from the original shed tear down (the were spring cleaning so I grabbed 2 branches. The other branches came from the ditch in my rural area. Free Free Free!

I then move to the nesting boxes. Opened here up and going to build a door there...

No costs incurred at this round. Wahoo!
Well, for now, this is "over and out".
 

Attachments

  • 1.jpg
    1.jpg
    341.9 KB · Views: 17
  • 11.jpg
    11.jpg
    343.8 KB · Views: 16
  • 3.jpg
    3.jpg
    300.2 KB · Views: 17
  • 2.jpg
    2.jpg
    375.8 KB · Views: 17
  • 4.jpg
    4.jpg
    329.7 KB · Views: 17
  • 5.jpg
    5.jpg
    507.3 KB · Views: 17
  • 9.jpg
    9.jpg
    481.8 KB · Views: 17
  • 8.jpg
    8.jpg
    370.1 KB · Views: 17
  • 10.jpg
    10.jpg
    1.1 MB · Views: 17
Here's the last few days worth of work.

Took the cutout from the nesting box cabinet and turned it into a door. Just framed it with 2x4s (on its side) from past projects and added corner braces from the scrap. Matches well now and not too our of place... Once painted it'll look decent. I do plan to change the lock... Just didn't have anything else on hand for that..

Went a little different route on the nesting boxes... As I only plan to have 4-10 birds at a time there was no need to make a ton of boxes... plus the cabinet is a bit shallow so I just split a bucket & cabinet in half. Simply just trimmed the bottoms to fit and screwed them stationary so the ladies have a bit more comfort and not peaking each other from one box to another.

Simple Chicken Coop Ladder was fabricated again with rural misc trees/scrub branch's and a single 2x4 from a past project.

Simple Feed Catch box from 1/4" (from the cabinet/nesting box back) and scrap 2x4s. Just need some hardware cloth to but over it...

Side Note:
Got some pullets about a week ago. 1 Black Link, 1 Ameraucana, 1 Production Red, 2 Cucko Marans & 1 Bard Rock. Then made a quick brooder from left over materials and got some shavings, feed, thermometer & heat lamp. That was about $80 total with the chicks. My pup, wife & baby daughter (18mo) were surprised and introduced to them. Has been cool seeing their reactions on it and excitement to help.

Till next time. Peace.
 

Attachments

  • a.jpg
    a.jpg
    748.3 KB · Views: 14
  • s.jpg
    s.jpg
    677 KB · Views: 13
  • sa.jpg
    sa.jpg
    731.5 KB · Views: 13
  • x.jpg
    x.jpg
    482.9 KB · Views: 13
  • q.jpg
    q.jpg
    643.2 KB · Views: 13
  • dadsa.jpg
    dadsa.jpg
    1.3 MB · Views: 13
  • asd.jpg
    asd.jpg
    1.2 MB · Views: 13
  • asdasdas.jpg
    asdasdas.jpg
    900.9 KB · Views: 13
  • asdasd.jpg
    asdasd.jpg
    712.9 KB · Views: 13
  • sadsada.jpg
    sadsada.jpg
    384.8 KB · Views: 14

New posts New threads Active threads

Back
Top Bottom