My fancy, home made incubator.

I would send you plans if i had some but i just built it off of the top of my head. i used high dollar cyder, and metal roofing that i had left over. I don't even know what it cost me.
 
I knew you'd done it out of your head, my father was the same way. I figured you could draw some up if PRODDED a bit. Exactly like your it need not be. And I can figure the roosts/nests and stuff.

Just wondering what dimensions you used, what you think the broadest spacing between wall studs should be or did you go standard 16", what kind of joisting you used for floor and base, how far apart your rafters are for that size of a thing. That kind of basic stuff. Because a chicken coop and roof need not really meet housing construction standards - lots of $$ lumber.

Since I converted stuff that was here for mine. Building from scratch would be a new adventure. So I have questions.

And I don't need fancy siding - I'm not looking to duplicate the look so much as the handy size, useful shape. I may hit the local sawmill for their edge scrap wood - little bit of bark on it and make a hillbilly version.

After all this is Soggy Hollar Farm...
 
Well absolutely,
As for the specs. I used 2x4s on 2' centers on the walls 2' on the rafters, and 2' spaceing on the floor also 2x4. the demintions of the coop are 6 x 10, it gives them 6x5 each breed (in the coop, out side is twice as much room). i only keep 4 giants and 6 rhodes in each 30 sq/ft. 2x4s are cheap and for a chicken barn they are plenty. However i always go 2' to support osb breaks. Yes i used 1/2 osb on the floor. Then i painted it with damtite. This is a water sealer for concrete but it works great to seal out the osb board. The roof i studed then lattered to tie the metal onto. In the winter i plan on insulating with ripped blue board screwed in between the rafters. Then i add a couple little 150 watt heat bulbs connected to a attic fan thermo and BAM i have myself a chick warmer. I hope to still get eggs in the winter. Time will tell. Another thing that i did was to put the access for the chickens in the floor. Heat rises but cold absorbs so i plan on putting the heat lamps right above the doors. I put 1/4" hardware cloth down on the ramp for two reasons. First to allow the chicken to climb the ramp when they were peeps, and second for the heat light to shine down on to absorb the heat and radiate. That's my therory anyhow. Well see.
Well i think i told all with my thinking. If not ask me and i'll be happy to share my thoughts.
 
Last edited:
Well this just in on Day 21.
Out of 20 eggs 19 hatched. four days ago 2 hatched that i started in a hoverbator before i was finished with the 144 bator, 16 hatched yesterday, which was 20 days and one hatched today the one egg left started to breaks the shell but hasn't hatched out yet. i'll give em' 1 more day to break out. If it does then that's 100% hatch rate on my first hatch out of this contraption. I did however move them to my new brooder this morning. i was sure to match temps before the swap however the humidity is not the same. i will have to watch that last egg closely. I just didn't want to keep the peeps in the incubator for another day for the sake of 2 eggs.

Sad thing was that 1 drowned in the waterier (My fault) and 1 of the peep's neck didn't work and it died.

But the hatch looks promising.

I have to tell ya'll this. You probubly won't believe me but it's true.

When my chickens started hatching over a month before i incubated. I marked two eggs with a red x. I took one and put it with my rhodes and i left one with my Jerseys. It was to remind them that this is where they were suppose to lay. It worked well. Well 21 days ago i collected the eggs. 3 days after i started incubating them i was candling and noticed that one of the eggs had a red x. rather than throw it out i kept it in there. Guess what, it hatched. I swear! it had to be at least 30 days old. i know it sounds like hog wash but it's true.

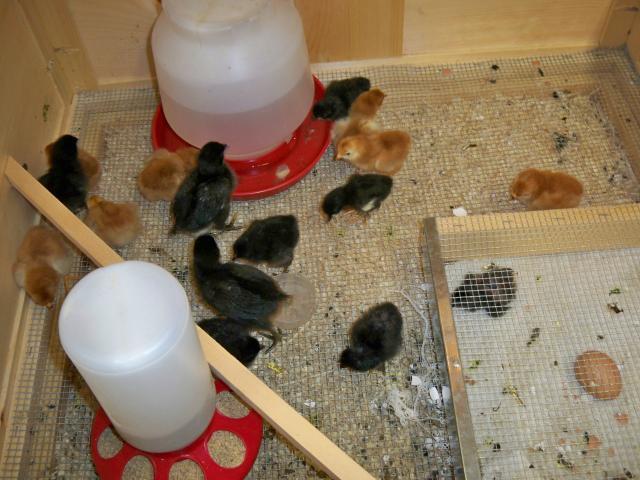
Here is the pic of the peeps in the brooder i couldn't get them all to stay in view though.
41326_peeps_day_21.jpg


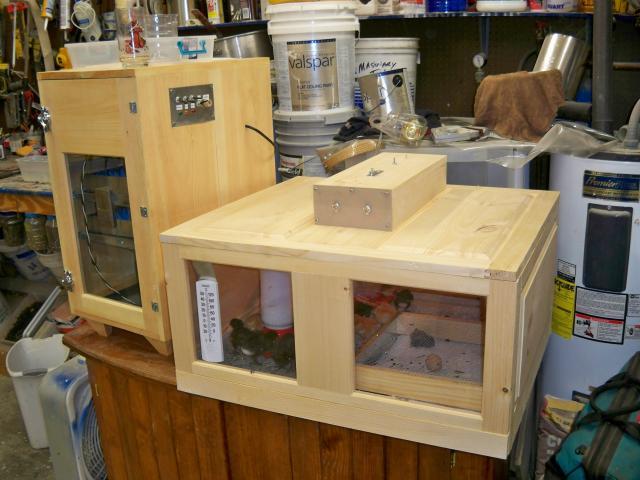
Here is my brooder that i through together before they hatched. i was out of time so i didn't get the finish it. i'll do that when i get them out and in the coop. Anyhow it's a forced air, wafer thermo controlled cabnet with a light and a droppings tray. It took me two days to design and build. It works awesome.
41326_brooder_box.jpg


By the way if anyone close wants to buy 7 rhode island red or 10 jersy giants for 2.50 each let me know. I'm also thinking of selling off my jersy giant adults to make room for my peeps. i have 3 laying hens and a gorgious rooster that is very noisy when he hears you. They are coop kept but i let them free range during the day at times. I will post a sell thread with pics tomorrow it's to dark to take pics now.
 
Last edited:
OMGoodness I am about to pass out from desire. You are very, very bad for showing us that brooder. I am thinking: Incubator end table with matching brooder coffee table... Oh My!
droolin.gif


P.S. Edited to add: and congrats on the awesome hatch... I guess I'm absolutely going to need one of these to go along with my wine cooler egg holder (oh dear... I bet you could design one of those to match too--incubator end table, brooder coffee table, egg storage cooler book end??)
 
Last edited by a moderator:
Want to know the cool thing about the brooder?
When you take a 96 bator and a hatcher, the brooder sits on top and holds them together. It was a design for a customer. When i build another set i will post the pics. I should of took pictures before i let them go but i had to build, stain, and have them out in 2 days. That was hard enough.
 
By the way we have a custom electro thermo for these now but in three weeks we should have a prototype of a humidity/ temperature controller with a led read out for temp/humidity, a egg turner motor control, a water sprayer controlled via the controller. We will be incorporating these into my cabinet design.
We will also be offering these in, you build it kits. Where i send you the cabinet parts, you assemble and stain and seal to your liking. This will save you in labor and shipping cost.

Stay tuned for updates.
 

New posts New threads Active threads

Back
Top Bottom