(picture heavy) New guy with DIY cabinet incubator build, come follow along

The cabinet has been holding temps steady. That sounds good and all but it's not. There are temp zones within the cabinet. The top egg rack is around 1.5 degrees higher then the bottom rack. I have not measured the bottom where the hatch out area is yet. I bet it's another degree cooler. I'm sure that it's because I don't have enough air flow. I added a big clamp on fan to try to balance the system. It seems to even the temps zones out. I will have to cut the area around the wood more. My current cut out impedes air flow too much and is not using the fans to the best of its potential.

I also was not able to increase humidity within the cabinet above 52 %. I had a decent amount of gaps between the door and the face of the cabinet. I added a foam weather strip and now I can easily increase the humidity to 60% with only 1 water tray as oppose to 2 with no strip.

I forgot to mention I mounted the egg trays so that I would be able to measure the temps on each rack for temp calibration purposes.

Here is now the cabinet stands for now. Don't mind the mess on top of the cabinet. I got tired of moving things back and forth as I fiddle with it. Don't mind those school books of mine either. They have been sitting there for a few days. School started last week and I'm procrastinating and have not touched them yet.


You can see the foam weather stripping in this picture. I added 2 strips of 1/8'' by 1/2'' foam strips. One on each side.


Here is a clear picture of the interior with the temporary fan in attempts to balance the temps.


ThangBom
 
Awesome built! Wish I had a son home yet to run to the salvage yard for some car parts lol. Are you sure your going to have enough heat with that for that big cab? let me tag someone just in case I cant get back here if its not.... @NaJoBeLe Nathan is this the same heating element you tried out? ugh and the other tag I cant get to work. I must be spelling it wrong. if I can find it I will come back and tag him. he makes some amazingly crafty bators. Keep on trucking!!

I have temps differences at different levels of the cabinet. The sensor probe is not long so I'm limited on placement to optimize the temp controller. The heater itself is adequate in heating the cabinet. It's just not as quick to increase the temp but that was part of the design. I didn't want too big of a heater element which will click on and off constantly due to heating the cabinet too fast. I rather a steady increase in temps than a on and off approach.

I with you on questioning the small heater in such a big cabinet. That's why I bought 2 controllers and 2 heaters just in case. It would be a simple install or swap out if ever I needed to change or add more.

Here is a bonus picture for you all. It's made from Kent type fingers, a few no name brand fingers and the tumbler of a large dryer. The bottom plate is a 1/4'' aluminum plant that we had cut. We drilled the holes ourselves. We had a thinner plate on the bottom and it would flex while on and spinning. I guess the centrifugal force would pull the fingers outwards since they are flexible and flex the thin plate that they were attached to.


ThangBom
 
Last edited:
love the plucker! what did you use as a pulley system and motor? we have a thread called processing support group where a bunch have made their own, I bought a big one after I priced all the parts, the pulleys are costly and then well, I figured this time I should just buy something. After we processed our meaties that year our freezer took a crap and we lost our birds and tons of stuff. I have yet to do them again. I am still mad.

Anyways.... about the quail and dying after hatch, how are you caring for them in the brooder? I think Oz had issues with him, I can try to help you out with that part but there are also quail threads on here with dedicated quail people, I have done them without issues, so not sure what up in your location or feeding n care.

your duck pen, that covering. What all have you put up? I think it looks pretty cool. We have a ton of grape vines here wonder if that would work and do a living roof for mine.
side%20of%20duck%20pens_zps66qeblei.jpg


When I did my upright cooler cabinet build I had to mess around with the bottom intake ALOT until I had steady all around. thats the upright cooler link ...... www.backyardchickens.com/t/861788/gigantic-cabinet-cooler-incubator-how-we-did-it-and-test-run-ready-set-go


I have more to say but of course no time to write it!!
 
I don't recall how the pulley is set up on the plucker. My dad finished the project. I only recall him saying he went to the local car body shop to get the shaft welded onto the feather plate. The belt was a regular car belt. The motor was given to us. I think it's a big 1.5hp motor. I'll take a few pictures for you this weekend when we go visit. I don't know exactly how much we spent on the plucker but my guess would be $275/$300 total.

We figured the quails out. My dad didn't have the right feed for them. He had the egg laying so it was 20% protein. We got him a bag of chick feed with I think 24% protein and all is good. The have been in the tub brooder out in the back for 2 about 2 weeks. My dad was in the process of building a 3rd quail coop last week.

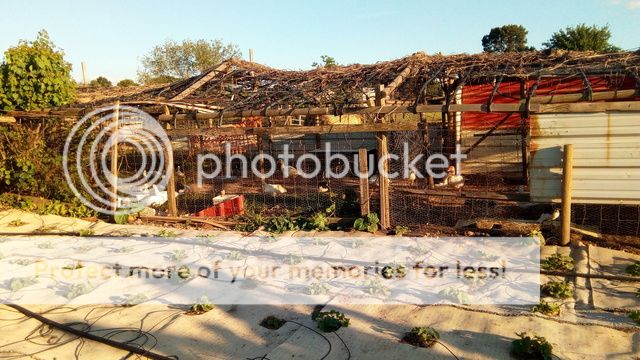
The duck/chicken pen is awesome. As the gourd plants grow, they "climb" the lattice and makes a very nice and cool canopy for the animals. It's almost a symbiotic relationship in the summer. The duck/chicken poop feeds the plants. The little duck bath gets dumped and waters the main plants. The plants grown and provide shelter and shading. We have hawks, vultures, coons, and stuff out here in the outskirts of Houston. Here is an old picture from the inside of the coop. You get a really good understanding of how awesome the system is.

Here is one with my old man to show how big these things grow with all the nutrients they get.


The birds actually "fly" and peck at the gourds and eat them which is okay. The plant's grow more than what we can eat or give away.

The Cabinet is a lot more even and stable with a bigger fan. I might just leave that cheap clip on fan in there for now. Then again, I might just buy a big cheap 120mm fan and install it. IDK, we will see.

I read your vertigo incubator a few weeks back. I did a lot of searching and reading prior to building my incubator. You like many others have many good ideas.

ThangBom
 
Last edited:
So the gourds are planted on the outside and travel up and over. Is this a handmade rope webbing for the ceiling? and is there any permanent prevention from fly outs and unwanteds coming inside? a smaller mess netting?
 
You are correct. The gourds are grown on the outside of the coop and grows upwards and over the coop. The red dots are where the main trunks of the plants are.


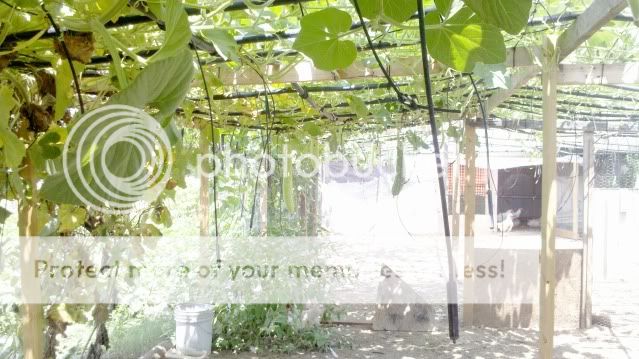
The "webbing" is made of irrigation tubing that we got for free. A agriculture garden center went out of business and gave them away for free. We got 2 truck loads full. We simply ran the tubing perpendicular to each other making the "webbing" for the plants to grab hold and grow on. The openings between the tubes are about 1'x 2'. It is small enough to keep the flying predators out and the fencing of the coop keep other 4 legged land animals out. We occasionally get a racoon, opossum or snake in the coop.

You can see the tubing in this picture. There are drip tubes hanging down.


We originally had a net that my dad made by hand to cover the top of the coop. That net only lasted 1 year as the relentless sun deteriorated it. We happen to come across the free irrigation tubing and it has been installed for years.

YzGyz
 
Very impressive, as Sally had mentioned that is the heating element I was using. I actually have two installed and still had to add 150watts worth of light bulbs to get my temp up. Also had issues with temp stability and circulation as you. I originally had 2 PC fans but wound up adding a similar one as you(same size just has a stand instead of a clip on). Based on the looks of it mine is 3-4X the size of yours, so that probably explains the heater not being strong enough. Still at the drawing board for the turner but life got in the way and it has been put on the back burner.
 
My cabinet is even and stable with the clip on fan. I will eventually put in. Bigger 120mm pc fan. I ordered a timer to control the window motor. I'll run it 1 second ever 20 minutes. That should be plenty of turning. I think the 3/4" plywood and 1/2" foam insulates it well. I also live in TX so be it should not be that bad.

Will have pictures of the garden tomorrow.

YzGyz
 
I didn't make it out to my parents until late so I didn't take many pictures but man-o-man does my mom have a green thumb. Just compare these pictures with the ones posted before. The old pictures were taken on May 13, 2017 and these are the ones I took this afternoon.

This is the bland melon patch all grown out.


Here is a good picture of the main trunk of the gourd creeping its way up the duck coop.


Here you can see a few of the other gourd creeping over and becoming a nice canopy for the ducks.


Some fresh green veggies.


The string beans have already grown out. Nice!


Here is a nice bunch of water spinach.


This is a good long view to compare with a prior one. Look at how much more green this picture is compare to last month's.


This is a picture of that bland tasting melon


This is the huge quail coop my dad built last week. It's 10' long and 3' deep. That thing can fit lots of birds!


Well, I don't know why but guess what this is. If you guessed a 8' version of the above you are correct. I don't know how many birds he plans to have around but it's going to be a lot.
 
So my dad likes these albino quails. He said he plans to turn one of the smaller quail coops to a albino only coop. So far we have 2 albino quails. The smaller older coop is about 4' long and 3' deep so it's really not that small.

This coop is the designated baby grow out coop. The mesh is 1/4 inch making it easier for the little ones to walk around. Once they group bigger, that are moved to the other coop with 1/2'' mesh.

This is this tag on the motor of the feather plucker as promised. It's kind of hard to read but it's the best I could get.


This shows the belt assembly


ThangBom
 

New posts New threads Active threads

Back
Top Bottom