Awww... so sorry to hear about your troubles!
This was incredibly easy to make. I did most of it with little help from my hubby. I really just "winged" it and it turned out ok! It literally took me 20 minutes to cut all the pieces and have it together...
Here's what you'll need: (Lowe's has it all. This is for the run only without a door. If you want a door on it, then get another piece of 3/4 sched. 40 and another 1/2 piece)
3 10ft. pieces of schedule 40 pvc 3/4"
6 10ft. pieces of thinner, more flexible pvc, 1/2"
6 pvc T's... with the top being 1/2" and the sides 3/4" (make sure you get all slip connectors and no screw ones)
4 pvc side outlet elbow... with the sides being 3/4 and top 1/2
pvc cement
zip strips... both 4" and 6" (a pile of them!)
poultry netting or whatever you feel comfortable using for the netting (black poultry netting is easy to work with in this case, but doesn't provide as much protection for the chickens as hardware cloth)
Steps I took:
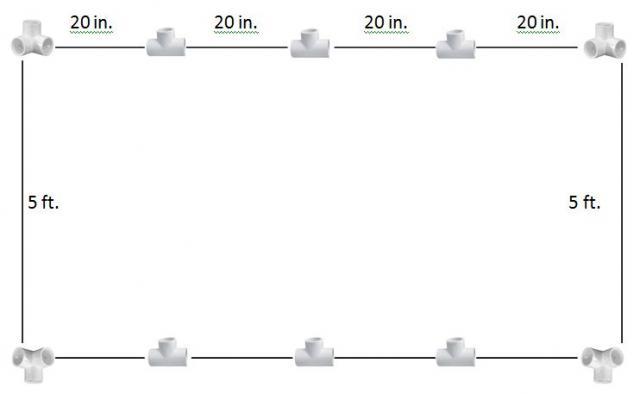
1. Cut 2 of the 3/4" pvc into sections approx. 22 in long. You will need 8 of them. (I made a boo-boo here... I cut them to be 2ft. but didn't take into account the extra length the T connectors would add. If you cut it 22", or 20" would be even better. I'll explain why later)
2. Cut the other 3/4" pvc in half so each section is 5 ft.
3. Arrange the base with the 5 ft. sections on each end, connected to the side outlet elbows. For the sides, start with a pvc section, then a T, then pvc, then T. Use 3 T's and 4 sections on each side.
4. Cement together.
5. Take 5 pieces of 1/2" pvc, insert and cement one end into a corner, wait until cement sets (a few seconds... it's quick), then bend and cement the other side into adjacent corner. Keep doing that for all the T's.
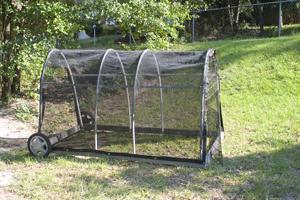
6. For extra stability I added a beam across the top with the remaining 1/2" pvc piece. I put it on top and drilled a hole big enough for a zip tie to fit down through, and then drilled a hole in the top of the arch and zipped them together. I did this on each arch. I suppose you could just zip it on, but I didn't want it moving around...
7. Cover in netting and attach with zip strips (I used 4" strips on the 1/2" pvc, and the 6" strips on the 3/4" pvc)
Voila! PVC run!
If you wanted to add the "D" shaped door on the one end, you will need to get another piece of both the 1/2" and 3/4" pvc pipe, and two 90 degree elbows. Cut the 3/4" into two 5ft. sections, cement the elbows on, attach the arch, cover with netting, and then attach at the bottom of the "D" with zip strips or maybe even hinges, and secure at the top with clamps.
Of course you could make this longer by adding more sections, or shorter by taking some away... whatever suits your needs!
And because I'm a visual person... here's a rough diagram of the base:
And after the arches are on:
Ooopsies I made:
I cut the sections for the base at exactly 24 inches. I figured my netting was 4 ft. wide and I'd be able to cover two "arch" sections in one swipe and only have to do it twice to cover the arches. Well, I didn't account for the inch or so that I had to overlap to attach it to the end arch, or the extra length the T connectors would add. Therefore, it wasn't wide enough to do two sections, only about 1.5. So I had to cover the first section, then the last, and then do a third in the middle. Wasteful... If I had only been thinking I would have cut the pieces about 20" long, and that should have given me enough to cover the run in two swipes. Does that make sense? You can see all the zip ties I used (plus the three extra that my 3 year old added for "zest" I suppose) that are on the netting only... that's to hold all the pieces together because they didn't overlap at an arch.
I also wasn't sure of what to do about some sort of door, but nurse_turtle came up with the great idea of having on end open completely with a "D" shaped door, which I am going to put on my coop, too!
Hope this makes sense! If any of it's not clear, ask away!
Best wishes!