Rebuilding an incubator

N.WChickenGuy :

How does the door seal ? how many vent holes does it have? the shell looks in rough shape are you sure youe efforts will be rewarded in the end? It may pay to build a new one in the end if after all your hard work you can't hold temp or humidity just my two cents though.
lol.png
please don't be offended:thumbsup

I don't have a door set up yet. The inside is in excellent condition with plenty of of space for the air to circulate. Definitely not a problem there. I think the outside of the cabinet won't be that difficult. Thecabinet itself is very sturdy. I think the door will be a challenge though. Not offended here. All imput is helpful.

It's learning how to set up the guts to work well and safely. Bascially I need heat, a way to circulate the air and a reliable way to regulate and show the temps and humidity. Right? If it can be done in a piece of styrofoam then why not something a bit larger?​
 
Quote:
Interesting thought. I never used a dehydrator before but would the heating element be tough enough to run steady for over a month? Some eggs take 21 days others can take 35.
 
The guts from a dehydrator would probably work well. Considering they are designed to work in a dampish environment and for extended periods of time, the idea has merit. I'm not sure if it would be able to crank out enough heat to get the job done though.

The pans of water probably go in the same section as the wafer thermostat and all these wires. That's one of the reasons I would consider getting some sort of sealed element (that silver ring around the fan looks to be a heating element similar to one in an LG or Hovabator).

Using wire nuts and then electrical tape over them should seal off any wire ends sufficiently for the humidity levels here. A little roof flashing or a water sealing type of paint may also help here. You could put down a coat of sealer then basically wallpaper the heating element section with flashing. That would give the heat something to bounce off of instead of "soaking" into the wood.

Did ya get that fan to work? Once you get that going or decide to replace the thing, the next steps would be 1) the little light, 2) heating element, and 3) thermostat.

Just had a thought here. There is plenty of room in that section. You could get an electric junction box and some small PVC piping to use as conduit, further protecting the wiring from water for where it has to travel from the front to the back. The junction box would give you a place to bring all the wires together in connecting to the power cord and a "stash" for all those wire nuts.
 
Quote:
Yes.......... and it works like a charm!!!!!!! I really don't think the heating elements were hooked up but I didn't actually keep it on very long to find out. I noticed a ring around the fan with wires that came out of each end that were disconnected. I believe that had something to do with the heat as well. The red like did work which I would guess is a good thing. I don't know how that disk works. It's not hooked up to anything but what I did notice is that you can move it close or far away from a piece of metal in front of it. Don't know what that means.

I did take more pictures of the set up. Maybe that will help figure things out and figure how to change things up a bit. I will post them later when I have more time.

Here are close up pictures of the stuff.

45848_12-10-2011i_3.jpg

The fan and heating elements are on the right and the wires run to the left and end at the disk.

45848_12-10-2011i.jpg

This is looking at the fan unit and you can see an aluminum ring where wires come out of each end that are not attached to anything.

45848_12-10-2011i_1.jpg

The wires do end here at the disk. I do not know how this works but the little light does work on the outside. The plug is also attached to these same wires but splits off just before the disk.

45848_12-6-2011_incubator_hutch_6.jpg

Ok, this totally stumps me. At first I thought this went in the back just under the fan. Does not fit. Then I thought my husband said it was part of the door.... can't see how that works. I have no idea where this fits in. I guess I will worry about that after I get the thing running properly.
 
Last edited:
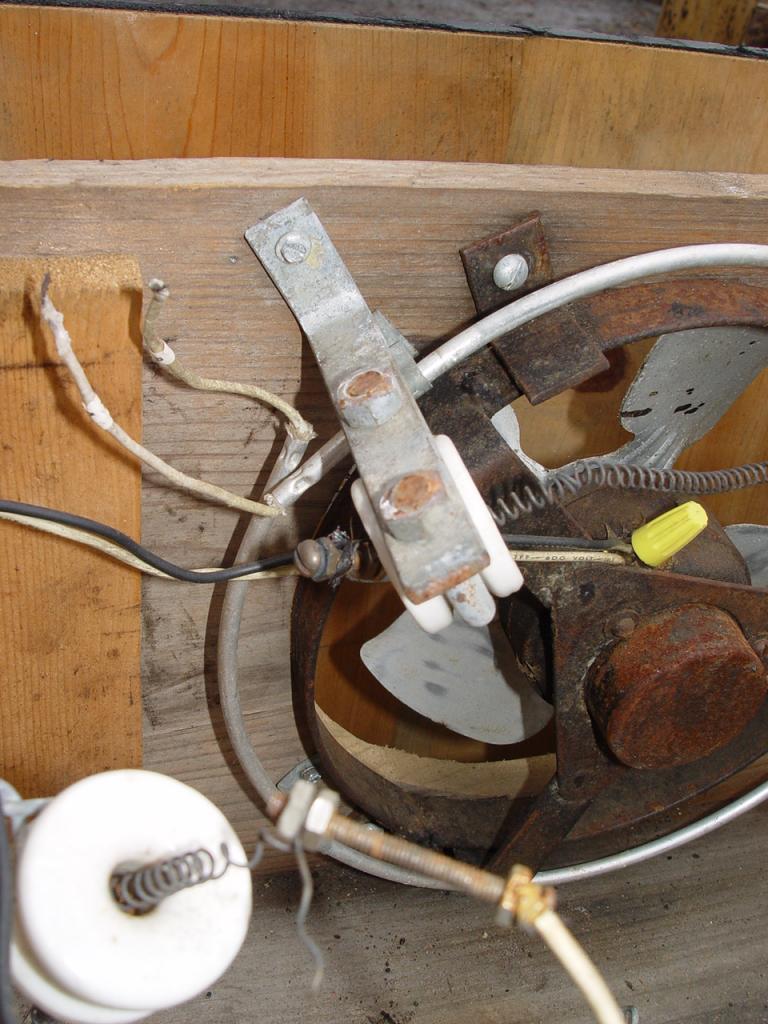
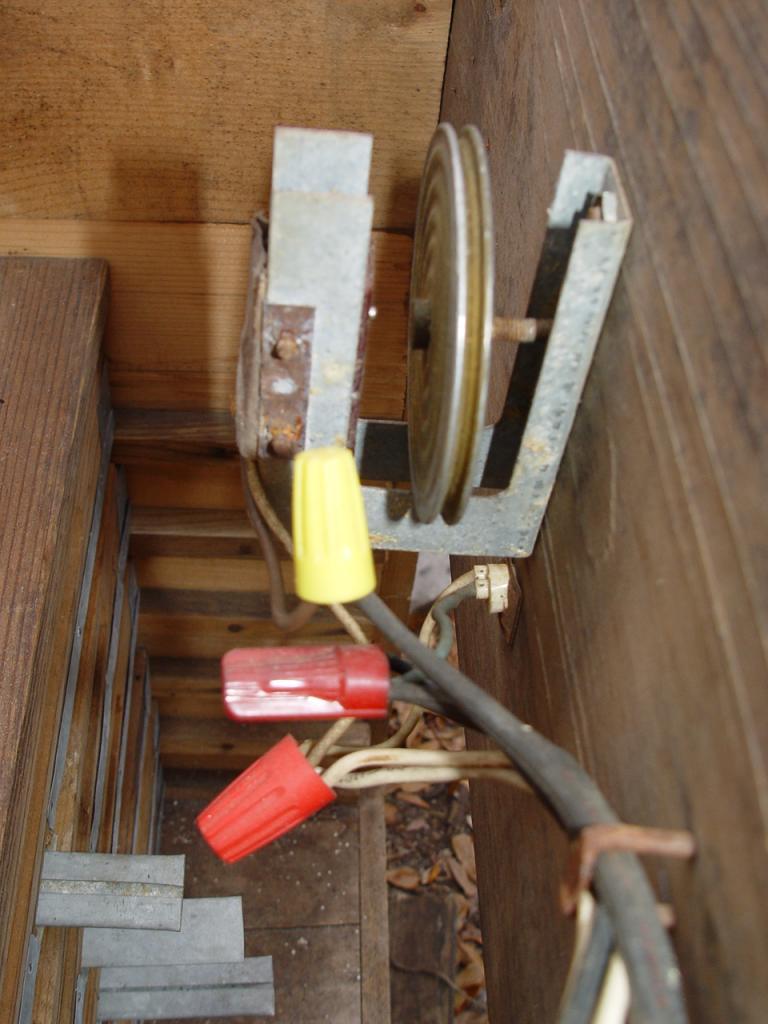
I want you to do something for me. first unplug the incubator. Look at the wire where it is connected to the plug, it's black and probably as big around as a pencil. Follow this pencil sized cord to where there isn't anymore black, and you will see one black wire and one white wire. There may be a green but right now we won't worry about it. The small black and white wires are called the conductors. The black wire carries the voltage from where it's plugged in, and the white completes a path to ground allowing current flow and making things work. If either one of these wires is unhooked, broken, burnt, for whatever reason, things don't work. Follow the small black wire around the incubator, and write down everywhere it hooks to something. Do the same with the white. I noticed in some of the pics that some places the wire is attached to something with a screw, this is called a termination point, other places where the wires are hooked together with colored plastic things, these are called wire nuts. Follow both the white and black wires through the incubator noticing where the wires are terminated, they all should be tight, the colored ones can be unscrewed my hand by holding onto the wires, and turning the wire nut. the others may need a screwdriver and a pair of pliers. If everything is tight plug the thing in and give it time to work, the coil may take time to turn red, the fan may or may not come on right away, but give it time. The light on the front may just be an indicator light telling you that the thing is plugged in, or it comes on and off with the wafer as the coil is hot. Don't be afraid to leave it plugged in for awhile, The coil may smoke alittle and smell bad, but as long as there's no fire,and the breaker or fuses didn't pop, the fan should run, the wire will get red, and maybe if things get the right temp. the wafer will shut things off. Give it a try. DON'T TOUCH ANYTHING AFTER YOU PLUG IT IN, KEEP YOUR HANDS OUT.
 
why not take out the 2nd and 4th trays use the 6th as a hatcher and get little giant turners for the remaining trays if you do three turners thats 140 regular eggs on turners and fourty or so in the hatcher. Just what I thought when I looked at it.
Have fun building
smile.png
-Dan

-
 
somebody help me with this wafer thermostat. I've never used one, and don't admit to being an expert on incubating, I use a styrofoam cooler and a light bulb. The one in the pics looks like it can be adjusted. It also looks like there's a coil infront of the wafer, can the wafer be drawn to the coil for whatever reason? Thanks.
 

New posts New threads Active threads

Back
Top Bottom