Bread Making: Sourdough BreadIt's Easy!
Fresh baked bread, I love it!
Cooking has always been part of my life. My Dad inspired me to learn how to cook outdoors. I learned how to cook all sorts of stuff a variety of ways. The kitchen seemed like just another workshop to me.
Shortly after I was married I watched my wife bake bread one day. I was stunned at the kneading process. Here was this 105 pound woman literally subduing and conquering that huge lump of dough. To this day I've never seen anyone knead bread as gracefully as her. And when she had won, there was a little sweat on her brow and a glow on her face...I was intrigued and I swept her up in my arms!
romantic interlude...

The next time she baked, I asked her to teach me how to bake bread like she did. She made it easy and I reveled in the fun she had baking. I've spent years eating my wife's delicious breads and learning how to bake them and it's really quite easy. Onion breads, cheese breads, herb breads slathered in fresh butter...is your mouth watering yet?
My wife began cooking with sourdough starters over 20 years ago after reading just about everything she could find on the subject. She wanted to be able to bake with just what we had available in our area. While experimenting, she stumbled onto a key factor to being successful all the time. It simply involved making a sponge the night before baking the bread. Using a sponge allows the dough to rise in a reasonable amount of time even compared to a commercial yeast activated dough. Our sourdough starter uses native (or homegrown) grapes to begin the process.
One day, after a recent discussion with friends I asked my wife to teach me how to make Sourdough Bread. I've followed her directions which have been successful for years and it's easy. I'm an average type of fella and when I say "It's easy.," it's easy.
Here are a few things to consider before you begin your own sourdough adventure:
Use only crockery, glass or plastic to store the starter.
Never use a metal utensil for stirring; the yeast reacts to it.
When feeding your starter, use equal amounts of liquid and flour.
Do not cover tightly and leave ample head space for expansion.
Step 1 - Making your starter
The cast
water small bunch of grapes cheesecloth string crock white spring wheat flour
First, stem your grapes.
Next, make a cheesecloth bag for the grapes.
Now, mix equal amounts of water and flour in crock: 2 cups each.
Next, slightly crush the grapes to bruise the skins and release the juice into your pot.
Finally, put the bag in the flour & water mixture, and stir well.
Now the bacteria need time to do their work. It may take as little as 24 hours or as long as 3 days for all the ingredients to work together to make a nice bubbly batch of starter. During this time you need to stir down the mixture regularly as it begins to rise and ferment. Whats happening is the yeast from the bruised grape skins starts to feed on the sugars in the grape juice (like in making wine) and this creates the bubbles in the flour/water mixture. When the flour mixes with the water it forms a thick elastic texture that holds the dough together.
Once the starter is working well I can begin making bread.
Good active starter!
Step 2 - Making your sponge
The night before making your bread measure out the required amount of starter for the recipe (the rest I store in the fridge) and add the other ingredients to make the sponge. This recipe calls for 1 cup of starter, 1 cup of water and 1¼ cups of unbleached white flour. I use our own ground spring white wheat flour which absorbs more liquid than processed flour so I have to add an additional ¼ cup of water.
Sponge
1 cup sourdough starter
1¼ cup unbleached white flour
1 cup water
The sponge is measured and ready to rock.
Step 3 - Making the Dough
The cast
1½ cups milk 2 Tbls. honey 2 Tbls. butter 2 tsp. salt
These ingredients need to be mixed and heated to room temperature.
The heat melts the butter and the liquids will be warm enough to stimulate the whole dough to rise. Pour mixture into mixing bowl.
Add your sponge.
Next I beat in the flour a cup at a time so I dont add more than the dough can absorb.
When the stirring gets tough I just dump the whole of it onto my board and knead in the rest of the flour. The dough takes anywhere from 5 - 6½ cups flour total.
Kneading until dough is smooth and elastic takes up to 10 minutes. An easy way to know for sure if it's ready is to press my finger into the rounded up lump of dough to see if it springs back. If it springs back, it's ready.
Step 4 - The Rise
Nicely rounded dough ready to use.
After the kneading place your dough in a well greased bowl. Now turn the top of the dough in the bottom of the bowl to grease. Then flip it over and cover with a slightly damp towel to prevent a crust from forming on the top.
Now its ready to work without me so I place it in a warm draft-free to rise.
After about 2 hours your dough has doubled and its ready to punch down. To get a nice fine texture for your bread, let the dough rise a second time. When it has doubled again, punch it down, divide in half and shape the loaves.
Step 5 - Shaping the loaves
Shaping the loaves is easy. Cut your dough in half. Pat out each half into an oblong shape of dough about 8"x12". Roll it up tightly, pinch the bottom seam and ends closed and put in pans.
The two loaves are in greased clay loaf pans ready to rise before baking. In about an hour they'll be ready and into the oven they go...
...and come out!
Time for lunch!
Fresh Sourdough Bread slathered in local butter, fresh broccoli from the garden and rabbit from the barn.
Recipe: Sourdough Sandwich Bread
Sponge:
1 cup sourdough starter
1¼ cup unbleached white flour
1 cup water
Bread:
In saucepan heat, then cool until lukewarm:
1½ cups milk
2 T. honey
2 T. butter
2 tsp. salt
In bowl blend the milk mixture with the sponge and mix in enough flour for a medium-stiff dough (5 - 6½ cups). Allow to rest 15 minutes, then knead until smooth and elastic, about 10 - 15 minutes. Place in a greased bowl, cover and let rise until double in size, 1½ - 2 hours. Punch down, divide and shape into 2 loaves. Place in greased pans and allow to rise until double. Bake in preheated oven at 375° for 40-45 minutes. For soft crust, brush with butter and allow to cool on racks.
Note: To have a finer textured bread, repeat the first rising.
The Care and Feeding of your Starter
Once you have successfully made a starter you need to feed it regularly to keep the yeast active. Each time you use the starter it needs to be replenished by equal amounts of water and flour. One cup of each is the usual amount necessary. If you use the starter once a week and feed it, the cycle will keep it fresh and active. This replenishing should be done at least once a month. When the starter isnt being used regularly you can do one of two things:
Pour some off and replenish as if you used it;
Put it in a plastic container and freeze it; the starter can be reactivated by thawing and feeding as before.
Variations:
Use milk instead of water when feeding starter.
Add up to ¼ cup of sugar at feeding time.
Add a pinch of salt if you want to slow down the action.
Try red winter wheat or rye flour.
Note: Starters will eventually take on the local flavor. When you visit friends in other areas of the country share your starter!
Fresh baked bread, I love it!
Cooking has always been part of my life. My Dad inspired me to learn how to cook outdoors. I learned how to cook all sorts of stuff a variety of ways. The kitchen seemed like just another workshop to me.
Shortly after I was married I watched my wife bake bread one day. I was stunned at the kneading process. Here was this 105 pound woman literally subduing and conquering that huge lump of dough. To this day I've never seen anyone knead bread as gracefully as her. And when she had won, there was a little sweat on her brow and a glow on her face...I was intrigued and I swept her up in my arms!
romantic interlude...

The next time she baked, I asked her to teach me how to bake bread like she did. She made it easy and I reveled in the fun she had baking. I've spent years eating my wife's delicious breads and learning how to bake them and it's really quite easy. Onion breads, cheese breads, herb breads slathered in fresh butter...is your mouth watering yet?
My wife began cooking with sourdough starters over 20 years ago after reading just about everything she could find on the subject. She wanted to be able to bake with just what we had available in our area. While experimenting, she stumbled onto a key factor to being successful all the time. It simply involved making a sponge the night before baking the bread. Using a sponge allows the dough to rise in a reasonable amount of time even compared to a commercial yeast activated dough. Our sourdough starter uses native (or homegrown) grapes to begin the process.
One day, after a recent discussion with friends I asked my wife to teach me how to make Sourdough Bread. I've followed her directions which have been successful for years and it's easy. I'm an average type of fella and when I say "It's easy.," it's easy.
Here are a few things to consider before you begin your own sourdough adventure:
Use only crockery, glass or plastic to store the starter.
Never use a metal utensil for stirring; the yeast reacts to it.
When feeding your starter, use equal amounts of liquid and flour.
Do not cover tightly and leave ample head space for expansion.
Step 1 - Making your starter
The cast
water small bunch of grapes cheesecloth string crock white spring wheat flour
First, stem your grapes.
Next, make a cheesecloth bag for the grapes.
Now, mix equal amounts of water and flour in crock: 2 cups each.
Next, slightly crush the grapes to bruise the skins and release the juice into your pot.
Finally, put the bag in the flour & water mixture, and stir well.
Now the bacteria need time to do their work. It may take as little as 24 hours or as long as 3 days for all the ingredients to work together to make a nice bubbly batch of starter. During this time you need to stir down the mixture regularly as it begins to rise and ferment. Whats happening is the yeast from the bruised grape skins starts to feed on the sugars in the grape juice (like in making wine) and this creates the bubbles in the flour/water mixture. When the flour mixes with the water it forms a thick elastic texture that holds the dough together.
Once the starter is working well I can begin making bread.
Good active starter!
Step 2 - Making your sponge
The night before making your bread measure out the required amount of starter for the recipe (the rest I store in the fridge) and add the other ingredients to make the sponge. This recipe calls for 1 cup of starter, 1 cup of water and 1¼ cups of unbleached white flour. I use our own ground spring white wheat flour which absorbs more liquid than processed flour so I have to add an additional ¼ cup of water.
Sponge
1 cup sourdough starter
1¼ cup unbleached white flour
1 cup water
The sponge is measured and ready to rock.
Step 3 - Making the Dough
The cast
1½ cups milk 2 Tbls. honey 2 Tbls. butter 2 tsp. salt
These ingredients need to be mixed and heated to room temperature.
The heat melts the butter and the liquids will be warm enough to stimulate the whole dough to rise. Pour mixture into mixing bowl.
Add your sponge.
Next I beat in the flour a cup at a time so I dont add more than the dough can absorb.
When the stirring gets tough I just dump the whole of it onto my board and knead in the rest of the flour. The dough takes anywhere from 5 - 6½ cups flour total.
Kneading until dough is smooth and elastic takes up to 10 minutes. An easy way to know for sure if it's ready is to press my finger into the rounded up lump of dough to see if it springs back. If it springs back, it's ready.
Step 4 - The Rise
Nicely rounded dough ready to use.
After the kneading place your dough in a well greased bowl. Now turn the top of the dough in the bottom of the bowl to grease. Then flip it over and cover with a slightly damp towel to prevent a crust from forming on the top.
Now its ready to work without me so I place it in a warm draft-free to rise.
After about 2 hours your dough has doubled and its ready to punch down. To get a nice fine texture for your bread, let the dough rise a second time. When it has doubled again, punch it down, divide in half and shape the loaves.
Step 5 - Shaping the loaves
Shaping the loaves is easy. Cut your dough in half. Pat out each half into an oblong shape of dough about 8"x12". Roll it up tightly, pinch the bottom seam and ends closed and put in pans.
The two loaves are in greased clay loaf pans ready to rise before baking. In about an hour they'll be ready and into the oven they go...
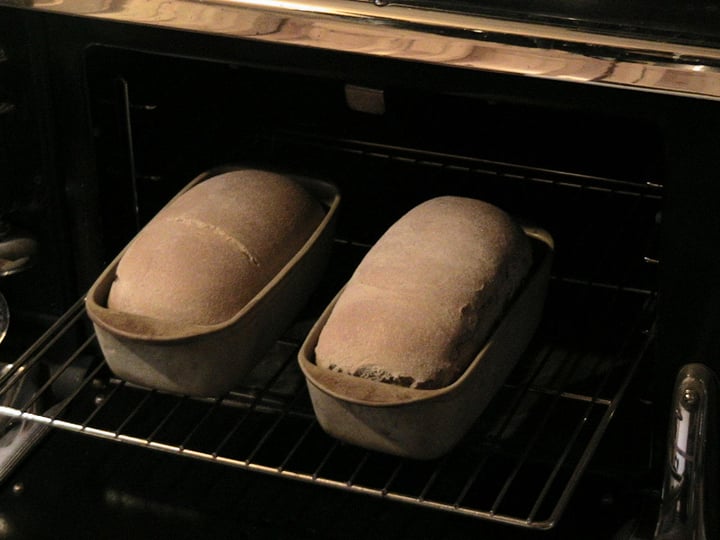
...and come out!
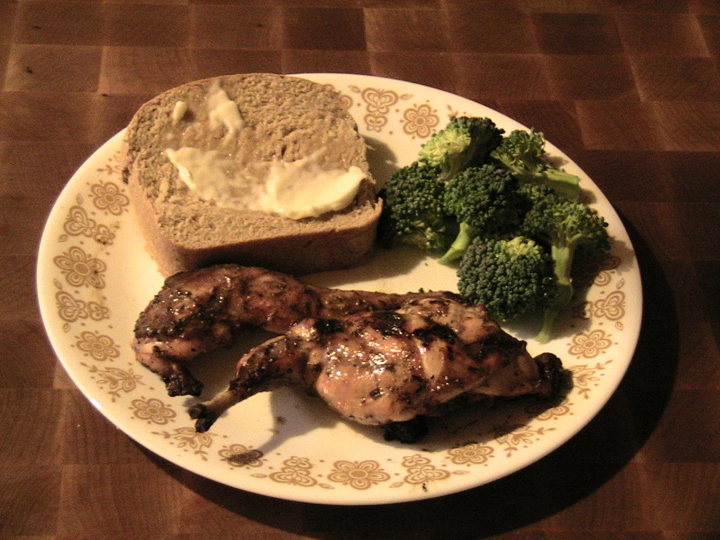
Time for lunch!
Fresh Sourdough Bread slathered in local butter, fresh broccoli from the garden and rabbit from the barn.
Recipe: Sourdough Sandwich Bread
Sponge:
1 cup sourdough starter
1¼ cup unbleached white flour
1 cup water
Bread:
In saucepan heat, then cool until lukewarm:
1½ cups milk
2 T. honey
2 T. butter
2 tsp. salt
In bowl blend the milk mixture with the sponge and mix in enough flour for a medium-stiff dough (5 - 6½ cups). Allow to rest 15 minutes, then knead until smooth and elastic, about 10 - 15 minutes. Place in a greased bowl, cover and let rise until double in size, 1½ - 2 hours. Punch down, divide and shape into 2 loaves. Place in greased pans and allow to rise until double. Bake in preheated oven at 375° for 40-45 minutes. For soft crust, brush with butter and allow to cool on racks.
Note: To have a finer textured bread, repeat the first rising.
The Care and Feeding of your Starter
Once you have successfully made a starter you need to feed it regularly to keep the yeast active. Each time you use the starter it needs to be replenished by equal amounts of water and flour. One cup of each is the usual amount necessary. If you use the starter once a week and feed it, the cycle will keep it fresh and active. This replenishing should be done at least once a month. When the starter isnt being used regularly you can do one of two things:
Pour some off and replenish as if you used it;
Put it in a plastic container and freeze it; the starter can be reactivated by thawing and feeding as before.
Variations:
Use milk instead of water when feeding starter.
Add up to ¼ cup of sugar at feeding time.
Add a pinch of salt if you want to slow down the action.
Try red winter wheat or rye flour.
Note: Starters will eventually take on the local flavor. When you visit friends in other areas of the country share your starter!


